4. Devices
Devices types
At NFON, there are two main categories of devices:
certified devices
any other SIP devices, or unprovisioned SIP devices
Note
Please note that if a device is not listed under certified devices, or if you have manually configured it, NFON will not support it. Devices like that are referred to as unprovisioned SIP devices.
Provisioning
Provisioning is the process of automatically and remotely configuring a device without having to directly interact with it on-site. This feature is only available for devices that are certified by NFON.
The provisioning process includes:
authorisation (checking that the device is configured on a customer account)
firmware management (upgrading / downgrading the device firmware, if required)
pushing configuration to the device:
SIP settings (e.g. SIP proxy server, voice encryption)
device configuration (e.g. dial plan options)
line and phone display information
additional features
soft keys configuration (e.g. voicemail button, XML menus)
function keys (e.g. speed dials, Busy Lamp Field)
refreshing the configuration on a regular basis or when a change has occurred (e.g. a user has logged into the device)
Types of provisioning
zero-touch provisioning
auto provisioning
Please note that devices that are not provisioned and are configured manually are referred to as unprovisioned SIP devices.
Zero-touch provisioning
Devices that support zero-touch provisioning just configure themselves, straight out of the box, without any human intervention, as long as they have been added to the NFON Admin Portal in advance. This is the most common type of provisioning available for NFON-certified devices.
The process is as follows:
Order the phone from NFON
Get it delivered straight from a distributor
Get the device out of the box
Plug the device into a network with internet access
⇒ The device configures itself and is ready to use.
In other words, zero-touch provisioning is plug-and-play.
Auto provisioning
Some NFON-certified devices don't quite support zero-touch provisioning. In this case, the devices need to be manually configured.
The process is as follows:
Order the phone from NFON
Get it delivered straight from a distributor
Get the device out of the box
Plug the device into a network with internet access
Log in to the device web interface
Set the provisioning address to NFON
⇒ The device reboots and starts configuring itself, and is ready to use.
Please note that both zero-touch provisioning and auto provisioning use two-factor authentication.
4.1 Configuring devices
Overview
There are various editing options once a device has been added and saved in the Admin Portal. In this section, you can see all the devices that have been configured in the telephone system.
In this view, you can:
Add a new entry
Select one, several or all entries
Edit, activate, or delete an entry, or copy it to a clipboard
Export a CSV file
Refresh the table
Select how many entries you want to have on the page
In this table, you can see and filter according to:
The device status (registration information)
Whether the device has been activated / deactivated
The device type, e.g. snom, Yealink, Zebra
MAC/ID of the device
Extension the device has been assigned to
Site the device has been assigned to
Date the device was created
4.1.1 Adding a new device
General
In this section, you will learn how to install and configure a new device as well as get an overview of each configurable feature within devices.
Please note that the process described below relates to certified devices. Adding unprovisioned devices is slightly different and will be described at the end of this section.
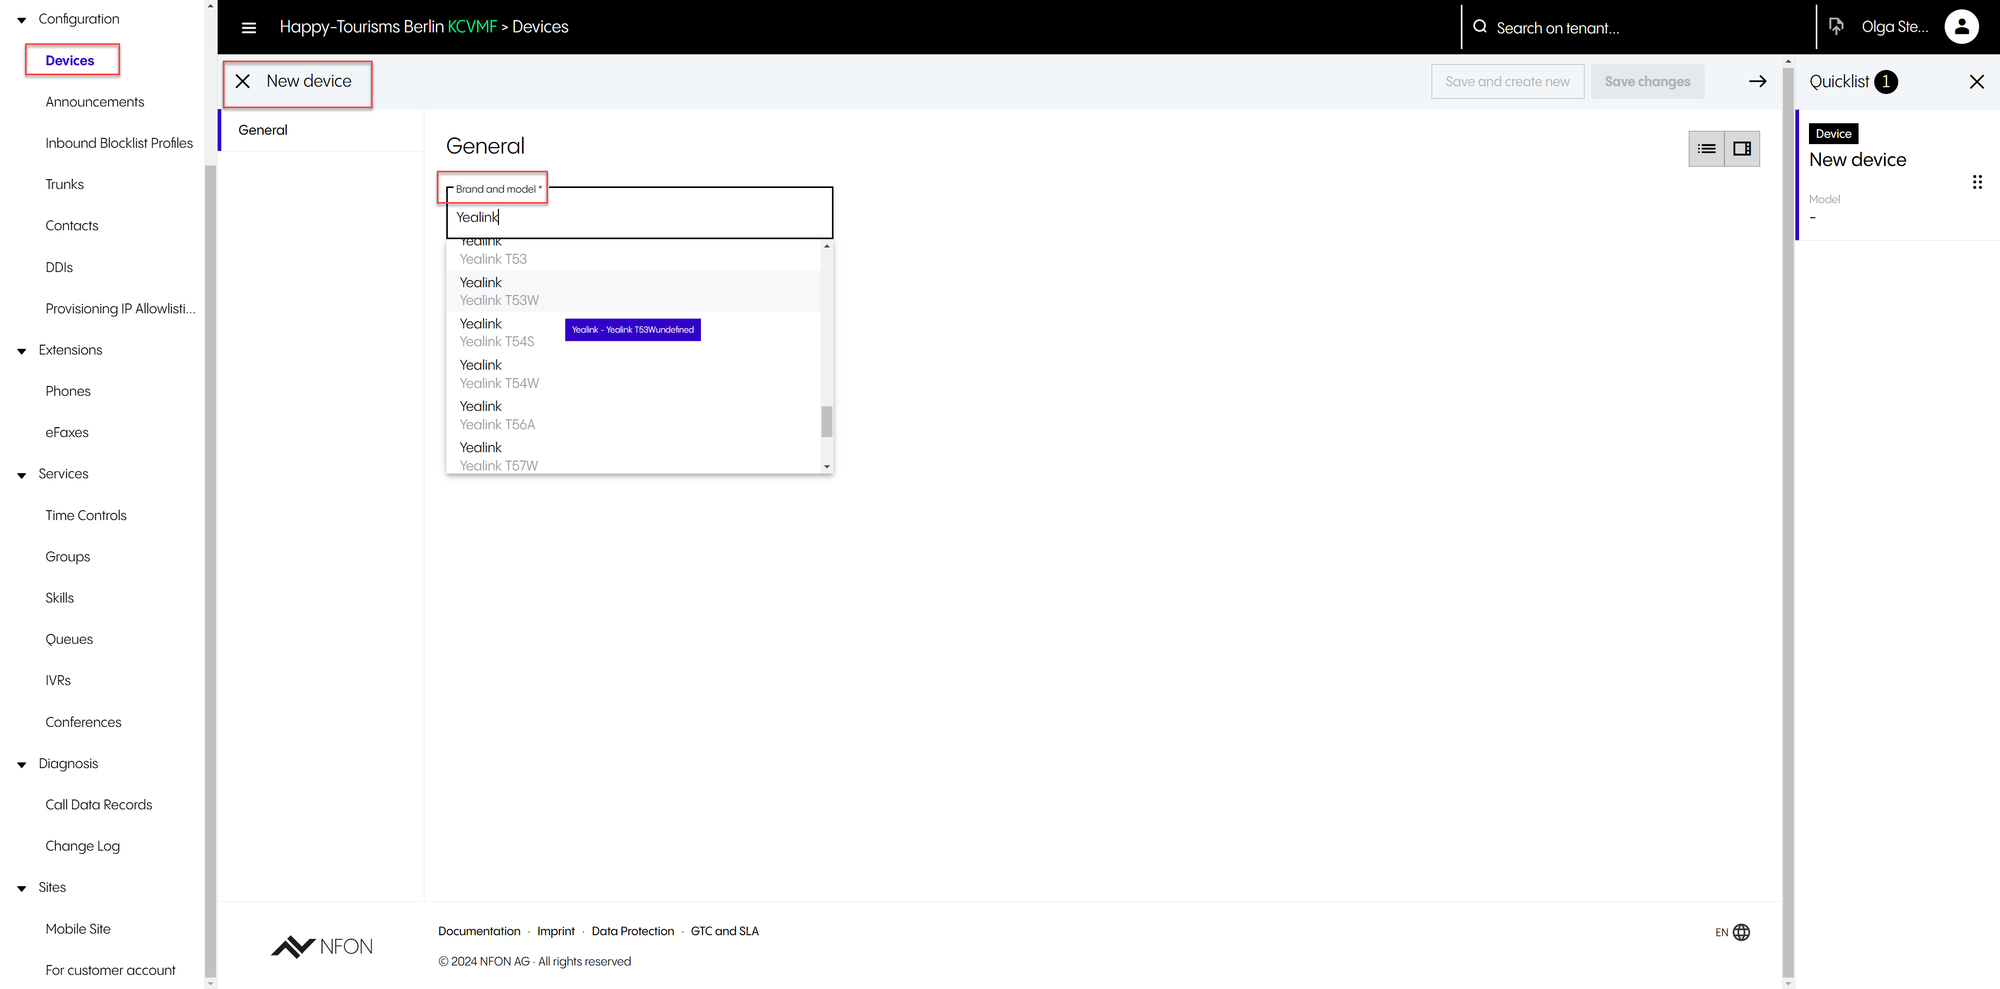
1. Click Add device.
2. Select a brand and model (e.g. Yealink T53W).
⇒ A configuration section will open.
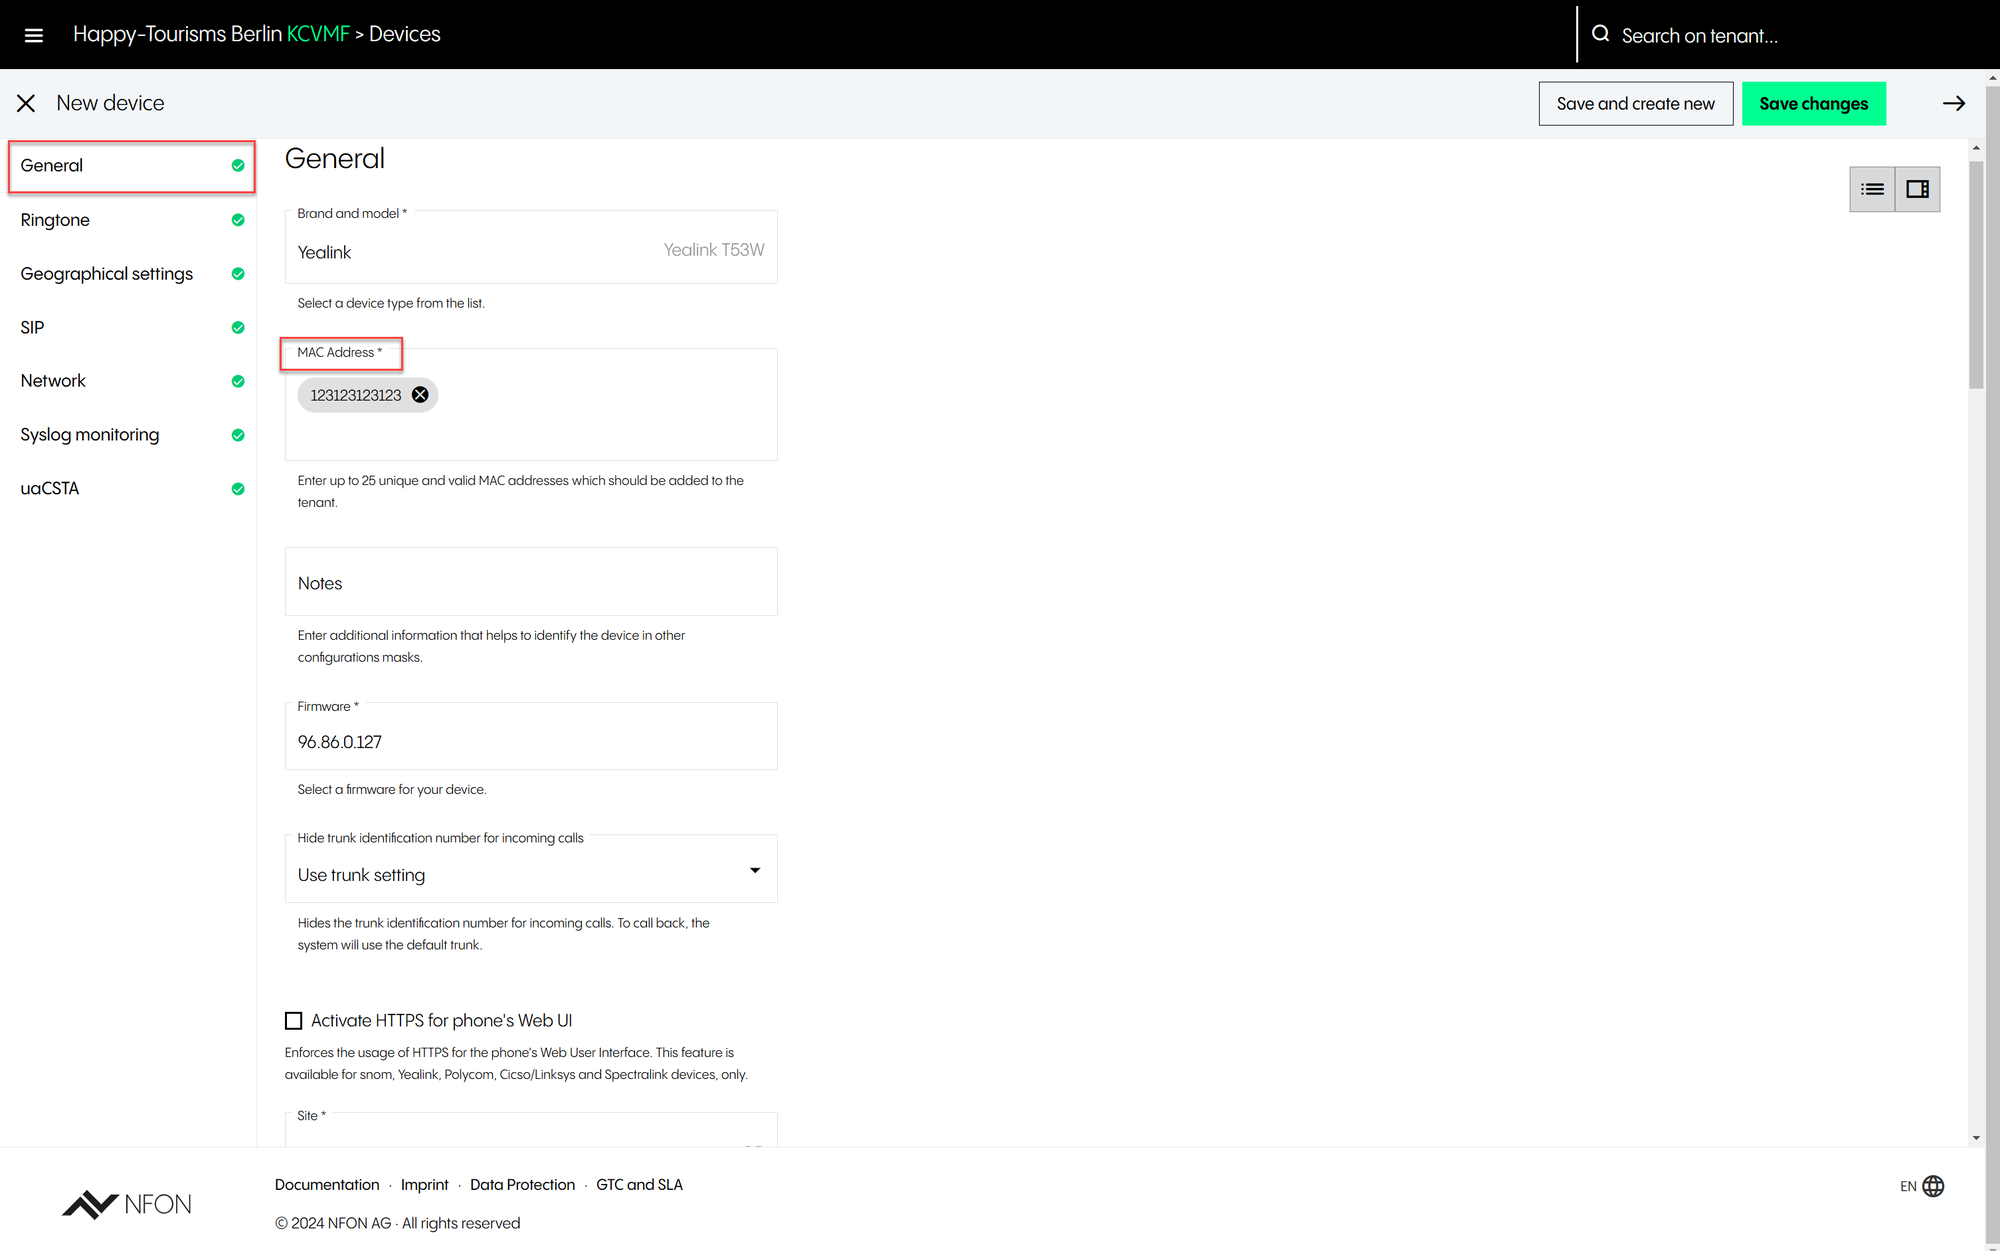
3. Enter a MAC address.
Important
If you get an "Already in use" error message when adding a device, this means that a device with the same MAC address has already been added to the Admin Portal. Make sure to check whether you have transferred the device from another customer or if the device has been added to your own account for testing.
Important
When transferring devices from another communication provider:
If the device has already been registered with the alternative provider, you will get an error message when the device tries to download the configuration details from the redirection server. The alternative provider needs to make sure they have deleted (and unblocked) the device from the manufacturer's server as well as their portal.
4. Choose a firmware version.
The most recent version is selected automatically.
5. Set if the trunk ID is visible/not visible on incoming calls.
Please note that it is possible to inherit options which have been configured under Sites. It is also possible to override the site settings on this device.
6. Activate HTTPS for phone web user interface to use HTTPS.
Please note that this feature is only available for Snom, Yealink, Polycom, Cisco/Linksys and Spectralink devices.
7. Define which site the device is assigned to.
It is paramount to select a site, as it allows to inherit site settings, which is crucial for emergency calls.
8. Activate to inherit site configuration.
If you untick this option, you will be able to configure your own settings for this device, e.g. geographical or network settings.
For more information on Geographical settings, SIP, Network, Syslog monitoring and uaCSTa, see Sites.
Important
Assigning a device to a site is crucial.
Other than getting the site default configuration settings, the site information is also used by the NFON cloud telephone system when a user makes a call to an emergency service number. That means that the telephone system will use the site address to provide location information to the emergency services
Make sure that all devices are configured to the right address and that if a device is moved to another site, its configuration will need to be amended to reflect this change.
Roaming devices (devices that are rarely at the same location) should be configured against the mobile site.
Network settings for devices
If you want to enable VLAN tagging, make sure that Provision site VLAN settings is activated under the Tenant configuration. If this setting is not activated under Tenant, the feature will not function as intended.
Ringtone
Under Ringtones, on devices that support the feature, you can configure ringtones for:
External numbers (a ringtone for when the device receives an external call)
Internal numbers (a ringtone for when the device receives an internal call)
Group, queue or skill services (a ringtone for when the device receives a call via a group or queue /skill service)
You can either set them to mute or select one of the ringtones from the drop-down menu.
Note
Please note that it is not possible to configure ringtones on all devices for at least one of the following reasons:
The device doesn't support distinctive ringtones
The device manufacturer has not provided a way to configure distinctive ringtones via provisioning
The manufacturer has recently added support for distinctive ringtones, and NFON is still working on making the feature available to customers
Adding an unprovisioned SIP device
The process of adding an unprovisioned SIP device is very similar to that of a certified device, with the following differences:
The selected device type is always Unprovisioned SIP device.
The MAC address must be unique, yet it can be customised for identification, e.g. the brand and/or model.
You cannot set the firmware version.
Once the device is created, it is not possible to edit it, however, you can activate / deactivate and delete the device from the portal.
Assigning a device to an extension
Adding a device to the portal doesn't automatically assign it to an existing extension. Newly added devices are unassigned. Manually assigning a device to an extension must be done from the extension configuration screen.
A majority of NFON-certified devices support hot-desking (i.e. users can log in and out of the device using the NFON XML menu), which means that it is often faster to train users on how to log on and off using the XML menu, rather than having to go around looking for which phone needs to be assigned to which extension.
Note that not all NFON-certified devices support hot-desking. This is often due to the device not supporting external XML menus. In this case, the device will need to be manually assigned to an extension by an administrator.
Unprovisioned SIP devices will also need to be manually assigned to an extension. Users will never be able to log in or out of these devices. This is one more reason to avoid using unprovisioned devices.
4.1.2 Managing existing devices
Authentication
When editing a device after it has been created and added to the Admin Portal, you will have more options than when adding a new device.
For the majority of certified devices, Authentication will be the only additional configuration option available.
Under Authentication, you can:
See the activation status of the device
See the Authentication PIN (The PIN is entered on the device as part of the two-factor authentication. It is randomly generated and used during provisioning; for more information, see Provisioning IP Allowlisting)
Disable the token check (for 30 minutes). This enables the device to be allow-listed for 30 minutes for resetting and reprovisioning, without the need to enter the PIN.
Reset / Re-enable (voice) authentication on the device. When this option is ticked, it will set the status from "successful" to "needed". This option is used if you want to block a device remotely, but not to remove it from the Admin Portal, or to troubleshoot authentication.
DHCP
There is an additional configuration option available for DECT devices, DHCP (Dynamic Host Configuration Protocol).
Please note that this feature is typical for older devices and might not be available for every DECT device.
Under DHCP, you can set individual network settings which are device and customer-specific. These include IP address, Network mask, Default gateway, Primary and Secondary DNS and MTU (Maximum Transmission Unit).
Deleting an existing device
To delete a device from the Admin Portal, you have to deactivate it first. Please note that after deactivation:
Devices that have been deactivated won't be able to make or receive new calls
Active calls won't be dropped.
To permanently delete a device, click on the Delete icon. Please note that after deletion, all active calls will be dropped.
Important
You should be cautious if the device you're deactivating is still assigned to a phone extension.
It is highly recommended to unassign devices from extensions before deactivating them.
Important
Please note that it is not possible to edit the MAC address of an existing device. If the MAC address of an existing device is incorrect, you will have to delete and then add the device again to the Admin Portal.
4.1.3 Adding and configuring softphones and mobile clients
Adding a softphone
Once you have installed and configured a softphone or a mobile client, it is automatically added to the portal.
The installation process for a softphone is done from the end-user computer.
To install a softphone:
Select a relevant softphone client, i.e. for Windows or MAC OS.
Download the installer.
Install the application on your PC. Please note that you need administrator rights to be able to do so.
Register the softphone using your credentials (your K account user name and device creation password).
There are two versions of Nsoftphone for Windows: Standard and Premium. You can select the version you require during the installation process. Please note that unlike the Standard version, the Premium one is never included in any license.
Please note that the Nsoftphone Standard is non-terminal-server compatible. It can, however, be used on a Virtual Desktop Infrastructure (VDI).
Adding a mobile client
The installation process of a mobile client is very similar to that of a softphone.
To install a mobile app:
Go to Play Store or to the iOS App Store.
Search for NFON mobile or Cloudya mobile.
Follow the app installation process.
Register the app using your credentials.
Important
When installing a mobile app, please note that:
The NFON Mobile app cannot be used without a SIM card.
A valid mobile phone number is required when adding an NFON mobile device to the Admin Portal.
Should a dummy number be entered into the portal, NFON support reserves the right to delete the device without prior notice.
Important
When a call to the emergency services is made from the NFON mobile app, the application will automatically hand over the call to the mobile carrier. This means that the call will not go through the NFON telephone system.
Please note that:
Calls to emergency services numbers ignore permission and preferred outbound trunk configuration.
When a call is made to an emergency services phone number, the system will ignore the extension permission, as well as the preferred outbound trunk configuration.
The telephone system will instead use the site information of the device used to make the call to present the corresponding CLI to the emergency services.
However, note that only calls to emergency services rely on the device being configured to the correct site. For all other calls, the decision to allow or deny the call to go through will be based on the outbound trunk being used.
When the NFON telephone system is unable to contact an NFON mobile app over data, calls will be automatically forwarded to the GSM number registered in the Admin Portal.
4.2 Number formatting
Number formatting
It is important to use correct international number formatting to avoid configuration issues during device provisioning.
E.164 is the international telephone numbering format that ensures that each device has a globally unique number. This is what allows phone calls and text messages to be correctly routed to individual phones in different countries.
E.164 numbers are formatted [+] [country code] [subscriber number including area code] and can have a maximum of fifteen digits.
Here are some examples:
+491522881739
+442079461000
+331990089726
Please note that:
E.164 numbers do not contain any special characters
E.164 numbers do not contain the country long distance dial code (0)
The NFON configuration system and Admin Portal use a number formatting which is a derivation of the Microsoft number formatting. A further segmentation of numbers is created to define number ranges within a SIP trunk before defining what individual DDI numbers are.
For example, in a number +4420794601(00–19), the SIP trunk contains 20 individual DDI numbers (00–19).
4.3 Provisioning IP Allowlisting
Provisioning IP Allowlisting
In this section, you will find information about Provisioning IP Allowlisting. This configuration option specifically refers to physical devices.
When a device, e.g. a desktop phone, is initially plugged into the network, it contacts the manufacturer's redirection service over an IP address. To be directed to the NFON provisioning service, it will register on the NFON platform and download the relevant phone configuration.
With multi-factor authentication, however, the device will attempt to allowlist, or authorise the IP address it is contacting to register and start provisioning. NFON uses multi-factor authentication for security on its platform. For example, a Yealink desk phone, when plugged in, will ask for a PIN before it can be registered and provisioned.
If a device has been added to the account but has not been plugged in yet, you can configure authentication settings for the device provisioning, see Authentication. You will need to enter a PIN (which is a randomly generated PIN) on the device during multi-factor authentication. Only after you have entered the PIN can the device be registered and provisioned.
Provisioning IP Allowlisting makes it possible to set whether an IP address is temporarily or permanently allowlisted, so that devices will not need to authenticate.
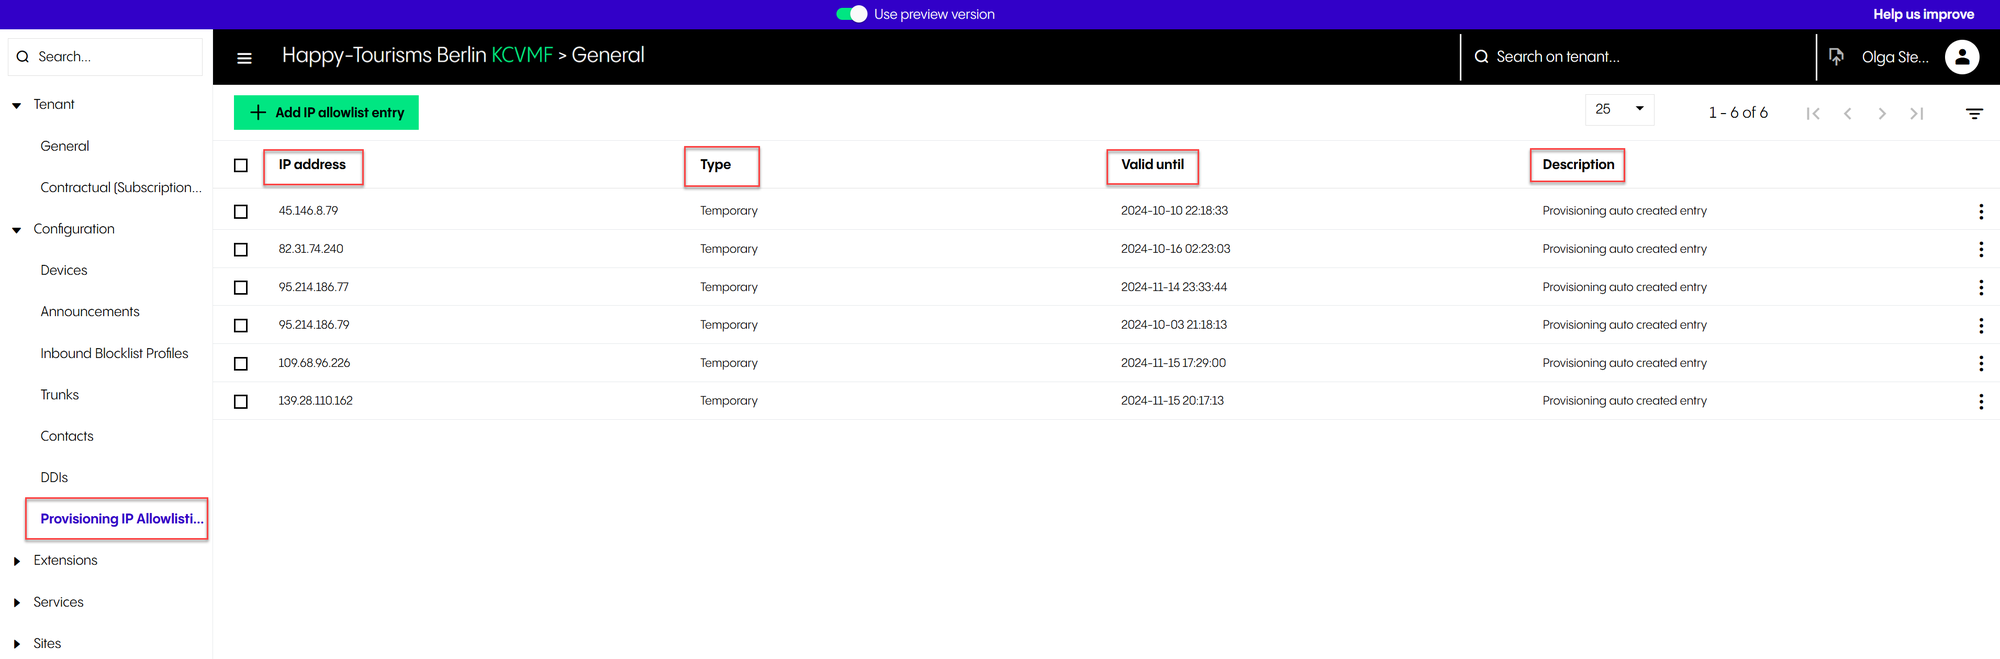
Under Configuration > Provisioning IP Allowlisting, you can see a list of entries which have already been configured.
In this section, you can see:
which IP address the device will register with during provisioning
whether the IP address is temporarily or permanently allowlisted
the date the IP address is allowlisted until
the description that has been added for the IP address.
Adding a new IP allowlist entry
To add a new IP allowlist entry:
Click Add IP allowlist entry.
Select whether the allowlisting is Temporary or Permanent. Please note that Temporary is a default setting.
If you have selected Temporary in Step 2, set an end date for the allowlisting.
Add a description (typically, a name) for the whitelisting.
Click Save or Save and create new.