5. Extensions
Overview
In this section, you will learn about phone extensions and eFax extensions.
5.1 Phone extensions
Overview
Phone extensions are targets. They are the most important of all the target types that are supported by the NFON telephone system and only one of two targets that can make calls to external destinations.
Under Extensions > Phones, you can see a list of all phone extensions that have been configured for the tenant.
In this view, you can:
Add a new entry
Select one, several or all entries and delete them
Edit, clone, or delete an entry, or copy it to a clipboard (you can also edit an entry by double-clicking on it)
Import a CSV file
Export a CSV file
Select how many entries you want to have on the page
Search for a phone extension
Important
Before deleting a target, make sure to check if any other target is referencing it, for example, an eFax, IVR or a skill service, as it will change the configuration of the latter.
5.1.1 General
General
Under General, you have the following options:
Display name | Assigns a name to the extension Mandatory field (for every target type), can be up to 50 characters. Please note that the display name may not contain the following special characters: &$!?=|"{}. The display name is not only used in the Admin portal. It’s also used in the following areas:
Bear in mind that it might not be practical to set the display name to something too long that would not fit in the restricted space that is available on the display of telephone handsets. |
Extension (internal number) | Assigns an internal extension number. It is a short number that an end user dials to make internal calls to colleagues or services. While present on all target types, it’s a mandatory field only on phone extension. Extension numbers are assigned to targets and not to a person or a device. In turn, a phone extension target will be assigned to one or more devices. The extension number length can be anything between 1 and 20 digits, although we would recommend a maximum of 6 digits. The extension number must be exclusively comprised of digits between 0 and 9. Note that *(star) and # (hash) are not allowed, as these are used for special code dialling. Please note that an extension number cannot start with 0 (zero) or be 0. This is because 0 is the default external dialling prefix (or 9 in the UK and Ireland, where 9 is used as the external dialling prefix). |
Email address | Adds a valid email address (optional field). The email address assigned to the extension is used for:
|
Important
Please make sure that you enter a valid email address, as the system does not recognise whether it is a valid address, only that it is correctly formatted.
5.1.2 External numbers (DDI)
External numbers/DDI
External numbers or DDIs (also known as inbound numbers) allow external callers to reach the phone extension directly without the need to be transferred by an operator or receptionist.
Under External numbers/DDI, you have the following options:
Preferred outbound trunk (toggle) | Activates/deactivates the option to set the preferred outbound trunk for outgoing calls |
Preferred outbound trunk | Selects the default trunk (default outside line) for outgoing calls Ideally, the selected outbound trunk should match one of the inbound numbers configured for this extension. |
Number signalling (CLIP/CLIR) | Selects the caller information displayed to the other party:
You can change your CLIR/CLIP settings using:
|
Add configuration | Assigns one or more DDIs (inbound numbers)
|
Important
Please note that calls to emergency numbers ignore permission and preferred outbound trunk configuration. The system will use the site information of the device instead. For this reason, make sure that the device is configured to the correct site.
5.1.3 Devices
Devices
You can assign one or more devices to a phone extension.
Please note that:
You can only assign devices to a phone extension
The maximum number of devices you can assign to a phone extension varies depending on the license / subscription type that is configured in the customer account. For example, some licences / subscriptions will only allow for one device to be assigned to a phone extension, while others will allow for up to 3 or even up to 9 devices.
The license / subscription type for phone extensions applies to the whole account and not to individual extensions.
You don’t have to assign a device when configuring a phone extension because:
The phone extension will never be used on a device and its only purpose is to forward calls somewhere else
End users will use the hot-desking feature and will log in and out of devices using the XML menus
Under Devices, you have the following options:
Add devices | Adds one or more devices to the phone extension Please note that if there is only one device assigned to the extension, it will automatically become the primary device for this extension. |
Remove other softphone devices when logging into a softphone | Unassigns all other softphones already assigned to the phone extension When this option is enabled, it means that upon logging into a softphone device, all other softphones already assigned to the phone extension will be automatically unassigned. This option is very useful when end users share PCs, and to avoid a phone extension reaching the maximum number of devices allowed by the license/subscription, just because end users are not properly logging out of their softphones. |
When assigning a device to a phone extension, please note that:
Only devices that aren’t already assigned to a phone extension will appear in the list
You can filter the list by entering a part of the device ID or the MAC address
When adding the first device to a phone extension, it will automatically become the extension's primary device
The list will show all unassigned devices, including devices that have been deactivated. If you select a device that has been deactivated, and this device is also the primary device, calls to this phone extension will fail
Primary devices
The primary device indicates which device is the primary device for the phone extension.
The primary device is used by some target types, such as queue or skill services, to know which of the end-user devices should be rung when a call comes in. Please note that by default, for incoming internal and external calls directly to the extension, all of the devices that are attached to it will ring, not just the primary device.
Devices that have been deactivated should be removed from phone extension configuration.
End users can select the primary device for their phone extension by:
Dialling star code from the phone they want to set as the primary device
Using the XML menu on a device (if supported)
5.1.4 Geographical settings
Geographical settings
Under Geographical settings, you have the following options:
Dial prefix | Selects the external line prefix that end users need to dial when making external calls You can select between
|
Language | Selects the language The default language is always set to German, and this can be changed based on your requirements. You can also change the language in
|
Time zone | Selects the time zone You can inherit the time zone configuration from the tenant configuration or select a different time zone from the drop-down list. The time zone information is used for two purposes:
|
Use TPS for outbound calls | Only available for the UK Only enabled on the C account, not the K account level |
Country for emergency calls (only applies to mobile site devices) | Only applicable to mobile sites In the example here, there are only two options: Automatic and GB. This is because there is only one mobile site configured on this tenant (see Sites), and the country is set to GB. If a tenant has several mobile sites in different countries, they all appear in the drop-down list. If you select the Automatic option, the system will derive the country from the default outbound trunk. In our example, there is only one trunk (hence it is the default outbound trunk), the geographical settings of which derive from the mobile site, which is set to GB. |
5.1.5 Voicemail
Voicemail
In this section, you will learn how to configure the phone extension voicemail.
Please note that:
All phone extensions have a voicemail box and it isn’t possible to fully deactivate it
You cannot have a voicemail box without having a phone extension
Phone extension is the only target that can have a voicemail box
The maximum duration of a single voicemail message is 180 seconds
Voicemail messages can be stored for up to 30 days, after which the system will automatically delete them.
Under Voicemail, you have the following options:
PIN | Voicemail PIN; only accepts numerical values, min. 4 characters. Please note that all phone extensions must have a PIN, and if you do not change it, it will be randomly assigned to you. The default PIN is random. Therefore, make sure to set your PIN and remember it, as there is no “Forgot PIN” function available in the system. The PIN length depends on the minimum and maximum length settings configured under Tenant. The voicemail PIN is used for more than just accessing voicemail. It’s also used to:
|
Announce caller ID | Activates/deactivates announcing the phone number (caller ID) of the person who has left a voicemail message on the phone extension mailbox. This is only used when the end user calls the voicemail system to retrieve voice messages. This setting can be changed in:
|
Announce date and time | Activates/deactivates announcing date and time the voicemail message was recorded and left on the phone extension mailbox. This is only used when the end user calls the voicemail system to retrieve voice messages. This setting can be changed in:
|
Send via email | Automatically sends an email with a recorded message attached as a WAV. file Please note that for this setting to work, you have to have added a valid email address under General. Please note that this setting can also be changed in the Cloudya apps. |
Delete after sending | Only active if Send via email has been activated. Deletes the voicemail message from the system inbox once the email with the recorded message has been sent Please note that the messages will be permanently deleted. Please note that this setting can also be changed in the Cloudya apps. |
Display voicemail transcription | Activates/deactivates automatic voicemail transcription for this extension Please note that this setting can only be active if voicemail transcription has been activated for all the extensions of the tenant under Tenant > General > Voicemails, see Voicemails, Geographical settings and Call recording. If voicemail transcription has been activated at the tenant level, yet you do not want this particular extension to have it, you can deactivate it here. |
Individual voicemail greetings | Allow you to customise the inbox messages for an inbound caller to the extension. For any of the four options to work, you need to upload an audio file with a maximum size of 7 MB in the MP3 or WAV format. There are four inbox message types available:
Voicemail greetings are optional. If no greeting is recorded, the voicemail system will automatically play a standard message using the extension number information instead of the recorded name. |
Important
Please note that a voicemail box can store up to a maximum of 100 messages. When this limit is reached, the user will be notified by email that their mailbox is full.
Please note that voicemail messages of less than 2 seconds are likely to be automatically deleted by the voicemail system.
5.1.6 Call forwarding
Call forwarding
Under Call forwarding, there are two main sections:
General settings
Profiles and rules
General settings
Under General settings, you have the following options:
Signalled number on external call forwarding | Selects which phone number should be presented to the party that the incoming call is being transferred to There are three options to choose from:
|
Profiles and rules
In this section, you will get an overview of how to create a call forwarding profile.
Please note that a default call forwarding profile is automatically created for each new phone extension. You cannot rename this profile or change its star code from 0.
Adding a new call forwarding profile
To add a new call forwarding profile:
Click Add profile.
Add a Profile name.
You can freely name the profile.
Assign a number between 1 and 9 to the profile.
Please note that this number is important because it will be used to activate the profile by dialling a star code from any device attached to the phone extension.
Please note that you can change this number at a later date.
Click Confirm settings.
To activate a new call forwarding profile:
Toggle it on.
Please note that only one profile can be active at any time.
Call forwarding profile rule sets
Within each call forwarding profile, you can configure a set of rules.
The system automatically configures a set of rules named Any which covers all call types. You can edit these rules and configure options for Always, Busy, No answer and Not registered.
To add a new set of rules:
Click Add rule.
Select a Source type, for example, Anonymous calls (if you do not want to receive anonymous calls).
There are four source types: All internal calls, Anonymous calls, Specific internal calls and Specific external calls.
Go to the Rules tab.
Activate one of the four rules (in the example, Always).
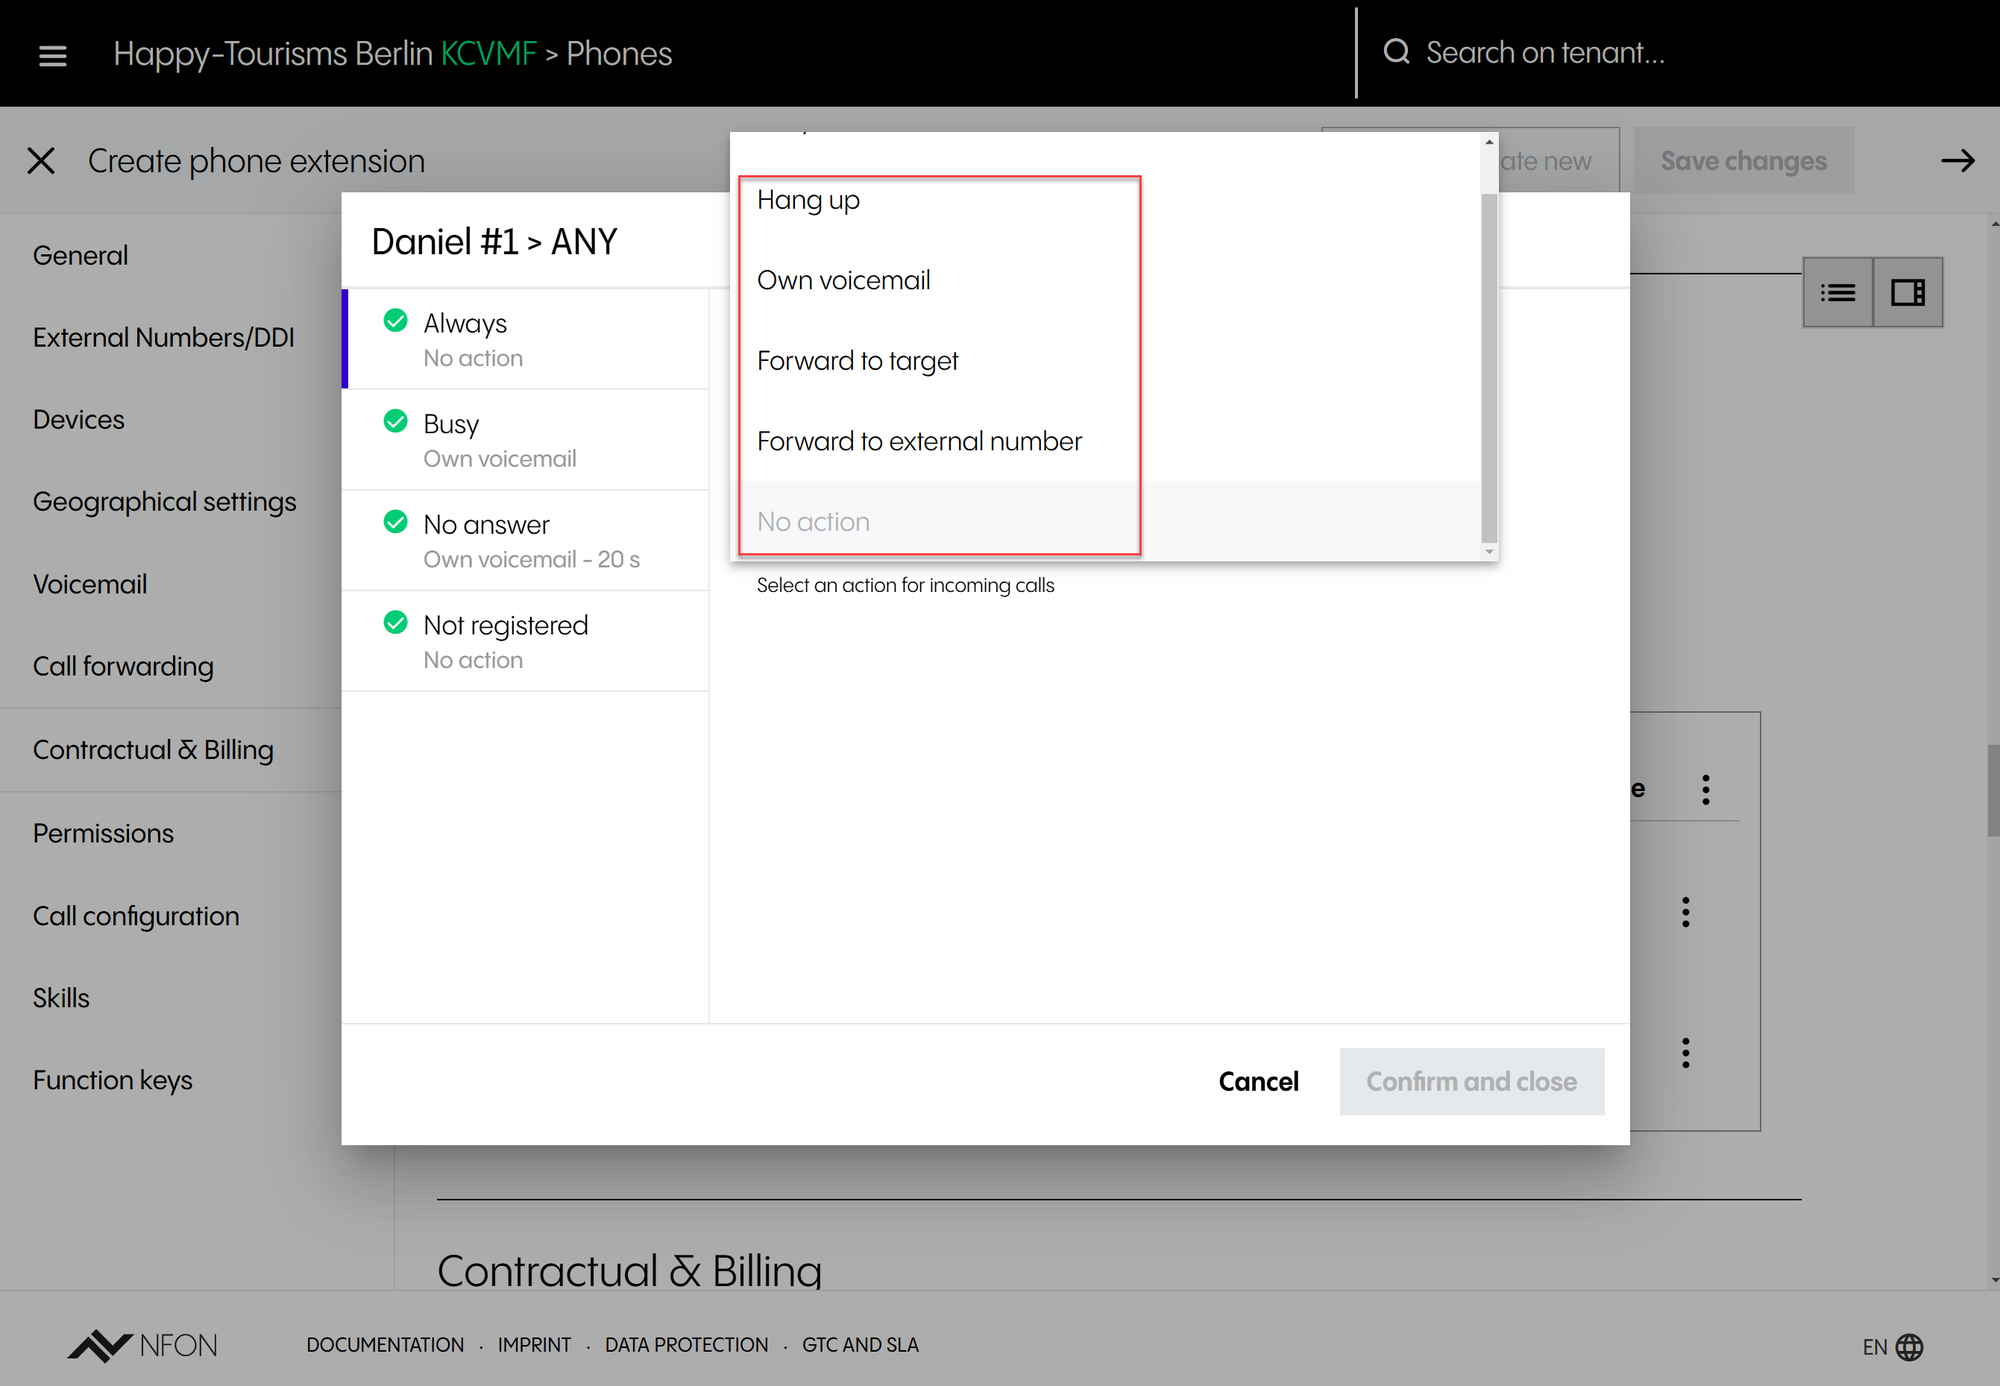
Select an action for incoming calls.
There are 5 action options: Busy, Hang up, Own voicemail, Forward to target and Forward to external number.
In the example, you want your extension to hang up if you receive anonymous calls, so you select Hang up.
Click Confirm settings.
⇒ You will now see two sets of rules under one profile. You can collapse and expand the sets of rules.
Note
Please note that there is only one set of rules available for the default call forwarding profile and that you cannot add further rules to it. However, you can edit the default set of rules.
Tip
Please note that you can add up to 9 call forwarding profiles of your own. Each of these profiles can have at least five different sets of rules.
The system automatically creates a rule set which applies to all inbound calls, and you can add a set of rules for each of the inbound call sources.
Source types
The individual call forwarding rules work the same way. However, sources work differently, depending on the source type:
All internal calls: Applies to all inbound calls from an internal number to this extension.
Anonymous: Applies to all inbound calls (internal and external) to this extension.
Specific internal calls: Allows selection of a single internal extension and specifies what happens if you receive calls from this extension. For example, you can set all calls to hang up if you receive calls from this extension.
Specific external calls: Allows selection of a specific area code and specifies area code and specify what happens. Please note that you cannot specify a specific number, only a number that starts with a specific area code.
Note
Please note that you can only add one rule for internal and anonymous calls. You can add more than one rule for specific internal and external rules.
Call forwarding types
There are four types of call forwarding profiles:
Always: Forwards calls to this phone extension to another destination. If activated, overwrites all other call forwarding rules.
If this option is disabled, calls will be sent to all devices that are currently assigned to your phone extension. Devices that are set to DND won't ring.
If No action is set as the destination and the rule is toggled on, then the system will behave as if the rule were deactivated.
Busy: Forwards calls to this phone extension to another destination if your extension is in use and has reached the maximum number of concurrent calls.
For the extension to be considered busy, one of the following conditions would have to be met:
The end user is already on a call, and call waiting is disabled on the phone extension configuration.
Call waiting is enabled on the phone extension, and the end user has already reached the maximum number of concurrent calls, which is currently set to 5.
If none of these criteria are met, the Busy call forwarding rule will not apply.
If No action is set as the destination and the rule is toggled on, then the system will behave as if the rule were deactivated.
No answer: Forwards calls when the call is not answered, and the timeout has been reached
We recommend configuring the timeout (in seconds). The default timeout value is 20. You can configure any value between 15 and 59 seconds. Please note that if the value is set to 0, the call forwarding will be disabled.
Please note that if all the devices assigned to the phone extension are set to DND, the system will apply the No answer call forwarding profile.
If this option is disabled, the system will return "Request Terminated" or "Temporarily Unavailable" SIP response to the caller.
Not registered: Forwards calls if all devices that are associated with this phone extension are not registered (not contactable) or if their registration has expired.
A device is considered not registered if it is no longer reachable by the telephone system.
Action types
There are five types of actions:
No Action
This option means that the call forwarding is disabled and the telephone system won't attempt any further action.
Busy
This option makes the PABX return a busy signal to the caller. This option forces the telephone system to return a busy SIP response. If the call is already connected, for example, when the call has been transferred, then the telephone system will play a busy tone for 10 seconds and then disconnect the call, returning a busy SIP reason for the call termination.
Hang Up
This option instructs the system to respond with a SIP message type of "Declined".
Own Voicemail
This option forwards calls to this phone extension's own voicemail.
Forward to target
This option forwards calls to any type of target, for example, configured contacts and internal extensions. You can search the drop-down list by name or extension number.
Forward to external number
This option forwards calls to an external destination. Make sure that the extension is configured to allow external numbers in call forwarding. Make sure that the number the call is forwarded to includes the external line prefix, otherwise the call will fail.
5.1.7 Contractual & Billing
Contractual & Billing
Under Contractual & Billing, you have the following options:
CTI | Sets what type of CTI the extension has access to Please note that this has to be enabled under Tenant. There are the following options:
|
Cost centre | Assigns a cost centre to the extension; max. length is 50 characters This option is useful for accounting purposes as it allows costs to be assigned to departments and cost centres. Please note that the cost centre is not the same as the project code. |
Extension is a call centre agent (NMonitoring Queues) | Activates/deactivates monitoring this extension in NMonitoring Queues Only visible if NMonitoring Queues is included in the tenant contract. |
Allow recording (direct calls) | Selects if the user can record a call via a star code Please note that this option is only available for direct calls and not queues, skill services etc. There are the following options:
The recordings will be sent to the configured email address. |
5.1.8 Permissions
Permissions
Under Permissions, you have the following options:
Calling profile | Sets outbound call permissions There are four options:
some text for Deutsche Telekom and DFN. |
Allow to access contacts | Activates/deactivates permission to access contacts under the tenant |
Enable intercom | Activates/deactivates the intercom function on this phone extension When activated, other extensions can dial this extension in the intercom mode. The intercom mode means that only the primary device of this extension will be called. Please note that devices that do not support this feature will ring until a call is manually answered. |
Allow Ncontrol login | Activates/deactivates the usage of Ncontrol This setting allows you to overwrite the default setting configured on this tenant. |
Enable Click-to-Dial | Configures Click-to-Dial There are three options:
This setting allows you to overwrite the default setting configured on this tenant. |
Request voicemail PIN for external calls | Activates/deactivates the request of the voicemail PIN input Please note that not all devices support this feature. |
Enable callback on busy/not available | Activates/deactivates callback on busy/not available Please note that this option is only available for internal calls. |
Tip
Please note that all external calls are also matched against a list of barred prefixes and phone numbers. These are mainly prefixes that are extremely expensive or phone numbers that have been reported as part of a scam or fraud.
NFON also uses various mechanisms to check for potential fraud. For example, the system automatically changes the permission to intern if the extension makes over 25 euros worth of calls within 60 minutes. Please note that this restriction can only be changed by the portal administrator.
Telefonica info
This is more info
5.1.9 Call configuration
Call configuration
Under Call configuration, you have the following options:
Number guessing | Defines how many digits you need to enter before the device starts to display matching numbers from the call history Only available for desktop phones. There are three options:
This setting can be changed using the XML menu on the desktop phone. |
Auto-dial timeout | Sets a delay in seconds before the call is automatically initiated after the number has been entered, but you did not press the send or call button Only available for desktop phones. There are five options:
This setting can be changed using the XML menu on the desktop phone. |
Return call after failed transfer | Sets the timeout in seconds after which a transferred call that has not been answered is returned to the extension that has transferred the call This setting is deactivated by default. |
Call waiting indication | Activates/deactivates call waiting indication for this extension When deactivated, and the extension is in a call, new incoming calls will follow the Busy call forwarding configuration. When activated, you will be informed that another call is waiting. If this second call is unanswered, it will follow the Not available call forwarding configuration. |
Use different extension number for internal calls | Activates/deactivates the use of another target's extension number as the extension number for internal calls |
Parallel ringing | Activates/deactivates parallel ringing This option can be used to call another phone extension, external number or a contact simultaneously when a call comes in. |
Hide phone extension in contacts | Activates/deactivates the option to hide the extension in the directory |
Voice recording | Activates/deactivates voice recording Please note that this setting is separate from the standard or on-demand voice recording feature. This recording option is available if you have a subscription or add-on, e.g. Neorecording. |
5.1.10 Skills
Skills
In this section, you will get an overview of how to make an extension a member of a skill service. Skills are described in detail under Skills.
Under Skills, you have the following options:
Add skill | Adds the extension to a skill service. Please note that a phone extension can be a member of multiple skill services. |
Active | Activates/deactivates the extension in the skill service. |
Skill levels | Sets the skill level of the extension in each skill service in which it is a member. |
Logged in as agent for skill set | Activates/deactivates the option to log in to this phone extension to the skill set. |
5.1.11 Function keys
Function keys
Function keys refer to the physical buttons on devices, e.g. desktop phones. # and * are examples of function keys.
The number and type of function keys depend on the device type.
In this section, you will get an overview of how to add a function key and the different types of function keys.
Click Add function keys to have the following options:
Key | Specifies which physical button the key is assigned to Please note that if you already have function keys configured, the system will suggest the next available number here. |
Type | Selects the function key type There are five options available:
|
Target | Enters the function code for the function key |
Name | Sets a name for the function key that will be shown on the device Bear in mind that the space on the device to display a key name might be limited. |
5.2 eFax extensions
Overview
In this section, you will get an overview of the configuration settings for an eFax extension.
An eFax is a virtual fax where conventional faxes are received by the telephony system and then forwarded to a pre-configured email address as an attachment.
eFax is listed as an extension, not as a service. eFax is the second and last extension type in the NFON cloud telephony system and the only other target type that can make outbound calls.
An eFax extension also allows end users to send faxes. Please note that it’s also possible to send faxes using a special printer driver that is compatible with the NFON cloud telephony system eFax subsystem.
Under Extensions > eFaxes, you can see a list of all eFax extensions that have been configured for the tenant.
In this view, you can:
Add a new entry
Select one, several or all entries and delete them
Edit, clone, or delete an entry, or copy it to a clipboard (you can also edit an entry by double-clicking on it)
Import a CSV file
Export a CSV file
Select how many entries you want to have on the page
Search for an eFax extension
Note
Please note that the configuration of an eFax extension is very similar to that of a phone extension. For this reason, the following sections will only cover the settings that have not been previously described under Phone extensions.
5.2.1 General
General
Please note that the same rules and guidance apply here as for phone extensions, unless specified otherwise.
Under General, you have the following options:
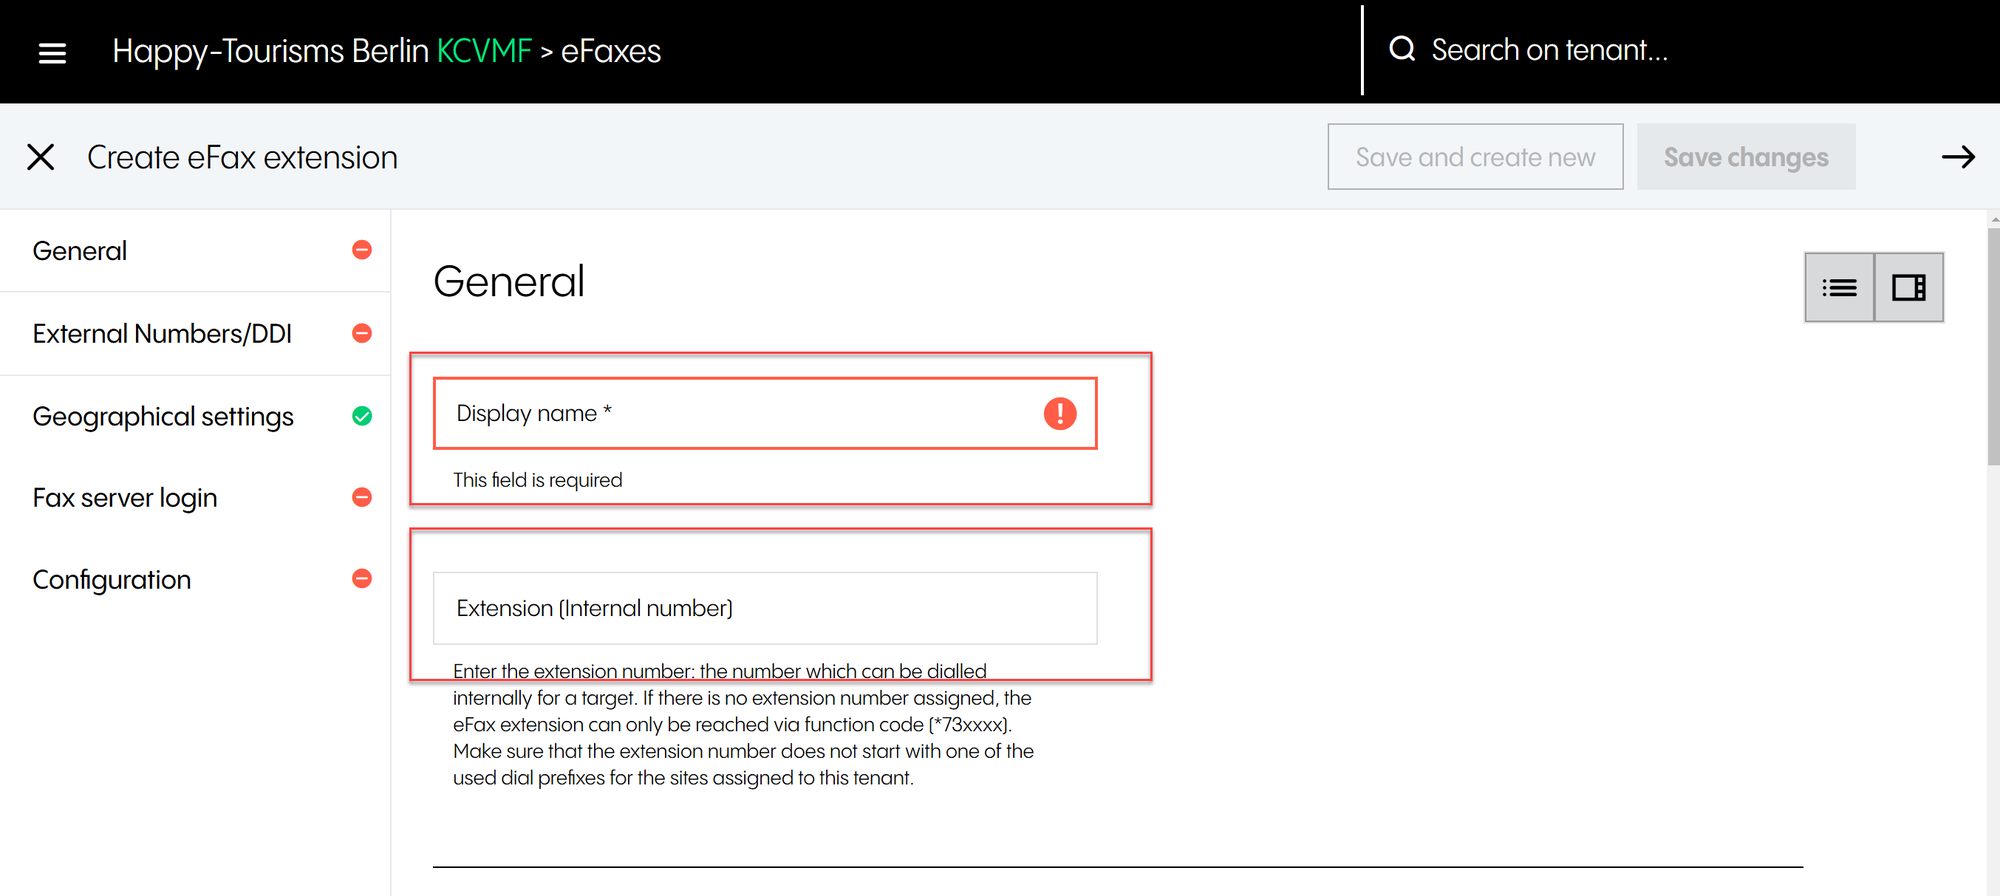
Display name | Assigns a name to the extension Mandatory field (for every target type), can be up to 50 characters. |
Extension (internal number) | Assigns an internal extension number. Unlike for phone extensions, this field is not mandatory for an eFax extension and can be left blank. |
5.2.2 External numbers/DDI
External numbers/DDI
You can configure one or more inbound numbers for an eFax extension as well as outbound numbers.
Please note that the same rules and guidance apply here as for phone extensions, see External numbers/DDI.
5.2.3 Geographical settings
Geographical settings
Please note that the same rules and guidance apply here as for phone extensions, see Geographical settings.
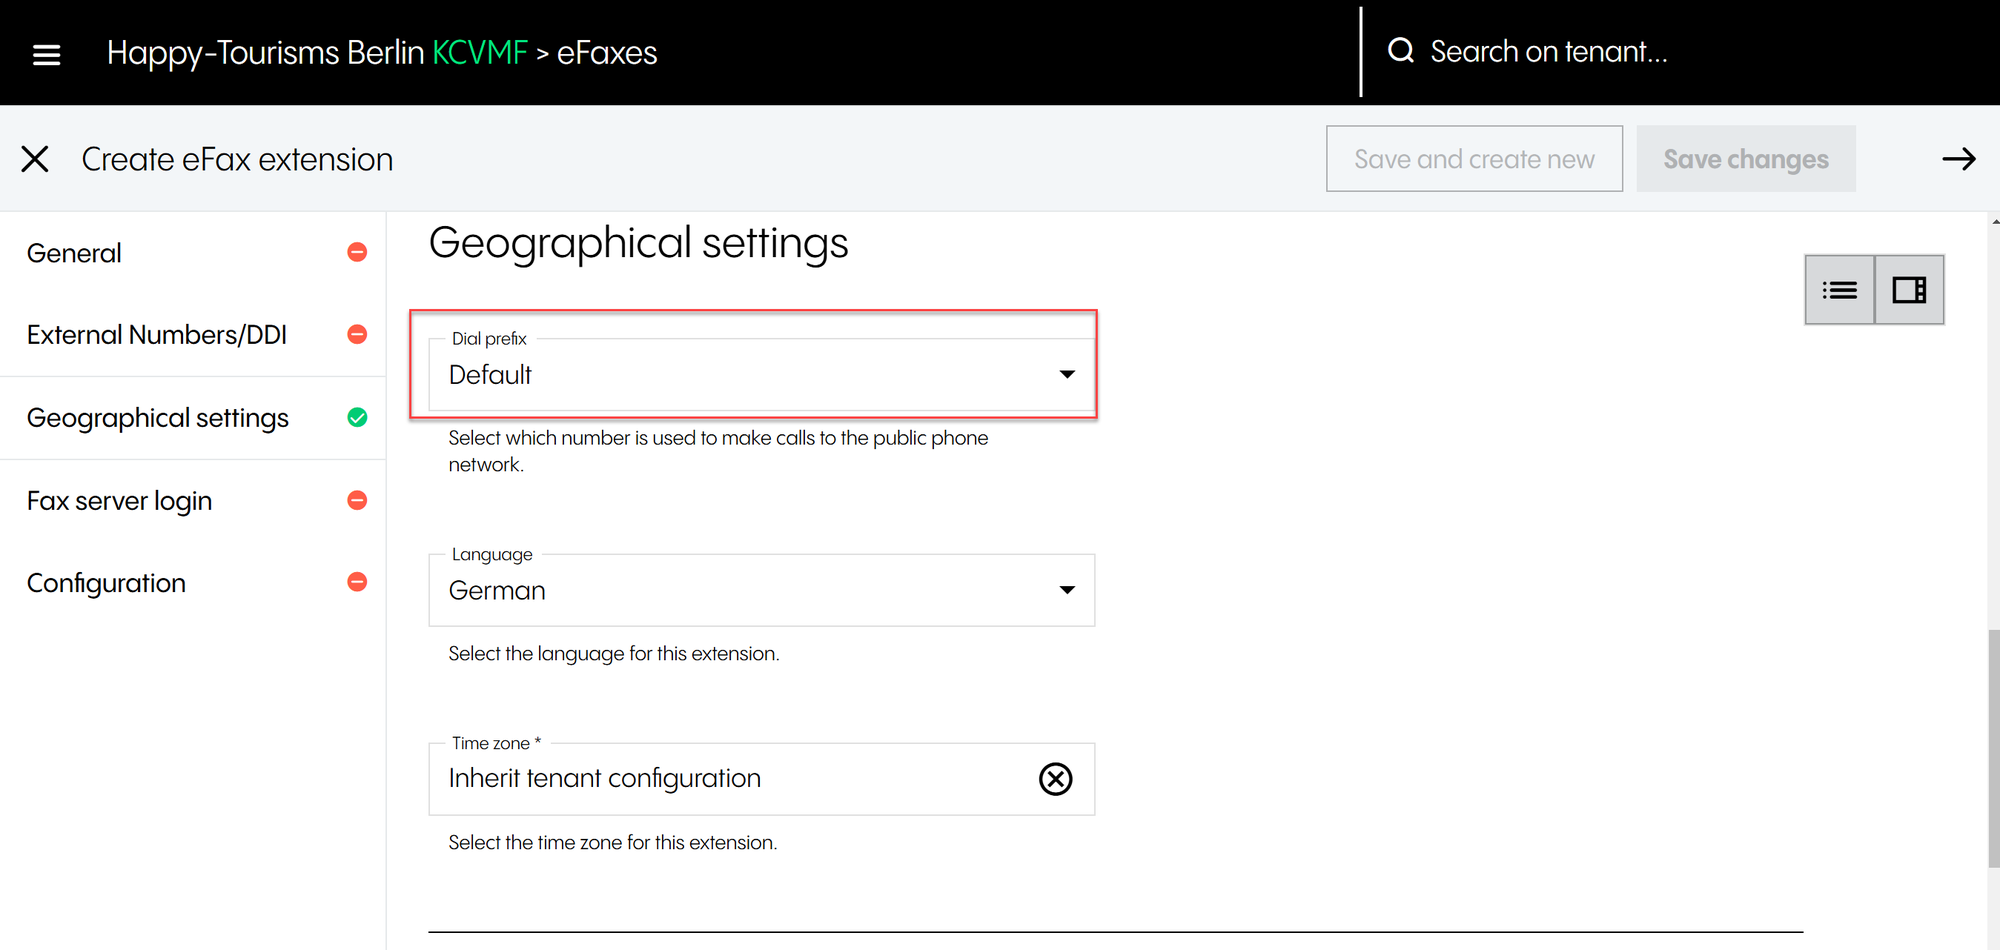
Please make sure that the language and the time zone on an eFax extension are set appropriately.
We recommend keeping the Dial prefix set to Default. If set to any other value, the extension might not be able to send eFaxes externally.
5.2.4 Fax server login
Fax server login
In this section, you will get an overview of how to subscribe to this eFax extension.
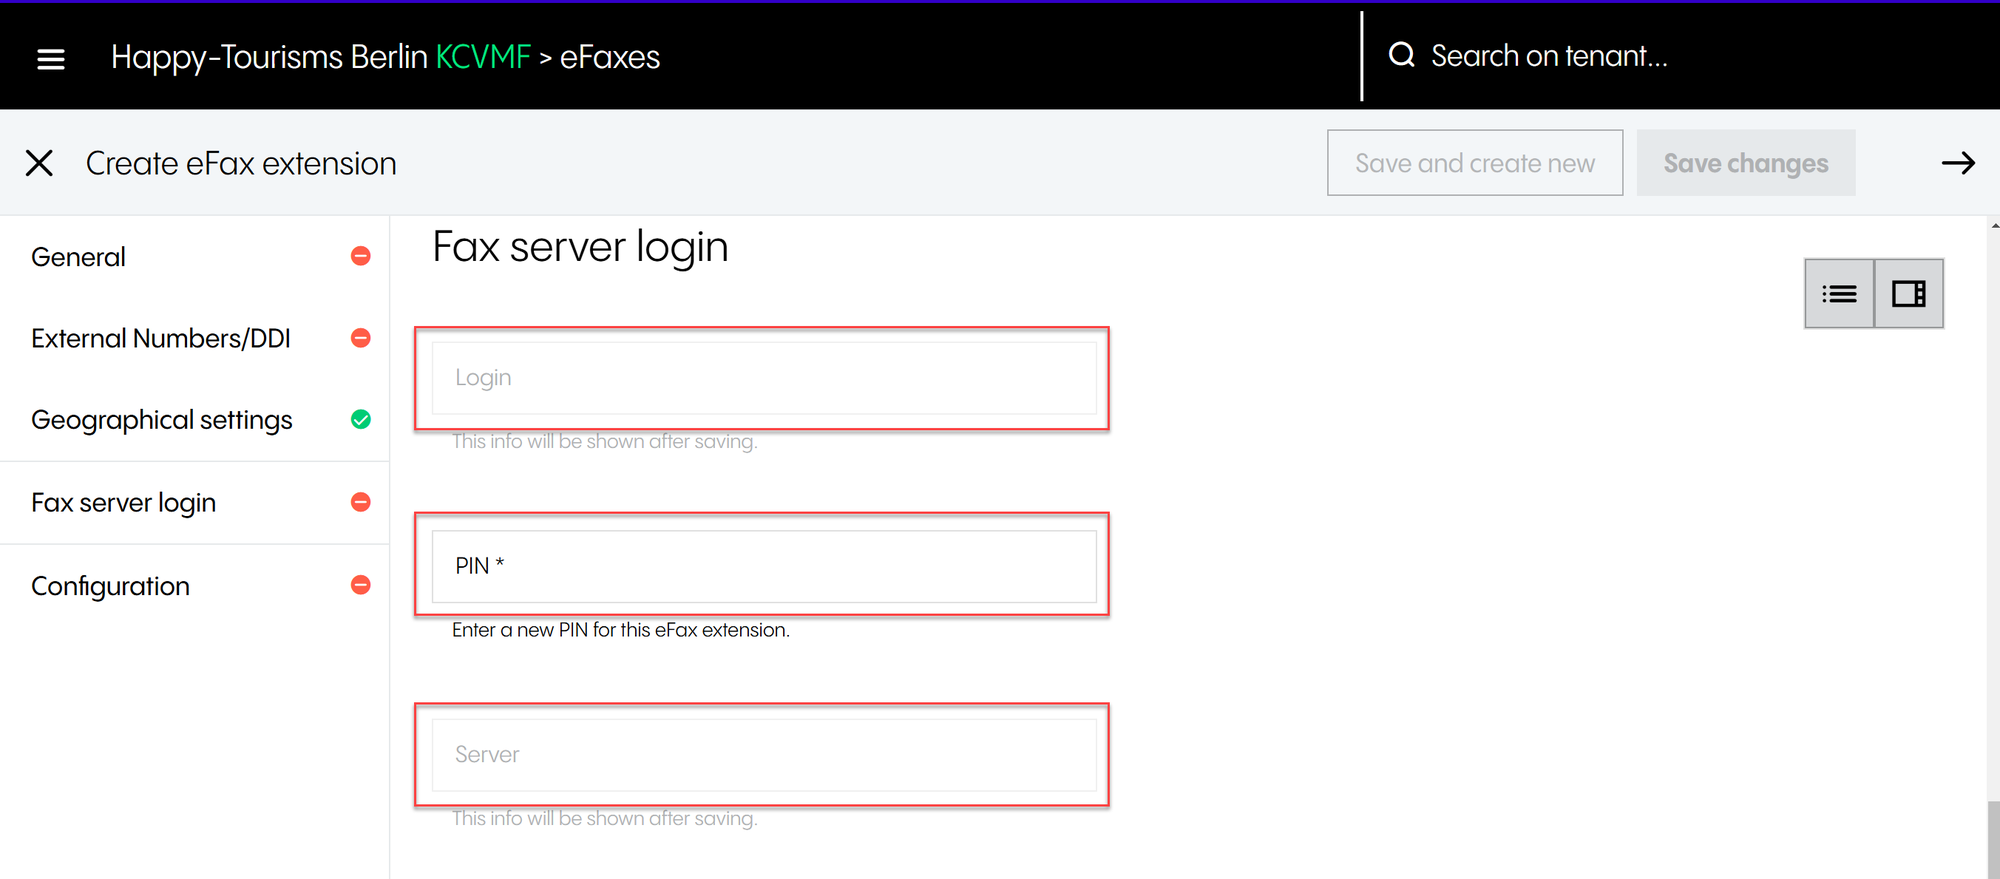
Login and Server are greyed out and you cannot change them.
You will, however, need to set a PIN, which will be used to subscribe to this eFax extension from the Cloudya apps. This is a mandatory field. For end users to be able to use an eFax extension to send faxes, they will need to subscribe to it. To do so, they need to know the fax login and its PIN.
Please note that the login details will change upon saving a new eFax extension. Therefore, we recommend setting the PIN to something simple and easy for team members to remember, as these details will be shared amongst users. The rules around the minimum and maximum length for the PIN are identical to the ones already covered in the phone extension section.
5.2.5 Configuration
Configuration
This section is very similar to what has been described for phone extensions. All of these settings are required to configure the extension for calling externally.
Please note that the same rules and guidance apply for Calling profile and Cost centre as for phone extensions.
Other options are:
Email address | Assigns an email address An email address is required on all eFax extensions. This is the email the fax server will forward the faxes it has received to. Often this is a shared address or an email distribution list. Make sure that the email address needs to be able to receive emails from external sources. |
Custom header text | Adds a text to the fax header, which appears at the top of each page when sending a fax |
Delete after sent | Activates/deactivates the deletion of an eFax from the fax server after it has been forwarded via email Please note that if this option is activated, the faxes will be permanently deleted from the server. |
T.30 tax identifier | Sets the fax identification shown on the recipient's fax display if it supports the T.30 standard The maximum length for this field is 30 characters. If this field is left blank, the outbound caller line identification for this eFax extension will be used. |