5. Call forwarding
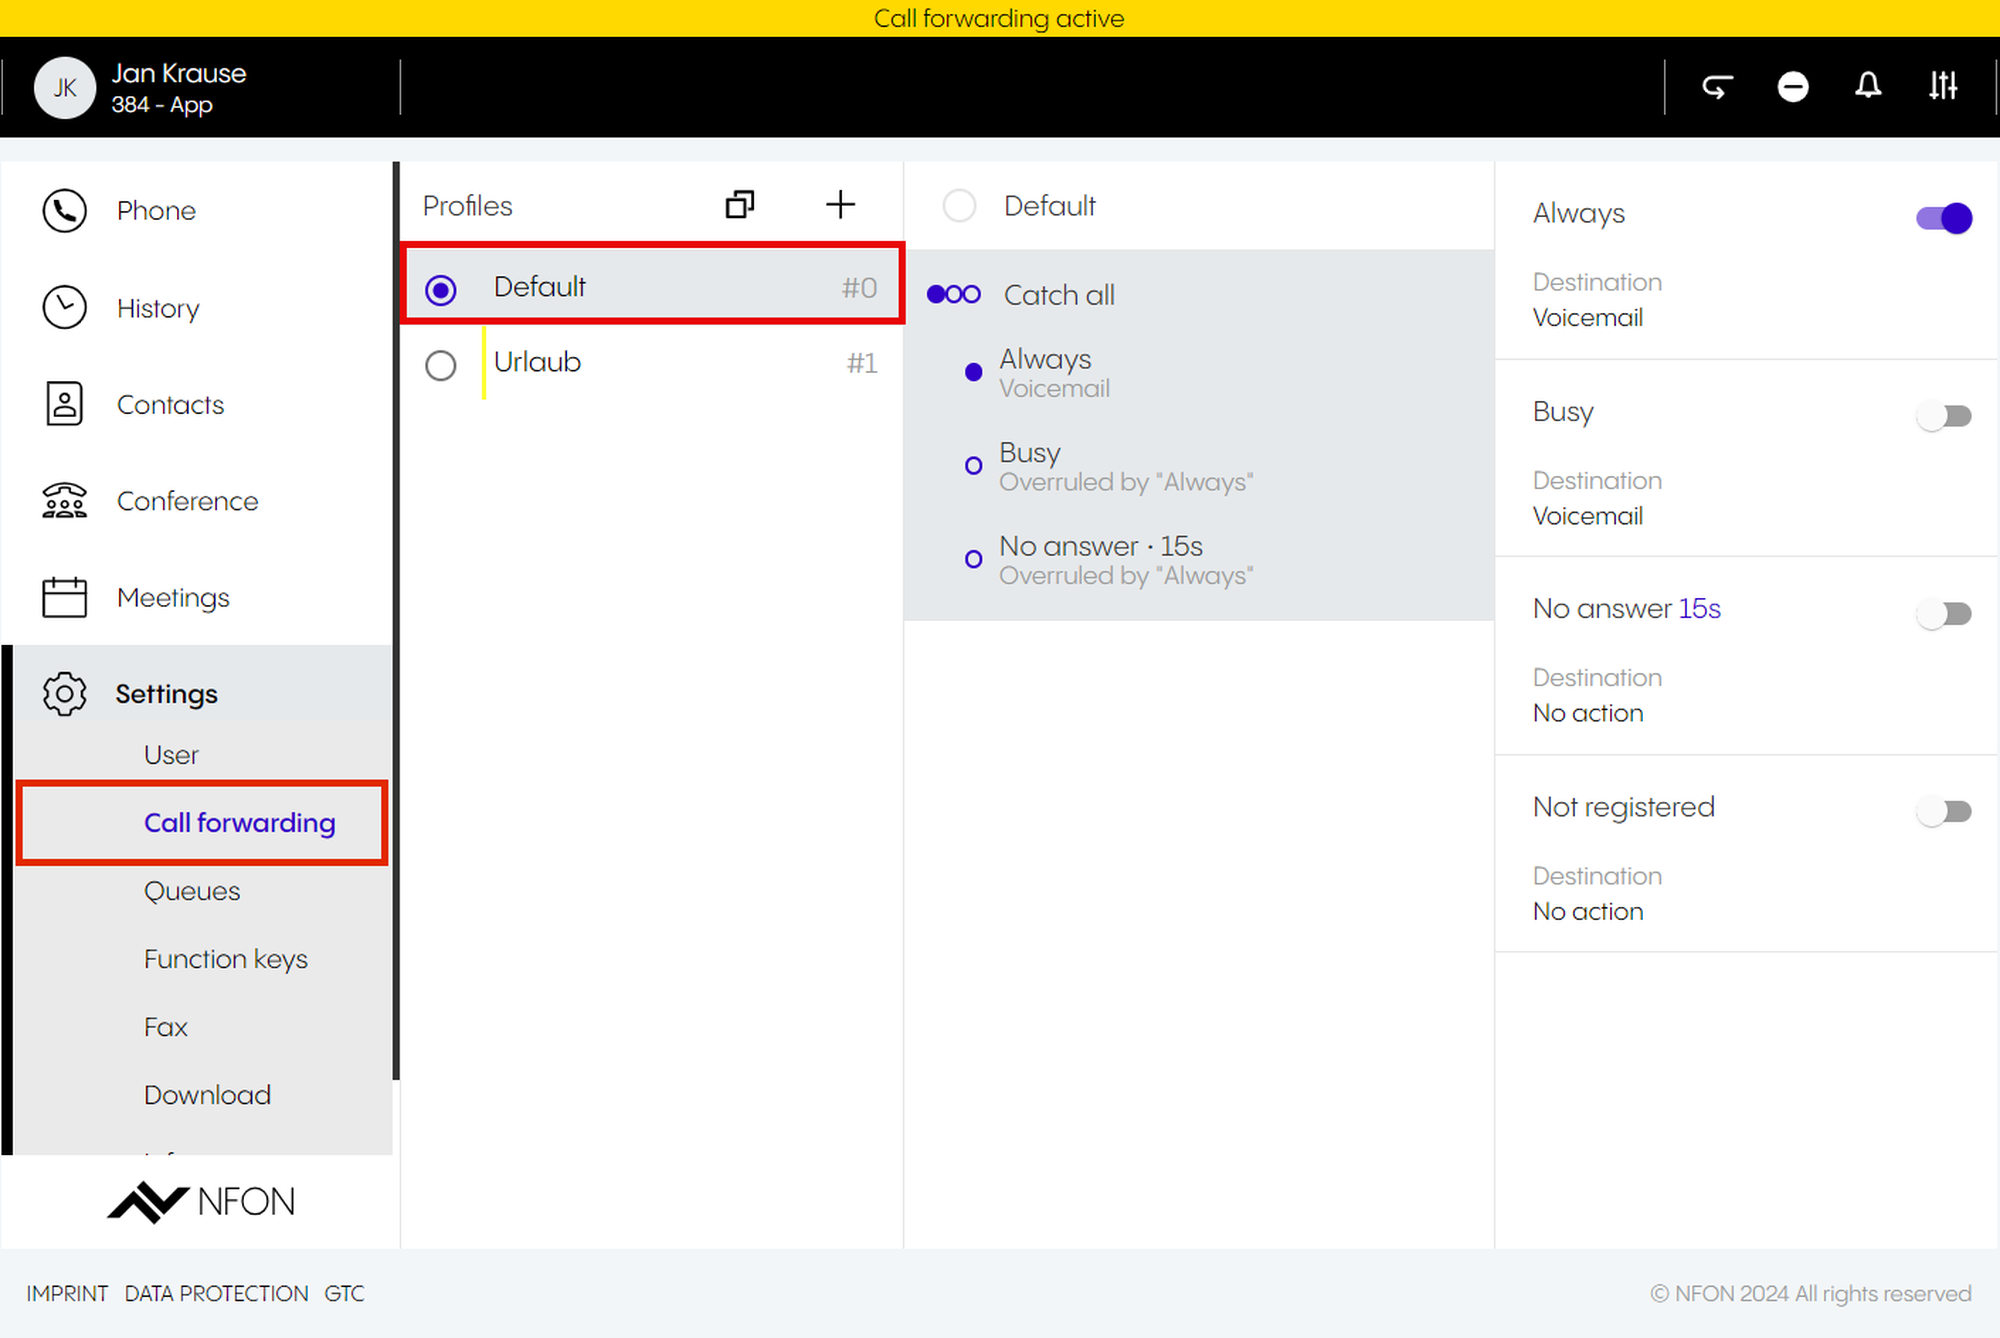
With call forwarding, you can forward your calls to a specific destination depending on a chosen scenario. You can create your personalised profiles for certain scenarios, e.g. "Vacation", and set a target phone number to which calls can be forwarded to.
Each user has an automatically set call forwarding profile – the default profile – with the following properties:
It is active per default
It cannot be deleted
Call forwarding destination can be edited
It does not have source-based call forwarding
Tip
Up to 10 call forwarding profiles are available per extension.
The user can create up to 9 additional call forwarding profiles.
Creating a profile
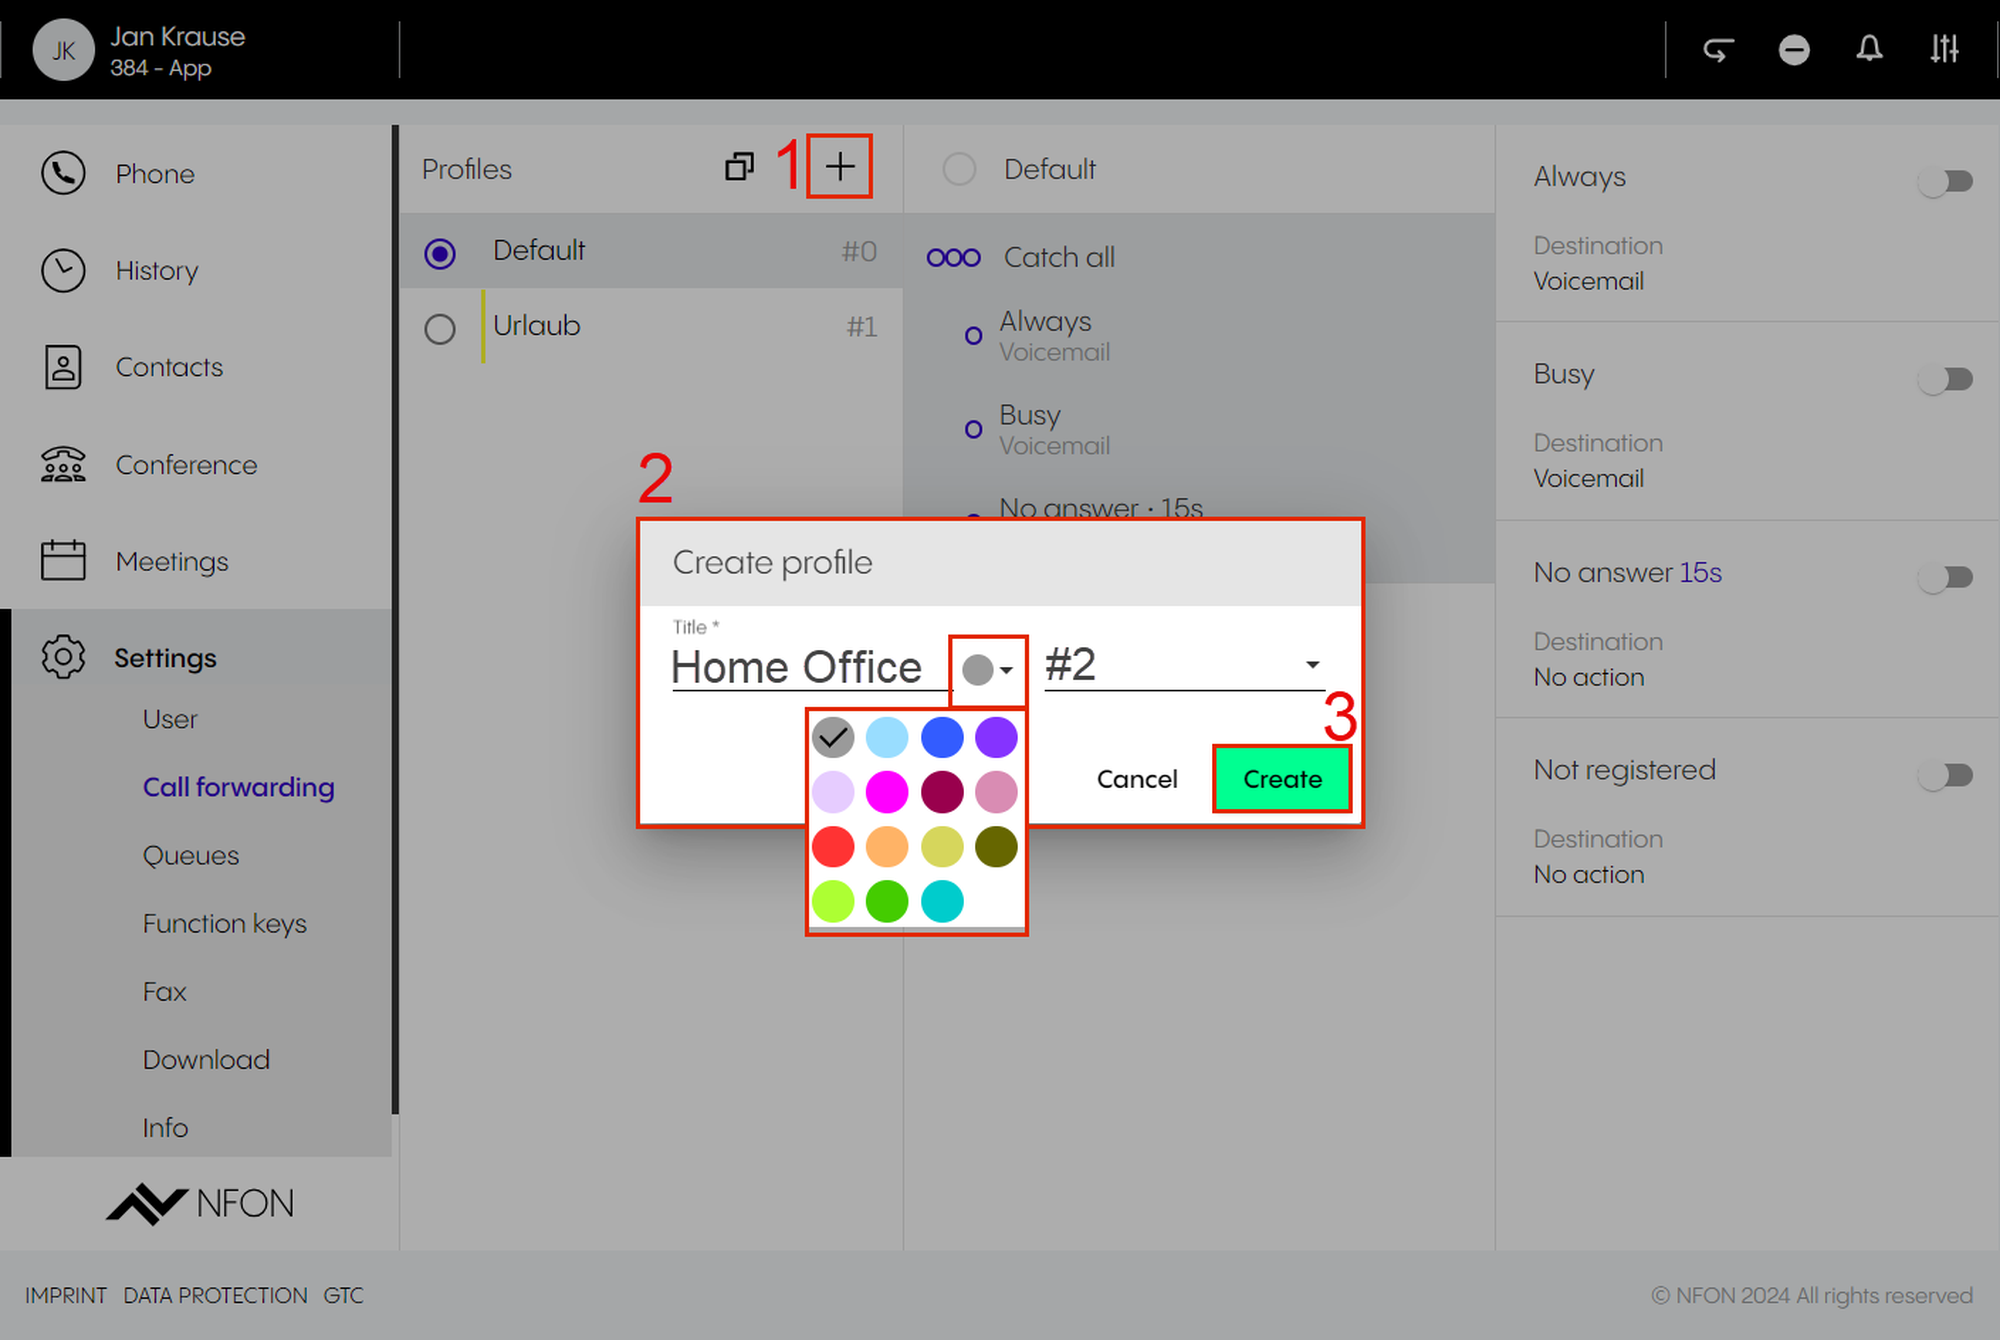
Click on the + button in the Profiles tab.
⇒A pop-up window to create a profile appears.
Define the title and the number of the profile. Furthermore, you can add a colour to your call forwarding profile.
Click on Create.
⇒The new call forwarding profile has been added.
Selecting and activating a profile
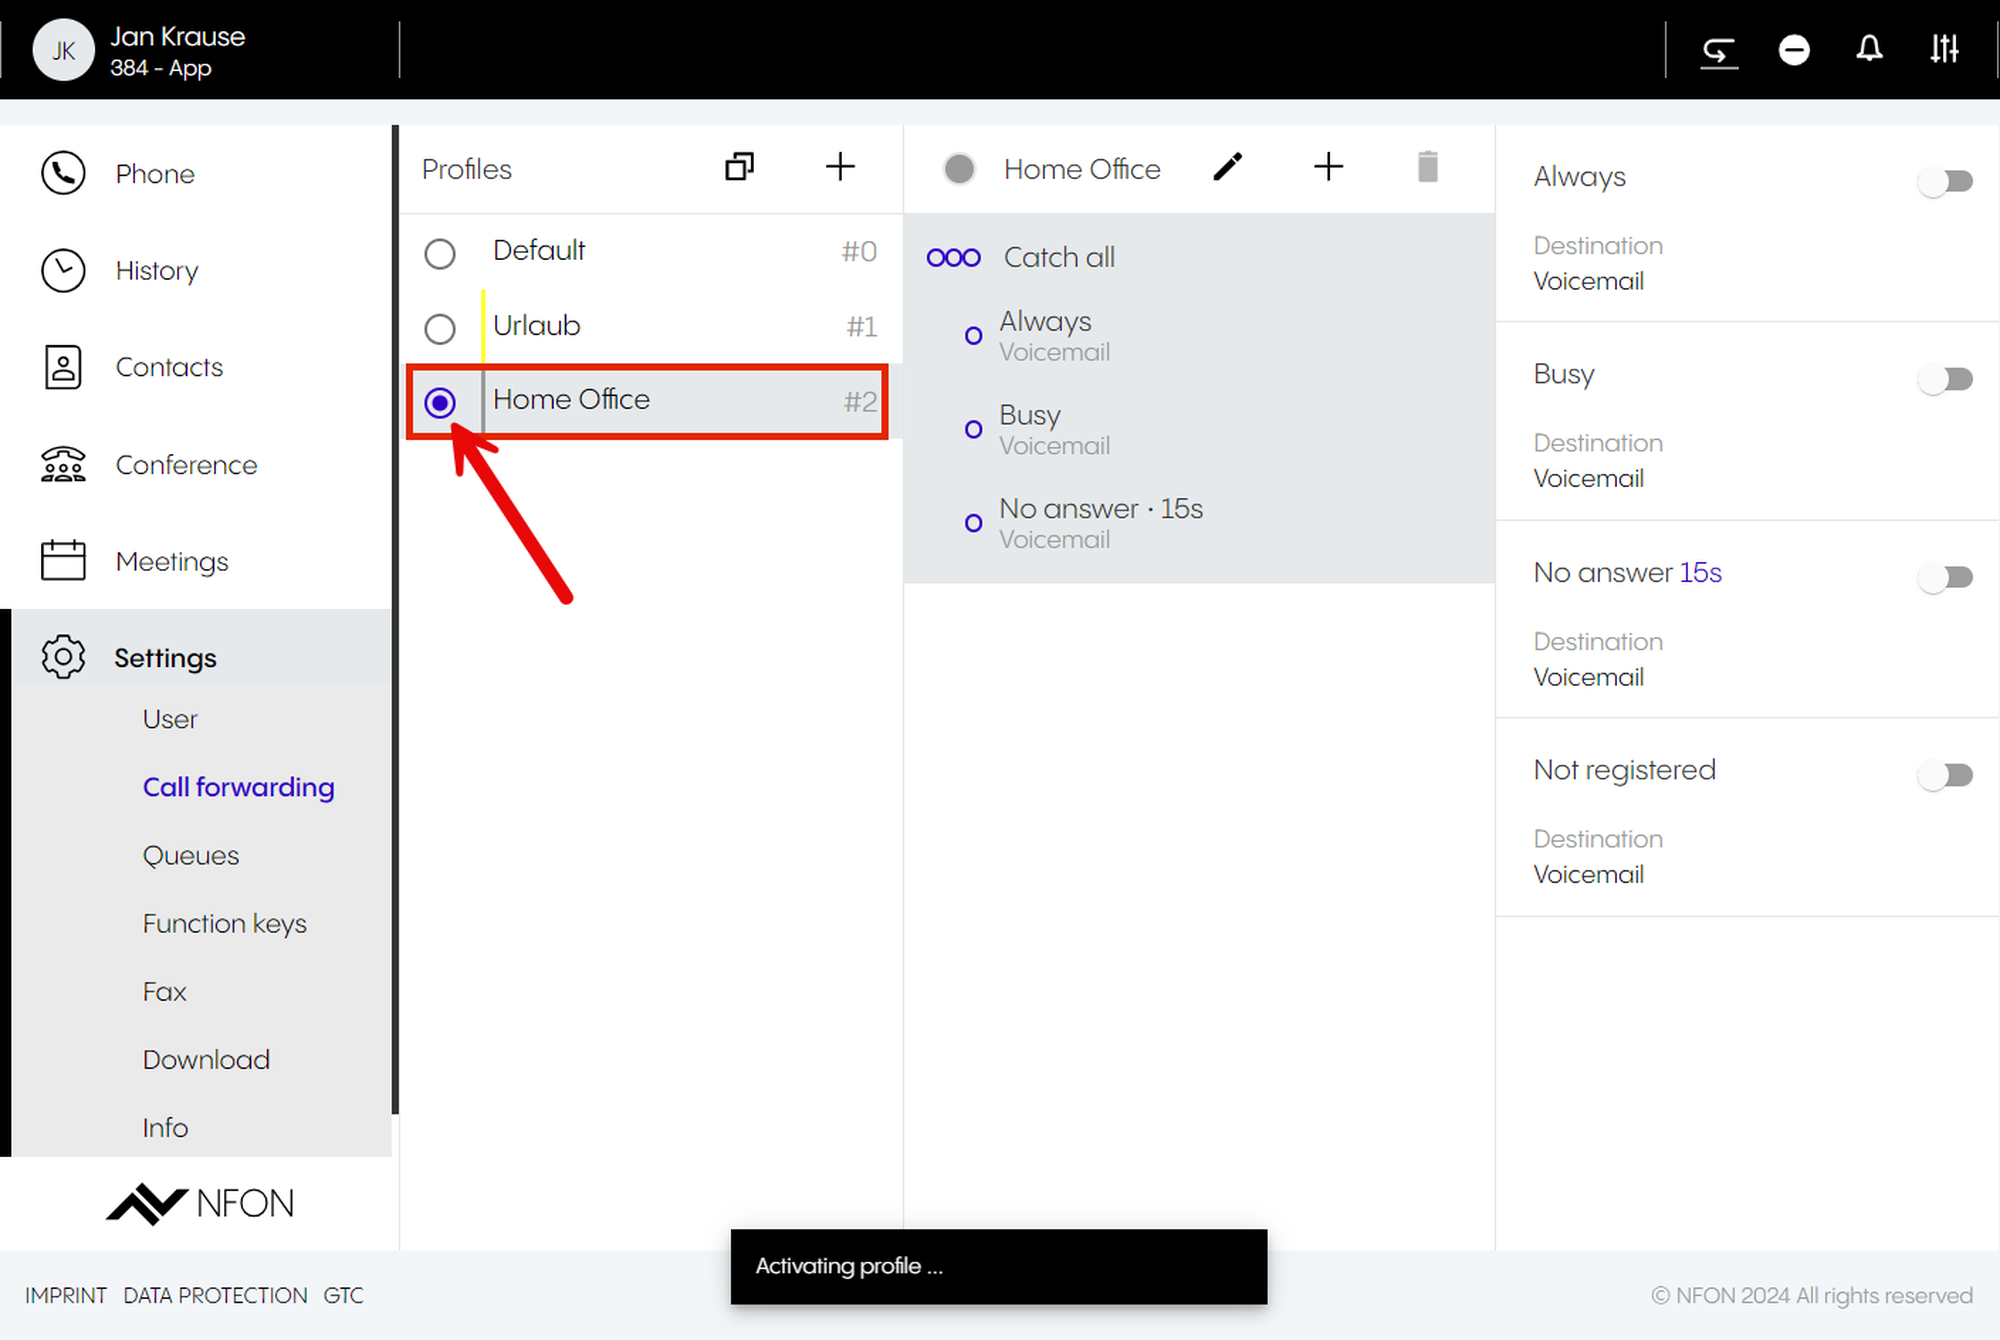
To select a profile, tick the circle next to the call forwarding profile.
⇒The circle has a blue dot inside it, which means that the profile has been selected.
To activate a profile, go to the destination section and make your call forwarding selection.
Note
To use a call forwarding profile, you need to select it. Otherwise, the default profile or another profile you have previously selected will be active.
Editing a profile
You have created a profile "Vacation". To define exactly what this profile should do, you can either activate one of the call forwarding conditions
Always
Busy
No answer
Not registered
or you can set a rule and use source-based call forwarding (for more information, see Source-based call forwarding).
Call forwarding conditions
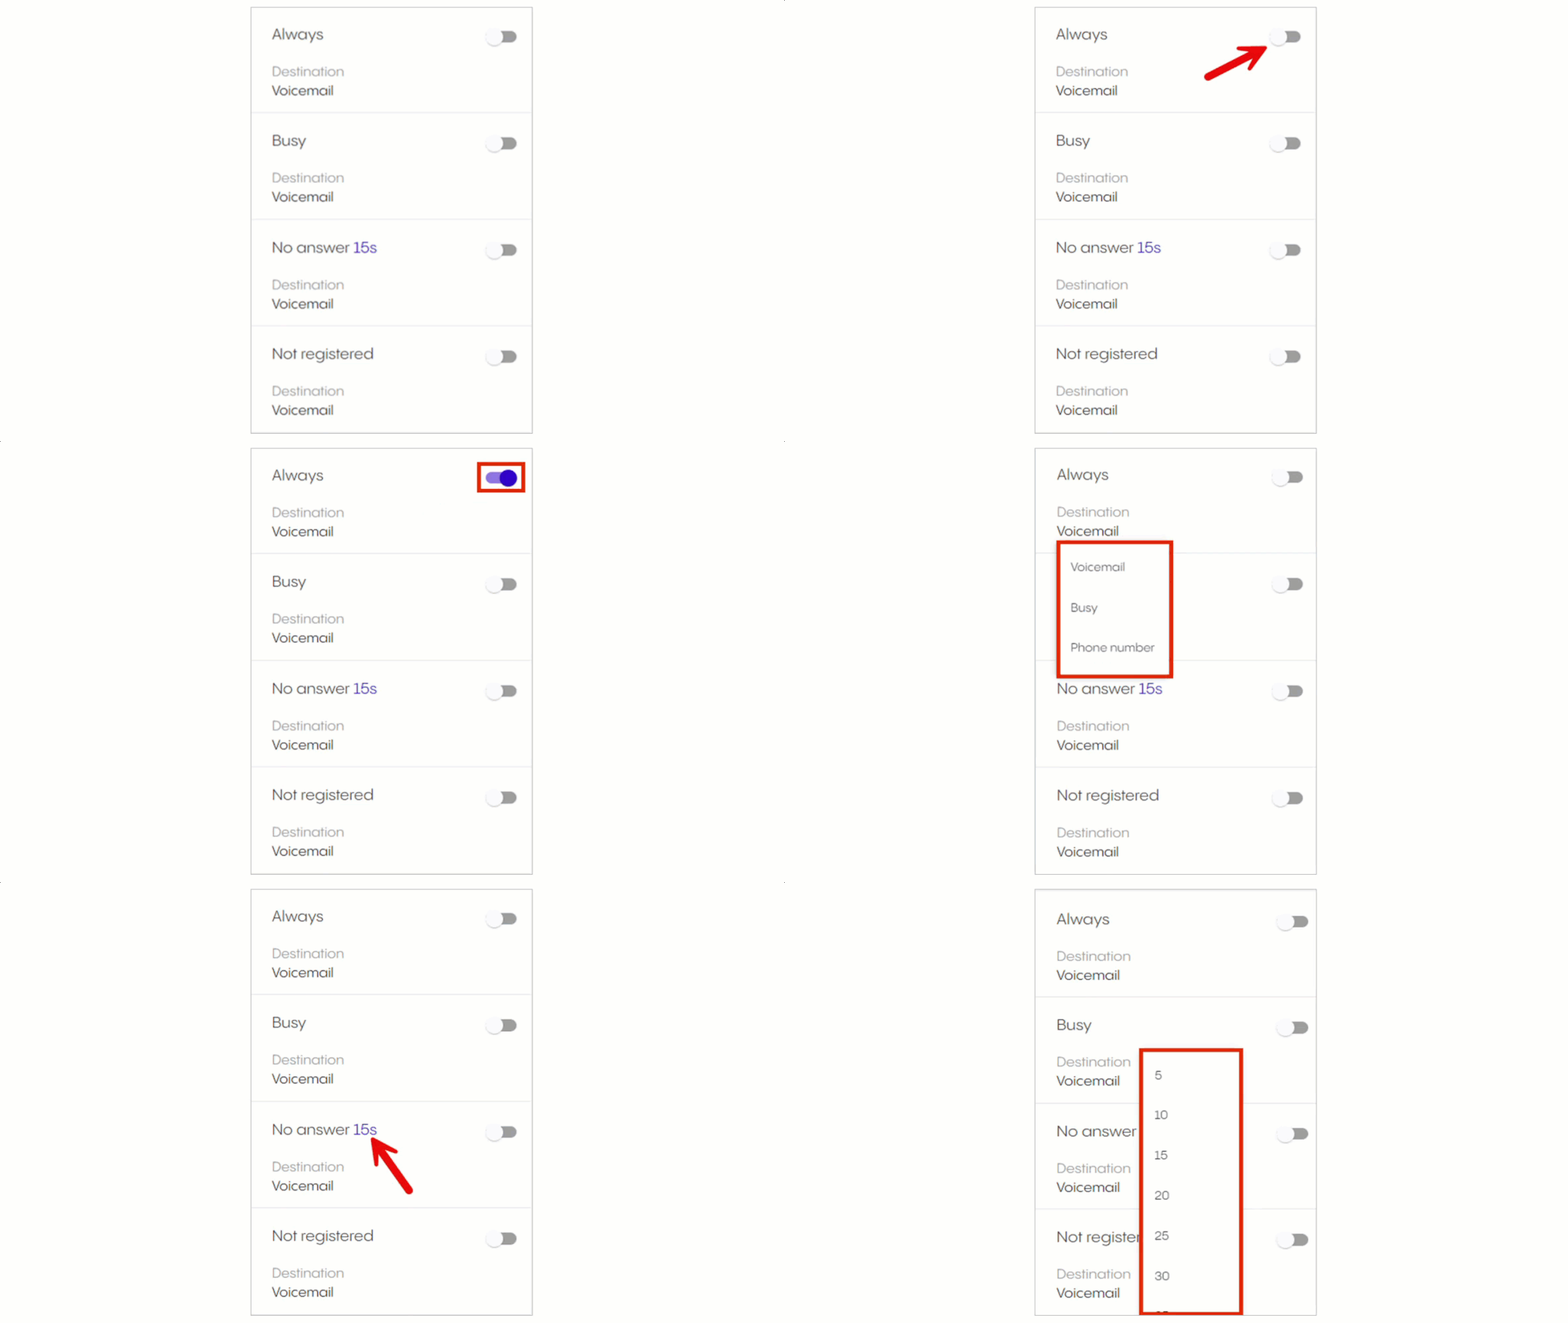
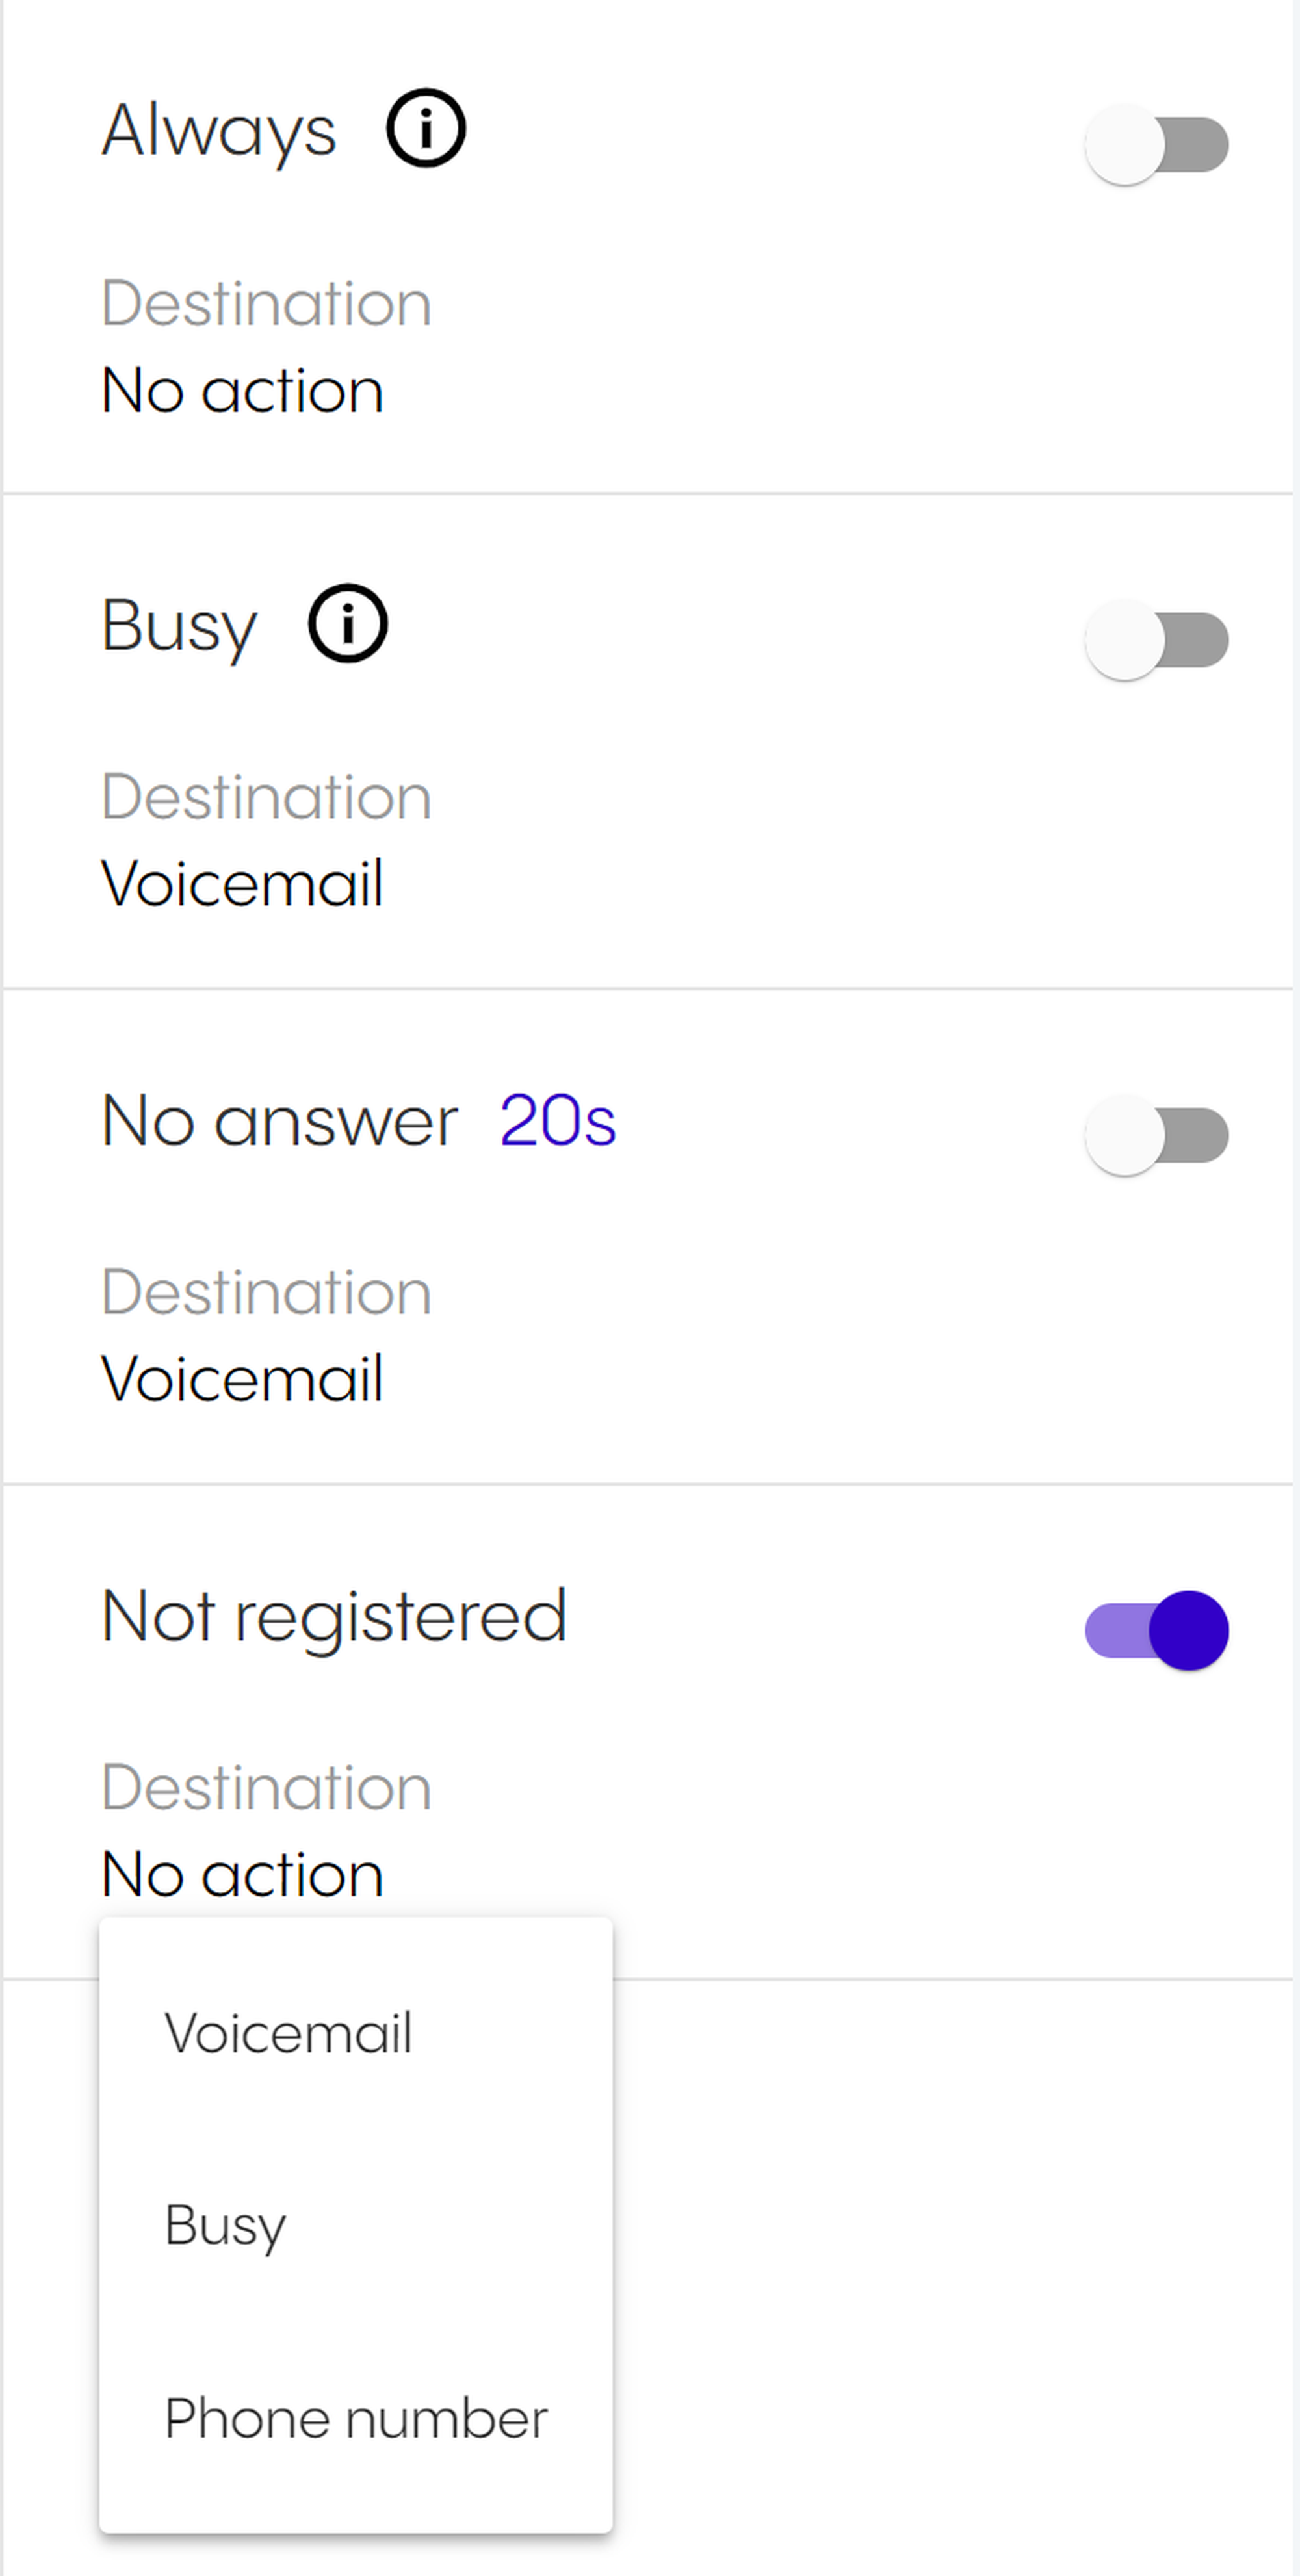
There are four call forwarding conditions, Always, Busy, No answer and Not registered.
Select a call forwarding condition.
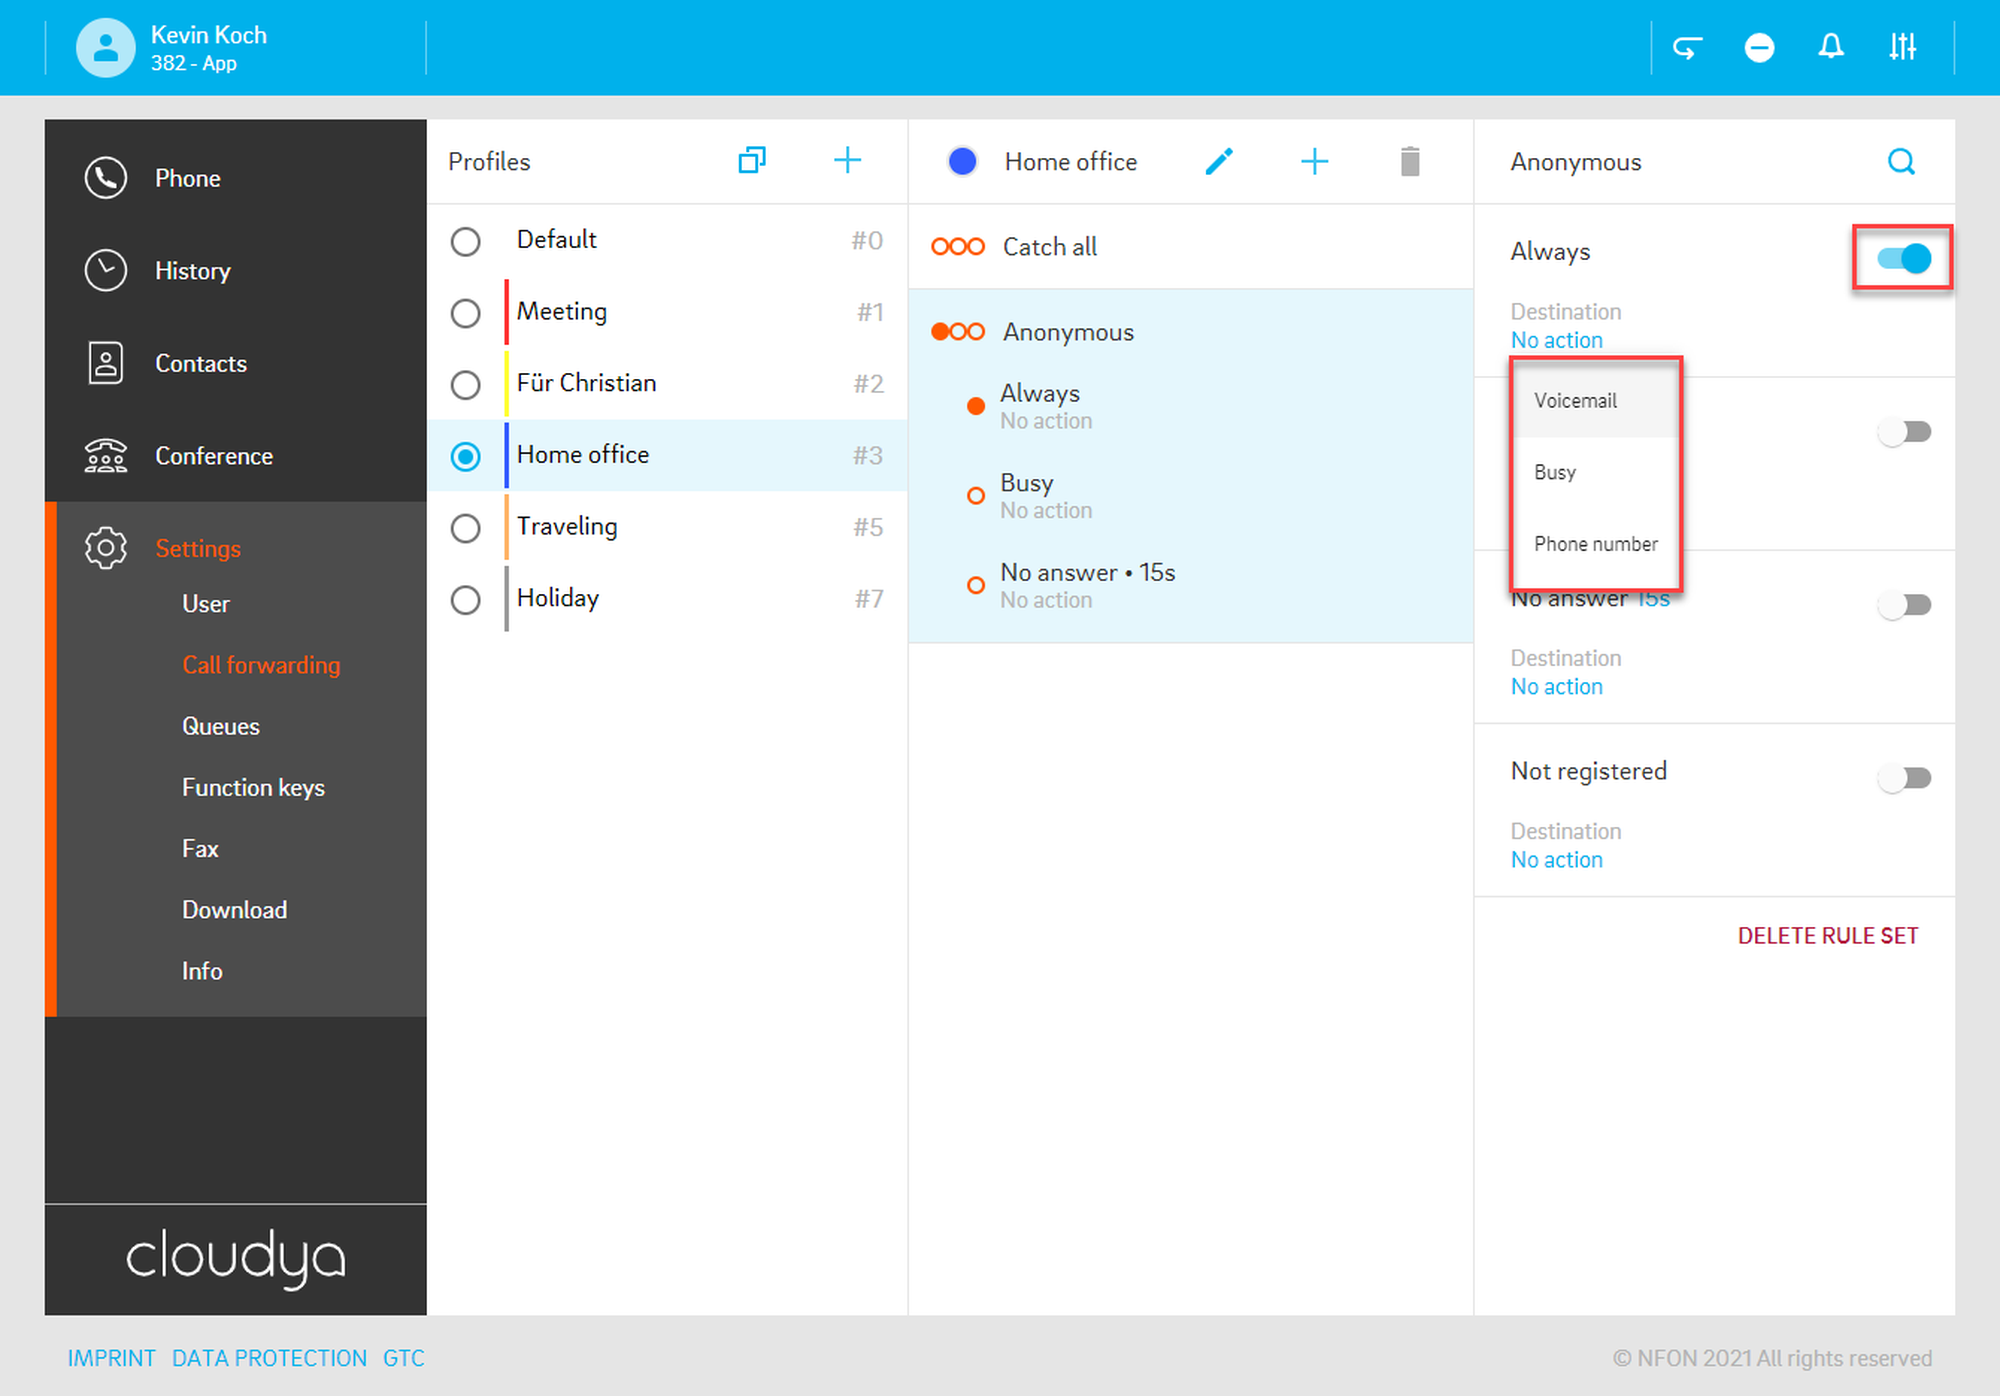
Select a call forwarding destination via the Destination dropdown below the call forwarding condition. You can select between three options, Voicemail, Busy and Phone number.
What do the call forwarding conditions mean:
Always
The call will always be forwarded. The caller will be forwarded directly to the defined destination.
Please note that if this forwarding condition is active, it will influence the call destination on Global DND. That means that Global DND will have the same call forwarding destination as defined here.
Busy
The call will be forwarded if your extension is busy. The caller receives a busy signal and will then be forwarded to the defined destination.
Please note that if this forwarding condition is active, it will influence the call destination on Global DND. That means that Global DND will have the same call forwarding destination as defined here.
No answer
The call will be forwarded if you do not answer within a defined time limit. The caller receives a waiting signal and will then be forwarded to the defined destination.
The time limit can be set to 5, 10, 15 or 20 seconds by clicking on the number dropdown.
Not registered
The call wil be forwarded if your device is not registered on PBX (e.g. broken cable etc.). All incoming calls will be forwarded to a defined destination.
Duplicating a profile
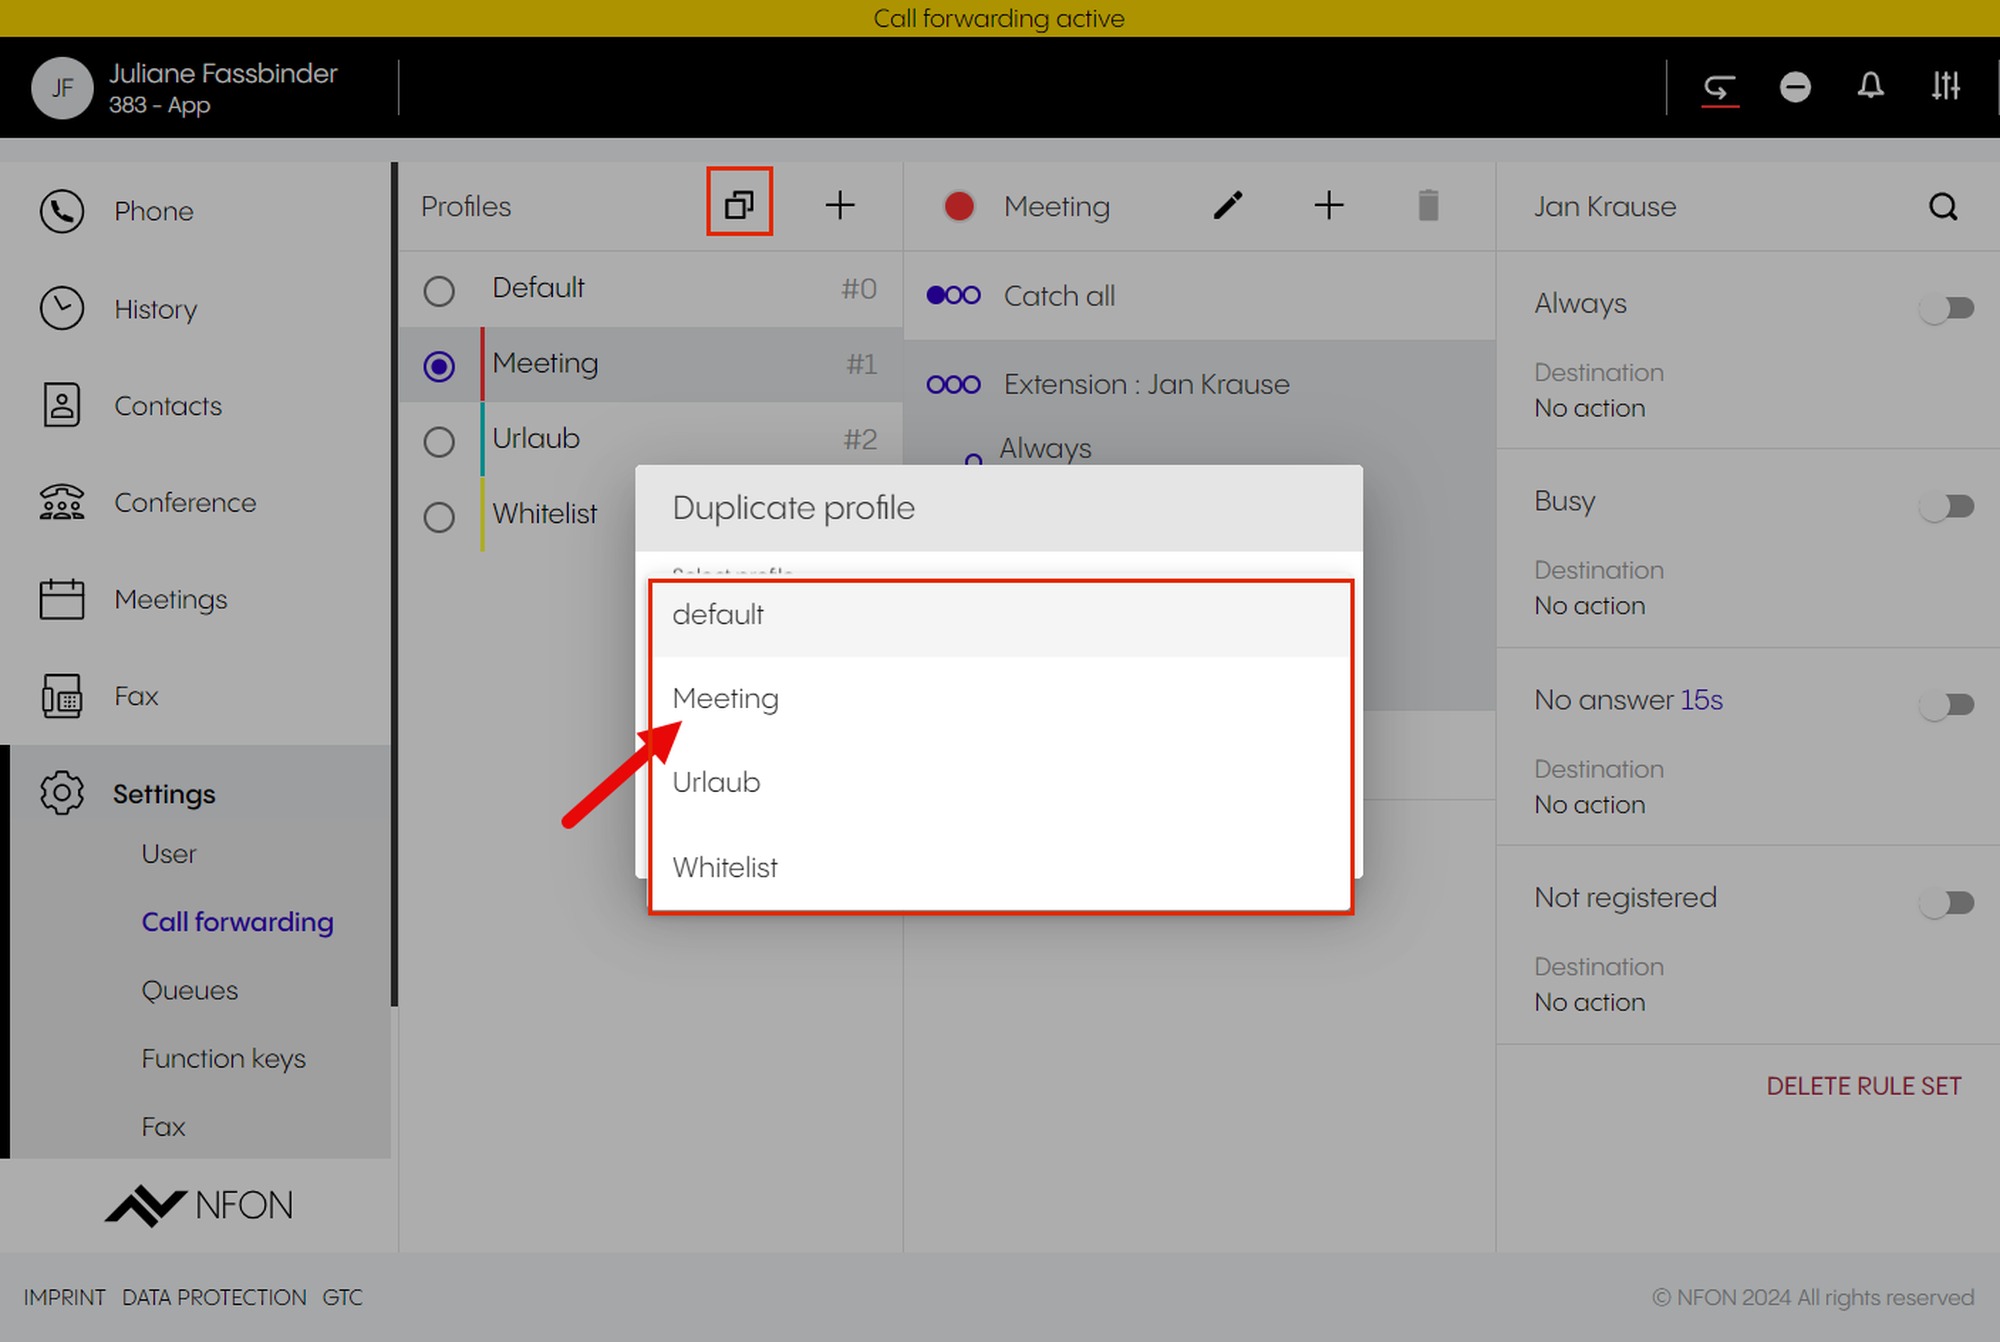
Click on the duplicate button
 .
.⇒ The pop-up window will appear.
Select a profile you would like to duplicate.
Enter a new profile title.
Choose a profile number.
Click Save.
⇒The new profile will appear in the list.
5.1 Source-based call forwarding
What is it?
With source-based call forwarding, you forward your calls to your desirable destination based on who is calling. This can be done for internal calls, specific extensions or phone book entries. In addition, you can have a personal block or allow list to decide who can reach you and who cannot.
Tip
Please note that source-based call forwarding is not available for the default profile.
Note
Make sure to activate the call forwarding profile for the source-based call forwarding rule to work.
Creating source-based call forwarding for anonymous calls
For example, you do not want to receive any calls from anonymous callers, so you want to forward these calls to your voicemail.
To enable it:
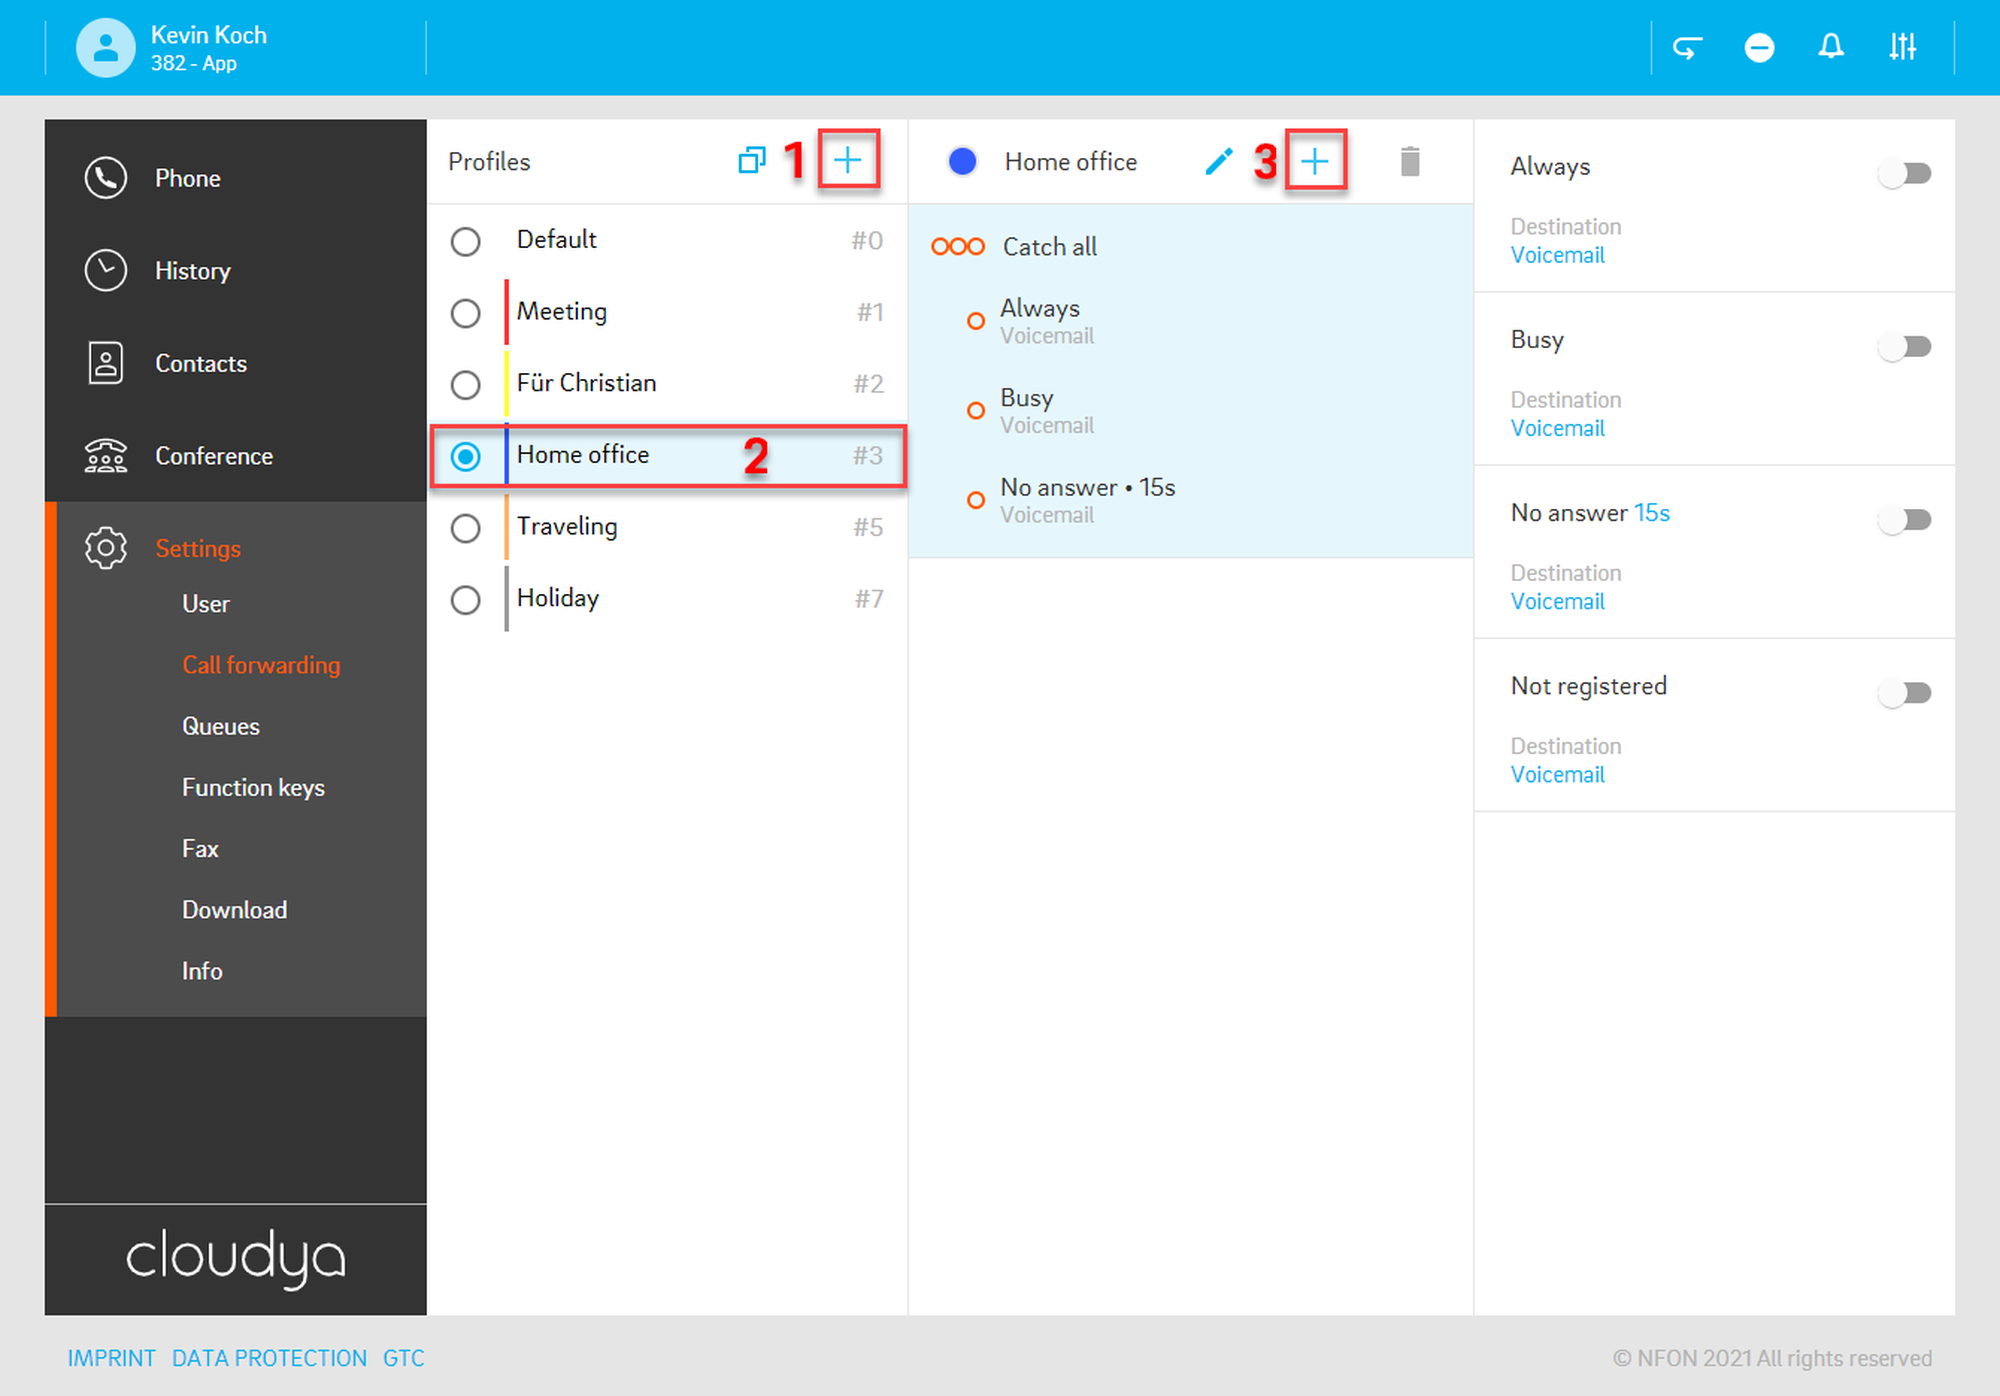
1. Create a new call forwarding profile (1) or select an already existing customised call forwarding profile (2) and add a new source-based call forwarding rule (3).
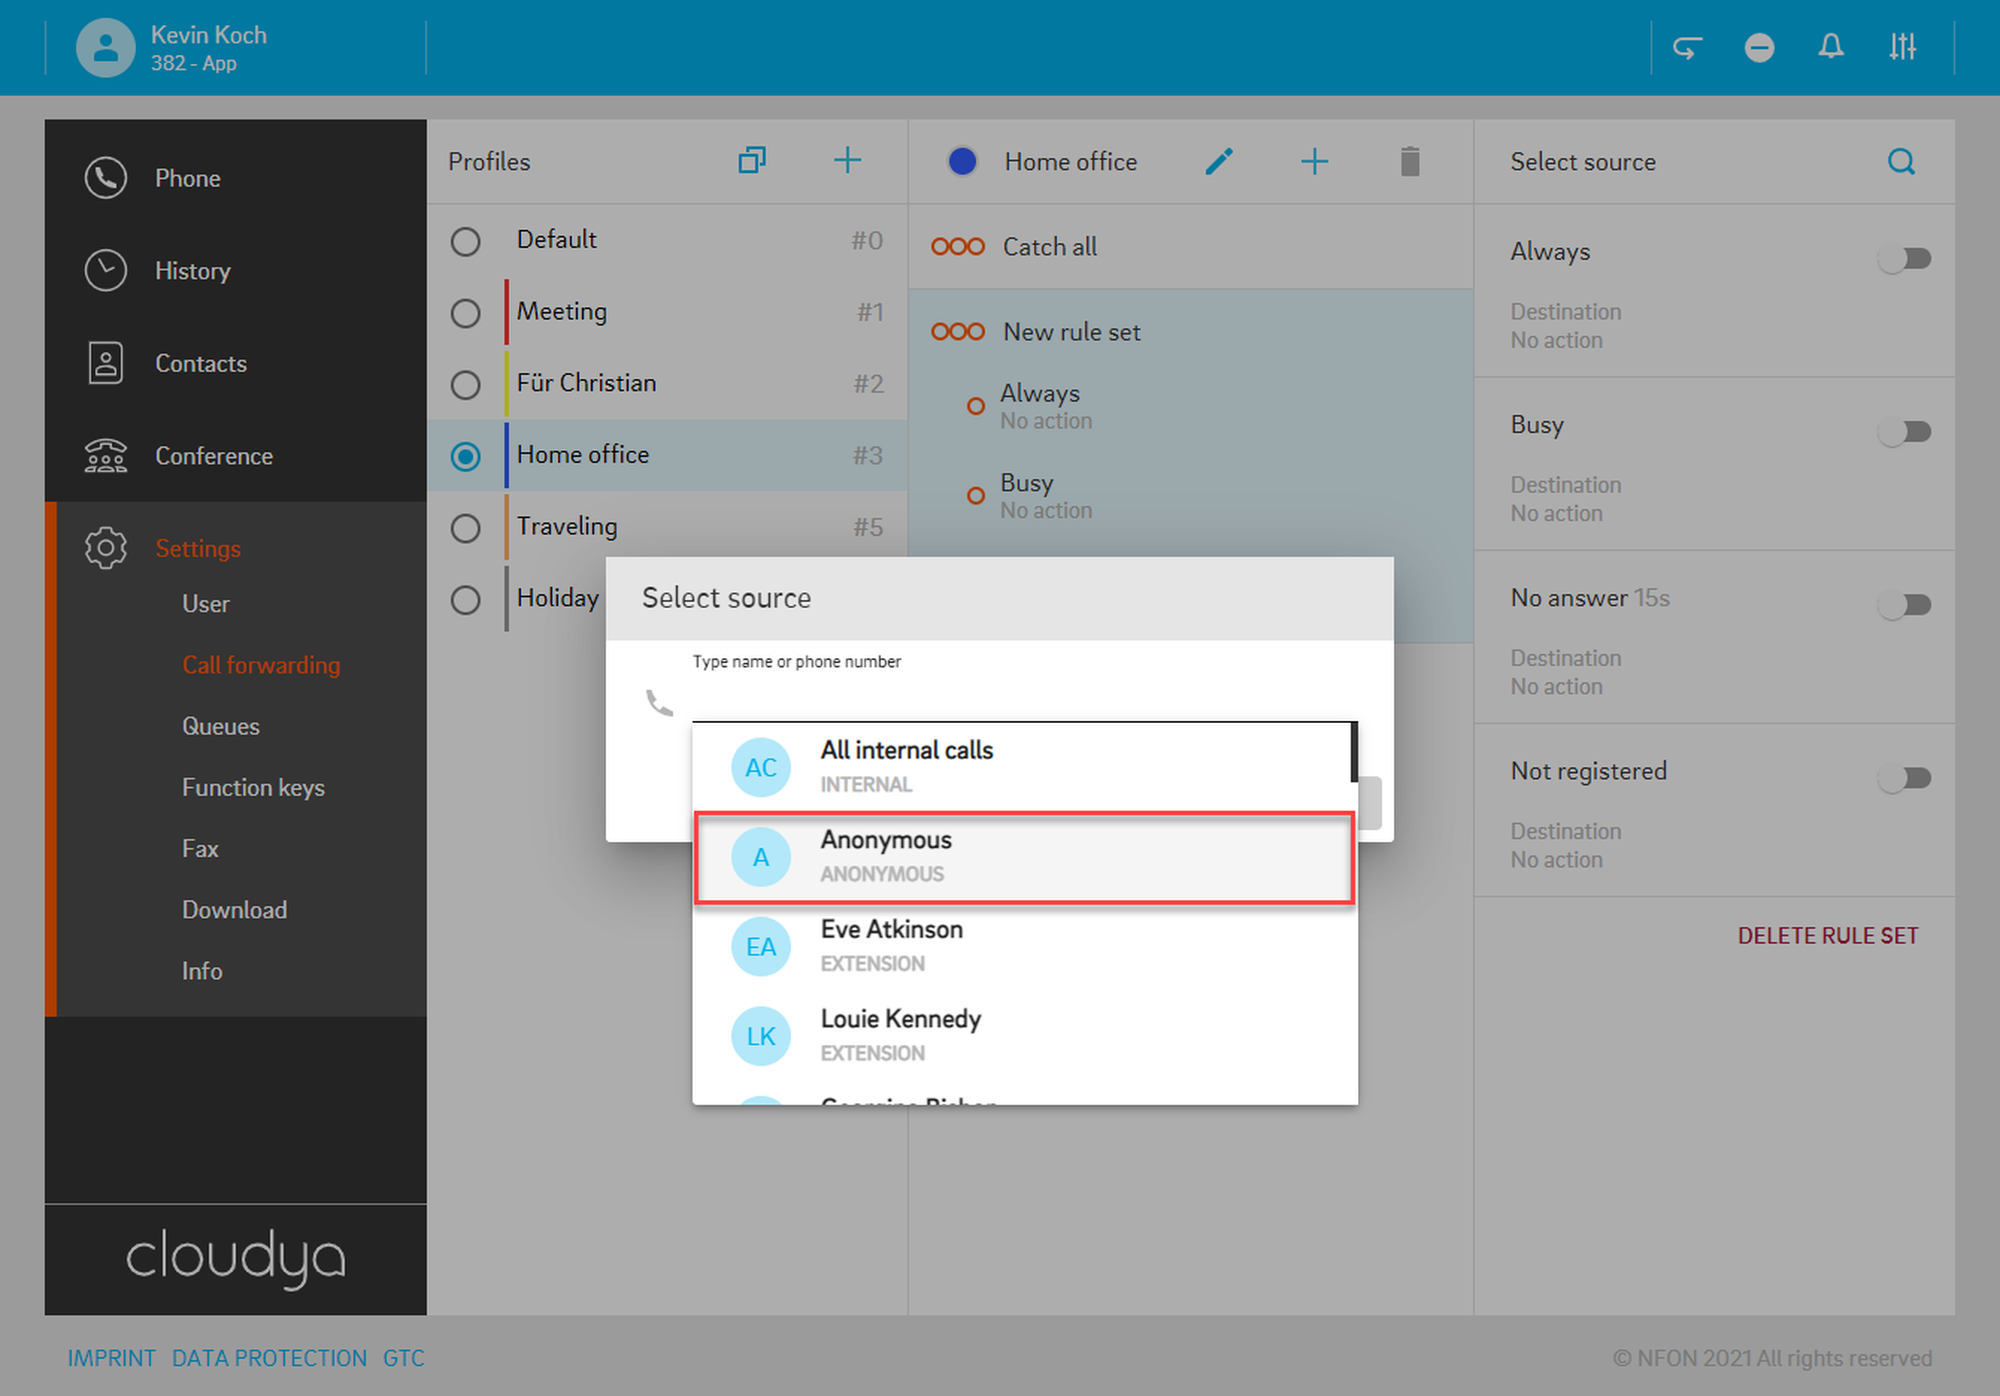
2. Click on the Type name or phone number search field. A list for selecting a number appears.
3. Select Anonymous.
4. Click on Select.
The new source-based call forwarding rule has been created.
5. Activate Always.
6. Select Voicemail.
⇒ All anonymous calls will be forwarded
to your voicemail from now on.
Creating source-based call forwarding for internal calls
For example, you are a director of a company and you do not want to constantly receive the internal calls. You would like all the internal calls to be forwarded to your PA, however, you would like your PA to be able to reach you.
To enable it:
1. Create a new call forwarding profile (1) or select an already existing customised call forwarding profile (2) and add a new source-based call forwarding rule (3).
2. Click on the Type name or phone number search field. A list for selecting a number appears.
3. Select All internal calls.
4. Click on Select.
The new source-based call forwarding rule has been created.
5. Activate Always.
6. Select Phone number.
7. Type in the extension number/name.
8. Select the extension.
9. Click on Select.
All internal calls will be forwarded to your PA from now on.
For the PA to be able to reach you:
1. Add a new source-based call forwarding rule.
2. Click on the Type name or phone number search field. A list for selecting a number appears.
3. Type in the extension number/name of your PA.
4. Select the extension.
5. Click on Select.
The new source-based call forwarding rule has been created. Your PA will be able to always reach you.
Creating prefix-based call forwarding
For example, you work in a company that has a customer company in Germany, which places a lot of calls with you. You do not speak German, therefore, you want to forward all calls from Germany to a colleague who speaks German. However, there is one person in the customer's company who you would like to be able to always reach you.
To enable it:
1. Create a new call forwarding profile (1) or select an already existing customised call forwarding profile (2) and add a new source-based call forwarding rule (3).
2. Click on the Type name or phone number search field. A list for selecting a number appears.
3. Type in the country code, +49 for Germany.
4. Select the prefix.
5. Click on Select.
The new source-based call forwarding rule has been created.
6. Activate Always.
7. Select Phone number.
8. Type in the the extension number/name to which you want to forward the calls to.
9. Select the extension from the list.
10. Click on Select.
The new source-based call forwarding rule has been created. All incoming calls from Germany will be forwarded to your German-speaking colleague.
To forward all incoming calls from a specific country and city:
1. Add a new source-based call forwarding rule.
2. Click on the Type name or phone number search field. A list for selecting a number appears.
3. Type in the country and city prefix, +4989 for Munich, Germany.
4. Select the prefix.
5. Click on Select.
The new source-based call forwarding rule has been created.
6. Activate Always.
7. Select Phone number.
8. Type in the the extension number/name to which you want to forward the calls to.
9. Select the extension from the list.
10. Click on Select.
All incoming calls from Munich, Germany will be forwarded to your German-speaking colleague.
To forward all incoming calls from a specific country, city and company:
1. Add a new source-based call forwarding rule.
2. Click on the Type name or phone number search field. A list for selecting a number appears.
3. Type in the country, city and company, +4989999998 for the company in Munich, Germany.
4. Select the prefix.
5. Click on Select.
The new source-based call forwarding rule has been created.
6. Activate Always.
7. Select Phone number.
8. Type in the the extension number/name to which you want to forward the calls to.
9. Select the extension from the list.
10. Click on Select.
All incoming calls from the customer's company in Munich, Germany will be forwarded to your German-speaking colleague.
To be able to receive calls from one colleage from the customer's company in Munich, Germany:
1. Add a new source-based call forwarding rule.
2. Click on the Type name or phone number search field. A list for selecting a number appears.
3. Type in the country, city, company and the DDI, +4989999998101 for the company in Munich, Germany.
4. Select the prefix.
5. Click on Select.
The new source-based call forwarding rule has been created. The selected person in the customer's company in Munich, Germany will always be able to reach you.
5.2 Star codes (DTMF)
Star codes are a convenient means for activating call forwarding profiles or aplying rules and forwarding destinations to the default profile.
Activating a call forwarding profile
The star code for activating a call forwarding profile is *10, followed by the profile number of the required call forwarding profile.
For example, to activate profile number #3, dial *103.
Applying a call forwarding rule and destination
By using star codes, you can also activate dedicated call forwarding rules, such as "call forward always" and apply a destination for this rule. However, a rule applied via star codes will only affect the default profile, and by applying the rule, you will automatically activate the default profile. To change the rules of a call forwarding profile other than the default profile, you have to use the Web app / Desktop app.
The code for activating the rule "call foward always" is *11+destination. The destination can either be a telephone number (TN) or an extension number (EN). A telephone number is added in the international format, e.g. *110049892343123. An extension number is simply added as such. For example, *1133 would activate "call forward always" to extension 33.
By using the *11 star code + phone number, you can add a phone number as a destination to the default call forwarding profile. By using the *11 + phone number, you will activate the default profile.
For example, you have 3 call forwarding profiles and currently, the active profile is profile #2.
Dial *110049892343123.
⇒ The default profile has been activated, and the calls are forwarded to the phone number "0049892343123".
Setting your voicemail as a destination
When you apply a call forwarding rule, instead of adding an extension or telephone number as a destination, you can add your voicemail. Therefore, add another * and number 791.
For example, if you want to forward all incoming calls to your voicemail, use the star code *11*791. *11 for the rule "call forward always" and *791 for applying your voicemail as the destination for this rule.
Star codes overview
The following overview lists all available star codes for call forwarding:
*10+n | Activate call forwarding profile n. n = number of the profile (0 to 9) |
*11+TN | Configure "call forward always" to a telephone number (TN) |
*11+EN | Configure "call forward always" to an extension number (EN) |
**11 | Cancel "call forward always" |
*12+TN | Configure "call forward on no answer" to a telephone number (TN) |
*12+EN | Configure "call forward on no answer" to an extension number (EN) |
**12 | Cancel "call forwarding if no answer" |
*13+TN | Configure "call forward on busy" to a telephone number (TN) |
*13+EN | Configure "call forward on busy" to an extension number (EN) |
**13 | Cancel "call forwarding if busy" |
*14+TN | Configure "call forward if not registered" to a telephone number (TN) |
*14+EN | Configure "call forward if not registered" to an extension number (EN) |
**14 | Cancel "call forward if not registered" |