1. Basic functions
1.1. Keys/Connections overview
Please find an overview over all keys of the respective models below.
Panasonic KX-HDV130
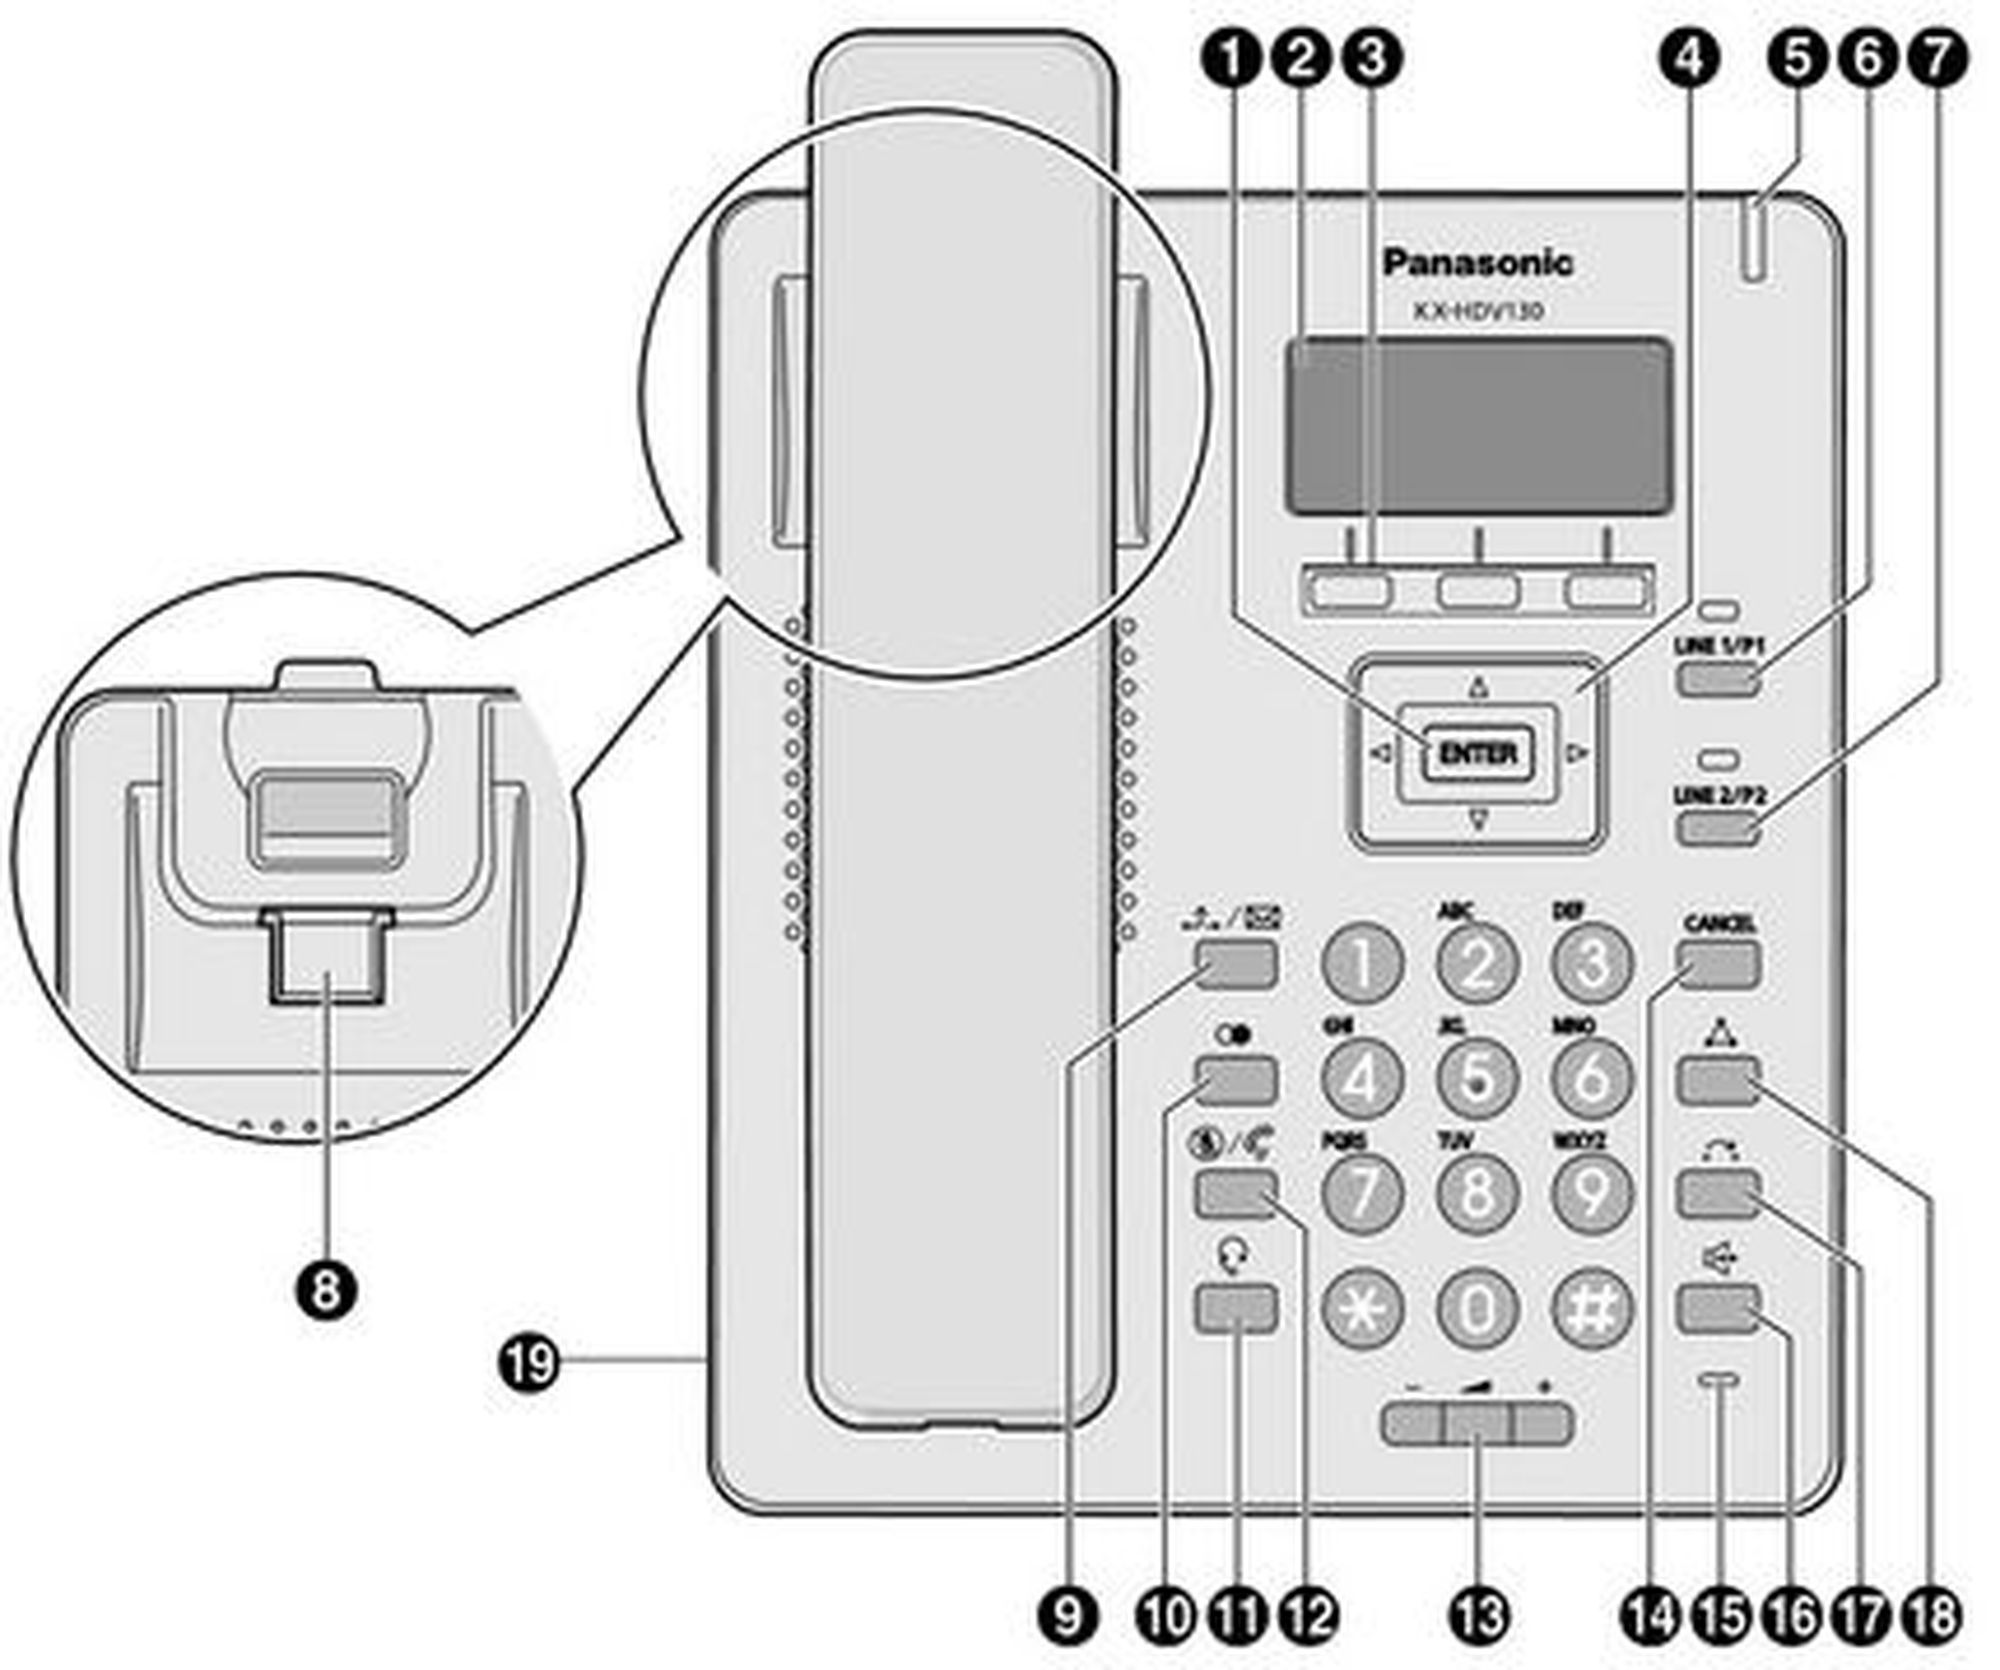
Pos. | Description | |
1 |
ENTER Used to confirm the selected item. | |
2 | LCD display | |
3 | Soft keys Used to select the item displayed on the bottom line of the display. | |
4 | Navigator key | |
5 | Ringer/Message Waiting/Missed Call Indicator | |
6 |
LINE/Program key 1 | |
7 |
, LINE/Program key 2 | |
8 | Handset hook | |
9 |
, Hold/Message | |
10 |
, Redial | |
11 |
, Headset | |
12 |
, MUTE/AUTO ANS | |
13 |
, Vol | |
14 |
, Cancel | |
15 | Microphone | |
16 |
, SP-Phone | |
17 |
, Transfer | |
18 |
, Conf | |
19 | Headset jack |





Panasonic KX-HDV230
"DSS" stands for "Direct Station Selection".
Pos. | Description | |
1 | ENTER Used to confirm the selected item. | |
2 | Main LCD display | |
3 | Soft keys Used to select the item displayed on the bottom line of the display. | |
4 | Navigator key | |
5 | CANCEL | |
6 | Ringer/Message Waiting/Missed Call Indicator | |
7 | Program keys | |
8 | Handset hook | |
9 | Headset jack | |
10 |
MESSAGE | |
11 |
Redial | |
12 |
Headset | |
13 |
MUTE/AUTO ANS | |
14 |
Vol | |
15 |
Hold | |
16 | Microphone | |
17 |
SP-Phone | |
18 |
Transfer | |
19 |
Conf | |
20 | Page key | |
21 | Self-labeling LCD | |
22 | DSS* keys | |
23 | DSS* page key |


Panasonic KX-HDV330/KX-HDV340
"DSS" stands for "Direct Station Selection".
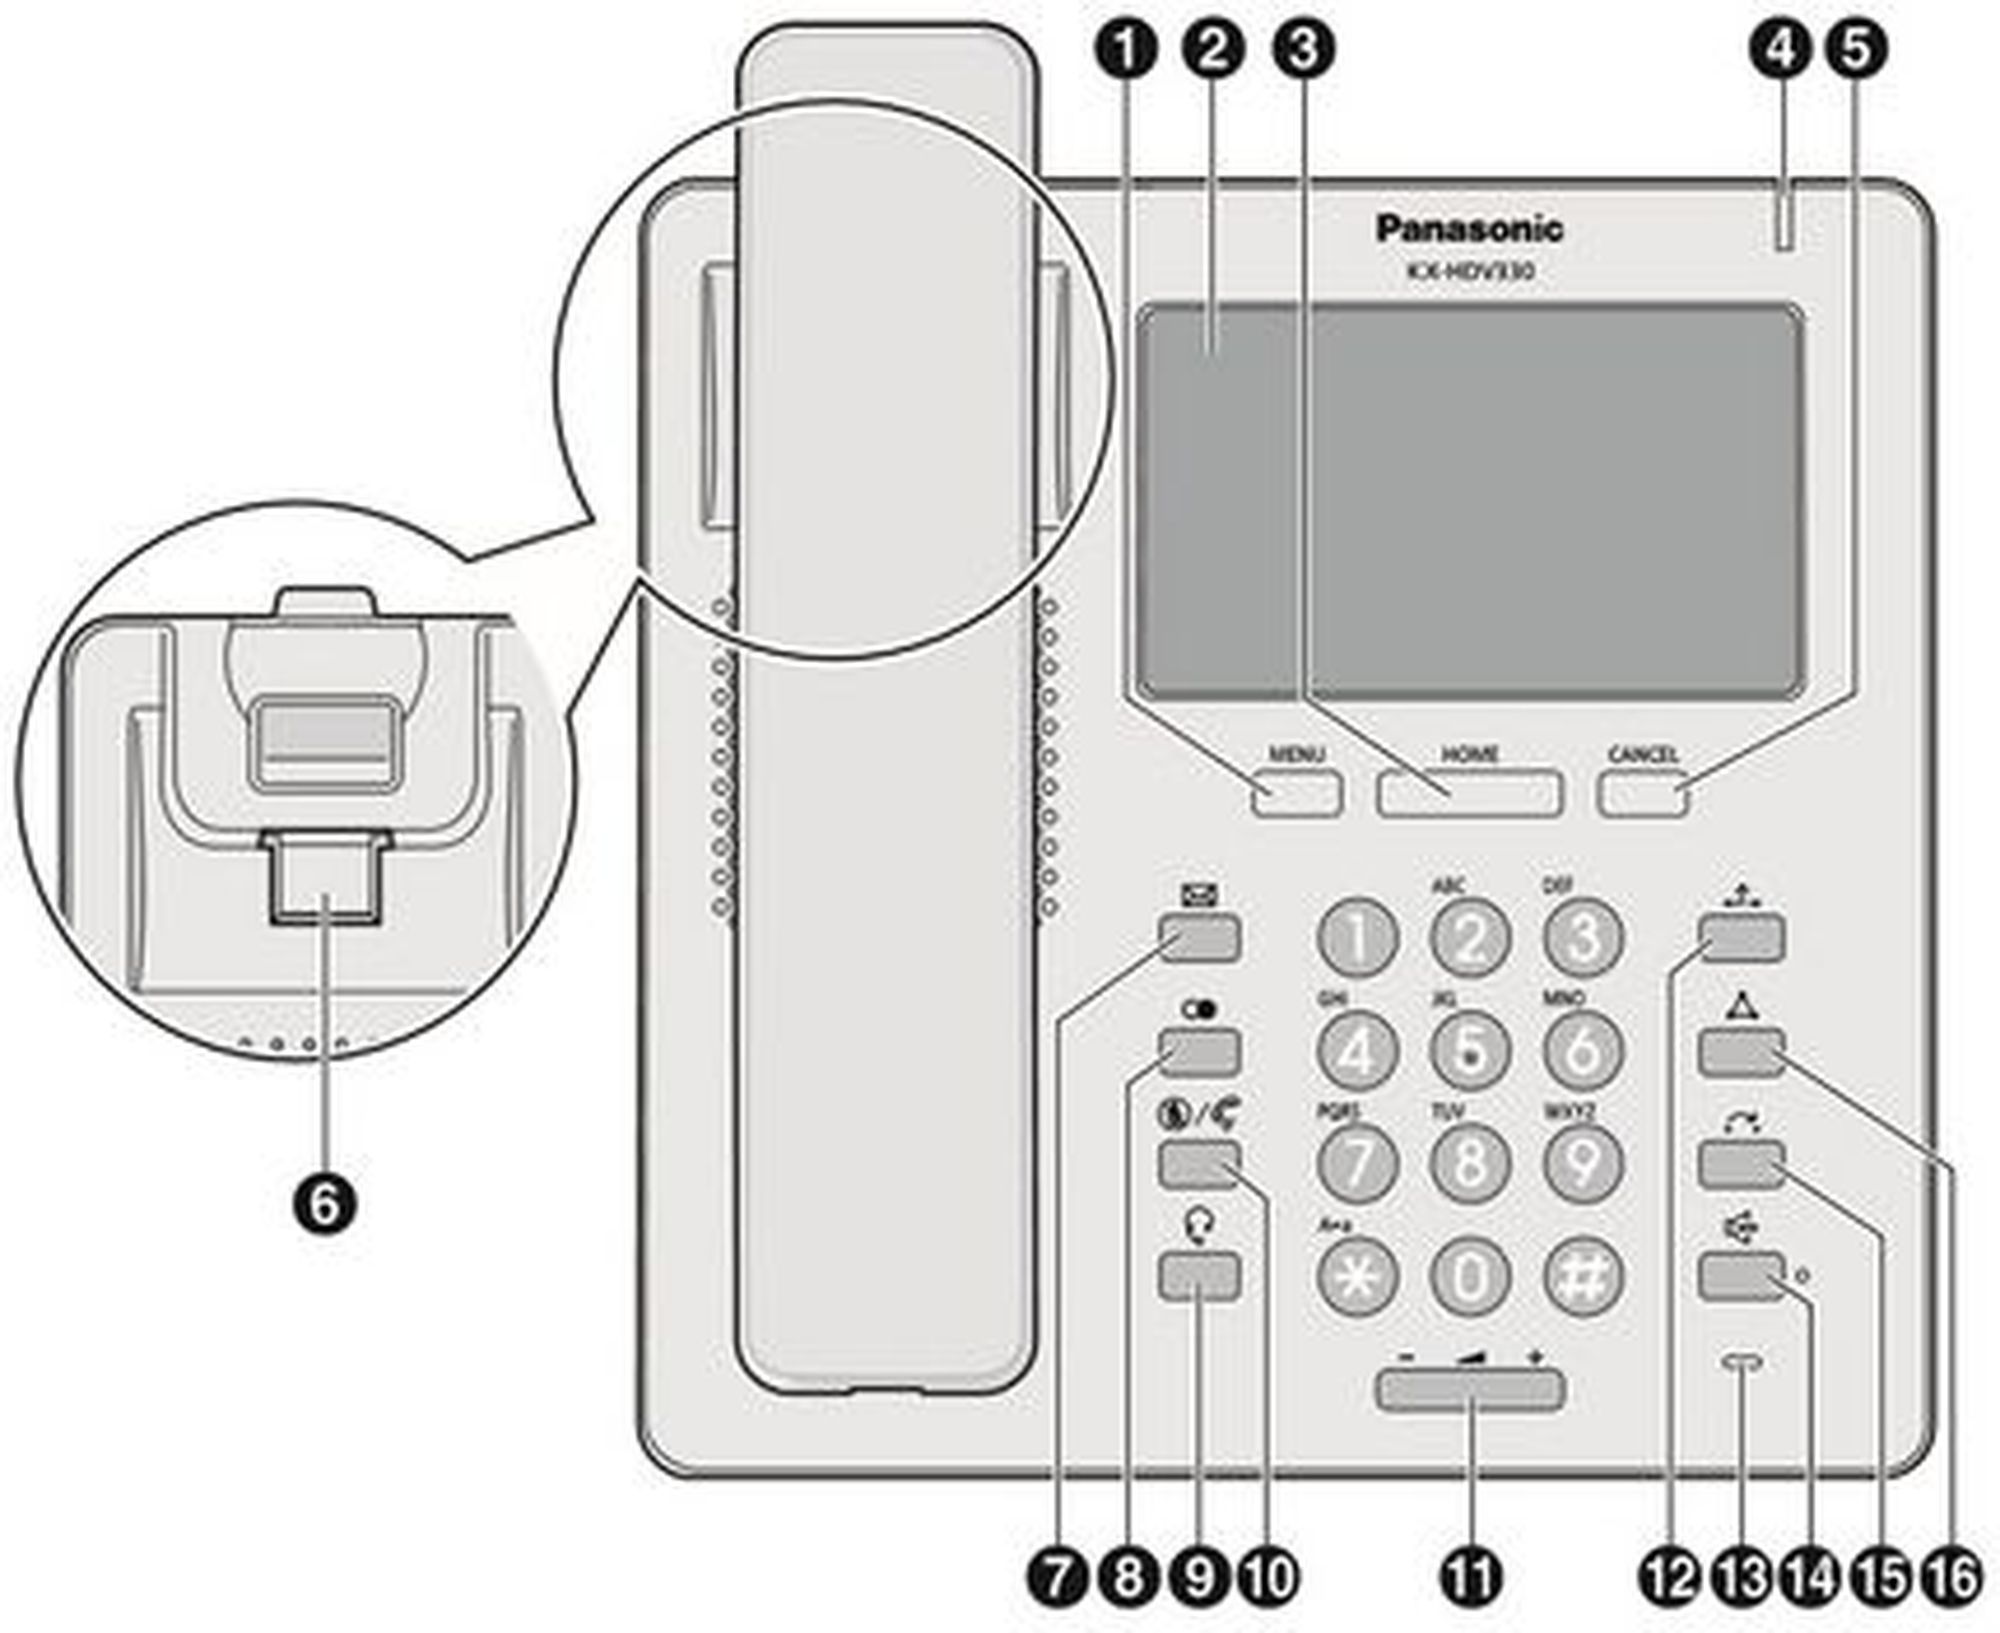
Pos. | Description | |
1 | MENU Displays the menu. Then content of the menu differ depending on the settings and mode. | |
2 | Touch display | |
3 |
Home | |
4 | Ringer/MEssage Waiting/Missed Call Indicator | |
5 |
Cancel | |
6 | Handset hook | |
7 |
Message | |
8 |
Redial | |
9 |
Headset | |
10 |
MUTE/AUTO ANS | |
11 |
Vol | |
12 |
Hold | |
13 | Microphone | |
14 |
SP-Phone | |
15 |
Transfer | |
16 |
Conf | |
17 | Self-labeling LCD | |
18 | DSS* keys | |
19 | DSS* page key |


Note
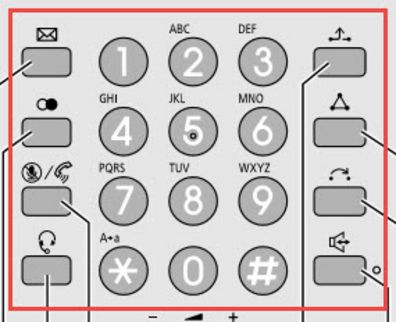
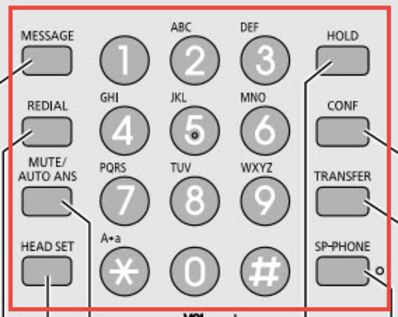
Please note that the phone key labels differ based on country. Please find two available models below.
Two available models of the KX-HDV line
1.2. Placing calls
There are various methods for placing a call
With the receiver
Pick up the receiver, enter the number and press [ENTER] to confirm the telephone number.
or enter the desired telephone number and pick up the receiver.
With the speaker / microphone
Enter the telephone number and press
 .
.
Calling a number from the call list
Press the softkey
 and select [Call list] and confirm with [ENTER].
This displays the telephone numbers for the last missed, incoming and outgoing telephone numbers. Select the respective telephone number using
 .
.Select the respective telephone number and press [ENTER] to place the call.
Calling a number from the phonebook
Press the softkey
 to access the phone book.
Use the arrow keys to select the respective name. Alternatively, you can also use the Search softkey to enter an initial (or additional letter) and confirm with the Enter softkey, which displays a list of search results.
Select the respective phone book entry and press [ENTER] to place the call.
Dialing the number via function keys
Press the respective function keys on your telephone to place a call.
Refer to “2.2. Function keys” for options to program function keys.
Refer to the administration portal manual for instructions on configuring the function keys for your extension.
1.3. Incoming call
There are various options for answering a call:
Using the receiver
Pick up the receiver.
With the speaker / microphone
Press the key.
1.4. Missed calls
The telephone display indicates missed calls (e.g.: “Missed calls: 001”).
To view missed calls press the softkey and select [Missed call], then confirm with [ENTER]. Now, you can see a list of missed calls. Use to select the respective call.
1.5. Call pick-up
If the function keys (speed dial, busy field lamps (BFL), etc.) have been configured through the administration portal and all parties are members of a pick-up group, you can pick up the call from another extension.
(For details on configuring the busy field lamps (BFL), please refer to the administration portal manual)
A flashing LED on the respective function keys indicates an incoming call (only for busy field lamps (BFL)).
- Simply press the function key to pick up the call.
⇒ You have now picked up the call.
If the monitored extension (busy field lamp (BFL)) is busy, the LED for the respective function key is consistently red.
1.6. Hold
Hold a call
- During an active call press the  key.
key.
⇒ The active call is now placed on “Hold”.
Returning to a call on hold
- Press the key again. The call is now active again.
⇒ The call is now active again.
1.7. Call waiting/Toggle calls
You have an active call. The call waiting tone indicates a second call is coming in. At the same time, the signal lights up green (see right).
- Press the  key to accept the call.
- You can now toggle the calls by directly pressing the key. The active call is shown in the telephone display.
To end a call, simply hang up the receiver during the active call.
1.8. Conference calls/Toggle calls
Your Panasonic system telephone allows you to place a 3-way call.
- Call party 1.
- Once party 1 has been reached, press the ** **key. The active call is now placed on “Hold”.
- Now call party 2 and wait until party 2 has been reached.
- Now press the key to activate the 3-way call. The display now indicates Conference.
Removing a party from a conference call / toggling
- Press during a conference call.
⇒ Party 2 is placed on hold but you may continue speaking with party 1.
- To switch between the two parties (toggle), press the key.
- To end one of the calls, simply hang up while the call with this party is active.
⇒ The party is now disconnected.
- Press the key. You can now continue the call with party 2.
Note
A conference call with more than 3 parties can easily be set up on the administration portal: Please refer to the administration portal manual.
Toggle refers to switching between 2 different telephone calls. Toggle places one of the parties on hold and they then hear the telephone system’s hold music while you continue speaking to the other party.
1.9. Attended call transfer
In order to perform an attended call transfer follow the steps below:
- During an active call press the [Transfer/  ] key.
- Now dial the party to whom you would like to transfer the call.
- To do so, enter the party’s telephone number and press [ENTER] to confirm.
- Wait for the other party to answer, then announce the call. If necessary, this step can also be omitted.
- Press the softkey  .
.
In case the other party declines the call ot does not answer, double press [CANCEL] to get back to your caller.
1.10. Unattended call transfer
In order to perform an unattended call transfer follow the steps below:
- During an active call press the BLIND softkey.
- Now dial the party to which you would like to transfer the call.
- To do so, enter the party’s telephone number and press [ENTER] to confirm.
- Hang up the receiver.
1.11. Call forwarding
1.12. Callback
The Completion of Calls on No Reply (CCNR) creates a callback in case a person cannot be reached (e.g. the person is not on its desk or busy) at the moment.
Note
To use this function, the CCNR function has to be enabled in the administration portal and in the phone extension. Click on the CCNR check box under Administration / Profile to activate the function.
Activate a callback
A caller generates automatic connection establishment within the private branch exchange (PBX) to a previously busy party (only internally). If the the other party cannot be reached, the caller can use the callback function.
-In order to activate the function, insert *5 into your key pad. An accoustic confirmation will finalize the activation.
-As soon as the other party is available again, your end device receives a callback generated by the PBX. As soon as you answer the callback, the PBX sends out a call to the number you tried to reach initially.
Erase Callbacks
- If the callback is no longer needed, all call backs can be erased by entering the **5 code into the key pad. An acoustic confirmation finalises the erase.