3. Targets
3.1. Phone extension
Definition phone extension:
An extension is always the internal number, i.e. you reach participants and services within the company without dialing a “0” first. This internal number is completely independent of the direct dial (external number). Extensions could be also defined without a direct dial (just internal extension) or with a different direct dial for an external caller.
How to edit a Phone Extension?
Example:
You want to create an extension, which is accessible internally under the number 111, externally by calling +49 123 456789-111 and the phone number +49 123 456789-112. Furthermore, this extension will also have a desk phone as a device. If the extension isn’t available within 30 seconds, the caller will be forwarded to the voicemail of the extension.
Instructions:
First, name the extension. Usually the extension name corresponds to the employee's name (example: John Doe).
Second, assign an extension number. The employee can now be reached at this extension number within the company. If you have only one trunk line, then a direct dial (external number) is created automatically. If you have multiple trunks, you need to choose a "Preferred Outbound Trunk" in the "Configuration". Afterwards, the direct dial will be created automatically. Then your extension is externally accessible at the direct dial +49 123 456789-111. Insert +49 123 456789-112 in the dialog window "Inbound Numbers" to ensure that your extension is also externally accessible at this number. You also have the option to be available only via the second number.
Finally, select a device. You see a drop-down list with all available devices (the MAC addresses of the devices are shown). The device that you select is immediately accessible at the extension.
Furthermore, you can also configure the settings such as Voicemail, function keys (BLF), call forwarding, etc. Activate your voicemail and upload your personal announcements, set a parallel ring, if desired, or configure the function keys (BLF) on your desk phone (snom).
Configuration:
Click on Targets in the navigation area. In the main window you can add a new phone extension by clicking the ADD symbol and select phone extension, or double click on an existing phone extension element to change this entry.
You can also define a skill group and skill level in the configuration part of an extension.
A new window with "phone extension" with several sections is shown.
Section | Picture | |
Name and extension |
| |
Referenced by |
| |
Inbound numbers |
| |
Phone devices |
| |
Voicemail |
| |
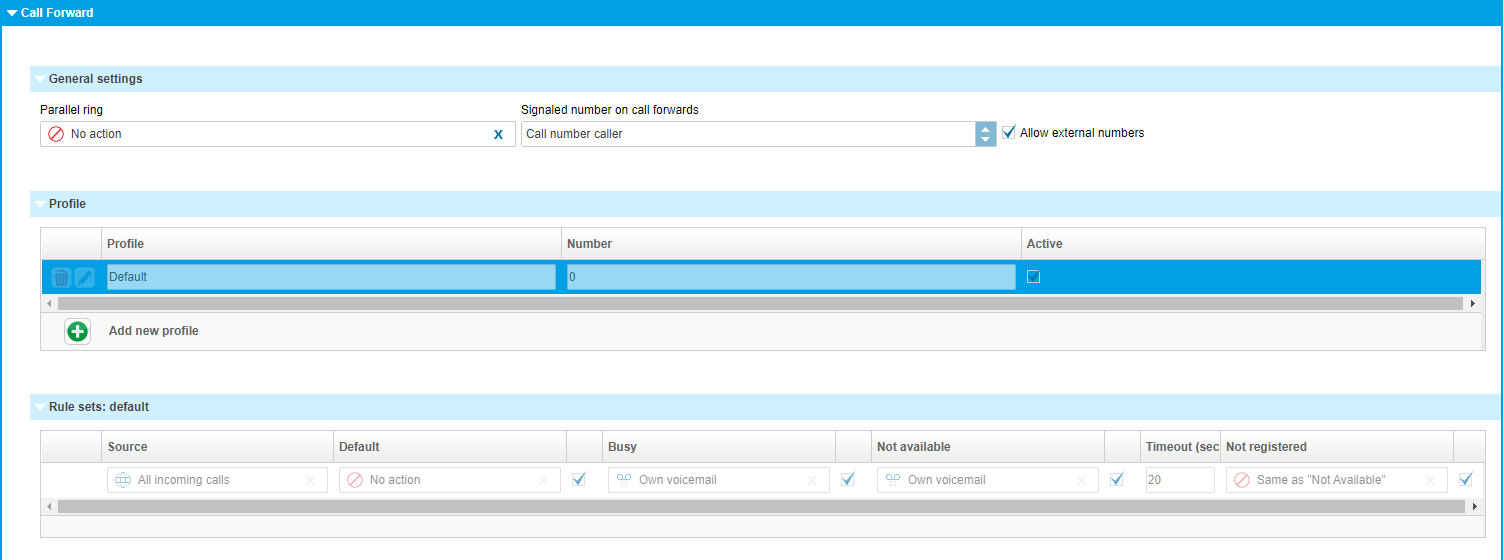
Call forward |
| |
Geographical settings |
| |
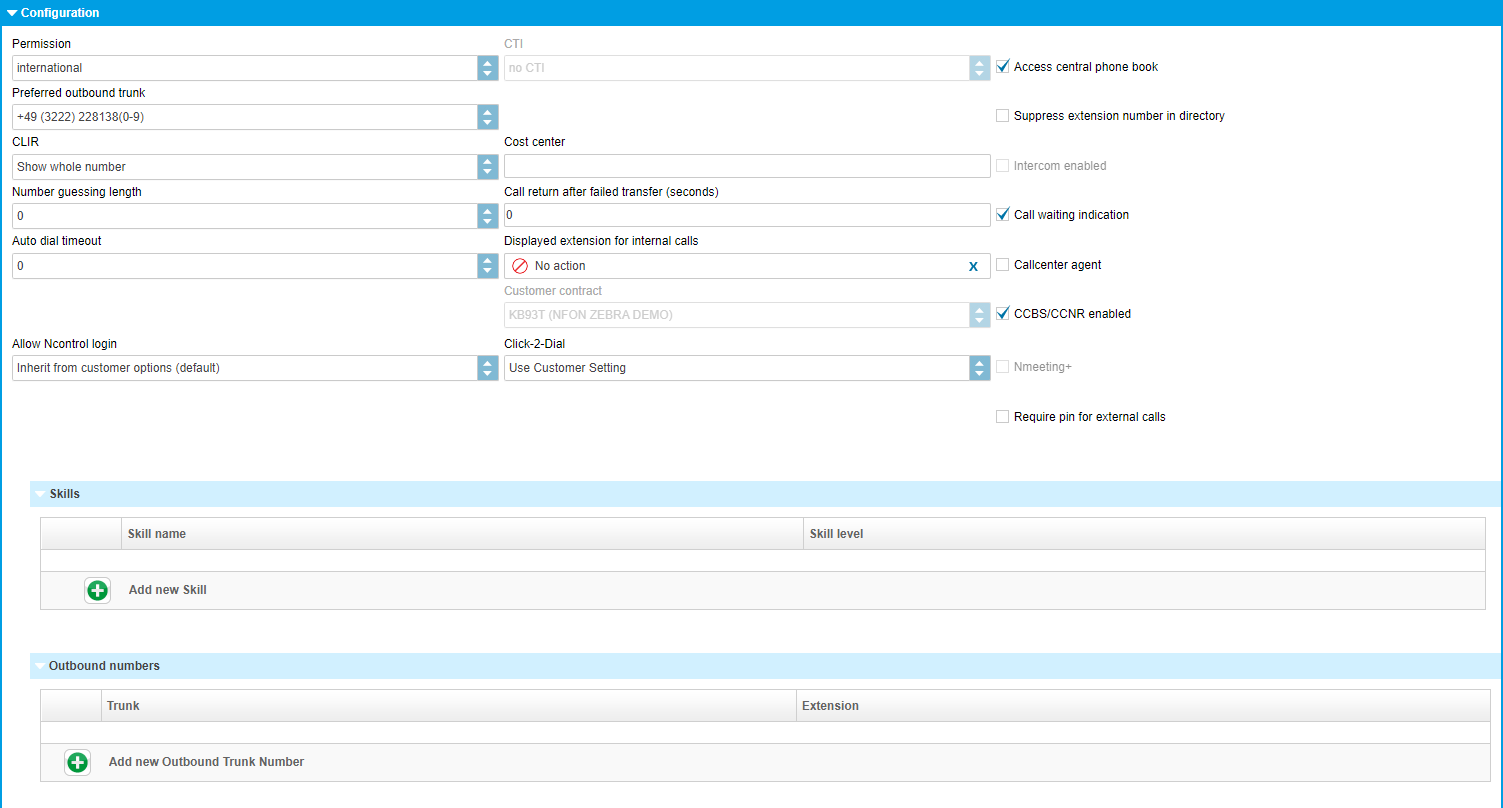
Configuration |
| |
Function keys |
|







3.1.1. Name and extension
 |
Fieldname | Description |
Name | Please assign a concise name to your extension (for example, John Doe). |
Extension (internal number) | Enter the extension number. |
3.1.2. Referenced by
This feature allows the user to see where his extension has been referenced.
 |
Field name | Description |
Name | The name of the service that references your extension. |
Type | The type of service that references your extension, e.g. an extension, a conference service, a queue service, etc. |
Description | Here you can see how your extension is being referenced, e.g. what function key referenced your extension. |
Tip
Note that the "Referenced by" feature is only described in detail in this chapter. It appears in all the following chapters, e.g. Conference Service, Time Control Service, Queue Service etc. Since the fields of the "Referenced by" feature are identical in every section, the description is only given once.
3.1.3. Inbound numbers
Assignment of DID.
 |
Fieldname | Description |
Base number | The direct dial number is automatically assigned according to your extension, once a main outside line has been selected. However, you can also assign multiple direct dial numbers. Simply click on “Add” button and define a new, additional direct dial number. |
Extension | Assign extension Exception: If you have only one direct dial number, then it is not necessary to assign it. |
Assign a direct dial number
1. Push the Add-Button to "Add new Inbound Trunk Number".
2. Select "your" dial number and extension.
3. Confirm your input by pushing the Confirm-Button .
Change the direct dial number
1. Select the entry which should be changed.
2. Push the Change-Button .
3. Change the direkt dial number or the extension number.
4. Confirm your input by pushing the Confirm-Button .
Deleting a direct dial number
1. Select the entry you want to delete.
2. Push the Delete-Button .
Icons | Function | |
| Add button. | |
| Delete button. | |
| Edit button. | |
| Confirm button, saves changes. | |
| Cancel button. | |
| Close selection. |


3.1.4. Skype for Business
Here you will find an overview over the Skype for Business settings. Please find more information about Skype for Business in this manual.
 |
The settings in this field can only be modified by our support team. For this reason the field "Add new Skype for Business configuration" is grey.
Fieldname | Description |
Inbound Trunk Number | Here you can see the DDI that has been defined during configuration. After the configuration has been complete, the settings can be modified only by our support team. |
Skype for Business domain | Here you can see the domain that has been defined during configuration. After the configuration has been complete, the settings can be modified only by our support team. |
3.1.5. Phone devices
Assignment phone device to an extension.
 |
Fieldname | Description |
Device-ID | Contains a list of all available devices. The devices shown are the MAC addresses for the telephones. Please select an device for your extension. |
Site | Define the site whre you use your phone device. (This is very important for Emergency calls). |
Device name | Name of the phone device, e.g. snom320. |
Device type | Type of the phone device, e.g. standard-phone. |
Primary device |
The phone devices are either configured under Elements/Devices or your provider has them pre-configured.
Assign phone device
Push the Add-button to "Add new Device".
Select from the free-device-list, "your" device for this extension.
Confirm your selection with the Confirm-button .
Change phone device
Select the device you want to change.
Push the Change-button .
Select a new device.
Confirm your selection with the Confirm-button .
Delete phone device
Select the device you want to delete.
Push the Delete-button .
Icons | Function | |
| Add button. | |
| Delete button. | |
| Edit button. | |
| Confirm button. | |
| Cancel button. |
3.1.6. Voicemail
Assign a voice mail function to an extension.
 |
Fieldname | Description |
Password | Specify a password for your voice mail. You need it to access voice mail from outside or directly from your desk telephone. |
Say CID | CID stands for Caller ID. That is, when retrieving a voice mail, the caller’s telephone number is announced. |
Say date/time | Specify whether or not to announce the date and time of the voice mail when retrieving your voice mail. |
Email address, where a copy of the voice mail will be sent to. | |
Send email | Confirmation, that copy have to be sent. |
nfon News accepted | Shall nfon News be send to email address. |
Delete after send | Set the voice mail to be deleted after being emailed. |
Temporary | Upload announcement file for temporary announcements. |
Busy | Upload announcement file if busy. |
Unavailable | Upload announcement file if not available. |
Name | Upload announcement file for name announcements. |
Temporary:
If you add an announcement, it overrules all other announcements and it is directly active. Usefull for absence announcements etc.
Busy:
Announcement, if extension is busy.
Unavailable:
This announcement is played, if you have set in "Call forward (next section)" the field "Not available" to "Own voicemail".
Name:
This announcement is played before your standard voicemail announcement if you have not defined another announcement.
Just click on the ADD-button to upload an anouncement.
A new window is opened. You can search "your" announcement file. Play the selected announcement by pushing the Play-button .
Note
You can upload the following announcement formats:
MP3
WAV
Icons | Function | |
| Add | |
| Delete selected item | |
| Play announcement | |
| Activate selection |


3.1.7. Call forwarding
Here you can define, manage and edit call forwardings.
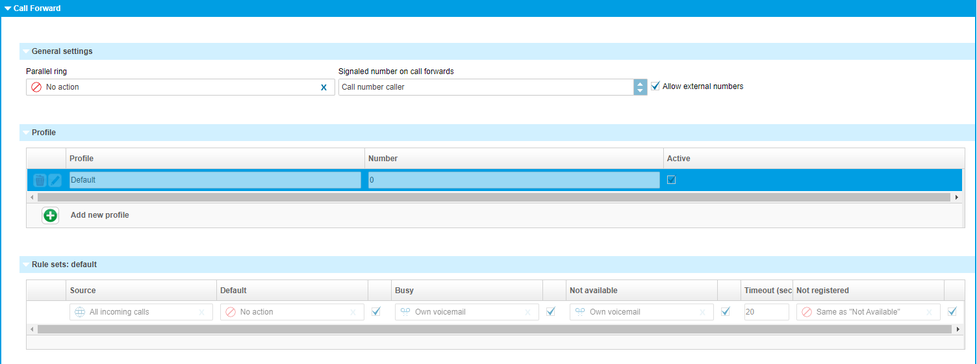 |
Note
Make sure to deactivate the option "call waiting indication" in the extension to be able to carry out the call forwarding when busy. If the option "call waiting indication" is active, the "busy" mode is not available.
Field name | Description |
Parallel ringing | Enter any additional number to which the call can also be forwarded to. This is usually your mobile phone. In this case, the system telephone and the mobile phone both ring and you can then choose which phone to answer. If, for example, the call is answered with the mobile phone, it can no longer be answered with the PBX phone. |
Signalised number on call forwards | Define the telephone number which will be shown to the target recipient. The following options are available: a) Show the caller’s telephone number b) Show the the callee’s telephone number c) Show the telephone number of the forwarding extension. |
Allow external numbers | Here, you can determine whether or not this specific extension is permitted to configure call forwarding to outside telephone numbers. However, you can also specify globally for all extensions whether or not external telephone number are permitted. This can be done in the menu item Administration 5.1 Profile. |
Profile | Profile refers to the call forwarding profile. Create a new call forwarding profile or edit existing call forwarding profiles. Up to 10 call forwarding profiles are available per extension. One of the profiles is the default call forwarding profile, which is automatically available on each extension.The other 9 call forwarding profiles can be freely defined by the user. |
Rule set | Define a rule set for a call forwarding profile. Four call forwarding conditions are available in a rule set. Here you can define what should happen with an incoming call. |
Source | Source of the incoming call, e.g. all calls (catch all). |
Default | Call forwarding condition: destination for unconditional call forwarding. A call is always forwarded to the number defined here. |
Busy | Call forwarding condition. Here you define to which destination the call will be forwarded to, e.g. a different phone number or voice mail, if your extension is busy. |
Not available | Call forwarding condition: You do not answer the incoming call within a defined time period (timeout). The timeout can be set to 5, 10, 15 or 20 seconds. Here you determine where the incoming call will be forwarded after the specified time has elapsed. The caller receives a call waiting signal and is then forwarded to the defined destination. |
Timeout (seconds) | Timeout for the extension, i.e. after how many seconds the caller will be forwarded accordingly. The timeout applies to call forwarding in case of no answer. |
Not registered | Call forwarding condition: Your device is not registered on the telephone system (e.g. broken cable etc.). All incoming calls will be forwarded to a defined destination. The caller will then be forwarded directly to the defined destination. |
Parallel ringing
Usually, you assign here your mobile telephone number. In case, you have a ssigned your mobile telephone number, the extension AND on the mobile device will ring. You can now choose what device you prefer to take the call on. If you select your mobile device, then it is not possible to redirect the call to your extension.
Note
If a call forward is set to an external number, e.g. a mobile device, a dial prefix has to be added. Example: 0 0049 171 xxxxx.
Icons | Function | |
| No action. | |
| Voicemail. | |
| Close selection. | |
| Activate selection. | |
| Select, all possibilities are shown. |


3.1.8. Geographical settings
 |
Fieldname | Description |
Language | Here you define the language for your device, all settings, e.g. phone menu, language of the voicebox and so on, are set to this language. |
Dial prefix | Default is the prefix of your site, you can select for this device if the prefix is 0 or 9. It has no influence on the site settings! |
Use TPS | Here you can activate or deactivate the TPS service by clicking on the box. |
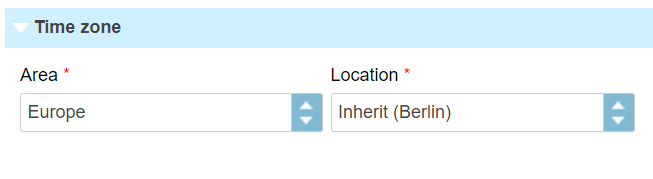
Time zone | Here you can define your time zone. Select the area and the location. |
TPS (Telephone Preference Service) is a service available in UK.
TPS currently contains more than 20.5 million phone numbers. As part of a regulatory requirement, it is compulsory to match outbound dial attempts to this list. If the dialed number matches an entry in the list, the calling person must be informed that the number dialed is in the TPS. The dialing person may override the warning and then still place the call.
How can TPS be activated:
- Click on the box "Use TPS".
Once the feature is enabled for the specific extension and this extension is placing a call, the external number will be matched with the TPS database.
The caller will be warned via a voice prompt that the callee has subscribed at the TPS, if the number matches with the database.
The dialling party has the option to overrule the call by pressing the DTMF key 1 (as stated in the announcement). If the dialling party does not press the overruling key, then the call will be terminated.
Note
The TPS service is availble in UK only!
3.1.9. Configuration
Extension configuration.
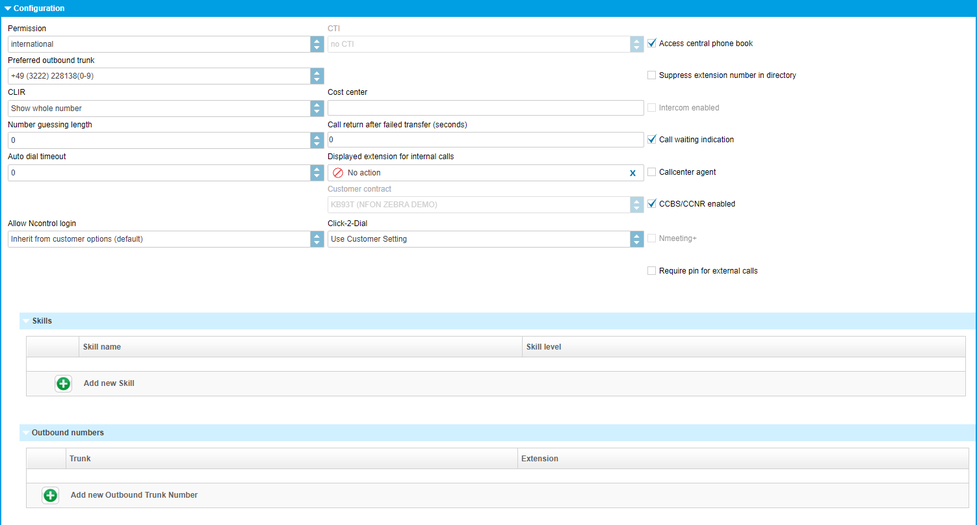 |
Fieldname | Description |
Permission | Specify direct outward dialing for the extension. I.e., this extension can make: internal, local, national, international or international free (contact support to enable this option) outgoing calls.* |
CTI | Define, which CTI is used by this extension. |
Language | Select your extension's language. |
Access central phone book | Specify if this extension is permitted to access the main phone book. |
Preferred outbound trunk | Select your preferential outside line for outgoing calls. I.e., which outside line would you like to use to phone “out”. This outside line is then also displayed to the other party. Note: You also have the option of indicating a different main number for outside calls other than the one specified here, by first dialling # + line number (see 6. DID). |
When recording | When do you want to record. To allow this, it has to be set for the complete site! If you have set this "on demand", then you can activate or deactivate it with "*+1". The informations "who will be informed" and in what kind of format (MP3 or Wav) is set in Administration/Profil. The recorded file is then sent to the email-address, set for this extension. |
Suppress extension in phone book | Specify if your extension should be visible in the main phone book. |
CLIR | Here you decide, how your extension number is shown extern. Show the complete telephone number or only the main number (outside line, e.g. +49 89 1234-0) or no telephone number at all (block caller ID). If you select show Pilot then the main number is shown without 0 8e.g. +49 89 1234) |
Cost center | Specify a cost centre number for the respective extension. This cost centre is listed in the itemised statement. |
Intercom enabled | Intercom activation. |
Number guessing length | Specify after how many characters entered on the end device a telephone number should be suggested. The suggested telephone numbers are based on the saved call history. |
Caller return after failed transfer (seconds) | Specify after how many seconds a call should automatically be transferred back. if a transfer (unattended) fails. That is, if e.g. the other party is not available or busy. (0 – 25 seconds) |
Call waiting indication | Specify if “call waiting” is allowed for this extension. When this function is deactivated, the caller is sent to voicemail (…if busy). |
Auto dial timeout | Specify how many seconds after entering the telephone number a call should automatically be initiated. |
Displayed extension for internal calls | Specify which extension number to display for internal calls with colleagues. For example, your extension is 111, but for internal calls you wish to display your assistant's extension 112. |
Callcenter agent | Specify if this extension is a call center agent. This information is only relevant when using call center monitoring. |
Customer contract | In case you own multiple contracts, select your contract here. The option is only available for customers with multiple contracts. |
CCBS/CCNR | CCBS = Completion of Calls to Busy Subscriber CCNR = Completion of Calls on No Reply |
Allow Ncontrol login | Has this extension the right to log in to Ncontrol? By default all new customers can log into Ncontrol. |
Click-2-Dial | Can this extension use Click-2-Dial? |
Nmeeting+ | You can see here, whether the Nmeeting+ client is used and how it is billed. (flatrate / units). |
Voice Recording Profile | Here you can choose a voice recording profile. By default, calls are not recorded. If you need that feature, please choose a recording profile. |
Require PIN for external calls | You need to enter a PIN (your voicemail PIN) in order to make external calls. In case the PIN will not be entered, the external call will not be carried out. |
Skill Options | Here you define for which skill group amd what skill level this extension will work. |
Skill-Set: Login/Logout | Here you activate and/or deactivate this extension for all his skill-groups. When the button is green, the extension is logged off. Click the button to activate the extension. If the button is red, the extension is logged on. Click the button to deactivate the extension. |
Outbound numbers | Here, only exceptions to the rule are defined. Furthermore, this setting only applies if “Show complete telephone number” is selected under display telephone number. If for example your direct dial number is 111 but you wish to show direct dial number 112 for outgoing calls, you can configure that here. You can define modifications for each outside line. Simply click on the Add-button and select an outside line and enter the direct dial number you wish to show for outgoing calls. |
*What is the difference between 'international' and 'international free'?
‘International’ - If the next 2 digits after the external line prefix are 00, then it’s an international call. Blacklisted prefixes are still blocked.
‘International free’ – There is a blacklist of 1331 prefixes that are considered very high cost or high risk destinations. International free is the only option that bypasses this list.
Intercom
On the one hand, this function allows you to monitor other parties’ extensions on your system and on the other hand, accept their calls or forward calls to them. When a call comes in to a monitored extension, the respective LED flashes - you can now answer the call by pressing the key (please note that this function only works if the administrator of your telephone system has added you to a mutual "Pick-Up Group" with the extensions being monitored). When the monitored extension is on a call, its LED remains lit. If your phone is ringing and you wish to ignore the call and send it to another extension, press the function key assigned to this extension - the call is then forwarded to it. However, in addition to the above functions, the main idea behind this "Intercom" function is being able to speak directly to the extension assigned to the respective function key (type:intercom) by pressing the function key (intercom). However, "Intercom" must be activated on the other party’s telephone for this purpose. Intercom refers to a conventional intercom system (similar to walkie-talkies), directly connecting you to the other party’s speaker by pressing the assigned function key.
Call waiting
Call waiting means that if you are on a call and a new caller tries to reach you, a subtle waiting tone informs you that someone else is trying to reach you. You can then decide whether or not you wish to answer the call (although you are already on a call). The voicemail function "Call forwarding if busy" does not work if “Call waiting" is activated!
If this function is deactivated and a person tries to reach you while you are on a call, the caller is forwarded to voicemail (…if busy).
Icons | Function | |
| Add | |
| Delete selected item | |
| Scroll | |
| Save selection | |
| Close without saving | |
| Close selection |

3.1.10. Function keys
Assignment of the function keys.
 |
Fieldname | Description |
# | Enter the keypad number you wish to assign. The function key sequence on your desk telephone depends on the type of telephone. Therefore, please refer to the manual for your desk telephone for the layout of function keys. You can assign keys 0 to 137. |
Extension | Select the destination for the respective type. |
Displayed name | option of assigning a concise name to your keypad number. |
Examples:
Call forwarding:
Call forwarding to your mobile device number 0171 12345 with the function key 1.
1. Push the Add-symbol .
2. Select function-key 1.
3. Enter *110017112345. (*11 for call forward, then 0 or 9 depending on the call number for external calls!).
4. Then confirm the line with the function-symbol.
5. Push the Confirm-symbol .
You can set another function key with *11 to deactivate the call forward.
Busy Field Light (BFL):
The "Busy Field Light (BFL)" function allows you to monitor other parties’ extensions on your system and pick up calls from these extensions or forward calls to them. When a call comes in to a monitored extension, the respective LED flashes - you can now answer the call by pressing the key (please note that this function only works if the administrator of your telephone system has added you to a mutual “pick-up group" with the extensions being monitored). When the monitored extension is on a call, its LED remains lit. If your phone is ringing and you wish to ignore the call and send it to another extension, press the function key assigned to this extension - the call is then forwarded to it.
Intercom:
The "Intercom" function also includes the functions described under "Busy Field Light (BFL)”, in addition to directly being connected to this extension when pressing the function key (intercom). However, "Intercom" must be activated on the other party’s telephone for this purpose. Intercom refers to a conventional intercom system (similar to walkie-talkies), directly connecting you to the other party’s speaker by pressing the assigned function key.
Function code:
Entering various codes (per the list on the last two pages of this manual) enables you to additionally program functions such as call forwarding to the keys. To do so, simply enter the code with the desired number in the entry field.
Services:
You can also assign a service (e.g. a group) to the function keys. Unlike an extension (BFL), this service cannot be monitored! I.e., this service is then only available via the function key.
Icons | Function | |
| Add | |
| Delete selected item | |
| Edit | |
| Save selection | |
| Exit without save |
3.1.11. Premium extension
Definition of premium extension (Premium version)
The premium extension manages up to 9 devices with one extension. The Premium version has a separate tariff. Please contact your sales representative about this option.
This tariff can only be booked for the entire telephone system, not for individual extensions. Invoicing is based on the extensions used. Service extensions such as e.g. for a virtual conference room, do not count as billable extensions and continue to be free of charge. I.e. the premium version does not bill per activated end device but per extension used (except service extensions).
Example:
You use one telephone at the office and one at your home office. Furthermore, when you’re on the go, you also use your softphone on your laptop as well as an FMC client on your mobile phone. With the premium extension, you can assign all of these end devices to one single extension and only need to manage the settings for the extension once because they are automatically copied to all devices. This eliminates different settings for voicemail, call transfers, function keys, etc., given that all settings are configured centrally via the premium extension. You are then available on all end devices with just one telephone number. I.e., all devices for a premium extension ring at once. To occasionally deactivate this, simply activate the DnD function (Do not Disturb) on the telephones you do not want to ring. Monthly costs are then billable per extension and no longer per activated device.
Note
Some functions do not work with multiple telephones. This is e.g. the case with queues or the “Forward calls if not registered” function. Therefore, the premium extension always has a primary device. You can recognise this on the telephone; it is indicated by the extension name on the display being preceded by an asterisk (*). If the extension is assigned to a queue, the primary device is always used for queues. The “Forward calls if not registered” function can only be used with the primary device. I.e., this call forwarding rule only applies if the primary devices loses its registration. If another end device on the premium extension, other than the primary end device, loses its registration, The forwarding "On unavailable/not registered" only works if all end devices of the extension are not reachable. In case of Cloudya Mobile, FMC, LYNC, parallel call or other devices this option cannot be used,
since these terminals are "always" accessible due to their characteristics.
In the administration portal, within the navigation item "Targets/Phone extensions/Section Phone devices" it is possible to add up to 9 devices to an extension. One of the extensions must be declared as "Primary device". You can assign this to a device by activate it in the column "Primary device".
Extension settings
The upgrade "Premium package" only includes the handling with multiple devices for one extension. All other settings and fucntions, e.g.queue services, remain unchanged.
For the general configuration of a premium extension, please see 3.1. Phone extension.
3.2. Conference service
Definition
You can create a telephone conference with up to 50 participants, they can dial in and communicate with each other. There are different rights for the conference leader and the participants. The conference leader for example can mute all participants.
How do I configure a telephone conference:
Example:
You want to create a conference which is internally available by calling the extension 300.
Instructions:
Enter a short name for your conference.
In addition please remember the admin and user PIN. These are important to log into a conference.
Optionally you can make additional settings, such as the announcement of a new participant in the conference, etc.
Now you assign the extension number 300 to your conference, so that it is internally accessible.
If you have only one trunk line, then a direct dial is created automatically. If you have multiple trunks, and the conference needs to be accessed externally, please submit the direct dial +49 123 456789-300 via the dialog box „Inbound Numbers“. Now the conference is externally accessible.
Configuration
In the administration portal under "Targets", click on the ADD-button and select a new telephone conference. You can also edit an existing conference by double-click.
A new window with "New Conference service" with several sections is shown:
Sections | Picture | |
Name and Extension |
| |
Referenced by |
| |
Inbound numbers |
| |
User options |
| |
Admin options |
| |
Conference options |
|





3.2.1. Name and extension
Standard information for conference service.

Fieldname | Description |
Display name | Assign a concise name to your telephone conference. |
Extension number (internal number) | Enter the extension number. Not assigning an extension number results in the extension not being available internally. |
3.2.2. Inbound numbers
Assignment of DID.

Fieldname | Description |
Base number | The direct dial number is automatically assigned according to your extension, once a main outside line has been selected. However, you can also assign multiple direct dial numbers. Simply click on “Add” button and define a new, additional direct dial number. |
Extension | Assign extension Exception: If you have only one direct dial number, then it is not necessary to assign it. |
Assign a direct dial number
Push the Add-Button to "Add new Inbound Trunk Number".
Select "your" dial number and extension.
Confirm your input by pushing the Confirm-Button .
Change the direct dial number
Select the entry which should be changed.
Push the Change-Button .
Change the direkt dial number or the extension number.
Confirm your input by pushing the Confirm-Button .
Deleting a direct dial number
Select the entry you want to delete.
Push the Delete-Button .
Icons | Function | |
| Add button. | |
| Delete button. | |
| Edit button. | |
| Confirm button, saves changes. | |
| Cancel button. | |
| Close selection. |
3.2.3. User options
User options:
 |
User Options:
Fieldname | Description |
User pin | Assign the PIN for the participants. The PIN is needed to dial into the conference. The PIN for the conference chair and the PIN for the participants cannot be the same. |
Announce user count | Announce the number of users already connected to the conference. |
Permanently mute | All user are in mute mode, only the conference administrator can talk. |
Signal join/leave | Acoustic signal if a user joins or leaves the conference. |
Announce joins/leaves | Announce all joins and leaves (by name). |
3.2.4. Admin options
Admin options:
 |
Fieldname | Description |
Admin pin | Assign the PIN for the conference chair. The PIN is needed to dial into the conference. The PIN for the conference chair and the PIN for the participants cannot be the same. |
Announce user count | Announce how many users are locked in. |
Signal join/leave | Acoustic signal if somebody joins or leaves the conference. |
Announce joins/leaves | Announcement of joins and leaves (by name). |
Close at exit | End of conference, if the administrator leaves the conference. |
Lock until entry | All users hear music on hold until the administrator (conference leader) has locked in. |
Icons | Function | |
| Activate function | |
| Dropdown |
3.2.5. Conference options
Conference options:
 |
Fieldname | Description |
Language | Select the language for the conference room. |
Music if single user | Standard music on hold if single user. |
Icons | Function | |
| Activate function | |
| Dropdown |
3.3. Time control service
Definition time control service:
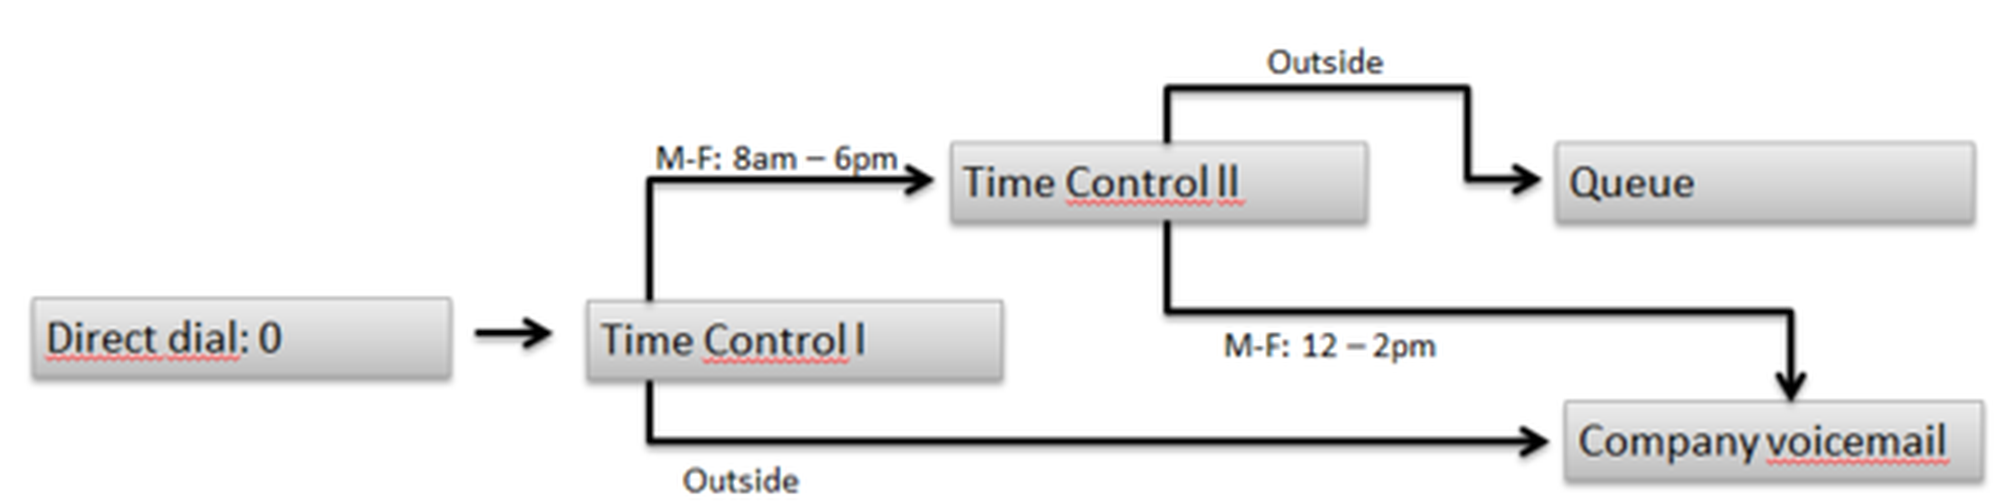
A caller can only indirectly recognise a time control. That is, the caller is guided according to the time. For instance, this function is used for a company’s business hours. Monday to Friday (9 am to 6 pm), callers should reach the company staff as usual. Calls outside the specified time are then routed to the company mailbox for example. A time control only recognises 2 intervals (Monday to Friday (9 am to 6 pm)). If for example you also have a lunch hour and callers need to be routed to the company mailbox from 12 pm to 2 pm, you must link 2 time controls to each other (exception).
How to configure a Time Control?
Example:
You want to create a time control, which is accessible externally by calling +49 123 456789-111. In addition the time control should be defined from Monday to Friday, 8:00 to 18:00. Anybody calling within this time will be forwarded to the employee group. If someone calls beyond the specified time, he should be forwarded to thecompany mailbox.
Instructions:
Enter a short name for your time control.
Next create the direct dial +49 111 456 789-300 in the dialog box "Inbound Numbers", so your time control is accessible for external calls. However, you can also add more direct dials.
Please define finally the period of your time control:
From : Monday To: Friday
From Time: 08:00 To Time: 18:00
Destination if Allowed: Group Staff
Destination if Denied: Company - Mailbox
Special case:
If you still have a lunch break from 12:00 to 14:00 and it is therefore necessary to forward the caller to the company voicemail, you need to connect the two time controls with each other (special case).You create a new time control and define first of all the third interval. I.e., Monday to Friday 12 am to 14 pm. Next choose the the company mailbox as "Destination if Allowed" and the employee group mailbox as "Destination if Denied". Now go back into the existing time control and select the just created new time control as "Destination if Allowed". Thus you have both connected and calls can reach you from Mondays to Fridays from 8 am to 12 am and 2 pm to 6 pm.
Furthermore, you still have the option to set special rules. For example if a public holiday is on weekdays, there you can specify the time control to behave as if it were outside of business hours.
Configuration:
In the serviceportal under "Targets" you click on the ADD-button and select a new time control service. You can also edit an existing time service by double-click.
A new window with "New time control service" with several sections is shown:
Sections | Pictures | |
Name and extension |
| |
Referenced by |
| |
Inbound numbers |
| |
Timezone settings |
| |
Time frame |
| |
Destinations |
| |
Time control exceptions |
|





3.3.1 Name and extension
Standard entries for Time control:
 |
Fieldname | Description |
Display name | Assign a concise name to your time control service (e.g. peak sales period). |
Extension number (internal number) | Enter the extension number. |
Evaluation strategy | When selecting “Automatic”, the configured time control triggers according to the specified period. When selecting “Always within”, the destination always applies to “within". When selecting “Always outside”, the destination always applies to “outside". |
3.3.2. Inbound numbers
Assignment of DID
 |
Fieldname | Description |
Base number | The direct dial number is automatically assigned according to your extension, once a main outside line has been selected. However, you can also assign multiple direct dial numbers. Simply click on “Add” button and define a new, additional direct dial number. |
Extension | Assign extension Exception:If you have only one direct dial number, then it is not necessary to assign it. |
Assign a direct dial number
1. Push the Add-Button to "Add new Inbound Trunk Number".
2. Select "your" dial number and extension.
3. Confirm your input by pushing the Confirm-Button .
Change the direct dial number
1. Select the entry which should be changed.
2. Push the Change-Button .
3. Change the direkt dial number or the extension number.
4. Confirm your input by pushing the Confirm-Button .
Deleting a direct dial number
1. Select the entry you want to delete.
2. Push the Delete-Button .
Icons | Function | |
| Add button. | |
| Delete button. | |
| Edit button. | |
| Confirm button, saves changes. | |
| Cancel button. | |
| Close selection. |
3.3.3. Timezone settings
Zeitzonen Einstellungen
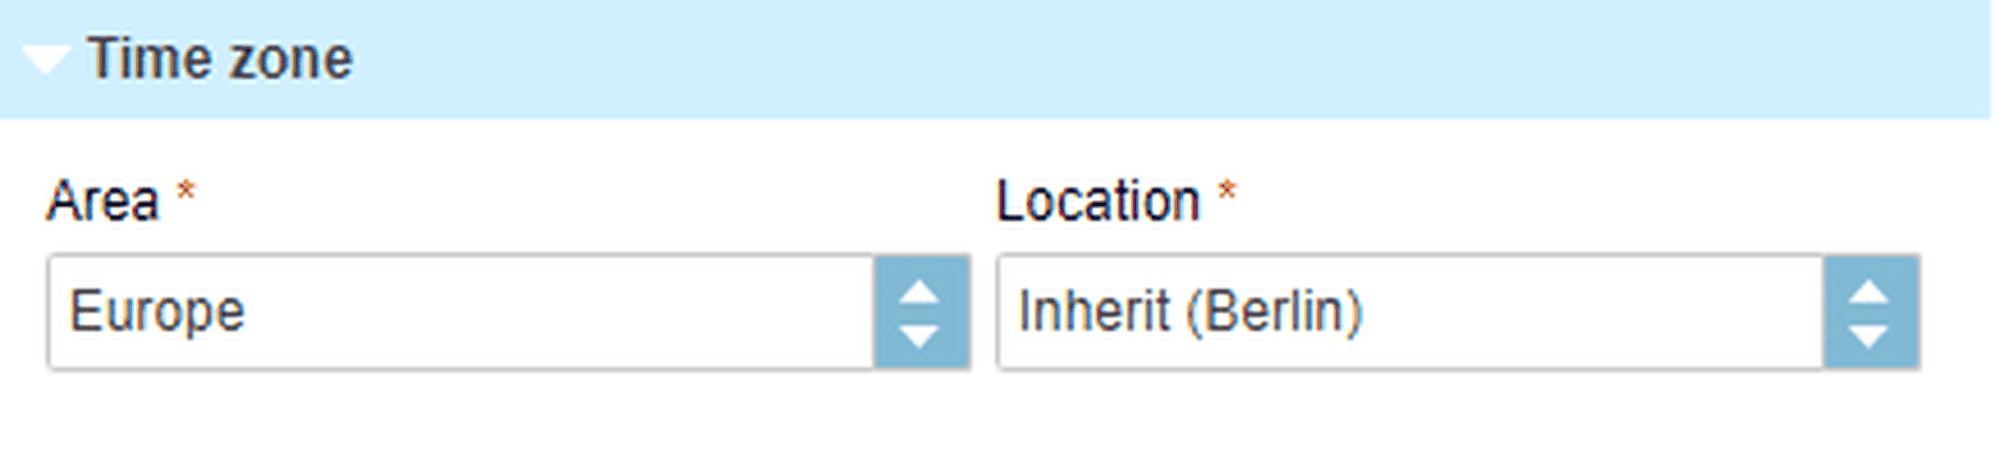
Set here the time zone valid for this region and city.
Find a detailed overview of the possible settings here.
3.3.4. Time frame
Timeframe of the time within the time control. Definition of "from day" till "to day" and "from time" till "to time"

Fieldname | Description |
From day | Define the starting day for the timing control. I.e."From day:" Monday. |
To day | Define the ending day for the timing control. I.e. "To day:" Friday. |
From time of day | Define the starting time. I.e. 09:00. |
To time of day | Define the ending time. I.e. 18:00. |
3.3.5. Destinations
Definition of activities inside and outside of the time control.

Fieldname | Description |
Destination if allowed | Define a period during which an action should occur (e.g. Time control for sales). |
Destination if denied | Define the destination for within or outside the period (e.g. company mailbox). |
3.3.6. Time control exceptions
Time control exceptions, Definition of e.g. bank holidays.

Fieldname | Description |
Fixed referral to"destination if allowed" | Specify exceptions, on which days the time control should be set to “Always within" or “Always outside" Several days can be set, you add a day by clicking the ADD-button, then you can select the day by clicking the button Example: Monday is a public holiday when nobody is in the office. Therefore, for this one day it is specified that the callers are always transferred to the destination for “outside". |
Fixed referral to "destination if denied" | Specify exceptions, on which days the time control should be set to “Always within" or “Always outside" Several days can be set. |

Icons | Function | |
| Add. | |
| Delete selected item. | |
| Calender. |
3.4. Queue service
Definition Queue
A queue is used for the "consolation" of the customer, for example, if there is not enough staff available to answer a call directly. This function is, among other things, used for hotlines.
How to edit a Queue?
Example:
You want to create a queue that is internally accessible at the extension 101. Furthermore 2 employees (Agent 1 and Agent 2) should be members of the same queue. If none of the two is available within 60 seconds, the caller will be forwarded to the voice mail of the team leader. Furthermore, the queue is the target for the time control 1 (main time).
Instructions:
1. Enter a short name to your queue and select whether it is an inbound or outbound queue.
2. Allocate the extension number 101 to your queue, so it is accessible internally. If you have only one trunk line, the direct dial (external number) is created automatically. If you have multiple trunks and the queue should be reachable externally, please submit the direct dial +49 123 456789- 101 via the dialog box "Inbound Numbers (external numbers)".
3. Now the queue is available for external calls.
4. Finally select the agents (members) of the queue. In this example these are the extensions "Agent 1" and "Agent 2".
You also define a timeout of 60 seconds and choose the voice mail of the team leader for the "Destination on rejection".
Configuration
In the serviceportal under "Targets" you click on the ADD-button and select a new queue service. You can also edit an existing queue service by double-click.
A new window with "New group service" with several sections is shown:
Sections | Pictures | |
Name and extension |
| |
Referenced by |
| |
Inbound numbers |
| |
Members |
| |
Direction options |
| |
Customer options |
| |
Member options |
|






3.4.1. Name and extensions
Standard information for queue service
 |
Fieldname | Description |
Display name | Enter a concise name for your queue. (e.g: Queue Logistics). |
Extension number (internal number) | Enter the extension number. If no extension number is assigned, the extension cannot be reached internally. |
Weight | The field “Weigth" allows you to prioritise individual queues. The value range is 0-255. The higher the assigned value, the higher the importance of the queue. Thus number 2 has a higher priority than 1, 3 higher than 2, etc. |
3.4.2. Inbound numbers
Assignment of DID.

Fieldname | Description |
Base number | The direct dial number is automatically assigned according to your extension, once a main outside line has been selected. However, you can also assign multiple direct dial numbers. Simply click on “Add” button and define a new, additional direct dial number. |
Extension | Assign extension Exception: If you have only one direct dial number, then it is not necessary to assign it. |
Assign a direct dial number
1. Push the Add-Button to "Add new Inbound Trunk Number".
2. Select "your" dial number and extension.
3. Confirm your input by pushing the Confirm-Button .
Change the direct dial number
1. Select the entry which should be changed.
2. Push the Change-Button .
3. Change the direkt dial number or the extension number.
4. Confirm your input by pushing the Confirm-Button .
Deleting a direct dial number
1. Select the entry you want to delete.
2. Push the Delete-Button .
Icons | Function | |
| Add button. | |
| Delete button. | |
| Edit button. | |
| Confirm button, saves changes. | |
| Cancel button. | |
| Close selection. |
3.4.3. Members
Assignment of queue functions. Definition of activities inside and outside of the time zone.

Fieldname | Description |
Display name | You have the option of assigning individual members to the queue. Simply click on the ADD-button and select the respective extensions. You can also edit ( Edit-button ) or delete ( Delete-button ) an existing entry. |
Penalty | Prioritising members within a queue (penalty). You can assign the priority of members from the drop-down. The lowest number always has the highest priority. Thus number 0 has a higher priority than 1, 2 is higher than 3, etc. By default all members within a queue have the same priority. |
Timeout delay (in seconds) | Enter a timeout for the group. I.e., after how many seconds should the caller be rerouted accordingly? |
Destination on timeout | Define the destination on timeout. |
Destination on rejection | Specify if the caller should be ignored if no member is logged into the queue. If this is activated, you then also need to specify a destination to route the call to. |
Join queue without membership | If there are no members in the queue, you can decide if a caller can phone this queue. If not set and no agent is in the queue, all callers are redirected to the destination set in the "Destination on timeout". |
Icons | Function | |
| Add | |
| Delete selected item | |
| Edit | |
| Save selection | |
| Quit without save | |
| Activate function |
3.4.4. Direction options
Direction options:

Fieldname | Description |
Record calls | No function. |
Direction | Definition of the called direction. Is this an inbound- or an outbound queue. Normally it will be an inbound queue. (inbound means incoming calls). |
3.4.5. Customer options
Customer options:

Fieldname | Description |
Initial | Select the announcement to play for the caller upon entering the queue. The announcement can also be uploaded to the system under menu item ELEMENTS/Announcement or uploaded by the Add-button . Initial announcements are only played once when greeting the caller. |
Postion announcement interval | Specify the delay or the interval to be used for playing the periodic and position announcement. If an invalid value is entered, the system suggests a valid value. |
MoH/Ring | Music on Hold. Select whether the customer in a queue should hear the regular “ringing”, the system’s standard hold music or a specific hold music. First, the hold music for the queue has to be uploaded under menu item ELEMENTS/Announcement. |
Periodic | Periodic announcements are repeated while the caller is waiting. The announcement can also be uploaded to the system under menu item ELEMENTS/Announcement or uploaded by the Add-button . |
Periodic announcement interval | Specify the delay or the interval to be used for playing the periodic and position announcement. If an invalid value is entered, the system suggests a valid value. |
MoH (if not ringing) | Music on Hold. When "Custom" is selected under "MoH/Ring" you will be able to select a custom hold music. The hold music for the queue can either be uploaded under menu item ELEMENTS/Announcements or selected by the Add-button symbol. |
Note
You can play the announcement/MoH, if you push the Play-button .
Icons | Function | |
| Add button. | |
| Dropdown. | |
| Play button. |
3.4.6. Member options
Member options:

Fieldname | Description |
Selection strategy | Select from the following options: All at once, Random, Longest pause first, “Round Robin” successively (The order cannot be specified for Round Robin!), Lowest utilisation first. |
Time to wait after timeout | Specify after how many seconds the system should attempt to reconnect the caller to the agent. |
Report hold time | Select if the members of the queue should be informed about the customers waiting time. |
Timeout per member | Enter a timeout for the member. I.e., after how many seconds should the call be returned to the queue? |
Wrap up time per member | Specify how much time a member has to register a completed call before being offered the next call. |
Member announcement | This allows you to play an announcement to the agent before accepting a call. For example, if a member works several queues, it may be useful to indicate which queue the caller dialed. The queue name is also shown in the telephone display.The announcement can be uploaded by the Add-button . You can also play it by pushing the Play-button . |
Icons | Function | |
| Add | |
| Dropdown | |
| Play |
3.5. Skill
Definition Queue:
A Skill is used to optimize a hotline. You can define skill groups and skill-levels within a group.
How to edit a Skill?
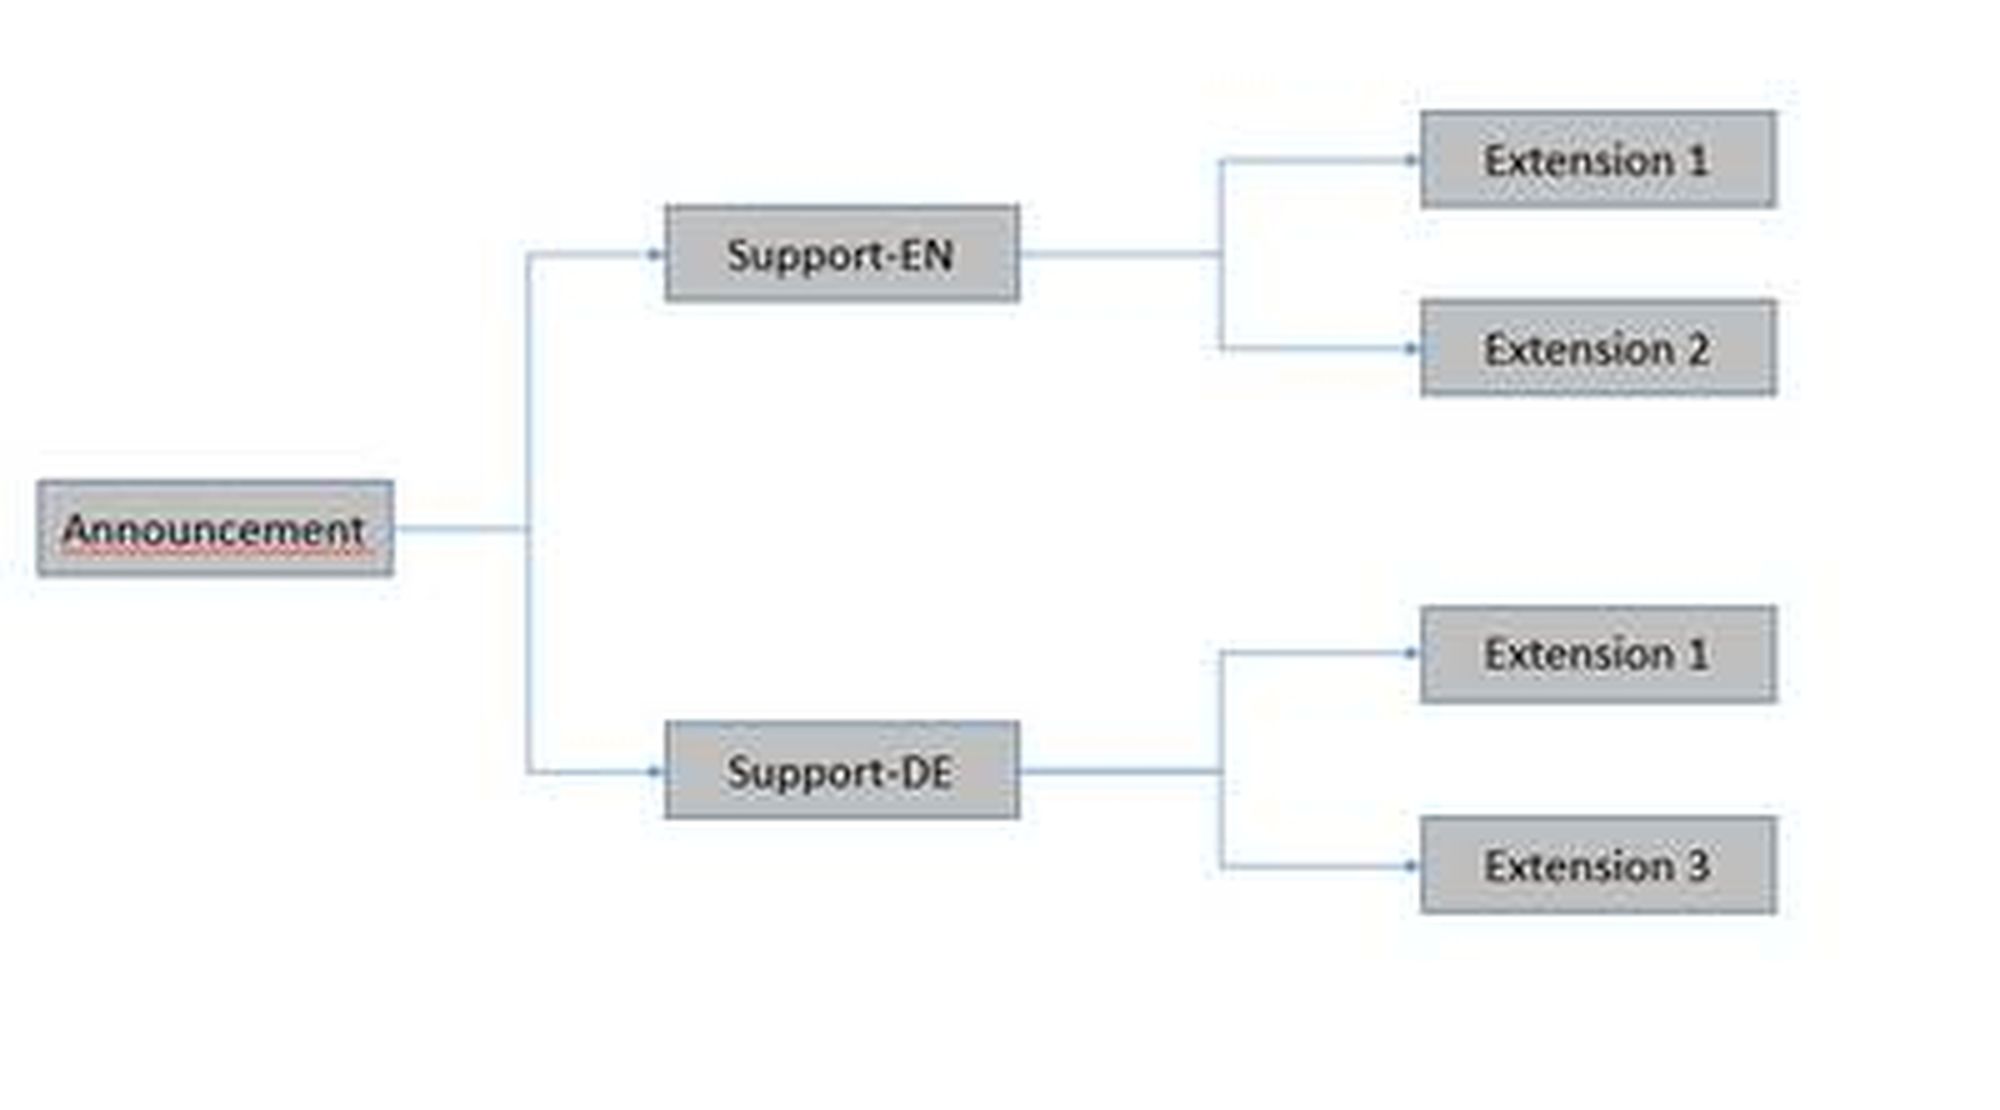
You defined a hotline, accessible under the extension number 110. You offer this hotline support in two languages and you have hotline memebers (extensions) who handle this support either in english or in german. Those members can have differnt experience levels (skill-level), e.g. 10=Senior support, and 1=low level support.
Instructions:
You have an announcement, e.g. "dial 1 for english support or 2 for german support.
Now you define two skill groups, one names Support-EN the other with Support-DE.
Now you add those extensions to the skill group, who will bring the support and you define his skill level. The caller is directed to the extension with the highest skill level (if available).
You must direct the IVR to the skill groups.
You can also add an extension to a skill under Targets/Phone extensions.
Configuration:
In the serviceportal under "Targets" you click on the ADD-button and select a new Skill service. You can also edit an existing Skill service by double-click.
Note
The extensions can subscribe to his skill set by the function-code *87, to unsubscribe please use **87.
A new window with "New Skill service" with several sections is shown:
Sections | Pictures | |
Name and extension |
| |
Referenced by |
| |
Inbound numbers |
| |
Skill Options |
| |
Direction options |
| |
Customer options |
| |
Member options |
|






3.5.1. Name and extensions
Standard information for queue service
 |
Fieldname | Description |
Display name | Enter a concise name for your queue. (e.g: Queue Logistics). |
Extension number (internal number) | Enter the extension number. If no extension number is assigned, the extension cannot be reached internally. |
Weight | The field “Weigth" allows you to prioritise individual queues. The value range is 0-255. The higher the assigned value, the higher the importance of the queue. Thus number 2 has a higher priority than 1, 3 higher than 2, etc. |
3.5.2. Inbound numbers
Assignment of DID.

Fieldname | Description |
Base number | The direct dial number is automatically assigned according to your extension, once a main outside line has been selected. However, you can also assign multiple direct dial numbers. Simply click on “Add” button and define a new, additional direct dial number. |
Extension | Assign extension Exception: If you have only one direct dial number, then it is not necessary to assign it. |
Assign a direct dial number
Push the Add-Button to "Add new Inbound Trunk Number".
Select "your" dial number and extension.
Confirm your input by pushing the Confirm-Button .
Change the direct dial number
Select the entry which should be changed.
Push the Change-Button .
Change the direkt dial number or the extension number.
Confirm your input by pushing the Confirm-Button .
Deleting a direct dial number
Select the entry you want to delete.
Push the Delete-Button .
Icons | Function | |
| Add button. | |
| Delete button. | |
| Edit button. | |
| Confirm button, saves changes. | |
| Cancel button. | |
| Close selection. |
3.5.3. Skill Optionen
Assignment of skill functions. Definition of activities inside and outside of the time zone.

Fieldname | Description |
Display name | You have the option of assigning individual members to the skill. Simply click on the ADD-button and select the respective extensions. You can also edit (Edit-button) or delete (Delete-button) an existing entry. |
Skill Level | The skill level defines the quality of service of this extension. The higher the skill level, the better the service, e.g. 10=Senior service, 3= Basic service. |
Timeout delay (in seconds) | Enter a timeout for the group. I.e., after how many seconds should the caller be rerouted accordingly? |
Destination on timeout | Define the destination on timeout. |
Destination on rejection | Specify if the caller should be ignored if no member is logged into the queue. If this is activated, you then also need to specify a destination to route the call to. |
Join queue without membership | If there are no members in the queue, you can decide if a caller can phone this queue. If not set and no agent is in the queue, all callers are redirected to the destination set in the "Destination on timeout". |
Icons | Function | |
| Add | |
| Delete selected item | |
| Edit | |
| Save selection | |
| Quit without save | |
| Activate function |
3.5.4. Direction options
Direction options:

Fieldname | Description |
Record calls | No function. |
Direction | Definition of the called direction. Is this an inbound- or an outbound queue. Normally it will be an inbound queue. (inbound means incoming calls). |
3.5.5. Customer options
Customer options:

Fieldname | Description |
Initial | Select the announcement to play for the caller upon entering the queue. The announcement can also be uploaded to the system under menu item ELEMENTS/Announcement or uploaded by the Add-button . Initial announcements are only played once when greeting the caller. |
Postion announcement interval | Specify the delay or the interval to be used for playing the periodic and position announcement. If an invalid value is entered, the system suggests a valid value. |
MoH/Ring | Music on Hold. Select whether the customer in a queue should hear the regular “ringing”, the system’s standard hold music or a specific hold music. First, the hold music for the queue has to be uploaded under menu item ELEMENTS/Announcement. |
Periodic | Periodic announcements are repeated while the caller is waiting. The announcement can also be uploaded to the system under menu item ELEMENTS/Announcement or uploaded by the Add-button . |
Periodic announcement interval | Specify the delay or the interval to be used for playing the periodic and position announcement. If an invalid value is entered, the system suggests a valid value. |
MoH (if not ringing) | Music on Hold. When "Custom" is selected under "MoH/Ring" you will be able to select a custom hold music. The hold music for the queue can either be uploaded under menu item ELEMENTS/Announcements or selected by the Add-button symbol. |
Note
You can play the announcement/MoH, if you push the Play-button.
Icons | Function | |
| Add button. | |
| Dropdown. | |
| Play button. |
3.5.6. Member options
Member options:

Fieldname | Description |
Selection strategy | Select from the following options: All at once, Random, Longest pause first, “Round Robin” successively (The order cannot be specified for Round Robin!), Lowest utilisation first. This is grouped according to Skill Level. Example: For "All at the same time: "All skill members with Level 10 ring "at the same time" - but skill members with Level 9 do not ring as long as not all Level 10 members are busy (or DnD). If all Level 10 members are in conversation/DnD, all Level 9 members ring simultaneously. |
Time to wait after timeout | Specify after how many seconds the system should attempt to reconnect the caller to the agent. |
Report hold time | Select if the members of the queue should be informed about the customers waiting time. |
Timeout per member | Enter a timeout for the member. I.e., after how many seconds should the call be returned to the queue? |
Wrap up time per member | Specify how much time a member has to register a completed call before being offered the next call. |
Member announcement | This allows you to play an announcement to the agent before accepting a call. For example, if a member works several queues, it may be useful to indicate which queue the caller dialed. The queue name is also shown in the telephone display.The announcement can be uploaded by the Add-button. You can also play it by pushing the Play-button. |
Icons | Function |
Add. | |
Dropdown. | |
| Play. |
3.6. Group service
Definition Group service
A group is for example a certain number of persons who should be achievable at one (or several) specific telephone number(s). Usually this is used for teams of employees, or departments of a company. In addition, you can configure a pick-up group in the group dialog. The function of a pick-up group is to determine which persons are authorized to put each other on the freely programmable function keys (BLF) on their desk phones (snom, AASTRA) and mutually accept, to monitor and possibly pick up a call from a colleague.
Furthermore, the group dialogue allows you to specify a pick-up group. For example, all members within a pick-up group can answer (pick-up) a call of a co-worker, who is currently unavailable, from their own telephone using a function key (BFL). If a co-worker is not part of a pick-up group, he/she can still add all co-workers to the function keys (BFL) and see when phones are ringing, redirect calls to them or call them with the function key (BFL).The only function, which is not available, is picking up a call**.**
How to edit a Group?
Example:
You want to create a group that is internally accessible at the extension 100. There should be also 2 employees (employee 1 and 2) in this group. If none of the two is available within 60 seconds, the caller will be forwarded to the voicemail of the team leader. Furthermore, this group is the target for the time control 2 (main time).
Instructions:
Give your group a short name. Then allocate your group the extension number 100, so it is accessible internally. If you have only one trunk line, then a direct dial (external number) is created automatically. If you have multiple trunks, and the group should be accessible for external calls, insert +49 123 456789-100 in the dialog box "Inbound Numbers" to ensure that your extension is also externally accessible at this number.
Please select finally the members of the group. In this example the extensions are "employee 1" and "employee 2". You also define a timeout of 60 seconds and choose as "Destination if unavailable", the voicemail of the team leader.
Configuration:
In the serviceportal under "Targets" you click on the ADD-button and select a new group service. You can also edit an existing group service by double-click.
A new window with "New group service" with several sections is shown:
Sections | Pictures | |
Name and extension |
| |
Referenced by |
| |
Inbound numbers |
| |
Members |
| |
Customer options |
|


3.6.1. Name and extensions
Standard information for group service.

Fieldname | Description |
Display name | Enter a concise name for your group. |
Extension number (internal number) | Enter the extension number. If no extension number is assigned, the extension cannot be reached internally. |
Pick-up group | When defining a group as a pick-up group, you define who may answer (pick-up) co-workers’ calls. |
3.6.2. Inbound numbers
Assignment of DID.
Fieldname | Description |
Base number | The direct dial number is automatically assigned according to your extension, once a main outside line has been selected. However, you can also assign multiple direct dial numbers. Simply click on “Add” button and define a new, additional direct dial number. |
Extension | Assign extension Exception: If you have only one direct dial number, then it is not necessary to assign it. |
Assign a direct dial number
Push the Add-Button to "Add new Inbound Trunk Number".
Select "your" dial number and extension.
Confirm your input by pushing the Confirm-Button .
Change the direct dial number
Select the entry which should be changed.
Push the Change-Button .
Change the direkt dial number or the extension number.
Confirm your input by pushing the Confirm-Button .
Deleting a direct dial number
Select the entry you want to delete.
Push the Delete-Button .
Icons | Function | |
| Add button. | |
| Delete button. | |
| Edit button. | |
| Confirm button, saves changes. | |
| Cancel button. | |
| Close selection. |
3.6.3. Members
Enter the members for this group.

Fieldname | Description |
Display name | You have the option of assigning individual members to the group. Simply click the Add-button and select the respective extensions (members).You can also edit ( Edit-button ) or delete ( Delete-button ) an existing entry. |
Icons | Function | |
| Add member. | |
| Delete selected member. | |
| Edit. | |
| Confirm. | |
| Cancel. |
3.6.4. Customer options
Customer options:
Fieldname | Description |
Timeout delay (in seconds) | Enter a timeout for the group. I.e., after how many seconds should the caller be rerouted accordingly? |
Destination on timeout | Here, please select the destination if the group is unavailable. This destination applies if: - all group members are on calls - the timeout was triggered. |
3.7. IVR service
Definition IVR (interactive voice response)
An IVR is initially an announcement. The customer then has several interactive features. For example: For sales inquiries, select the "1", for technical support, please select the "2".
Special case:
Announcement before a personal call: You can also use the IVR for playing a personal announcement before the external caller gets forwarded to the actual extension (employees). For this you select "no option" for each target, and set a timeout with the desired extension as timeout target.
Announcement without recording:
The IVR is also intended to play a personal announcement for incoming calls, which are calling outside normal working hours, but without the option to speak to the company mailbox after the announcement. For this you select "no option" for each goal and set a timeout with the timeout target "hang up".
How to edit an IVR?
Example:
You want to create an IVR, which is externally accessible by calling +49 123 456789 – 111. Furthermore the caller will be connected with the queue “Technical department” if he selects the "1", with the Marketing group if he selects the "2", with the support if he selects the "3" button. The announcement should be repeated if he presses "#" and the call will be terminated if he presses "*". If none of the defined goals is available within 90 seconds, the caller will be forwarded to the voicemail of the team leader.
Instructions:
Enter a short name for your IVR and select an announcement, which you have previously uploaded under the menu item ELEMENTS / Announcement. But you can also upload directly an announcement by clicking the Add-button.
Next you have to allocate the direct dial +49 123 456789-111 to your IVR using the dialog box "Inbound numbers", so that your IVR is accessible for external calls. However, you can also add more direct dials. The number of direct dials per IVR isn’t limited.
Finally select the targets for the IVR:
1: Queue Technical department
2: Group Marketing
3: Support
#: Repeat
*: Hang up
Timeout Delay(in seconds): 90
Destination on Timeout: Voicemail team leader
Configuration
In the serviceportal under "Targets" you click on the ADD-button and select a new IVR service. You can also edit an existing IVR service by double-click.
A new window with "new IVR service" with several sections is shown:
Sections | Pictures | |
Name and extension |
| |
Referenced by |
| |
Inbound trunk numbers |
| |
Configuration |
| |
Key assignments |
|



3.7.1. Name and extension
Standard information for IVR:

Fieldname | Description |
Name | Assign a concise name to your IVR. (e.g.: Announcement-hotline). |
Extension (internal number) | Enter the extension number. If no extension number is assigned, the extension cannot be reached internally. |
3.7.2. Inbound numbers
Assignment of DID.

Fieldname | Description |
Base number | The direct dial number is automatically assigned according to your extension, once a main outside line has been selected. However, you can also assign multiple direct dial numbers. Simply click on “Add” button and define a new, additional direct dial number. |
Extension | Assign extension Exception: If you have only one direct dial number, then it is not necessary to assign it. |
Assign a direct dial number
1. Push the Add-Button to "Add new Inbound Trunk Number".
2. Select "your" dial number and extension.
3. Confirm your input by pushing the Confirm-Button .
Change the direct dial number
1. Select the entry which should be changed.
2. Push the Change-Button .
3. Change the direkt dial number or the extension number.
4. Confirm your input by pushing the Confirm-Button .
Deleting a direct dial number
1. Select the entry you want to delete.
2. Push the Delete-Button .
Icons | Function | |
| Add button. | |
| Delete button. | |
| Edit button. | |
| Confirm button, saves changes. | |
| Cancel button. | |
| Close selection. |
3.7.3. Configuration
IVR configuration.

Fieldname | Description |
Announcement | Select an announcement to play for the customer when he/she calls. Select the announcements previously uploaded under menu item ELEMENTS/Announcement from the drop-down. The Add-button allows you to upload new announcements. Only use MP3 or WAV files. |
Icons | Function | |
| Add announcement. | |
| Dropdown. | |
| Play. |
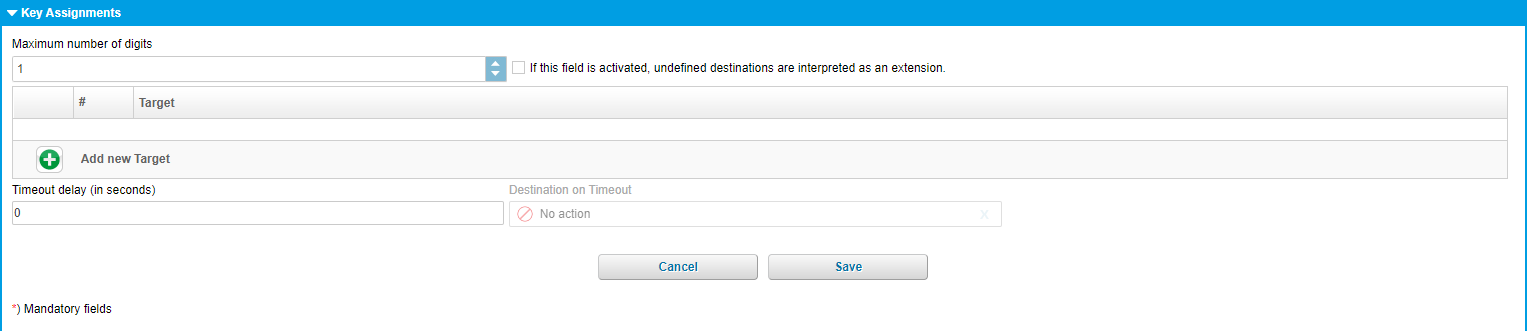
3.7.4. Key assignments
Key assingment for IVR:
 |
Fieldname | Description |
Maximum numbers of digits | Specify the maximum number of digits, the destinations of IVR are permitted to have. For 2-digit destinations (e.g.:12, 30, etc.) please select "2", etc. |
Interpret unkown destinations as extension | If this field is activated, undefined destinations of a number sequence (destination=no action) is interpreted as an extension. Example: You select number 120 but no destination (destination=no action). Now if the “Interpret invalid destinations as extension” is ticked, the caller is directly transferred to extension 120 if he/she enters the number sequence “120” during the IVR. |
Target | Use the Add-button to define destinations for the IVR. Example: If the caller presses “2”, he/she should be transferred to the logistics queue, etc. |
Timeout (in seconds) | Specify if the voice dialogue should have a timeout. And if so, what to do when the timeout expires (destination for timeout). |
Destination on timeout | Target destination on timeout. |
Icons | Function | |
| Add destination | |
| Delete destination | |
| Save selection | |
| Quit without save |
3.8. eFax extension
Definition eFax extension
An eFax is a virtual fax. With an eFax you receive conventional faxes in PDF format to your email account.
How to edit a virtual Fax?
Example:
You want to create an eFax that is internally accessible by the extension 111. All incoming faxes will be sent to the email address max@mustermann.net
Instructions:
Enter a short name for your eFax.
Next you assign the extension number 111 to your eFax, so that it is internally accessible. If you have only one trunk line, the direct dial (external number) is created automatically. If you have multiple trunks, you need to choose a "Preferred Outbound Trunk" in the "Configuration".
Afterwards the direct dial (external number) is created automatically.
Then your eFax is externally accessible at the direct dial +49 123 456789 - 111.
Finally select your email address "max@mustermann.de" as destination, so the eFax knows where to send incoming faxes.
Configuration
In the serviceportal under "Targets" you click on the ADD-button and select a new eFax service. You can also edit an existing eFax service by double-click.
A new window with "New EFax extension" with several sections is shown:
Sections | Pictures | |
Name and extension |
| |
Referenced by |
| |
Inbound numbers |
| |
Fax Server Login |
| |
Geographical settings |
| |
Configuration |
| |
Outbound numbers |
|





3.8.1. Name and extension
Standard information for eFax extensions:
 |
Fieldname | Description |
Display name | assign a concise name to your eFax. (e.g.: John Deere eFax). |
Extension number (internal number) | Enter the extension number. |
3.8.2. Inbound numbers
Assignment of DID.
 |
Fieldname | Description |
Base number | The direct dial number is automatically assigned according to your extension, once a main outside line has been selected. However, you can also assign multiple direct dial numbers. Simply click on “Add” button and define a new, additional direct dial number. |
Extension | Assign extension Exception: If you have only one direct dial number, then it is not necessary to assign it. |
Assign a direct dial number
1. Push the Add-Button to "Add new Inbound Trunk Number".
2. Select "your" dial number and extension.
3. Confirm your input by pushing the Confirm-Button .
Change the direct dial number
1. Select the entry which should be changed.
2. Push the Change-Button .
3. Change the direkt dial number or the extension number.
4. Confirm your input by pushing the Confirm-Button .
Deleting a direct dial number
1. Select the entry you want to delete.
2. Push the Delete-Button .
Icons | Function | |
| Add button. | |
| Delete button | |
| Edit button. | |
| Confirm button, saves changes. | |
| Cancel button. | |
Close selection. |
3.8.3. Fax server login
Account information for the Fax Server Login:
 |
Fieldname | Production |
Login | Login for your eFax. You need this to install a fax client to send faxes from your computer. |
PIN | Enter a new PIN for your eFax or keep the generated PIN. |
Server | Server name for your eFax. You need this to install a fax client to send faxes from your computer. |
3.8.4. Geographical settings
Geographical settings:
 |
Fieldname | Description |
Language | Here you define the language for your eFax, all settings are set to this language. |
Dial prefix | Default is the prefix of your site, you can select for this device if the prefix is 0 or 9. It has no influence on the site settings! |
3.8.5. Configuration
Configuration for eFax:
 |
Fieldname | Description |
Specify exactly one email address as the destination, to specify which address eFax should send incoming faxes to. | |
T30 Fax Identifier | Shows your fax station number that is displayed on in the receiver's fax. |
Cost center | Specify a cost centre number for the respective extension. This cost centre is listed in the itemised statement. |
Preferred outbound trunk | Select your preferential outside line for outgoing calls. I.e., which outside line would you like to use to phone “out”. This outside line is then also displayed to the other party. |
Permission | Here, please specify the direct outward dialling for eFax. I.e., is this extension allowed to send: - internal - local - domestic - international faxes. This setting is only relevant when using a fax client on your PC. |
CLIR | Select whether to show your complete telephone number, only the main number (outside line) or no telephone number at all (block caller ID). |
Custom tagline | Enter text to be shown in the eFax header. |
Delete after sent | Define whether the eFax will be deleted after sending or not. |
nfon News accepted | Accept nfon News. |
3.8.6. Outbound numbers
Assignment of DID to an eFax.
Here you decide, which DID is shown for outgoing faxes.
 |
Fieldname | Description |
Trunk | The direct dial number is automatically assigned according to your extension, once a main outside line has been selected. However, you can also assign multiple direct dial numbers. Simply click on Add-button and define a new, additional direct dial number. |
Extension | Assign extension Exception: If you have only one direct dial number, then it is not necessary to assign it. |
Assign DID
1. Push the Add-button to "Add new Outbound Trunk Number".
2. Select your DID.
3. Confirm your selection by psuhing the Confirm-button .
Change DID
1. Select the DID you want to edit.
2. Push the Edit-button .
3. Make your changes.
4. Confirm the changes with the Confirm-button .
Delete DID
1. Select the DID you want to delete.
2. Push the Delete-button .
Icons | Function | |
| Add a new base number | |
| Delete selected base number | |
| Edit | |
| Save changes | |
| Exit without changes saved |