1. Basic Functions
1.1 Overview of Keys
Below you will see an overview over all keys of the respective models.
Polycom VVX 101 / 201
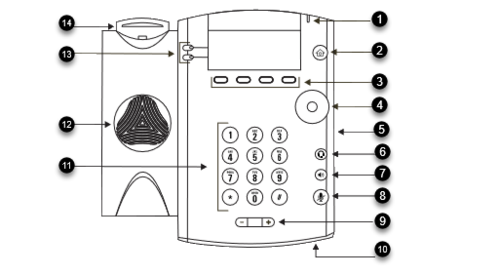
Polycom VVX 311 / 411
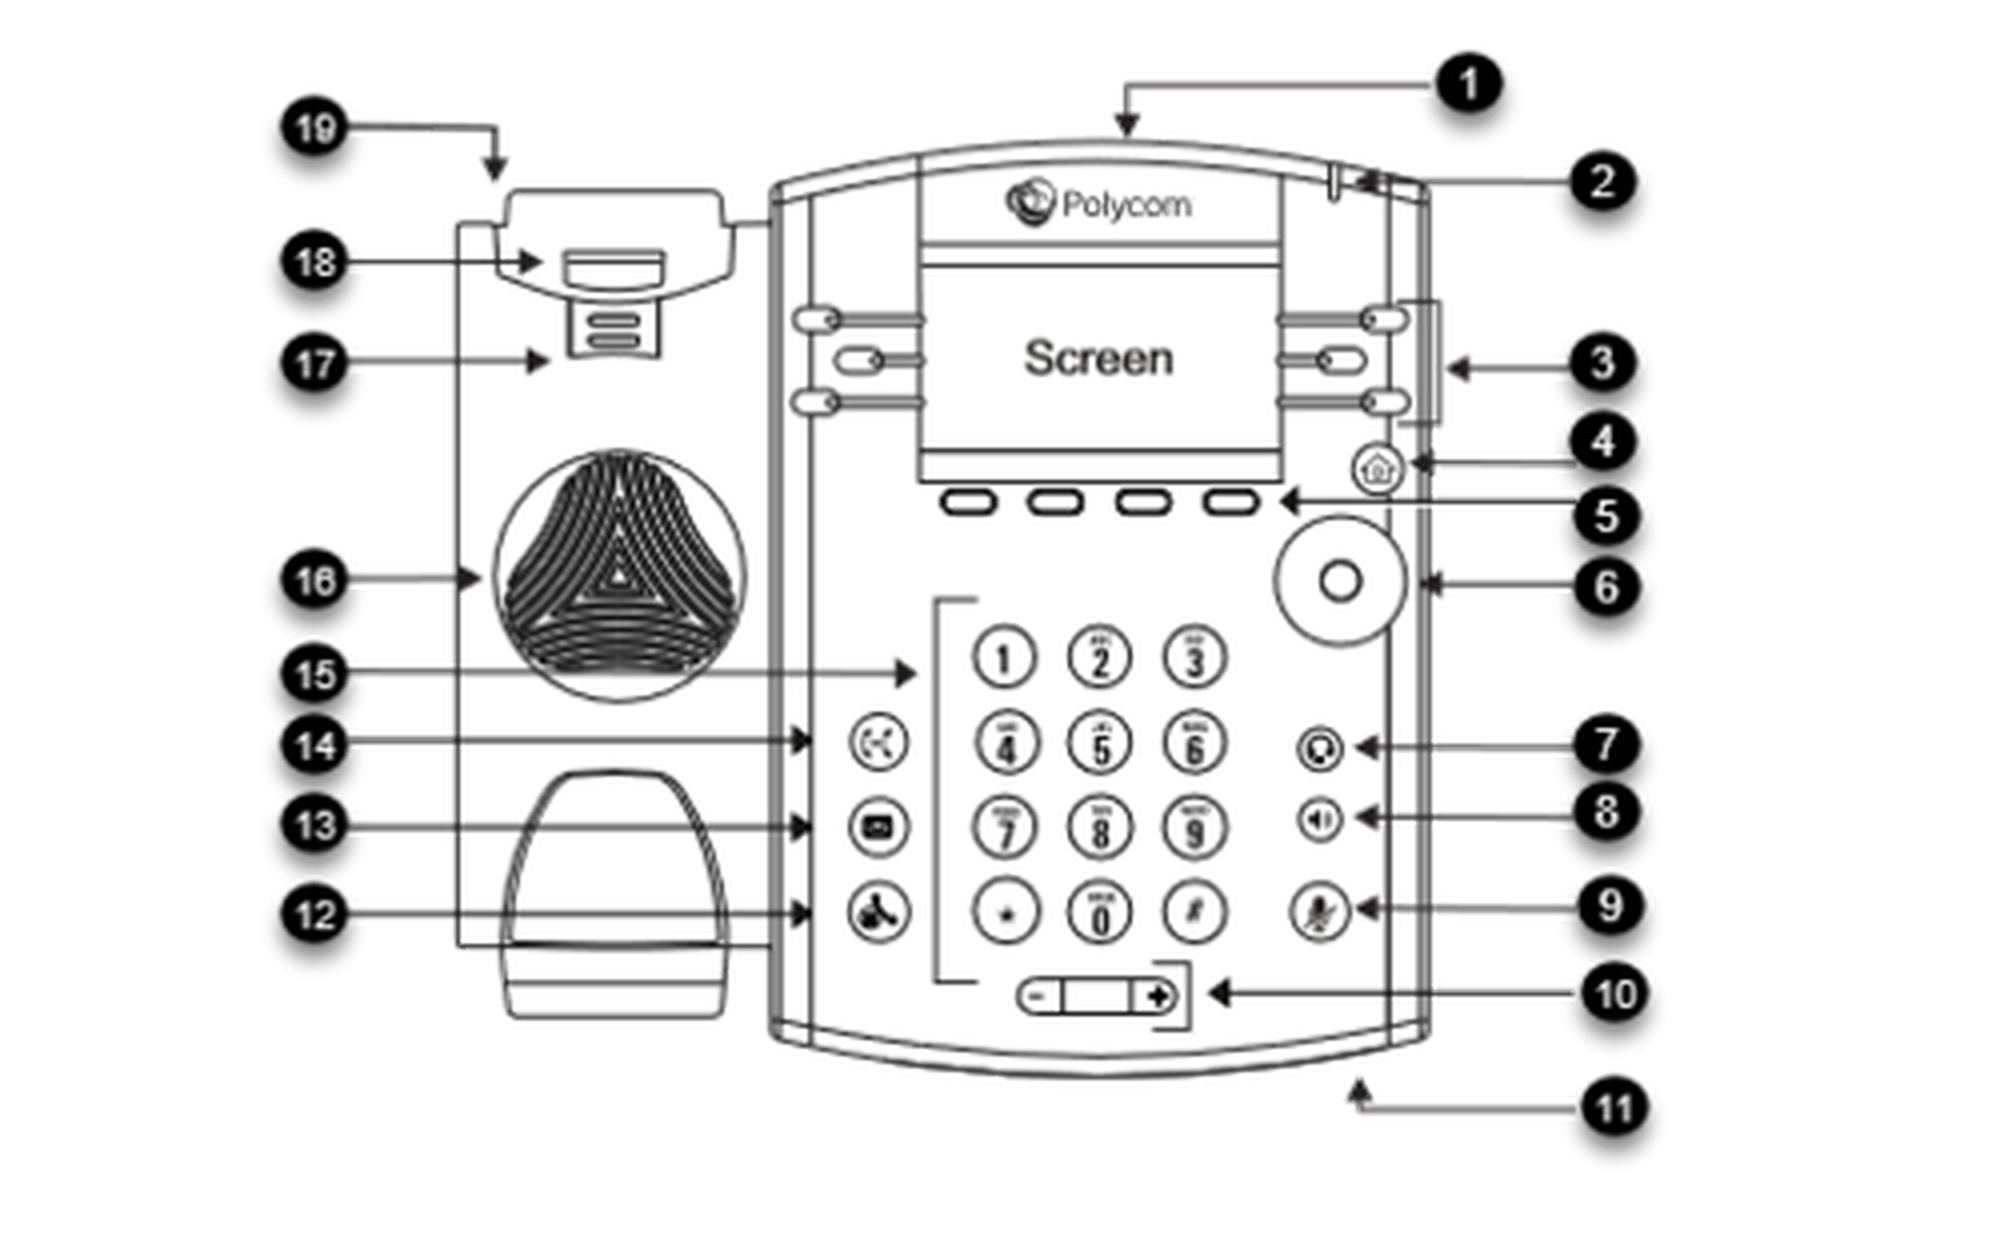
Pos. | Description |
1 | USB port |
2 | Message Waiting Indicator |
3 | Line keys |
4 | Home key |
5 | Soft key |
6 | Navigation keys/ select key |
7 | Headset key |
8 | Speakerphone key |
9 | Speakerphone key |
10 | Volume key |
11 | Microphone |
12 | Hold |
13 | Message |
14 | Transfer |
15 | Dialpad |
16 | Speaker |
17 | Reversible tab (for wallmount installation) |
18 | Hookswitch |
19 | Security slot |
Polycom VVX 501 / 601
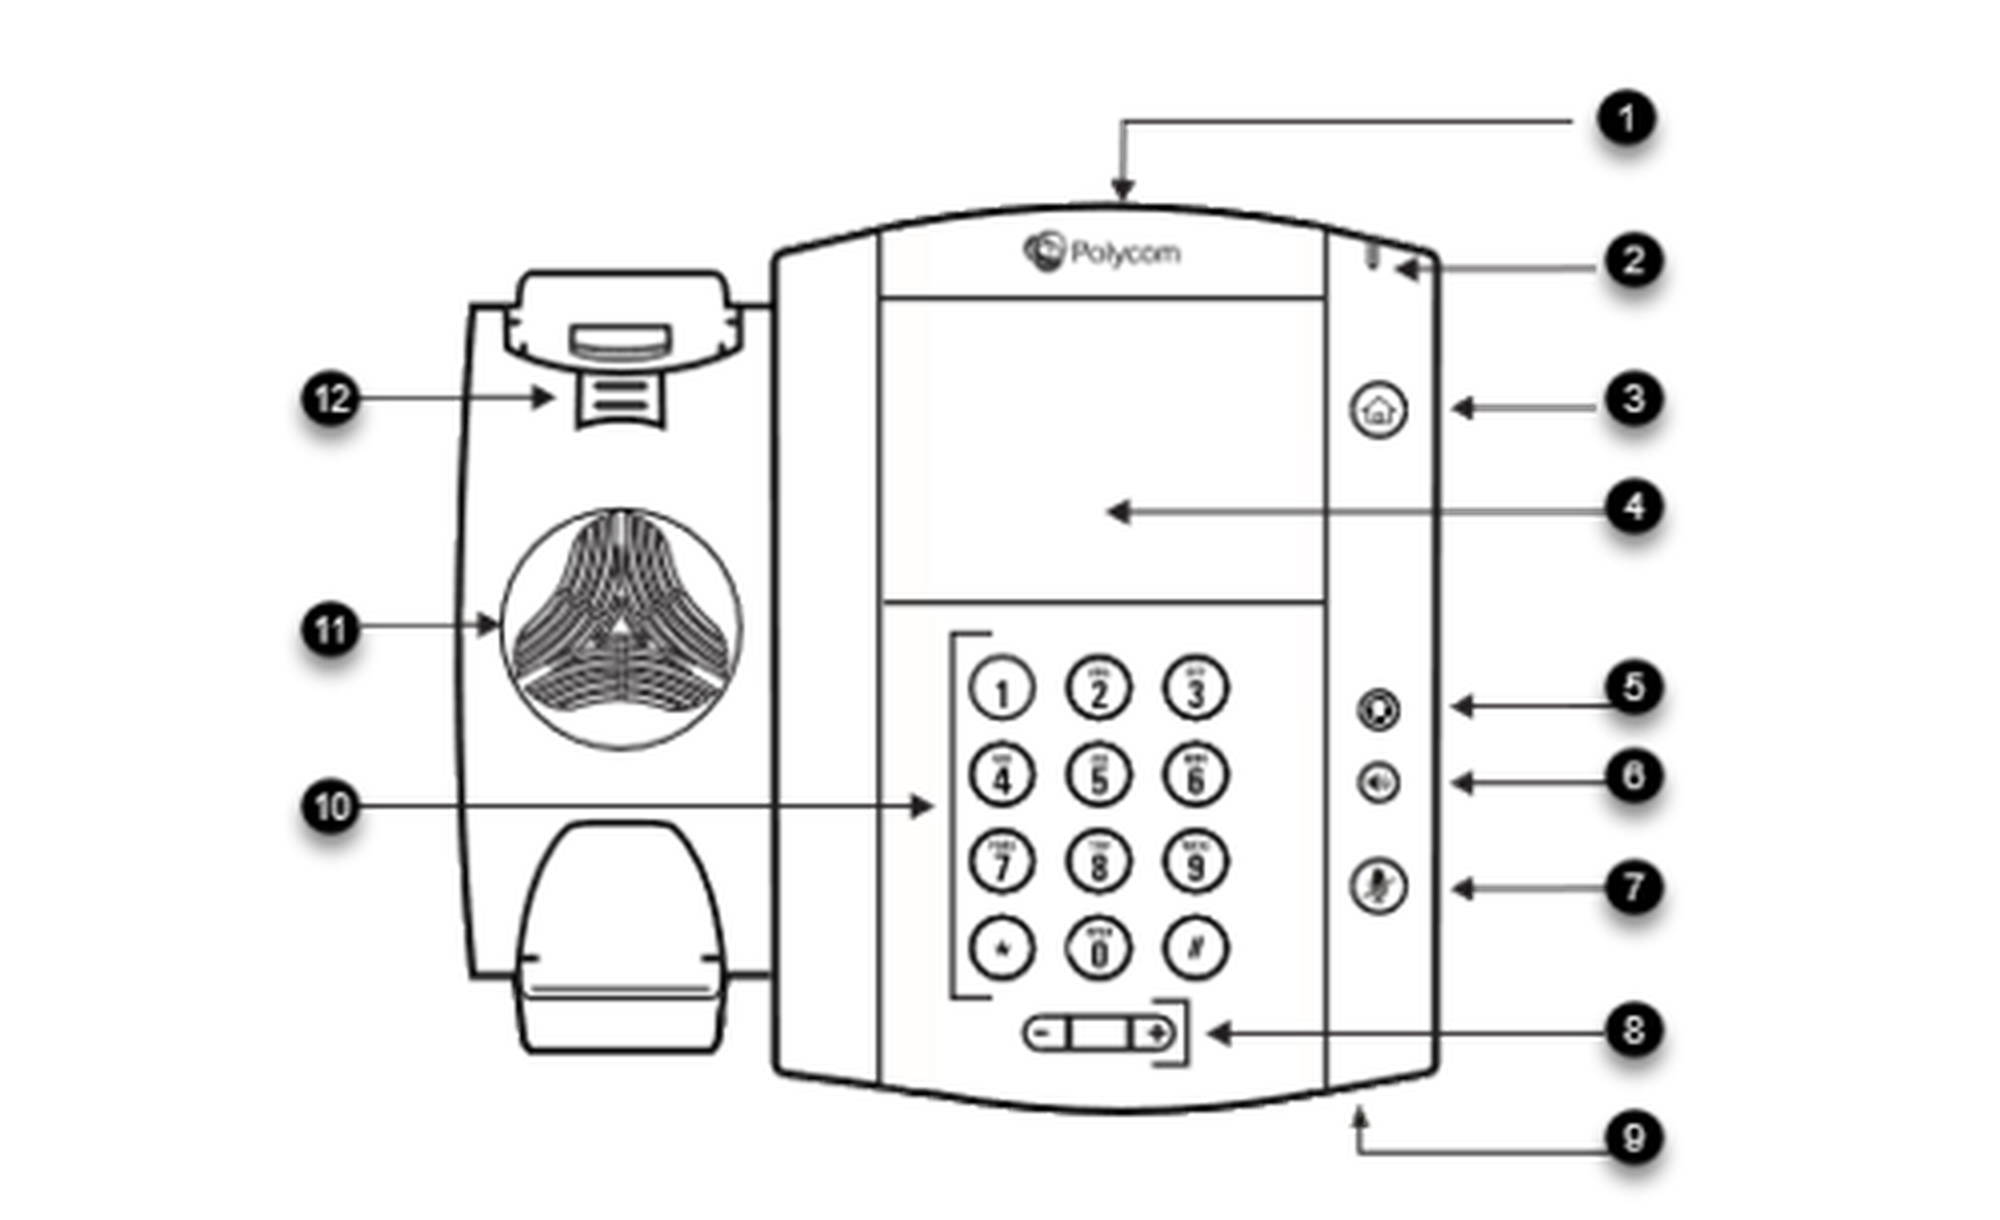
Pos. | Description |
1 | USB port |
2 | Message Waiting Indicator |
3 | Home/line key |
4 | Home/line key |
5 | Headset key |
6 | Speakerphone key |
7 | Mute key |
8 | Volume keys |
9 | Microphone |
10 | Dialpad |
11 | Speaker |
12 | Reversible tab |
1.2. Keys in Detail
Key | Description | |
| You can use the navigation keys to steer through the menu. On the initial page: Down: Menu Up: History Left: Telephone settings Right: Directory search | |
| Adjusts the speaker's and telephone's volume | |
| Mutes the microphone | |
| Headset | |
| Speaker | |
Transfer* | ||
Hold conversation* | ||
* not available for Polycom VVX 501 & 601 |


1.3. Outgoing Call
Note
Entering the extension number is sufficient when performing an internal call. If you choose to perform an external call, you have dial the exchange identification code (e.g. "9" for UK) prior to the external number.
You have the following options to perform an outgoing call:
Receiver
- Pick up the receiver.
- Enter the telephone number.
- Confirm your call by pressing the Send soft key.
- End the conversation by pressing the soft key End Call or hanging up.
Alternative:
- Enter the telephone number.
- Pick up the receiver.
- End the conversation by pressing the End Call soft key or hanging up.
Speaker
- Press the speaker key to activate the speaker.
- Dial the telephone number.
- Confirm your call by pressing the Send soft key.
- End the conversation by pressing the soft key End Call.
Headset
- Activate the headset by pressing the headset key  .
.
- Dial the telephone number.
- Confirm your call by pressing the Send soft key.
- End the conversation by pressing the soft key End Call.
1.4. Incoming Call
To answer an incoming call, you have the following options:
- Pick up the receiver or press the speaker key  to answer an incoming call. Press the headset key in order to answer with your headset.
- End the conversation by hanging up or by pressing the End Call soft key.
1.5. Call Waiting, Toggle & Hold a Call
Call Waiting
The display of the telephone sends out a double knocking sound as soon as a second call comes in during an active conversation.
You have the following options:
-You can take the incoming call by pressing the Answer soft key and set the active conversation on hold.
-You can reject the incoming call by pressing the soft key Reject.
-You can transfer the incoming call without taking it directly. Press the Transfer soft key or the transfer key  *.
*.
Note
Incoming calls can only knock, if the the Call waiting indication (CWI) for the extension is activated. To enable CWI for your phone, select Call Waiting Indication in the menu under Call Settings.
Hold a Call
- In order to hold an active call, press the Hold key or push the Hold button  *.
*.
- To take an incoming call during an active conversation, press the Answer soft key. To reject an incoming call, press the Reject soft key. You can transfer incoming calls directly by pressing the transfer button * or the Transfer soft key.
⇒ The active conversation is now on hold.
Note
Currently, it is not possible to access the central directory during a call on hold.
Toggle
- To toggle between two callers, press the soft key Swap. You can further toggle between the conversations using the navigation keys and confirm your choice by pressing the Resume soft key.
⇒ The active conversation is put on hold and the caller hears a waiting music.
1.6. Call Transfer
To transfer an incoming call, you have the following options:
Attended Transfer
- After taking the call, press the Transfer soft key.
- Now enter the extension number.
- Press Transfer.
- Announce the incoming call.
- To transfer the call, press the Transfer soft key, then you can hang up.
Unattended transfer
- Press the Transfer soft key during an active call.
- Enter the destination extension number and press the Transfer key.
- Hang up.
Note
If you want to perform a transfer during an active conversation follow the next steps:
Answer the call by pressing the Answer soft key.
Press the Transfer soft key.
Choose the line you want to transfer to.
Confirm with the Transfer soft key for an unattended transfer.
Blind Transfer
- Do not take the incoming call.
- Press the soft key Transfer.
- Enter the number.
- Press the Transfer soft key.
- Hang up to finalise the transfer.
Note
- When transferring a call that is on hold, you have the option to perform an unattended transfer by pressing the soft key Transfer, entering the number and press Transfer again.
1.7. Call Forwarding
1.8. Three-Way Calls
Follow these steps to start a conference call:
- Call the first participant.
- Press the Conference soft key.
- Dial the second participant's number.
- Press the soft key Send.
- As soon as the second party answers the call, press the Conference soft key once again to start the conversation with both participants.
Tip
You can split ongoing conferences to seperate calls with the soft key Split. Pressing the soft key Manage allows you to mute or remove participants.
Tip
A conference call with more than three participants is easily established via the administration portal: Please refer to the administration portal manual for more information.
1.9. Do not Disturb (DND)
Mit der Funktion Do Not Disturb (DND) können eingehende Anrufe automatisch abgewiesen werden. (Eingehende Anrufe werden als „verpasste Anrufe“ angezeigt).
Aktivieren Sie den DND-Modus wie folgt:
- Drücken Sie die DND (Nicht-Stören)-Soft-Taste auf Ihrem Display.
Ihr Telefon ist im DND-Modus, wenn auf dem Display das Zeichen  angezeigt wird. Ist Ihr Endgerät im DND-Modus, wird der Anrufer standardmäßig SOFORT auf das Ziel der Weiterleitung "Nach Zeit" weitergeleitet.
1.10 Callback
The Completion of Calls on No Reply (CCNR) creates a callback in case a person cannot be reached (e.g. the person is not on its desk or busy) at the moment.
Note
To use this function, the CCNR function has to be enabled in the administration portal and in the phone extension. Click on the CCNR check box under Administration / Profile to activate the function.
Activate a callback
A caller generates automatic connection establishment within the private branch exchange (PBX) to a previously busy party (only internally). If the the other party cannot be reached, the caller can use the callback function.
- In order to activate the function, insert *5 into your key pad. An acoustic confirmation will finalize the activation.
- As soon as the other party is available again, your end device receives a callback generated by the PBX. As soon as you answer the callback, the PBX sends out a call to the number you tried to reach initially.
Erase Callbacks
- If the callback is no longer needed, all call backs can be erased by entering the **5 code into the key pad. An acoustic confirmation finalises the erase.
1.11. Voicemail
Initial Set-up
When accessing the voice mail system for the first time, set up your personal voice mail.
- Press the message key on the telephone or dial the extension assigned by the administration portal to access the voice mail menu.
- Then select “0 Mailbox Options” to set up your voice mail box.
- Now press “1” to record a message in the event you are unavailable.
- Now record your message and press “#” to end the recording.
- Press “1” to accept the recording, “2” to replay the recording, and “3” to record a second time.
.
Access the voice mail
- Press the Message key  or dial *791 to access the voice mail.
- Enter your extension you saved in the administration portal and your voice mail pin to access the voice mail options.
Tip
You can install your personal voice mail announcement for every extension via the administration portal. These files have to be in .mp3 or .wav format.
Tip
Send voice mail messages to your email account via the administration portal.
Tip
For more detailed information, refer to the voicemail leaflet.
1.12. "Hot Desking"
Die Basisfunktionalität des „Hot Desking“ ermöglicht das Abmelden existierender und das Anmelden neuer Nutzer auf Ihrem Endgerät. Die ist hilfreich, wenn Mitarbeiter oft Ihren Arbeitsplatz wechseln ohne ihre Endgeräte mitzunehmen. Ihre Konfiguration wird automatisch nach dem erfolgreichen Anmelden auf das neue Telefon übertragen.
1. Schritt: Abmeldung der momentanen Nebenstelle
Menü -> Telefoneinstellungen -> Nebenstelle abmelden -> Ja
2. Schritt: Anmeldung der neuen Nebenstell
Menü -> Eingabe der Nebenstellen-Nummer -> Senden -> Eingabe der Voicemail PIN als Passwort -> Senden -> OK
Note
Die An- und Abmeldung der Nebenstelle kann ggf. einige Zeit in Anspruch nehmen.