C. Settings and customisation
1. Settings Overview
Settings overview
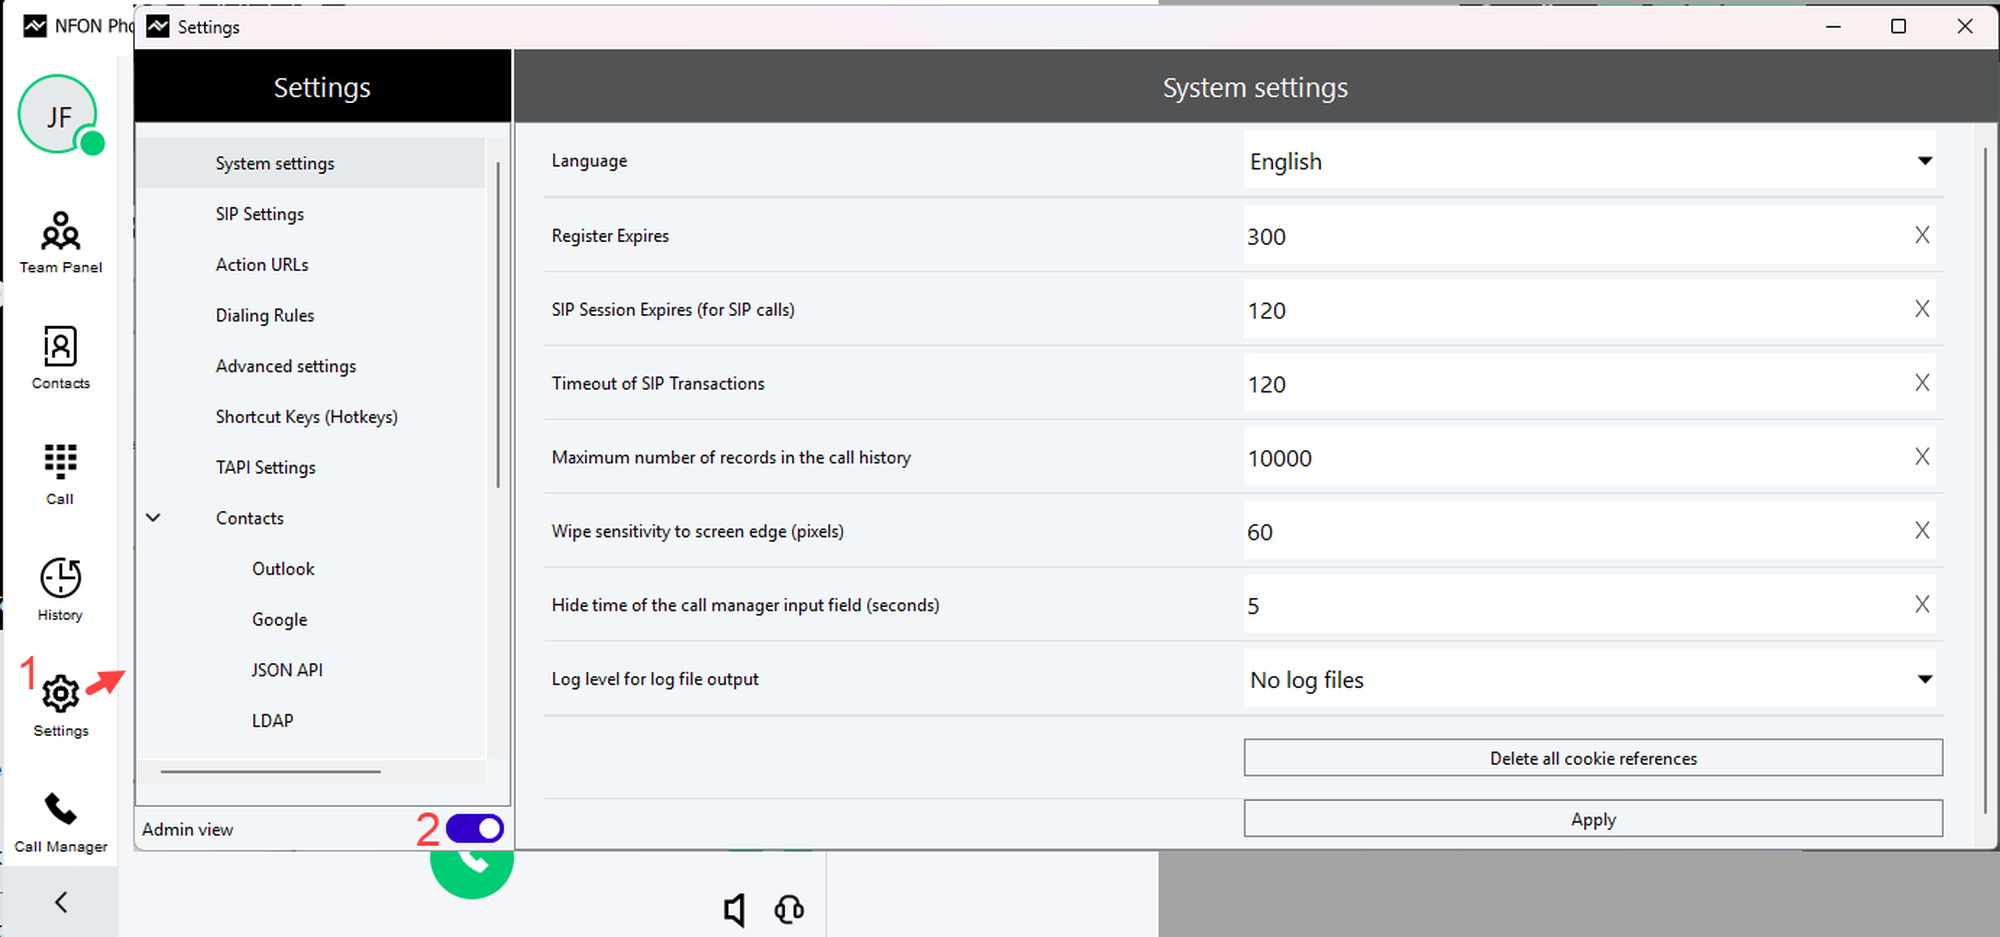
Under Settings, you can:
View the current version number of the software
Download a new software version.
You can use a slider to expand the area for administrators with necessary elements, such as TAPI settings or Action URLs.
Tip
If a new software version is available, this is signalled by a small letter U on the settings button of the toolbar.
Click on the U.
⇒ The software will automatically direct you to Feature overview & backups.
Furthermore, you can export or import individual configurations of the software.
2. System settings
System settings
Click on System settings in the side menu to view the basic Softphone Pro settings.
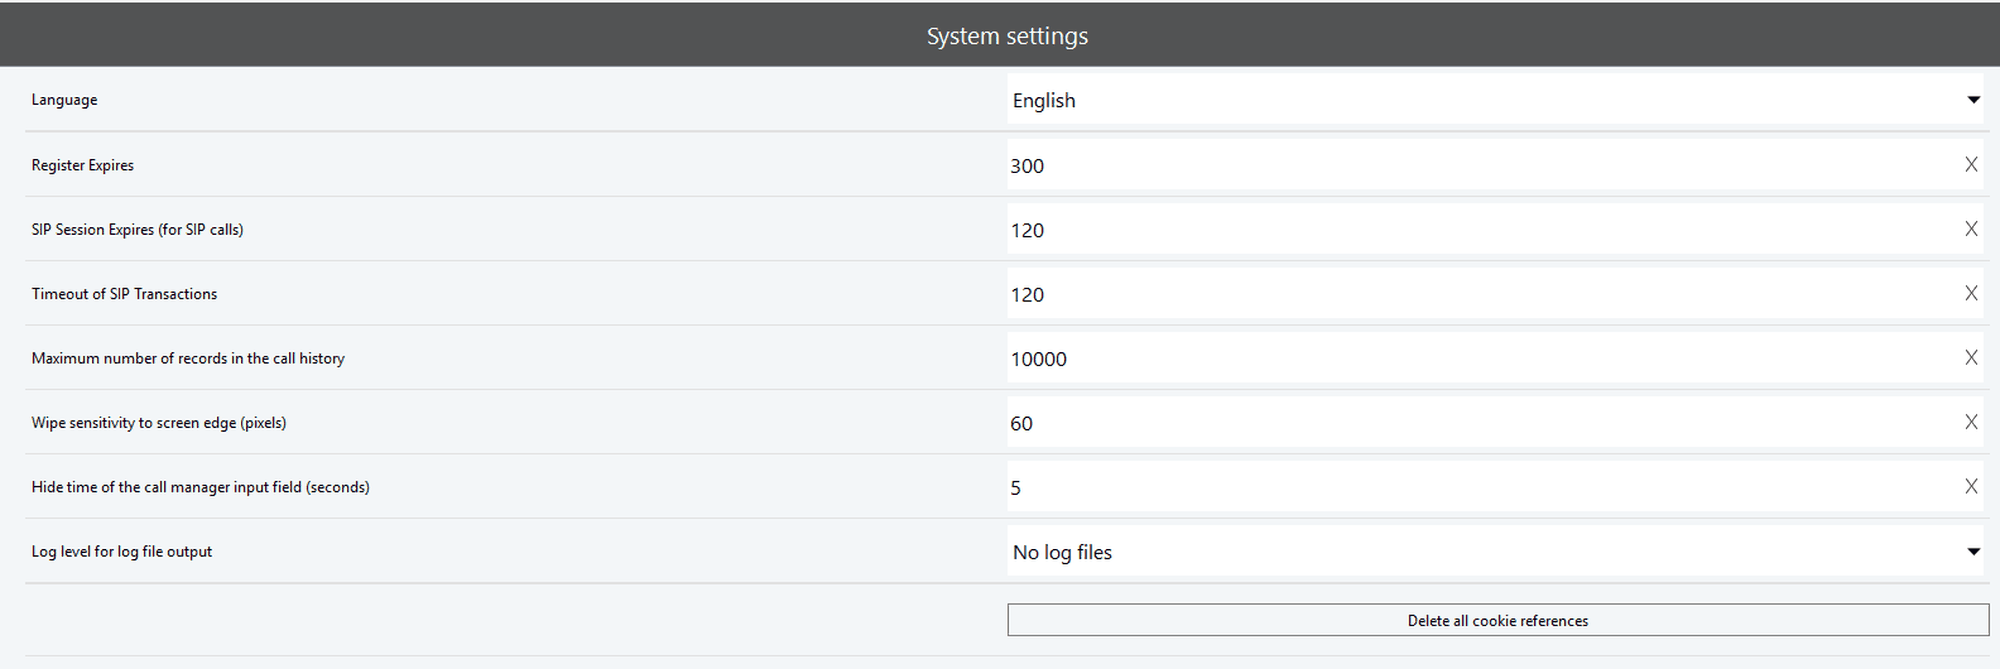
Setting name | Description |
|---|---|
Language | Selects the language in which the software starts |
Register Expires (general) | Sets the time period in seconds over which the registration to the server remains valid Longer expiration time: Device needs to be re-registered less often Shorter expiration time: Ensures that the unit can react quickly to changes in the network connection |
SIP Session expires (for SIP calls) | Defines the validity period of a session |
Timeout of SIP transactions (general) | Defines the time period after which a SIP transaction is terminated if no response is received from the other end |
Maximum number of entries in the call history | Changes the number of history entries displayed For example, you can set it to a lower number to have fewer entries displayed. Please note that a restart is necessary for this setting to take effect. |
Wipe sensitivity to screen edge (pixels) | Sets the minimum wipe size from the bottom of the screen that is needed to minimise/maximise the Softphone Pro windows Decrease to reduce the wipe size that is required to trigger. Increase to enlarge the wipe size that is required to trigger. |
Hide time of the call manager input field (seconds) | Sets the time after which the call manager will disappear if not used |
Log level for logfile output | Sets the precision and granularity of the log files |
3. CTI settings for desktop phones
CTI mode enables you to use Softphone Pro as a CTI Client for another telephony device, such as a desktop phone.
This section describes how to configure CTI mode to work in the NFON environment.
Tip
To access CTI mode settings in the Settings menu, it is necessary to first configure CTI mode and switch to the CTI client by following the steps below.
3.1. Configuring CTI mode
1. Make sure the desktop phone is the primary device by using the star code*55 .
The uaCSTA will always target the primary device.
2. Open Admin Portal 4 .
3. Select Configuration > Devices from the menu in the top left.
4. Select uaCSTA .
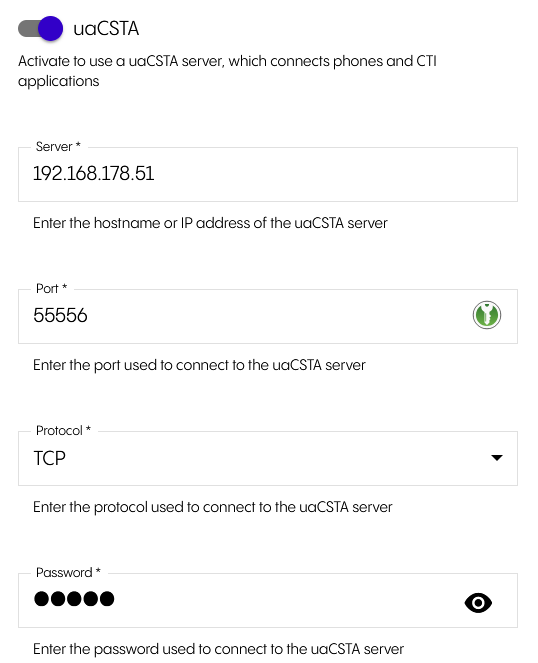
5. Change the uaCSTA settings for your desktop phone as follows:
Setting name | Required input |
|---|---|
uaCSTA | Enabled |
Server | IP address of the local machine, running Softphone Pro |
Port | 55556 |
Protocol | TCP |
Password | It must match the password you'll set in the Softphone Pro settings in Step 2.3 |
6. Save the changes in Admin Portal 4.
3.2. Switching to CTI client
When you start the software for the first time, you are automatically using the softphone client. To control a desktop phone with the software, it is necessary to switch to the CTI client.
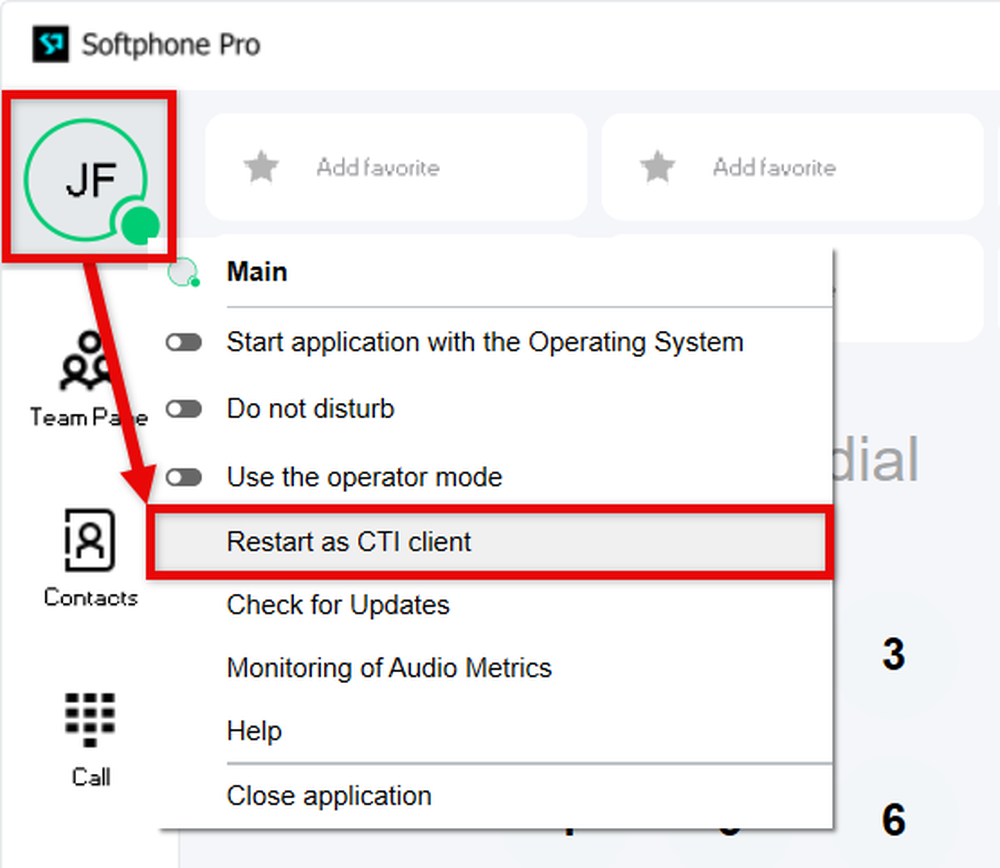
1. Click the user icon in the top left-hand corner of the client.
2. Select Restart as CTI client .
⇒ The softphone will restart in the CTI mode.
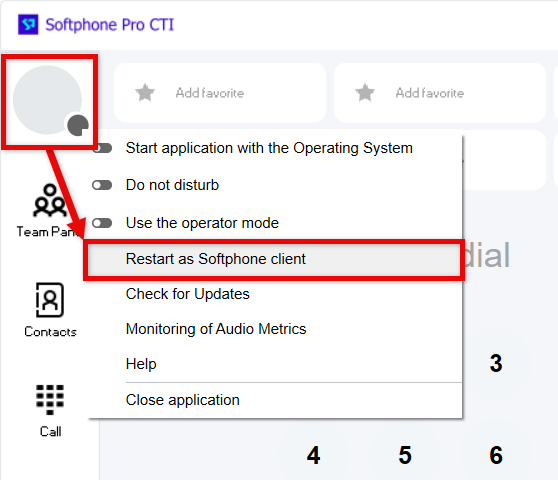
3. To return to the softphone client, click the user icon.
4. Select Restart as Softphone client.
3.3. Applying the connection settings
1. Click Settings in the Softphone Pro client.
⇒ The Settings window opens.
2. Select CTI Settings for Hardware Telephones.
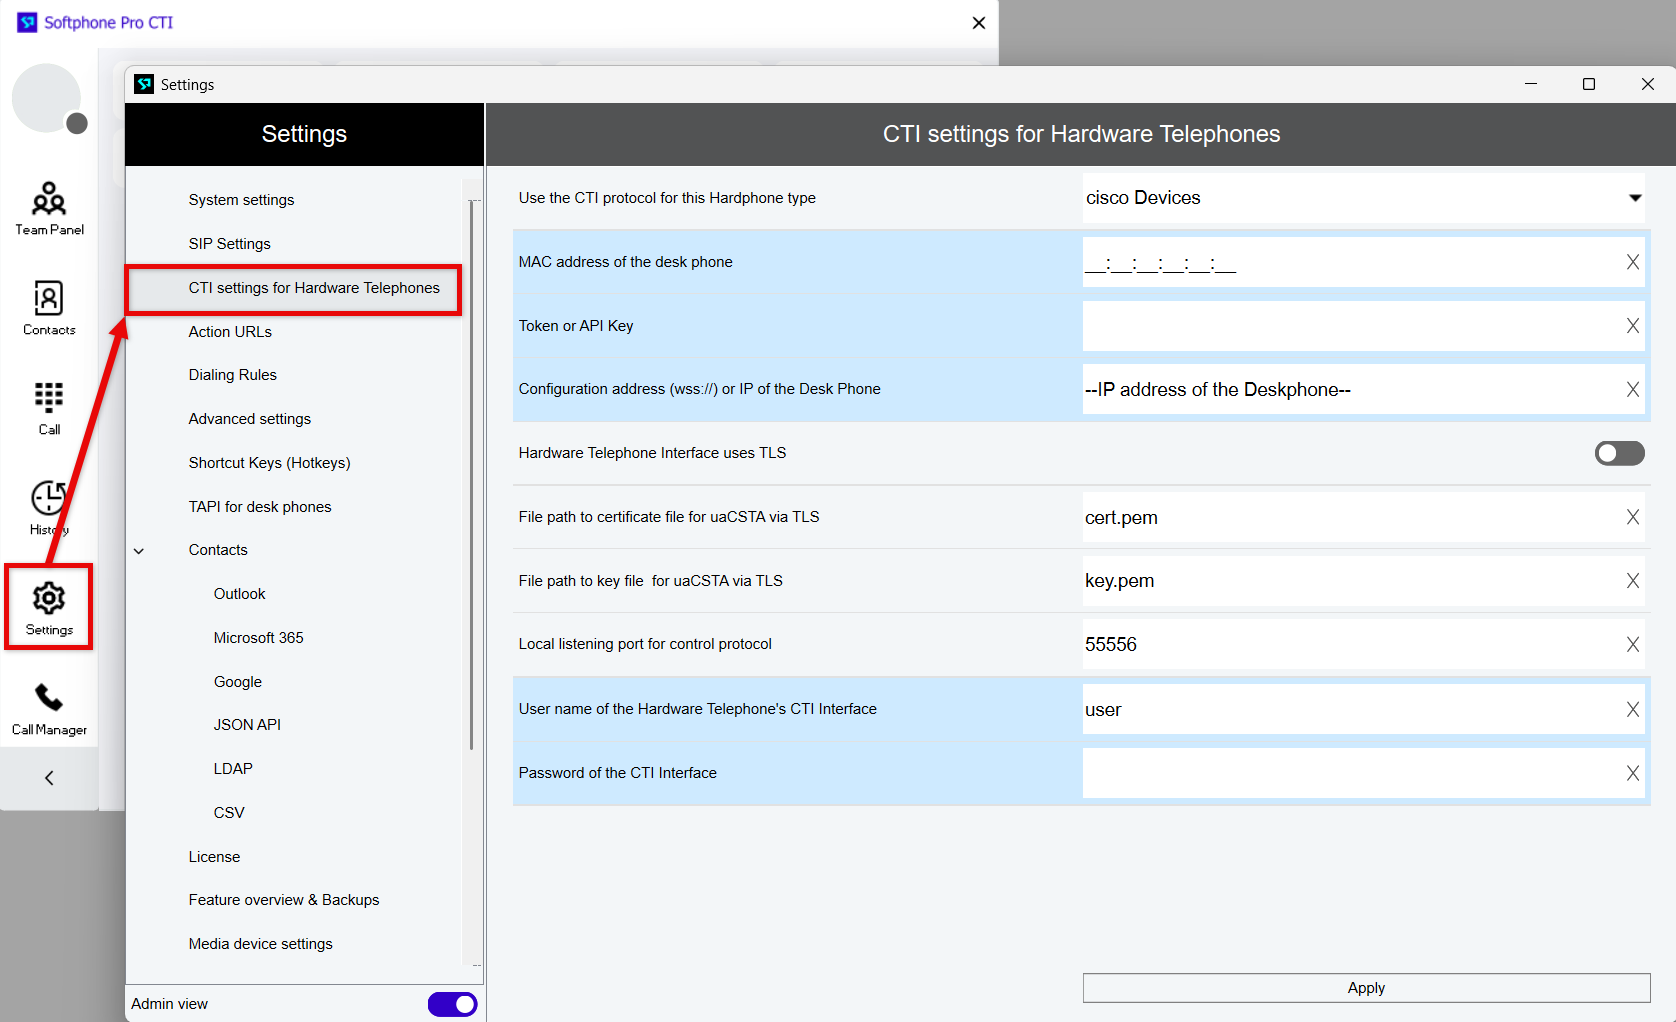
3. Apply the connection settings matching the desktop phone:
Setting name | Required input |
|---|---|
Protocol | |
MAC | empty |
Token | empty |
Address | IP address of the desktop phone you woud like to connect to |
TLS | Disabled |
File path certificate file | |
File path key file | |
Port | 55556 Make sure this matches the port you have configured in Admin Portal 4 in Step 2.1.3. |
Username | MAC address of the desk phone Please note that this is the default we provision to the desktop phone. Do not use capital letters. |
Password | It must match the password you created in Admin Portal 4 in Step 2.1.3 |
When the connection is established, the account status in the toolbar will turn green. You can also see the information about the registration status of the uaCSTA connection in the Log Message Window.
3.4 CTI settings explained
Setting name | Description |
|---|---|
Use the CTI protocol for this hardphone type | Defines the interface for Cisco desktop phones or uaCSTA-enabled desktop phones (snom, Yealink, Gigaset, Mitel, Panasonic) |
MAC address of the desktop phone | The MAC address is a unique identifier of the phone within the network. It consists of a combination of numbers and letters and can be found on the device or in the settings. It is used to identify the phone within the network. |
Token or API Key | A token or API key is a digital key that authorises an application or device to communicate with a server or service. It functions like a password and ensures that only authorised users or systems gain access. |
Configuration address (wss://) or IP address of the desktop phone | The IP address or wss:// address is used to access and control the phone within the network. While the IP address is a numerical identifier, wss:// is used for secure connections. |
Hardware telephone interface uses TLS | Enable if the phone uses TLS (Transport Layer Security) to securely transmit data and prevent unauthorised access. |
File path to the certificate file for uaCSTA via TLS | The file path specifies where the certificate file required for encrypted communication over TLS with uaCSTA is stored. This certificate ensures that the connection is secure and trustworthy. The exact path depends on the system configuration. |
File path to the key file for uaCSTA via TLS | The file path specifies where the key file required for encrypted communication with uaCSTA over TLS is stored. This file is part of the certificate and enables the secure identification of the device or server. |
Local listening port for control protocol | TCP port for data exchange between software and desktop phone. |
User name of the hardware telephone CTI interface | SIP username for the uaCSTA-enabled device, which is used as login credentials for the desktop phone. |
Password of the CTI interface | SIP password for the uaCSTA-enabled device, which is used as login credentials for the desktop phone. |
Tip
The functional features depend on the connected device (desktop or software phone). Therefore, the features shown here may look different on your device.
4. Action URLs
Action URLs
Activate up to 5 action URLs by inserting URLs in the designated areas.
Specify that the URLs are to be displayed in the external standard web browser.
You can (de)activate, delete or edited the stored Action URLs at any time.
Click Apply to apply the changes.
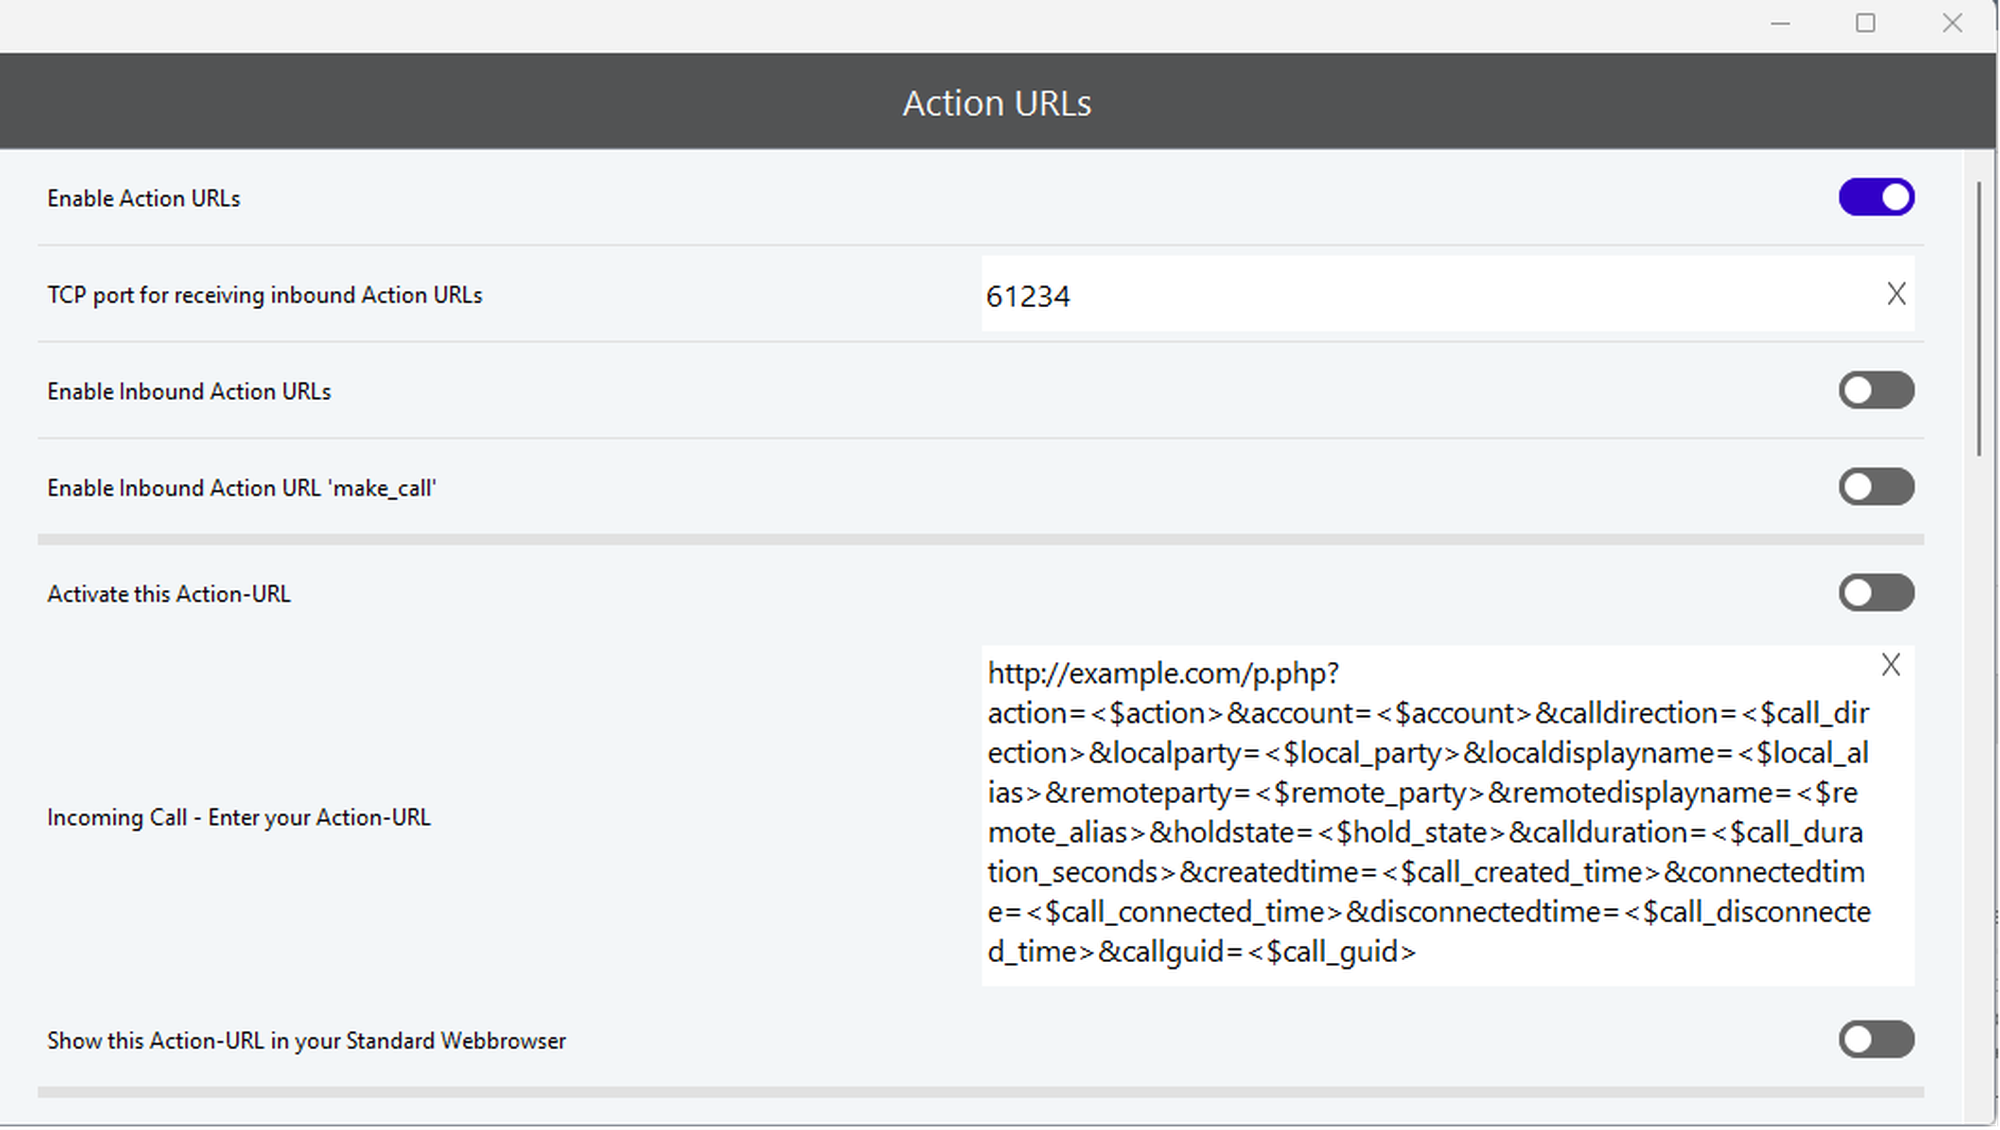
Action URL settings
Setting name | Description |
|---|---|
Enable Action URLs | Activates the usage of Action URLs for incoming and outgoing calls Action URLs are HTTP "GET" requests and may contain variable names as query part of the URL. Outbound Action URLs are typically called by the software when a changed telephone action has been recognised. Depending on the telephone action, the application can send several parameters for calling a website or storing data into a database. Inbound Action URLs are commands that the application should execute, for example, that the software shall initiate an outgoing call. |
TCP Port for receiving inbound Action URLs | Enters a TCP port for receiving HTTP requests |
Enable Inbound Action URLs | Activates the processing for inbound Action URLs The following code structure is provided for incoming inquiries: <IP>?action=some_kind_of_action¶meter =some_kind_of_parameter& .. another_parameter=some_kind_of_other_parameter |
Enable Inbound Action-URL "make_call" | Activates "make_call" ("dial phone number") The following structure is provided for "make_call": http:// 192.168.0.16:61234?action=make_call&target=123 or http:// [2003:a:1514:bc00:2c19:6474:2da5:1dc5]:61234?action=make_call&target=121 |
Activate this Action URL | Activates an individual Action URL Please note that each Action URL has to be activated separately. |
Incoming call - Enter your Action URL | Enters the URL which will be called with a special telephone action/status Currently you can choose between the following actions:
A description of all URL placeholders is available below. |
Show this Action URL in your standard web browser | The Action URL will be opened by the standard web browser of the operating system. |
Placeholder for Action URLs
<$action> | Specifies the type of Action URL:
|
<$call_direction> | Inbound : for inbound calls Outbound : for outbound calls |
<$call_direction_as_int> | 0 for inbound calls and 1 for outbound calls |
<$local_party> | The SIP URI of the local party. In hardware telephone mode: username@domain (e.g. 987@example.com) |
<$local_alias> | Display name of the local party In hardware telephone mode this equals <$local_party> due to the lack of data. |
<$hold_state> | Is either on_hold if the call is on hold or off_hold when the call is in the connected state |
<$call_duration_seconds> | Number of seconds since the call has been answered This number might differ from the difference of <$call_disconnected_time> - <$call_connected_time> due to internal delays by up to 2 seconds. The time base for this variable is within the call object that is visible to the user. |
<$call_created_time> | Time and date of call creation Example: 2019-03-25T10-34-22 |
<$call_connected_time> | Time and date since the call has been connected Example: 2019-03-25T10-34-27 |
<$call_disconnected_time> | Time and date when the call was disconnected Example: 2019-03-25T10-34-34 |
<$call_guid> | A globally unique string representing a 128-bit number that contains date and time, as well as at least 64 bit of true random data This parameter is useful for storing all calls, e.g. in a call center in a single database. Example call GUID: 1399c8c8-cf9e-3ebe-764f-d12b1f7bea35 |
<$remote_party> | Delivered phone number of the remote party |
<$remote_alias> | Delivered display name of the remote party |
Example of an output
action | inbound | BASE64_DECODE_ERROR |
calldirection | inbound | BASE64_DECODE_ERROR |
localparty | 303-14943821 | BASE64_DECODE_ERROR |
localalias | "Michael" (303) | BASE64_DECODE_ERROR |
holdstate | off_hold | BASE64_DECODE_ERROR |
callduration | 0 | BASE64_DECODE_ERROR |
createdtime | 2022-02-13T17-43-50 | BASE64_DECODE_ERROR |
connectedtime | 1899-12-31T00-00-00 | BASE64_DECODE_ERROR |
disconnectedtime | 1899-12-31T00-00-00 | BASE64_DECODE_ERROR |
callguide | 2843c1f9-1f8b-375a-0e01-e8682f222c10 | BASE64_DECODE_ERROR |
remoteparty | 420 | BASE64_DECODE_ERROR |
remotedisplayname | "Michael D785" (420) | BASE64_DECODE_ERROR |
5. Dialling Rules
Dialling rules
Dialling rules can be set for inbound and outbound calls.
Right-click on the table to add a new rule (or delete an existing rule).
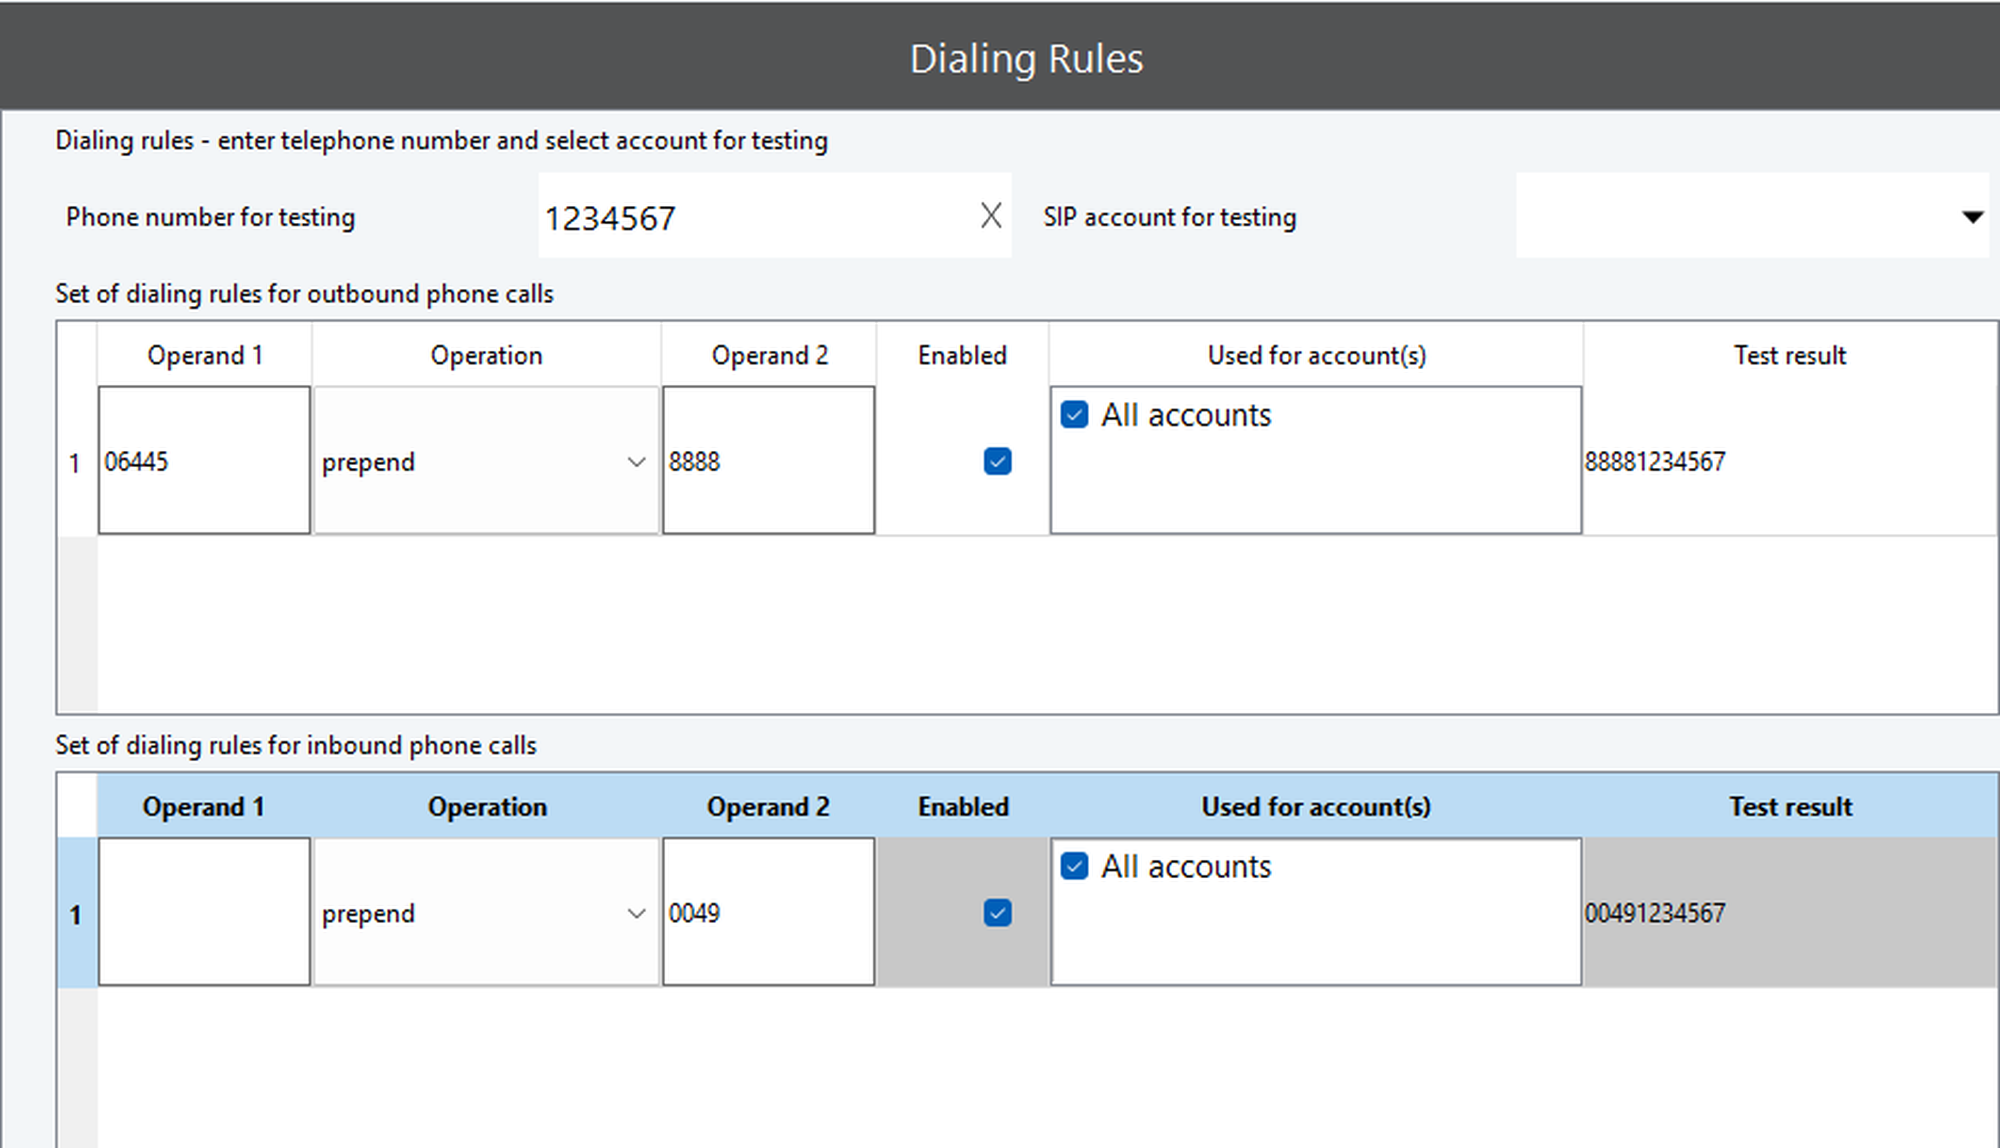
Dialling Rules settings
Setting name | Description |
|---|---|
Test number | Enters a test number The number will be formatted depending on the entered dialling rules. |
SIP account for testing | Selects the SIP account you want to use for testing the dialling rules |
Operand 1 | Number or character string which shall be searched/edited |
Operation | Selects an action from the drop-down list prepend → adds "Operand 2" as prefix append → adds "Operand 2" as suffix replace → replaces "Operand 1" with the entered number/charset replace exact match → replaces only if all characters match |
Operand 2 | Number or character string which shall be searched/edited |
Enabled | Enables or disables the dialling rule. |
Used for account(s) | Determines for which SIP accounts this dialling rule will apply |
Test result | Displays the formatted phone number after applying the dialling rule |
6. Advanced settings
Advanced settings
Click on Advanced settings in the side menu to view the advanced Softphone Pro settings.
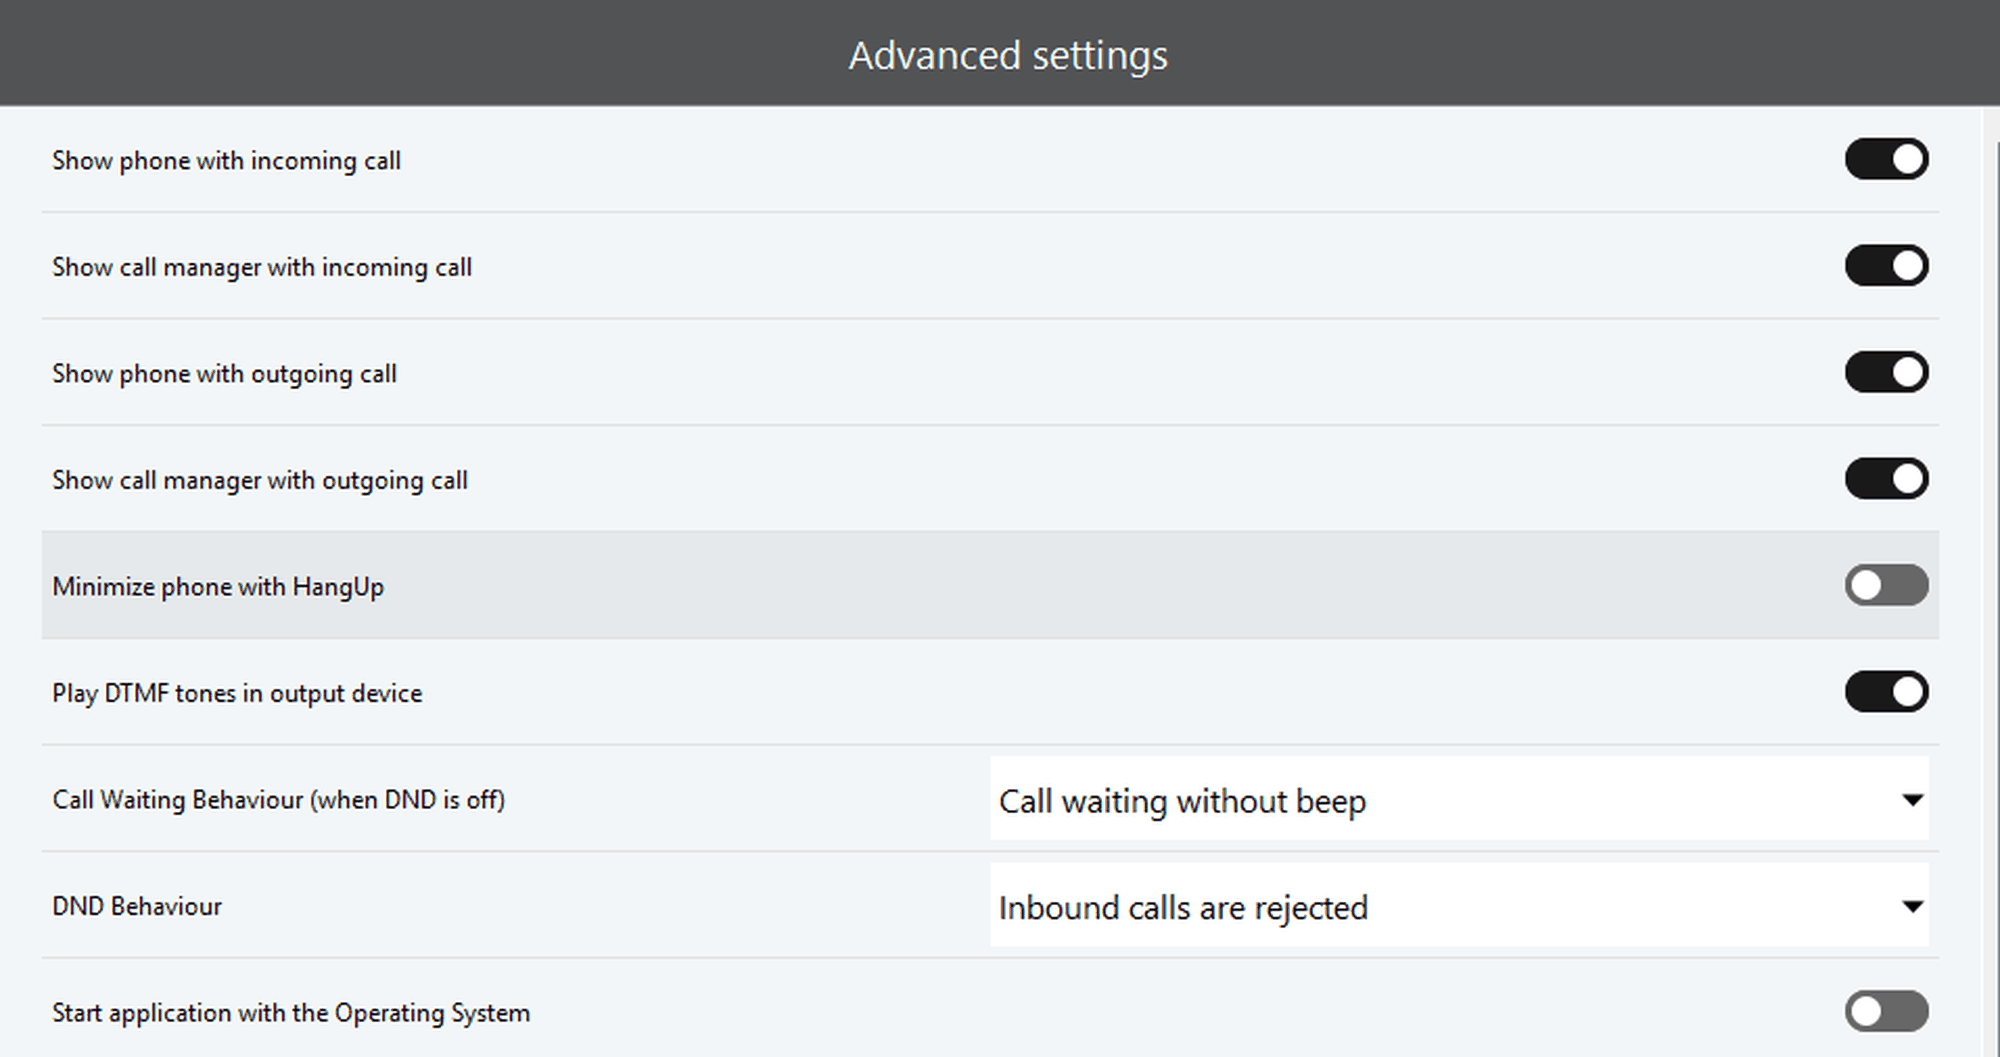
Setting name | Description |
|---|---|
Call waiting behaviour for incoming calls (when DND is off) | Handling of incoming calls when DND is not active The features can only be used if the connected device supports the feature and provides the option. |
DND behaviour | Activates DND with treatment options for signalling The features can only be used if the connected device supports the feature and provides the option. |
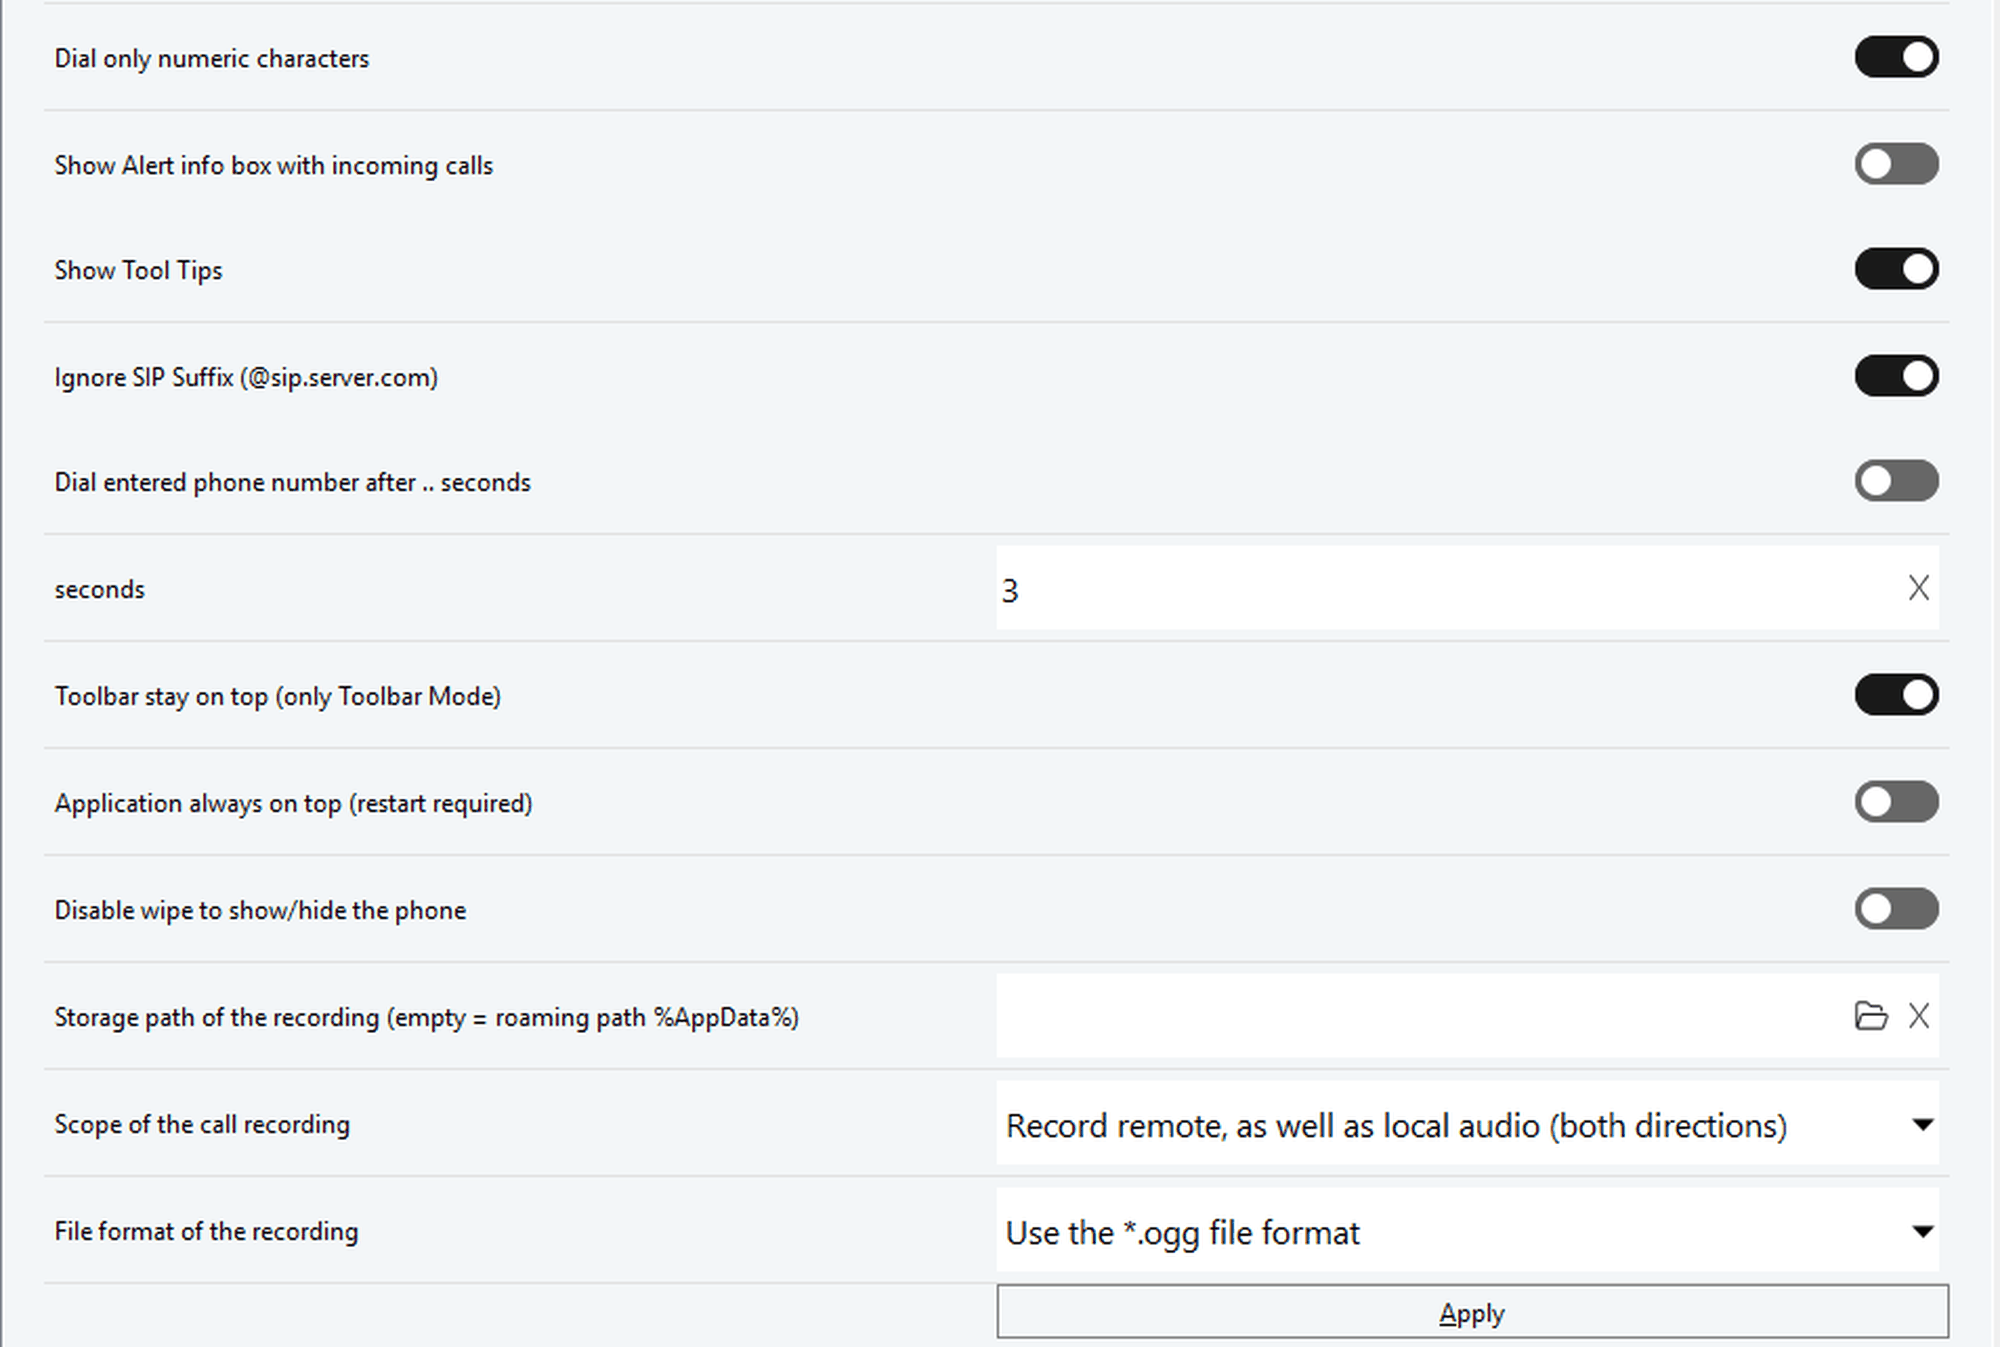
Setting name | Description |
|---|---|
Dial only numeric characters | Selects only numbers, no letters Activated by default |
Show Tool Tips | Activates showing tool tips As you hover the mouse over an element, a pop-up window opens. |
Dial entered phone number after ... seconds | Sets the time after which the entered call number is to be dialled |
Toolbar stay on top (only Toolbar Mode) | Keeps the toolbar in the foreground The application remains in the foreground. |
Disable swipe to show/hide the phone | When enabled, shows/hides Softphone Pro by moving the cursor two times repeatedly to the bottom of the screen. |
Storage path of the recording (empty= roaming path %AppData%) | Select the recording's storage path on your computer. If left empty, the file will be saved in: roaming path %AppData%. |
File name of the recording ("mytext-<$call_guid>_<$DateTime(yyyy-mm-dd-hh-mm-ss)") | Enter your desired filename. The output will be saved in the format shown. |
Scope of the call recording | Sets the recording direction (both or one-way), as follows:
|
File format of the recording | Available file formats are:
|
7. Shortcut keys / hotkeys
Shortcut keys / hotkeys
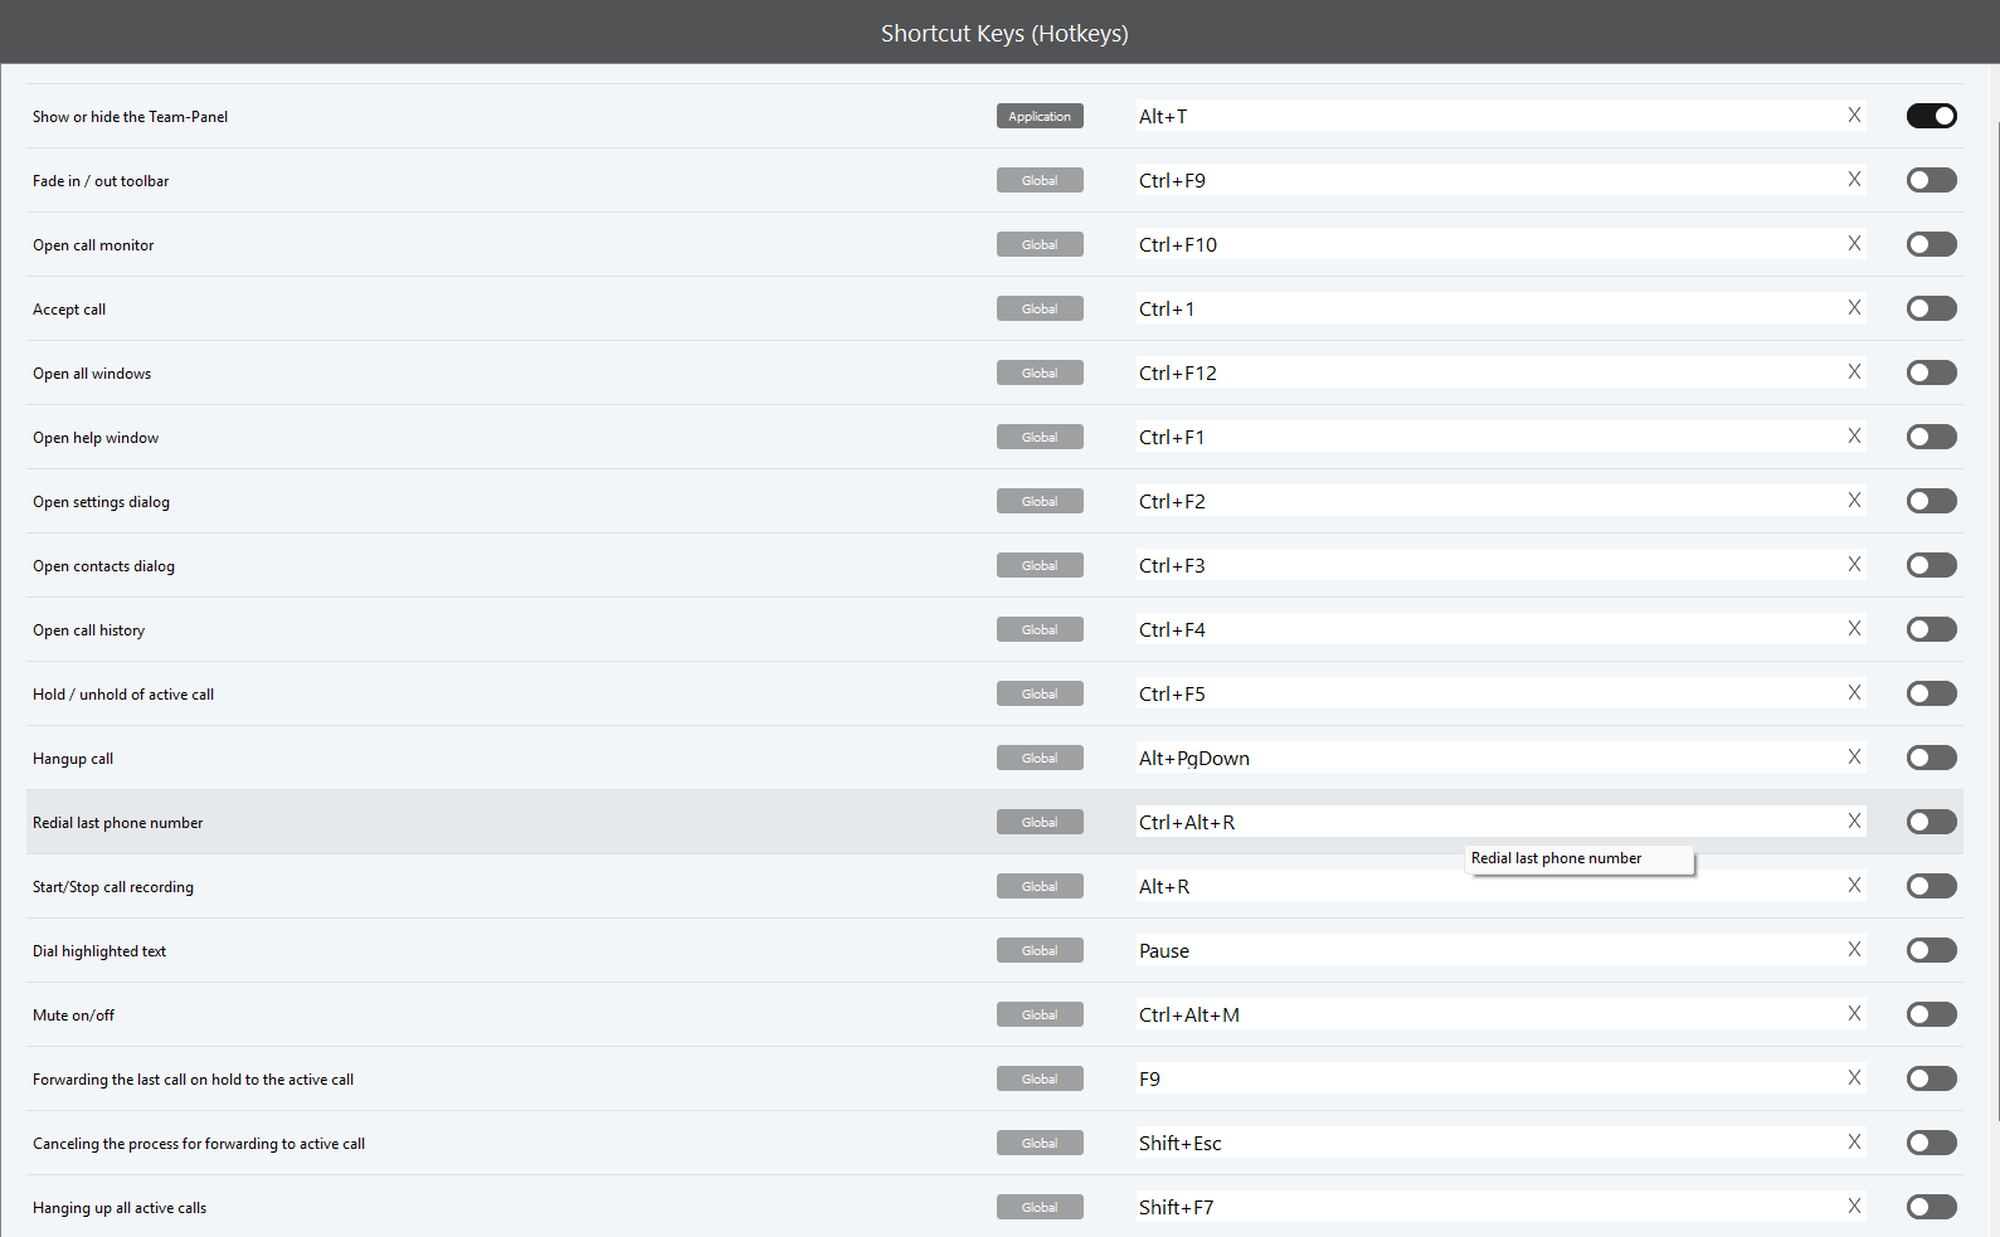
You can switch the keyboard shortcut on or off by pressing the slider on the right side.
To change the keyboard shortcut
Highlight the input field.
Type the desired key combination.
⇒ The program automatically recognises the key sequence.
Click Apply to save the settings.
If you switch on the toggle of a certain shortcut key, the display changes from Global to Application. This means the shortcut key only works within the open application.
If the toggle is off, the shortcut is set to Global. This means you can use the shortcut key anytime.
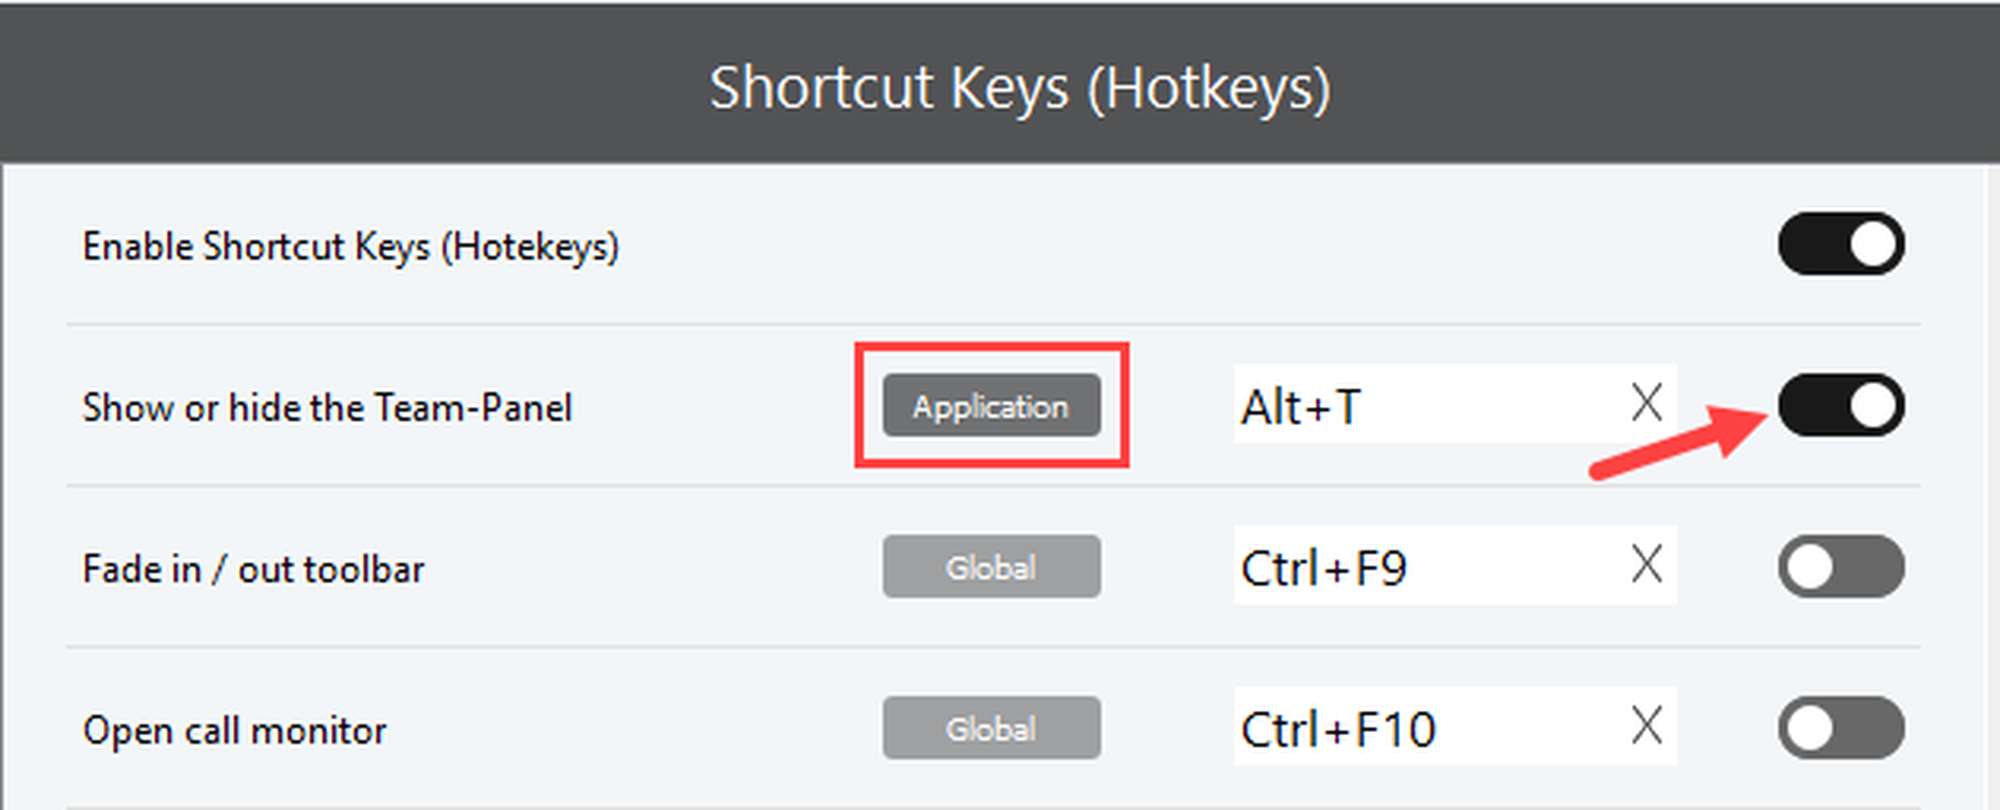
The default shortcut keys (hotkeys) are:
8. TAPI for desktop phones
Note
To use this feature, you need the TAPI driver provided in the Softphone Pro installation process. If you didn't install the TAPI driver, please repeat the installation of your Softphone Pro.
TAPI for desktop phones
If you would like to use TAPI on the workstation on which the software is installed, no special settings are required. The software finds all the settings automatically.
If you would like to use the TAPI service on a remote computer, such as a terminal server, make sure to do the following:
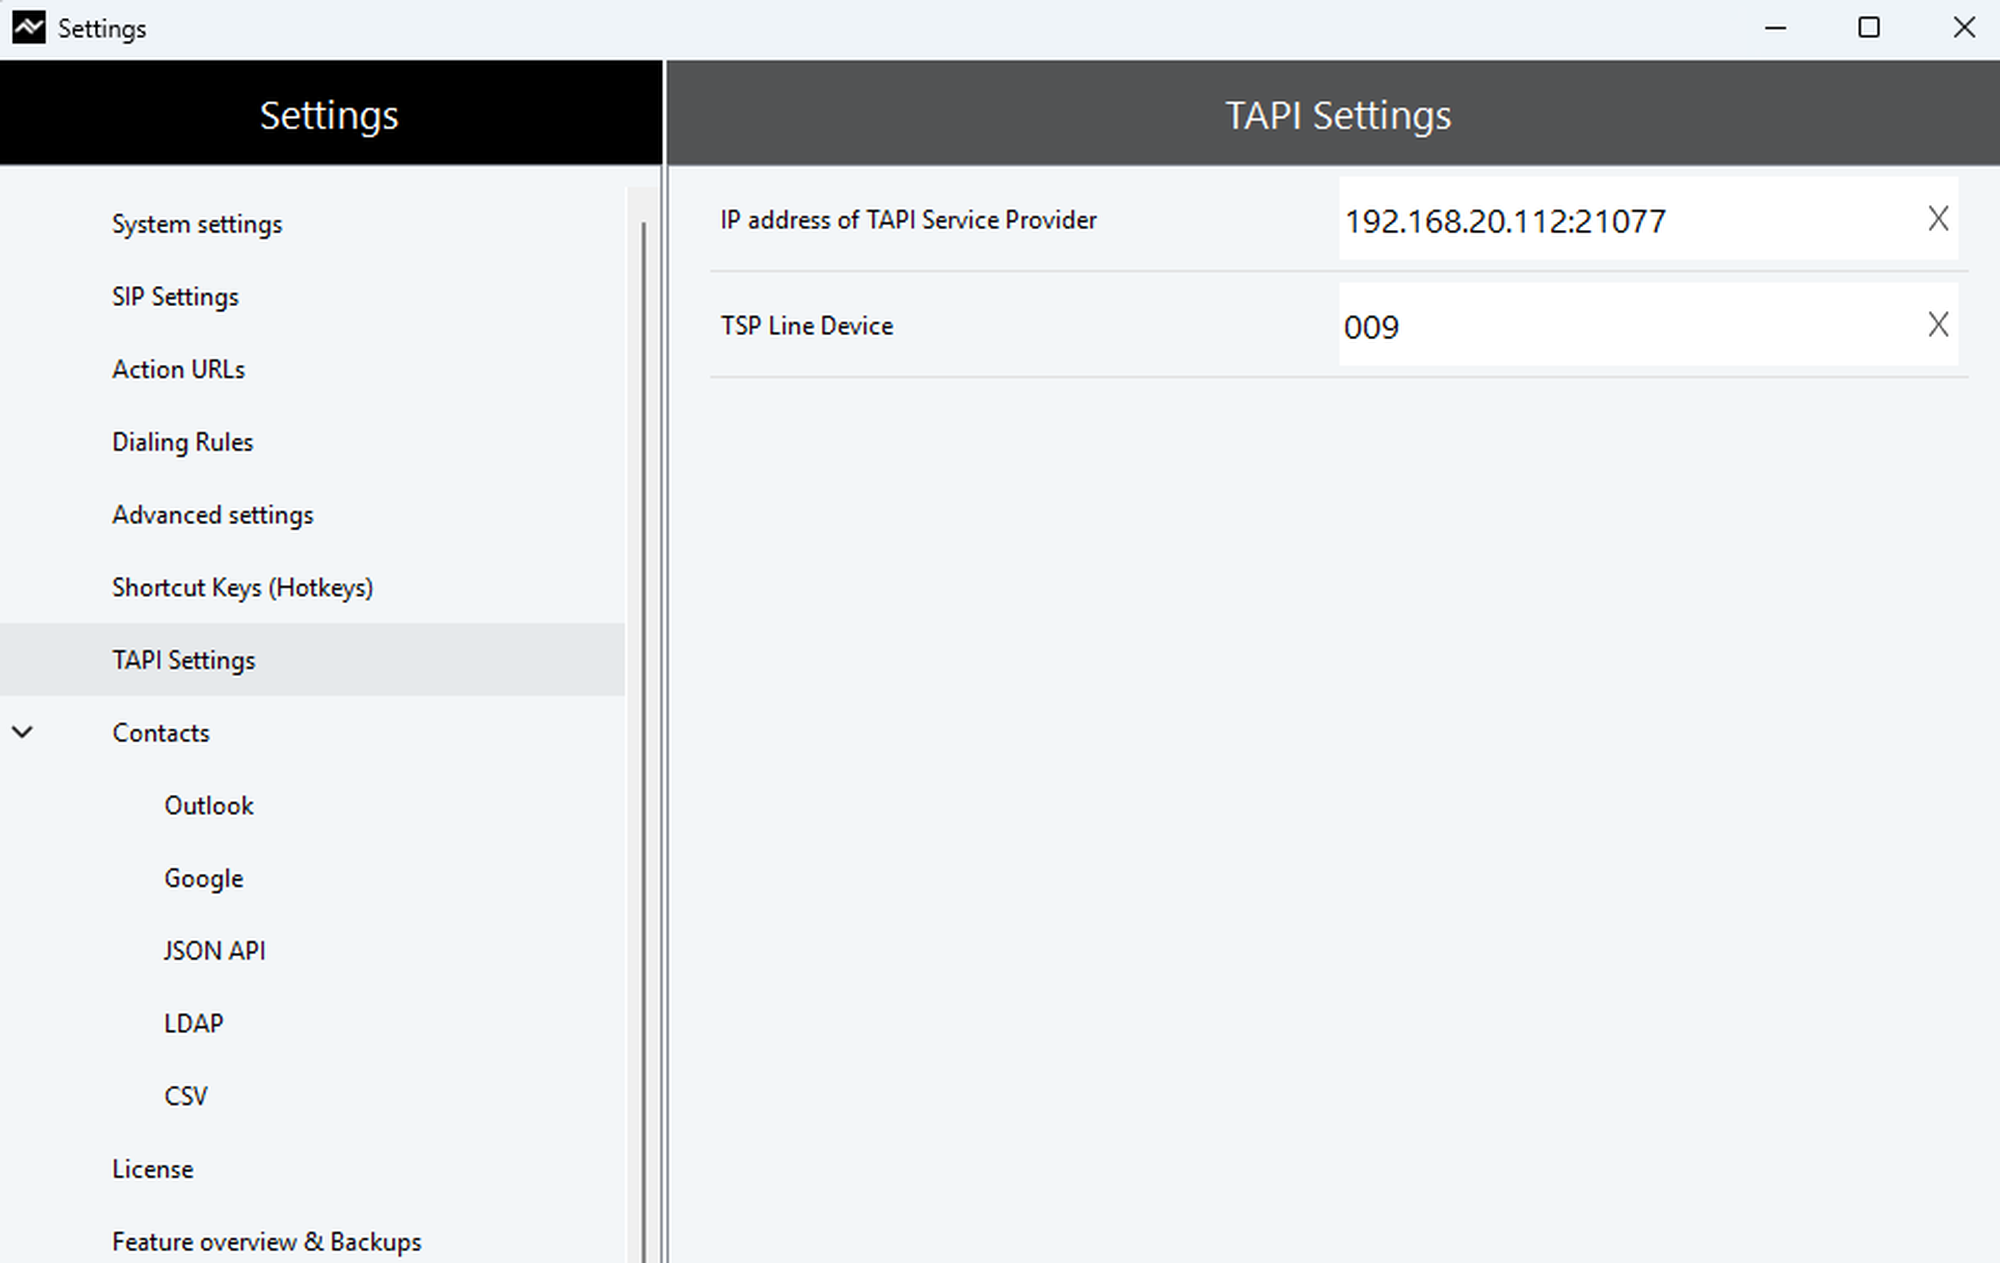
Enter the domain or IP address of the server or PC on which the TSP driver is set up and accessible.
2. Add the TCP port under which the TSP driver is addressed.
Example: 192.168.20.112:21077
Select a numeric TAPI line number on which data is to be exchanged.
Please note that each TAPI line can only be paired with one device.
Customer-specific sender ID for TAPI
Sends a specific, fixed TAPI ID. The CLIP feature must be supported by the SIP service provider.
Please note that it is only available in CTI mode.
Select a TAPI line in the respective SIP soft client that is to communicate with the TAPI server instance.
Enter your TAPI server address (e.g. your terminal server) including the TCP port.
Select Use Server to activate the TAPI server function.
8.1 TAPI lines
TAPI TSP
Calls that are routed through the softphone are signaled by our TSP (Telephony Service Provider) automatically to all other TAPI compliant applications (Outlook plug-in or other third-party CRM software). Third-party applications can use information that is offered by the phone to open contact windows or notice forms.
TAPI TSP requirements
Supported Systems | 32 and 64 Bit |
Provider name | GlobalIPTel TSP (32Bit) or GlobalIPTel TSP (64Bit) |
TSP Line (Device) | GlobalIPTel Multiline 000 - 049 (standard, line count depends on license) |
TSP Address | GIT address |
TAPI Version | TAPI 2.0 |
Multiline TSP
The TAPI TSP allows the parallel assignment of TAPI lines.
As a default, no individual TAPI line is set. No further configuration is required. Softphone Pro runs in a standard mode and is immediately useable (backward compatibility).
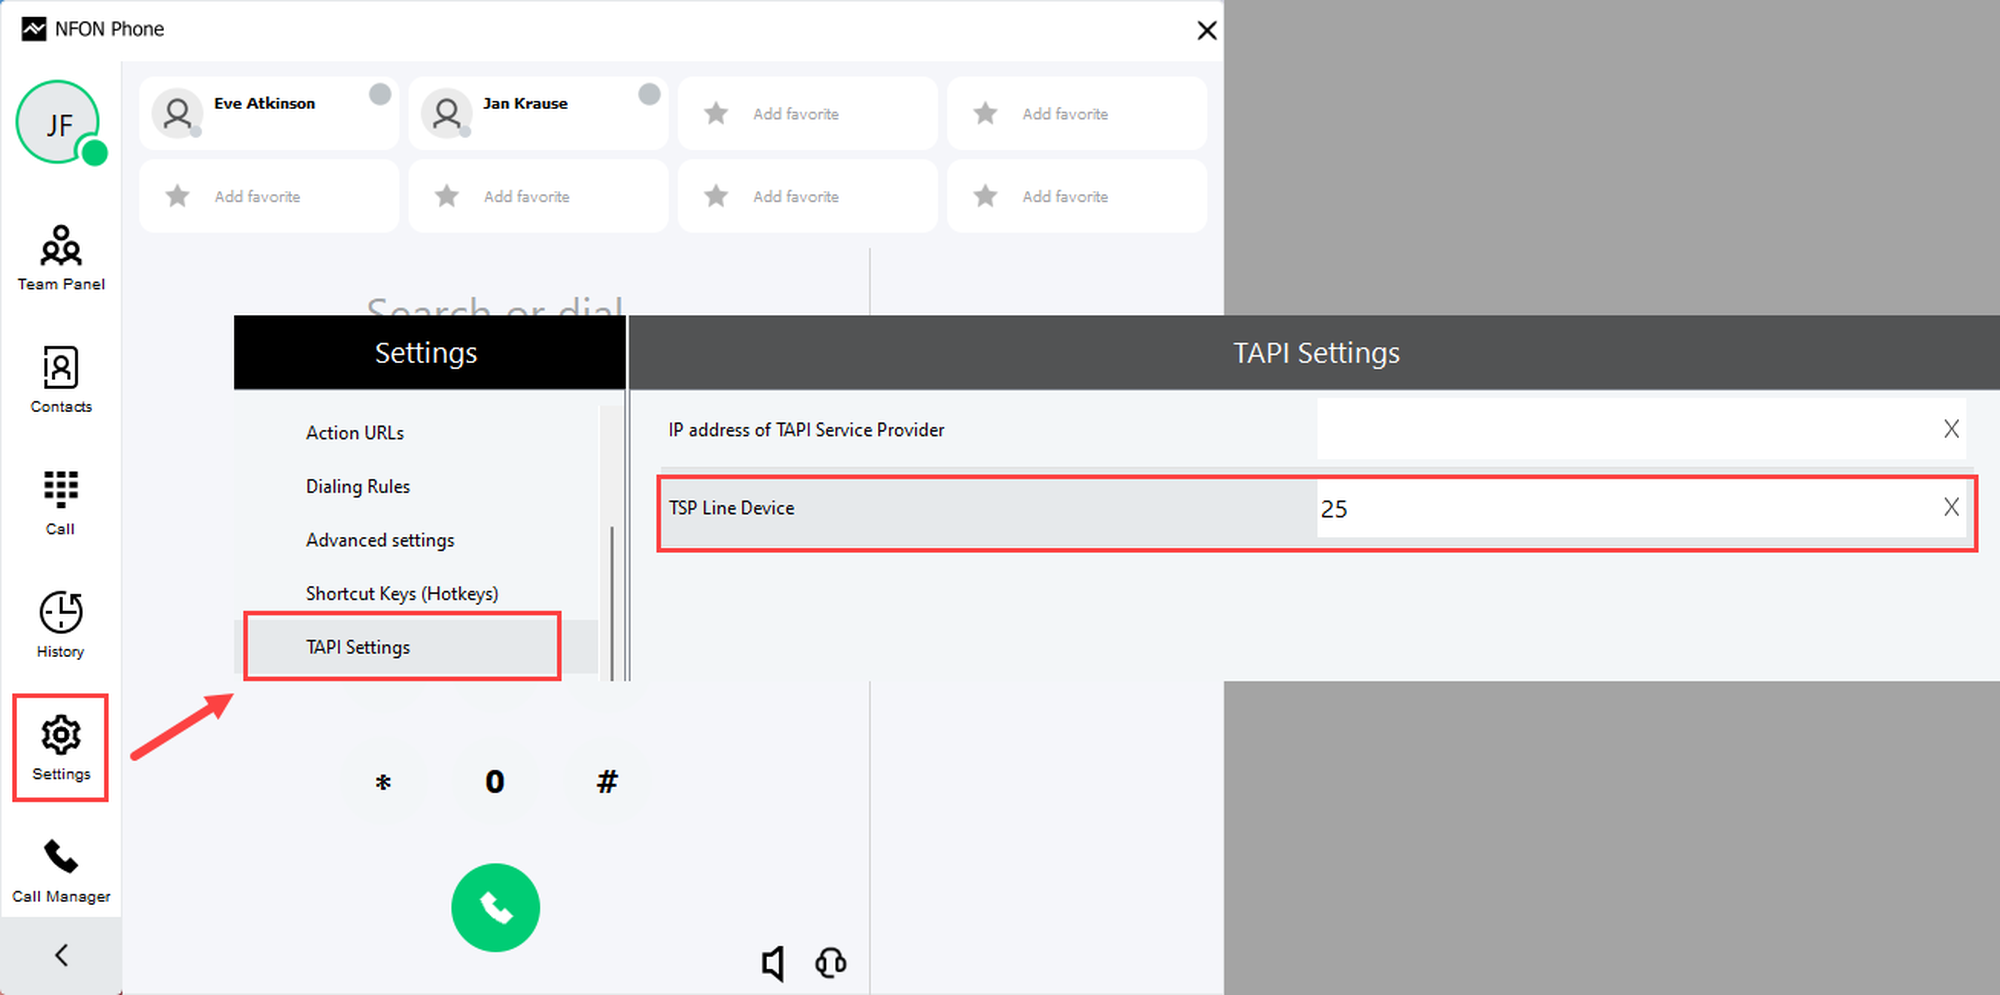
Should an individual TAPI line be used, set the desired TAPI line under Settings -> TAPI settings.
Please note that it is also needed to set the TAPI line in third-party applications (TAPI Client).
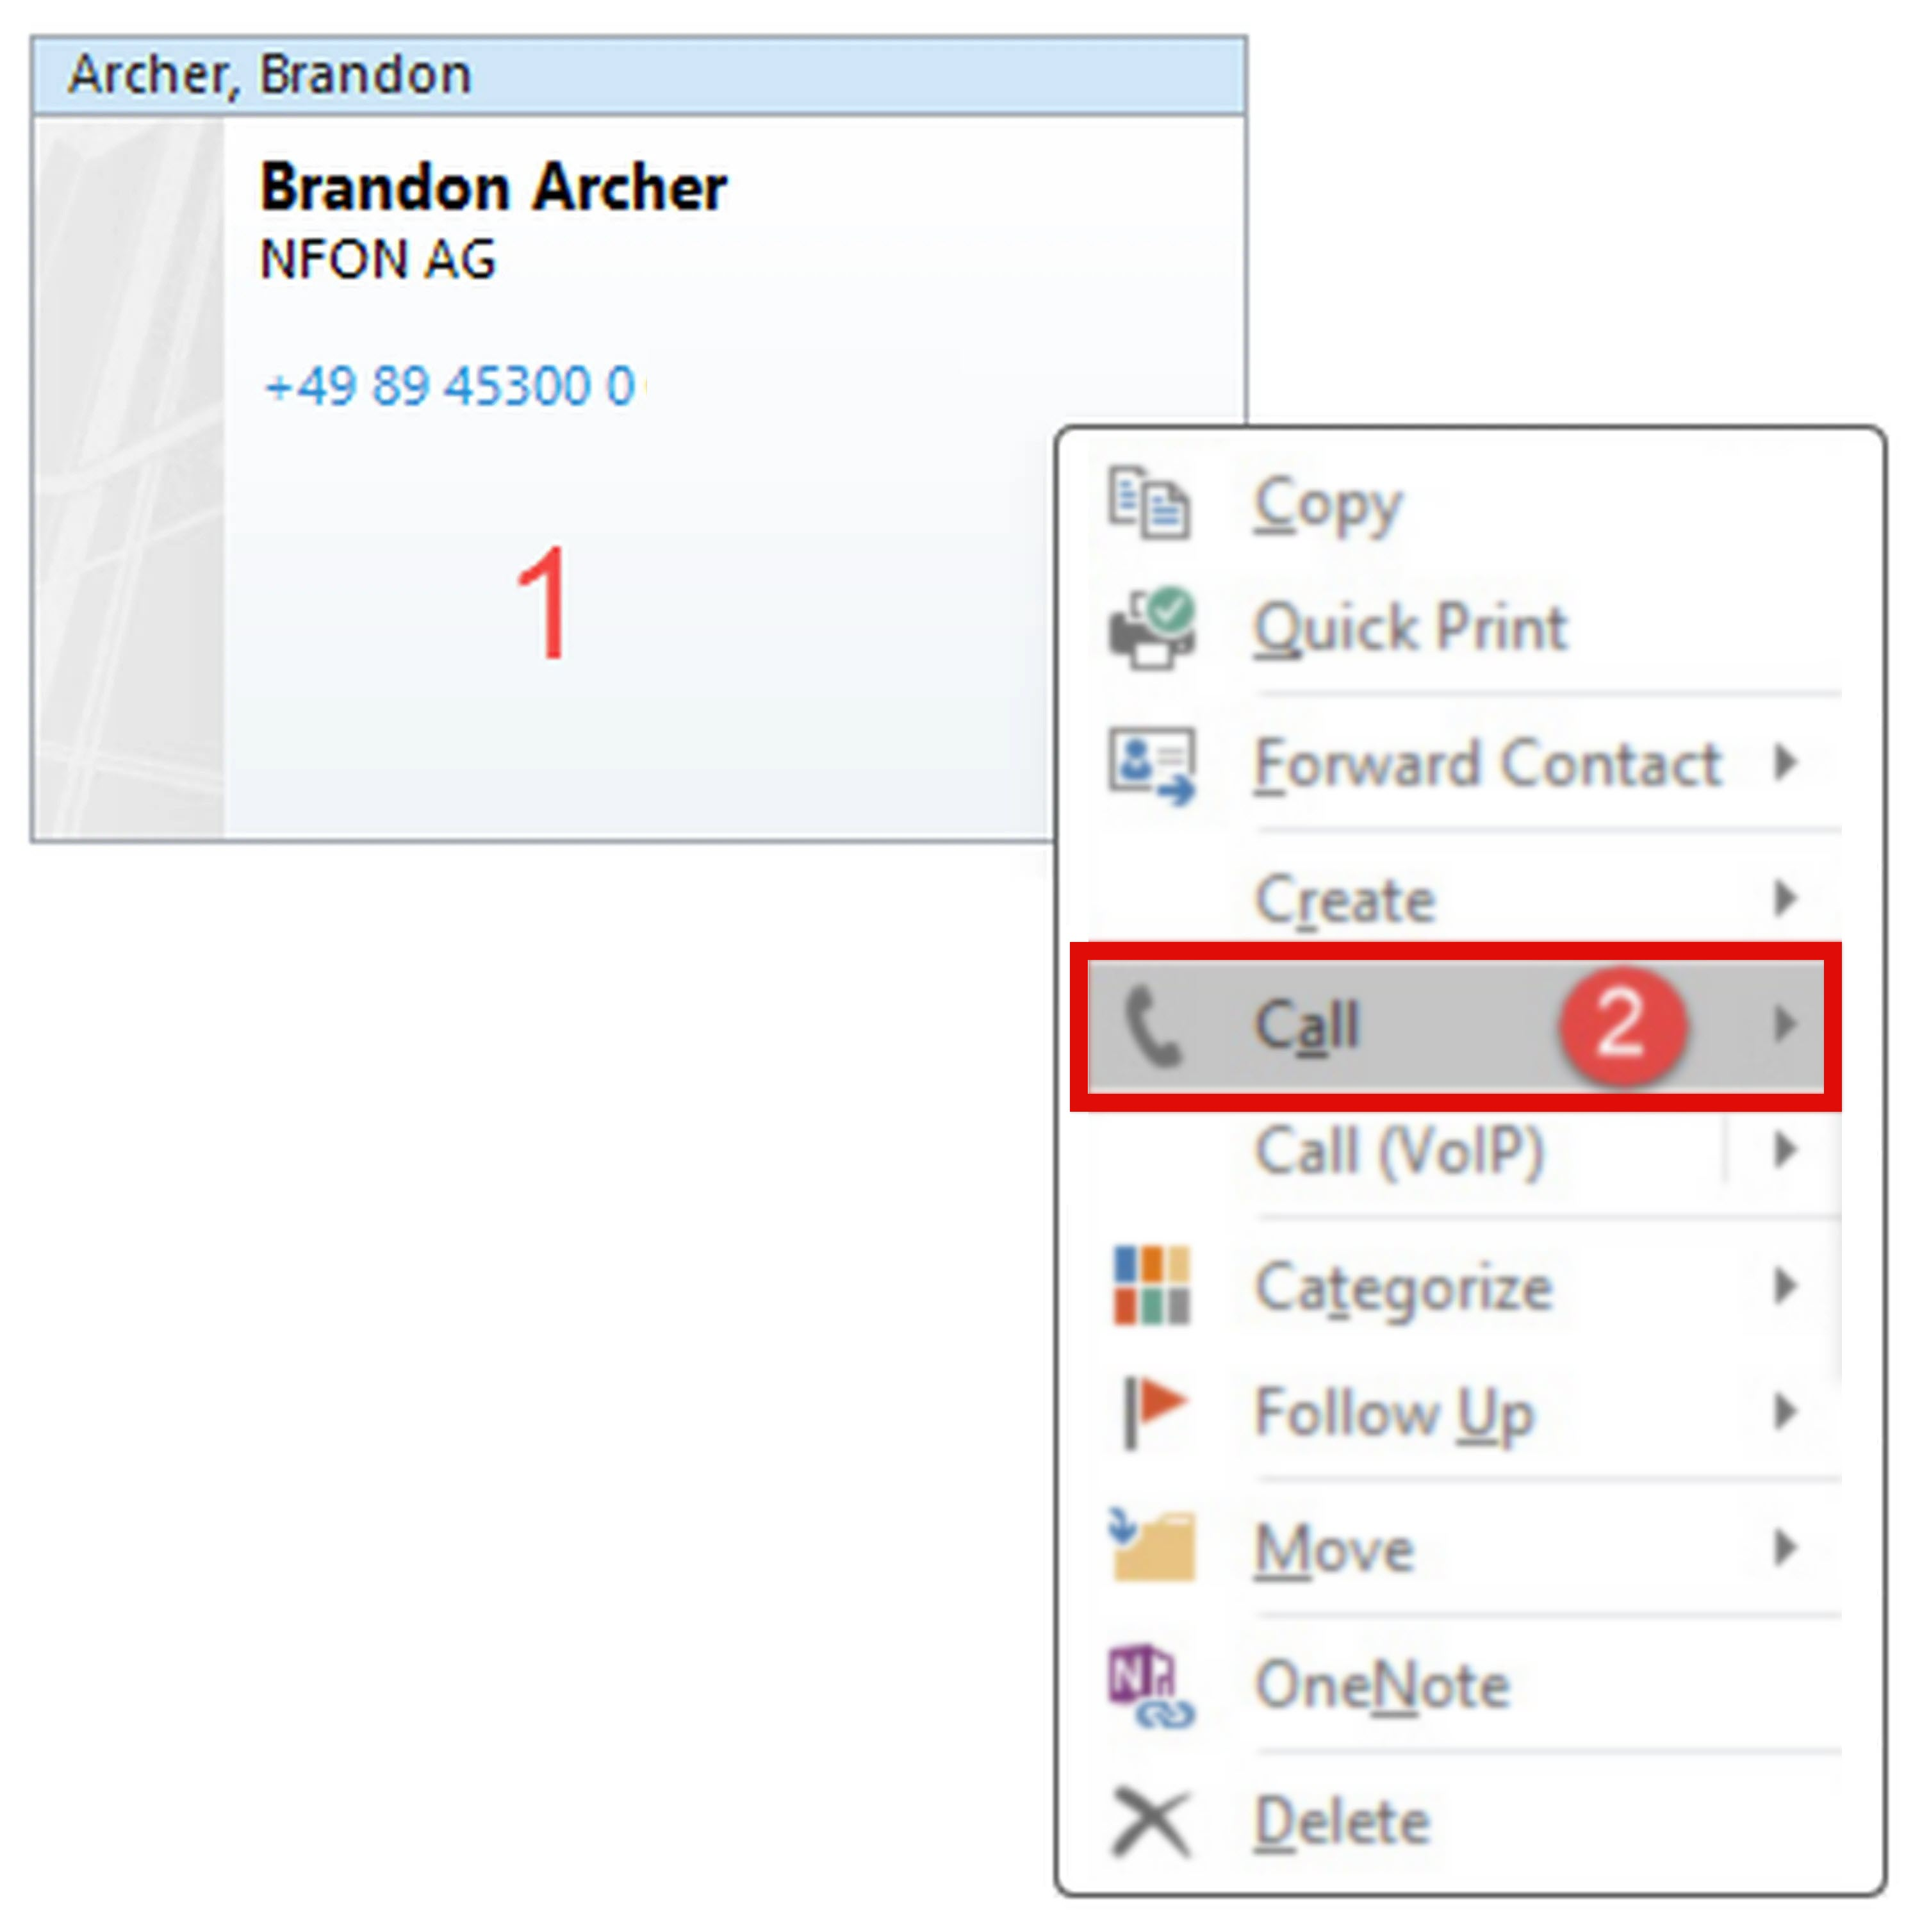
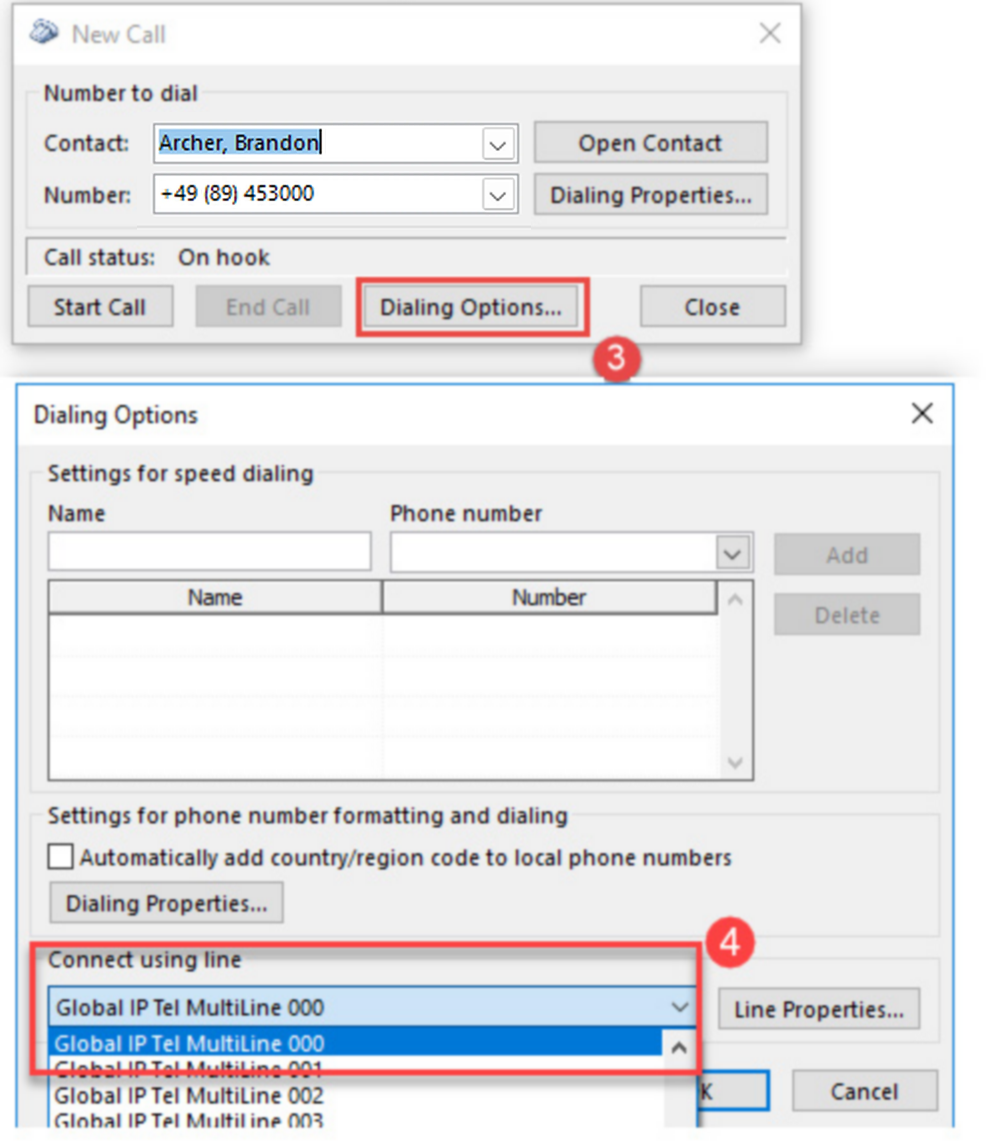
Example: Configuring TAPI in Outlook (Windows Dialer)
1. Select a contact.
2. Right-click.
3. Select Call.
⇒ The new call windows opens.
4. Click Dialing Options.
5. Select Global IP Tel Multiline at Connect using line.
8.2 TAPI server
TAPI server (TSP)
Softphone Pro is available with a free TAPI server (TSP) component. It allows to open a TAPI data connection between a personal computer (workstation) and any computer which acts as a server (e.g. Windows server 2019 used as a terminal server).
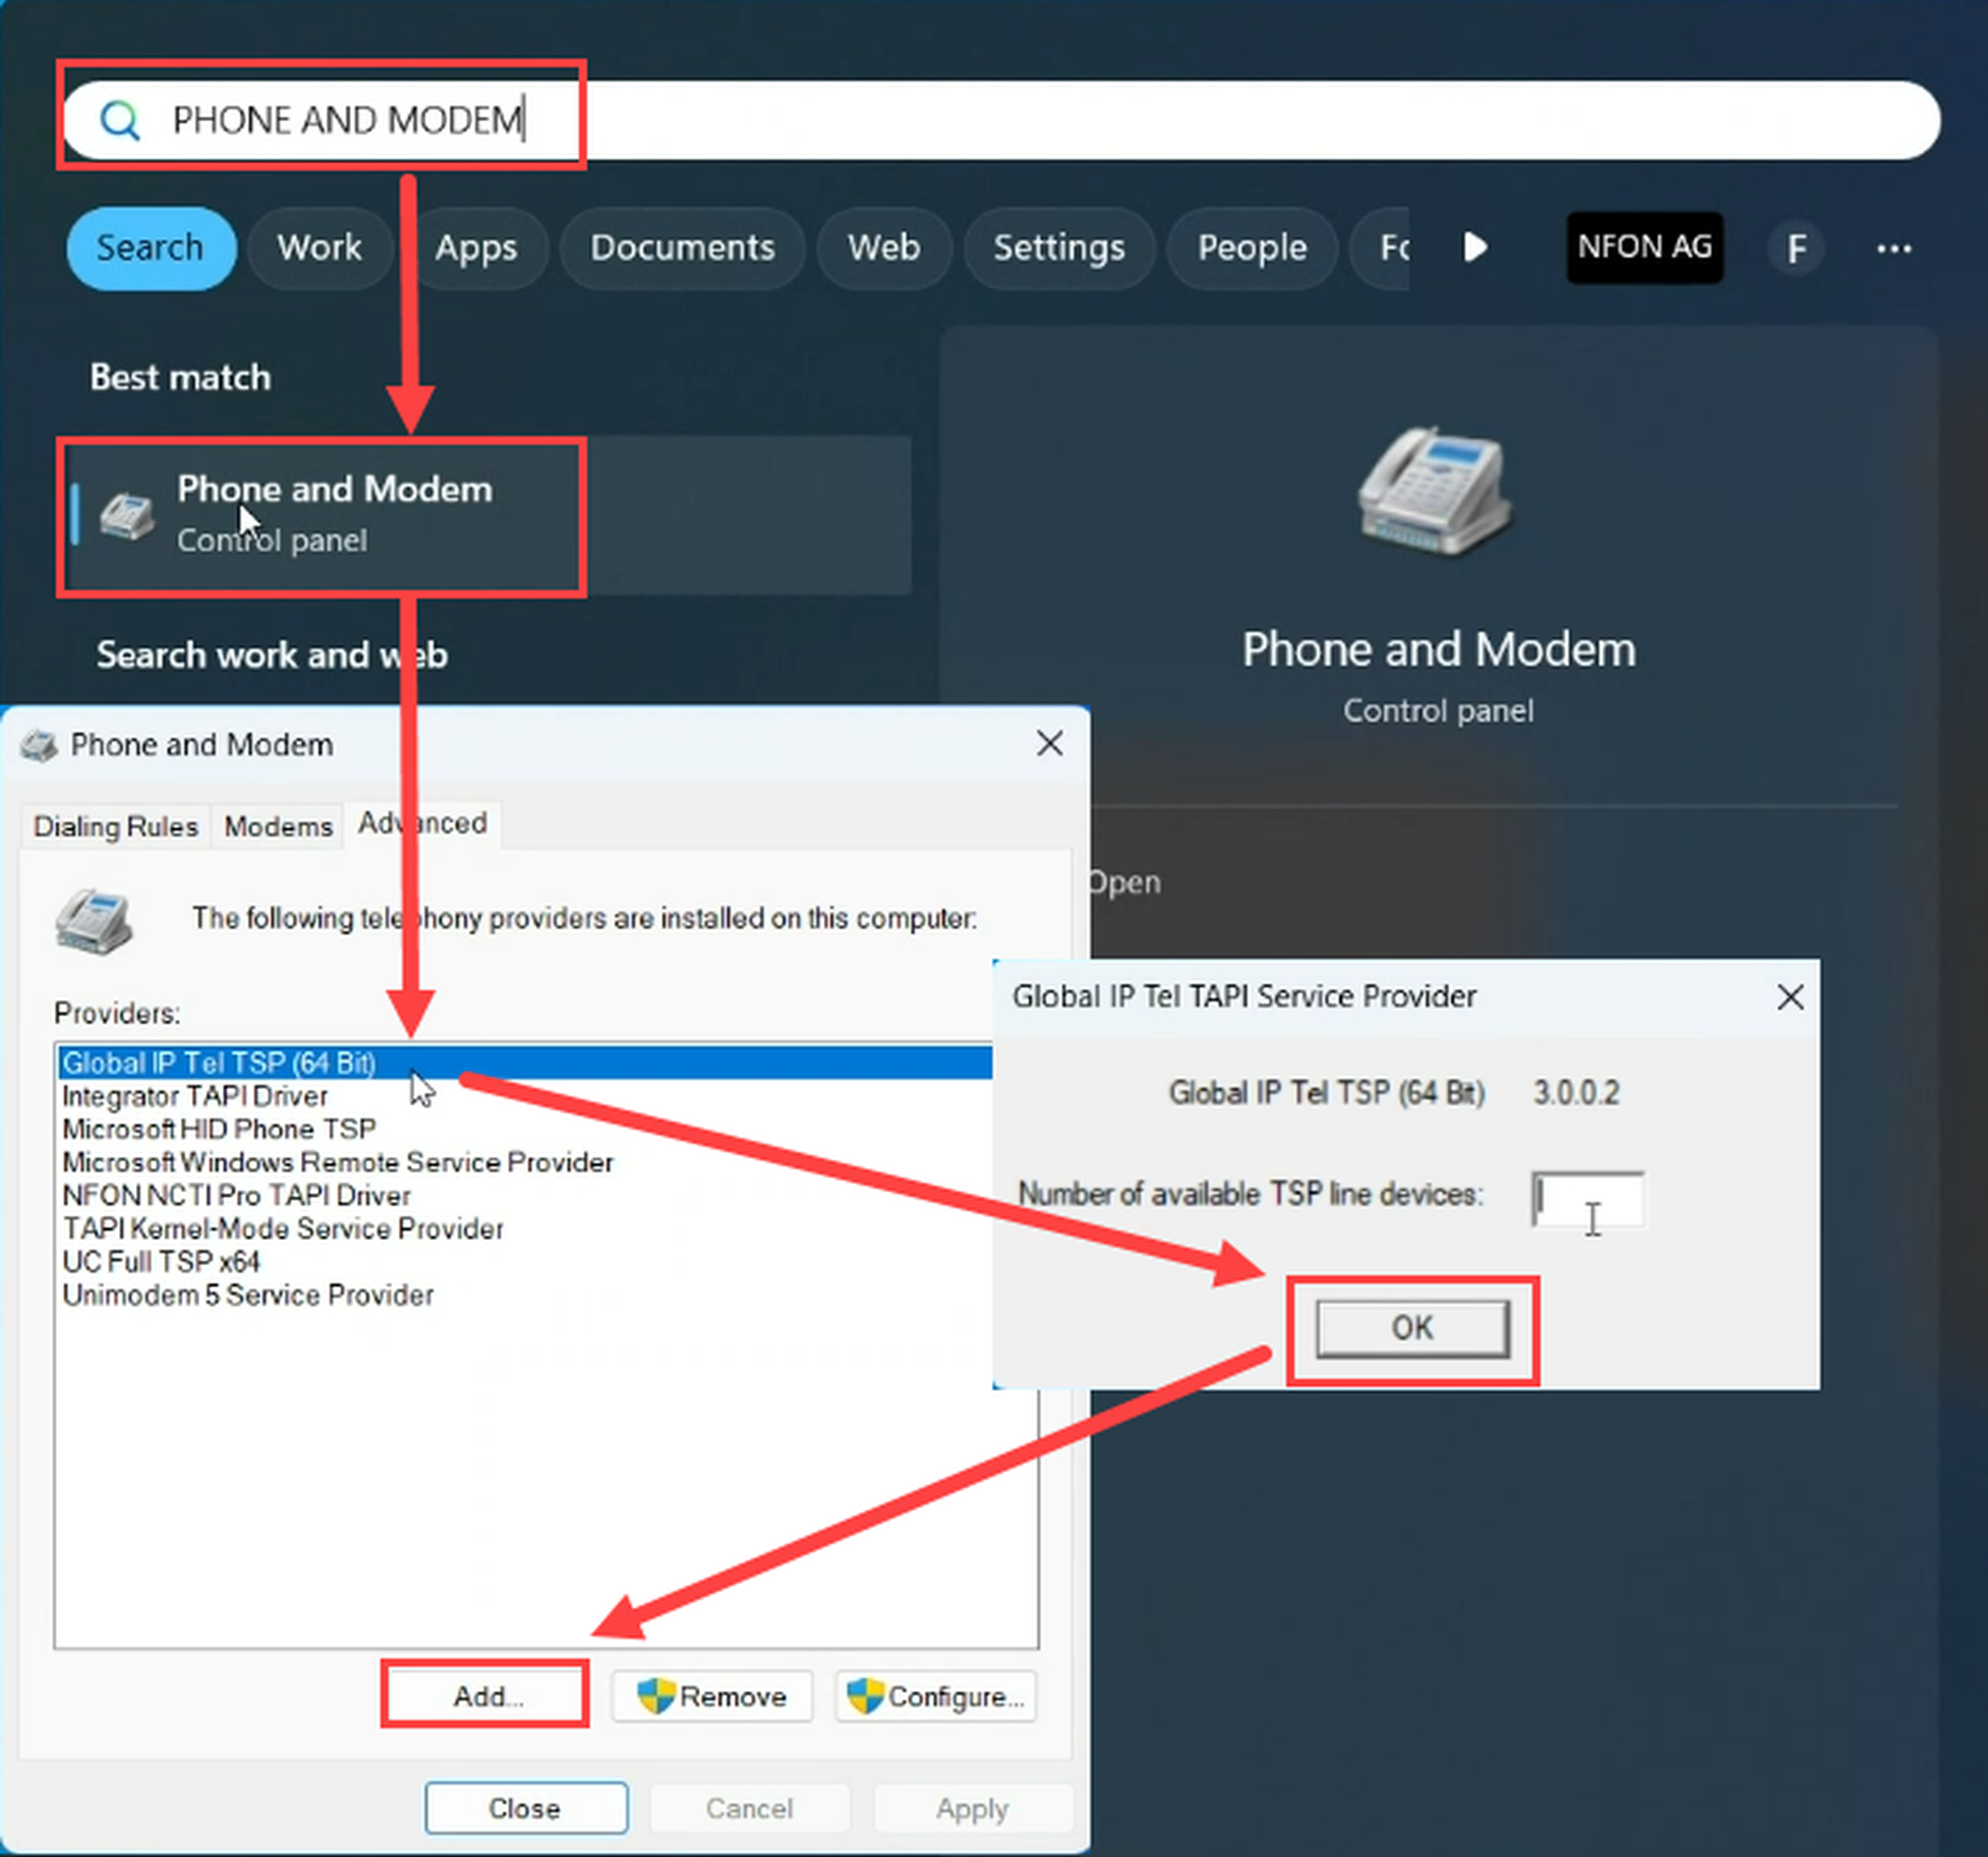
On the target system (server), it is only necessary to set up the Global IP Telecommunications TSP driver (giptsp64.tsp for 64-bit Windows or giptsp32.tsp for 32-bit Windows).
TAPI server step-by-step
Download the TSP driver (32 Bit or 64 Bit).
Copy the downloaded driver to the folder c:\windows\system32.
If a TSP driver with an older file date already exists, overwrite the old TSP driver with the new one.
Please note that you might need to restart the system restart to be able to overwrite the TSP driver.
Open the Phone and Modem configuration of Windows OS. You can easily locate the program by entering "phone and modem" into the Windows search box.
Click Add….
Select Global IP Tel TSP (64Bit) in the pop-up window.
Click Add to finish the driver set-up.
Open the registry.
Define a listening port (TCP) and the number of TAPI devices (lines) that fit your needs.
[HKEY_LOCAL_MACHINE\SOFTWARE\GlobalIPTel\TAPI]
"TSPListeningPort"="21077"
"TSPNumberOfLines"="32"
The registry entries need to be created manually due to the lack of administrative rights of the Phone and Modem tool.
Select Global IP Tel TSP (64 Bit).
Click Configure to set the count of TAPI TSP line devices that you need.
The TSP makes a maximum of 255 TAPI lines available, as there are restrictions in the maximum number of TAPI line devices in the operating system.
Important: After changing the number of TAPI lines, you need to restart the server in order to make the change effective.
Security: All transferred data are encrypted. Allow the server firewall to receive data on the initial listening port (our example: 21077 TCP). Use the TAPI server environment for security aspects in a VPN environment.
Choose the TAPI line in the respective SIP softclient that shall communicate with the TAPI server instance.
Enter your TAPI server address (e.g. your terminal server) including the TCP port.
Select Use server to activate the TAPI server function.
9. Importing and synchronising contacts
In this section, you will learn how to import and/or synchronise your contact information from various sources into the Softphone Pro. The following sources are supported:
Outlook
Microsoft 365
Google Contacts
JSON API
LDAP directory
CSV file
Please note that NFON has already made your Cloudya contacts available as part of the setup of your Softphone Pro. If this is not the case, please contact NFON Technical Support.
9.1 Outlook
Synchronising Outlook contacts
Your contacts in Outlook can be synchronised with Softphone Pro.
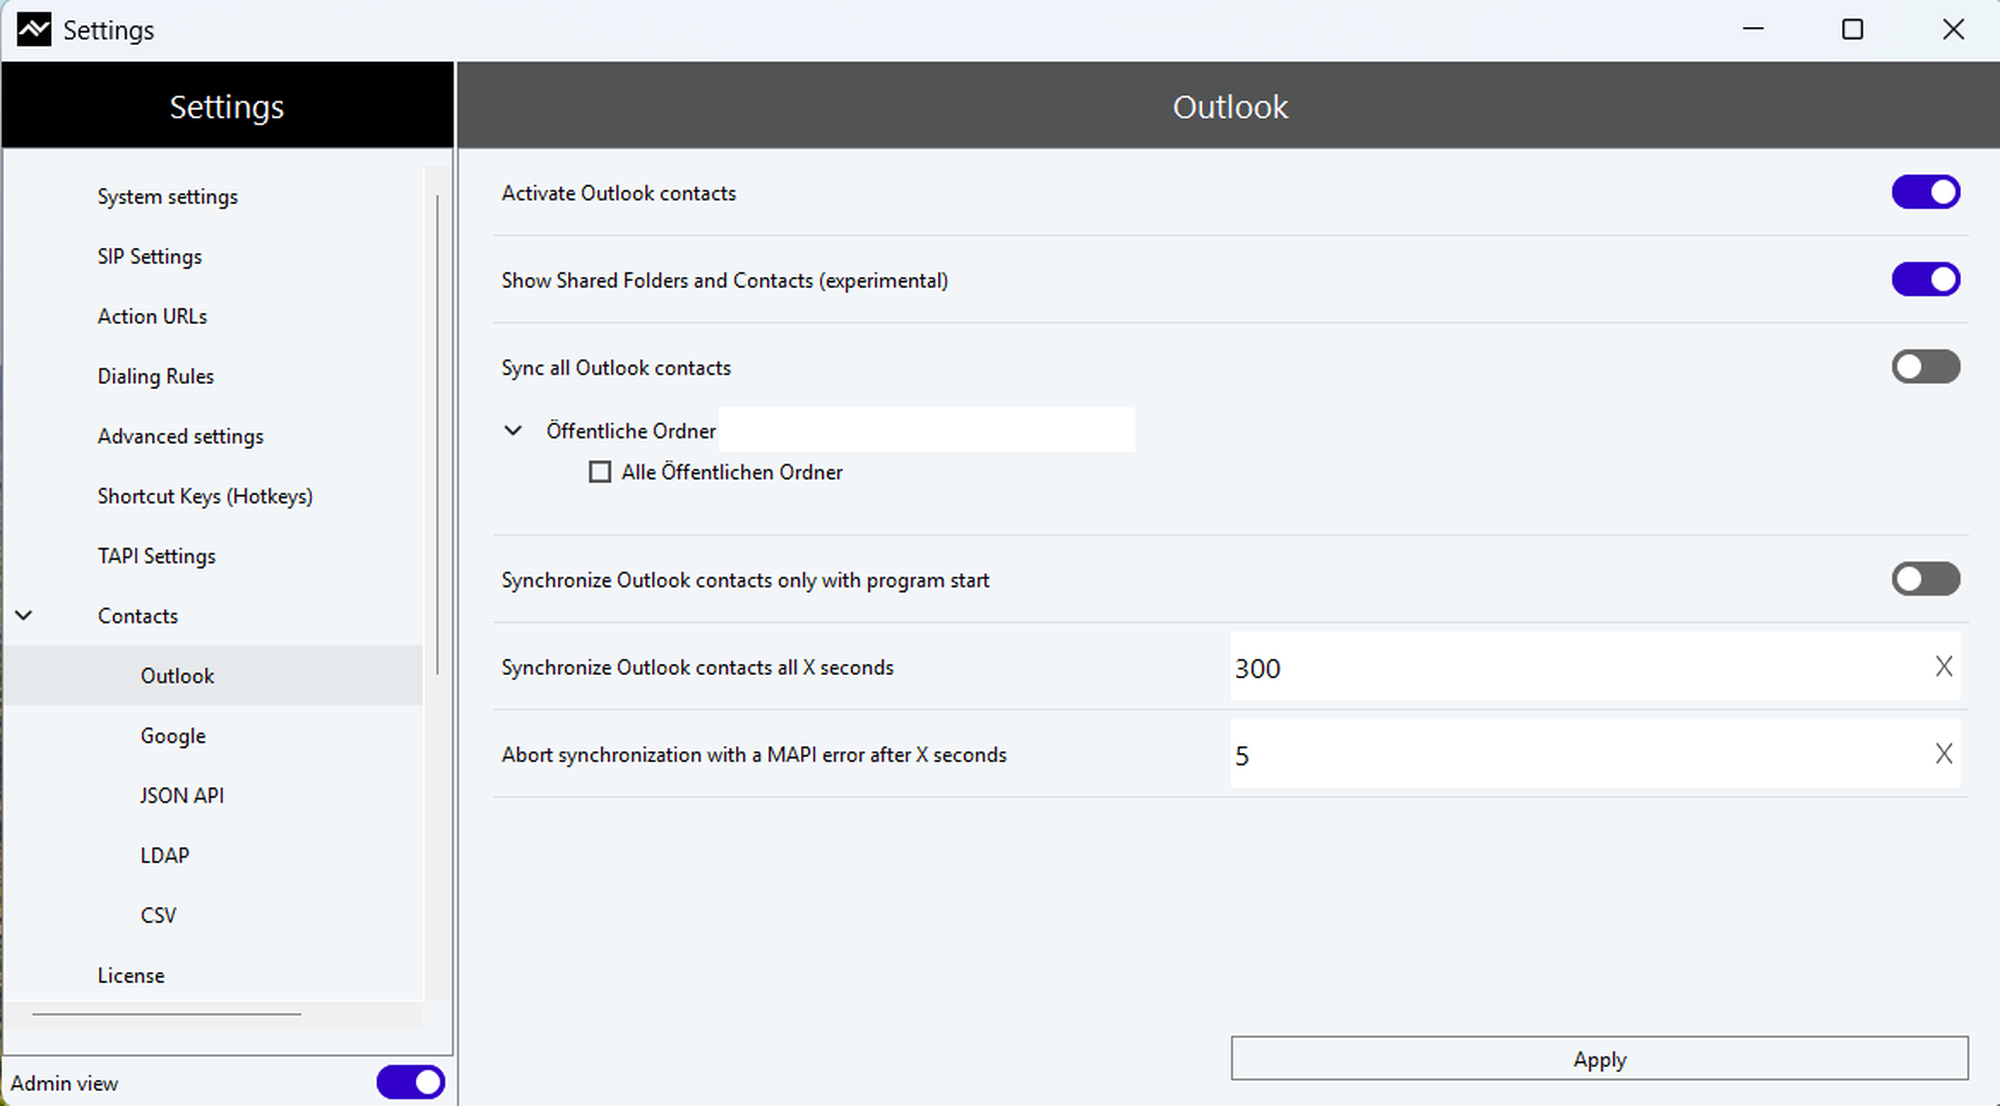
Click on Contacts -> Outlook in the side menu to access the Outlook synchronisation menu.
Outlook settings
Setting name | Description |
|---|---|
Activate Outlook contacts | Activates the interface to Outlook programmes installed on the PC All available contact directories to which the software automatically has access are synchronised. Data is only synchronised in READMODE. Regardless of the data origin (Outlook, Google, LDAP, ODBC), no write access is available. Updates to the contacts must be made in the respective original programme. |
Show shared folders and contacts | Selects the most appropriate HID USB usage page and the device for which you want to create or update an XML definition file |
Synchronise all Outlook contacts | Enable/disable |
Synchronise Outlook contacts only at program start | Contacts are only updated when the program is started. |
Abort synchronisation with a MAPI error after X seconds | Stops the Outlook contact synchronisation with a MAPI error if it does not complete within X seconds |
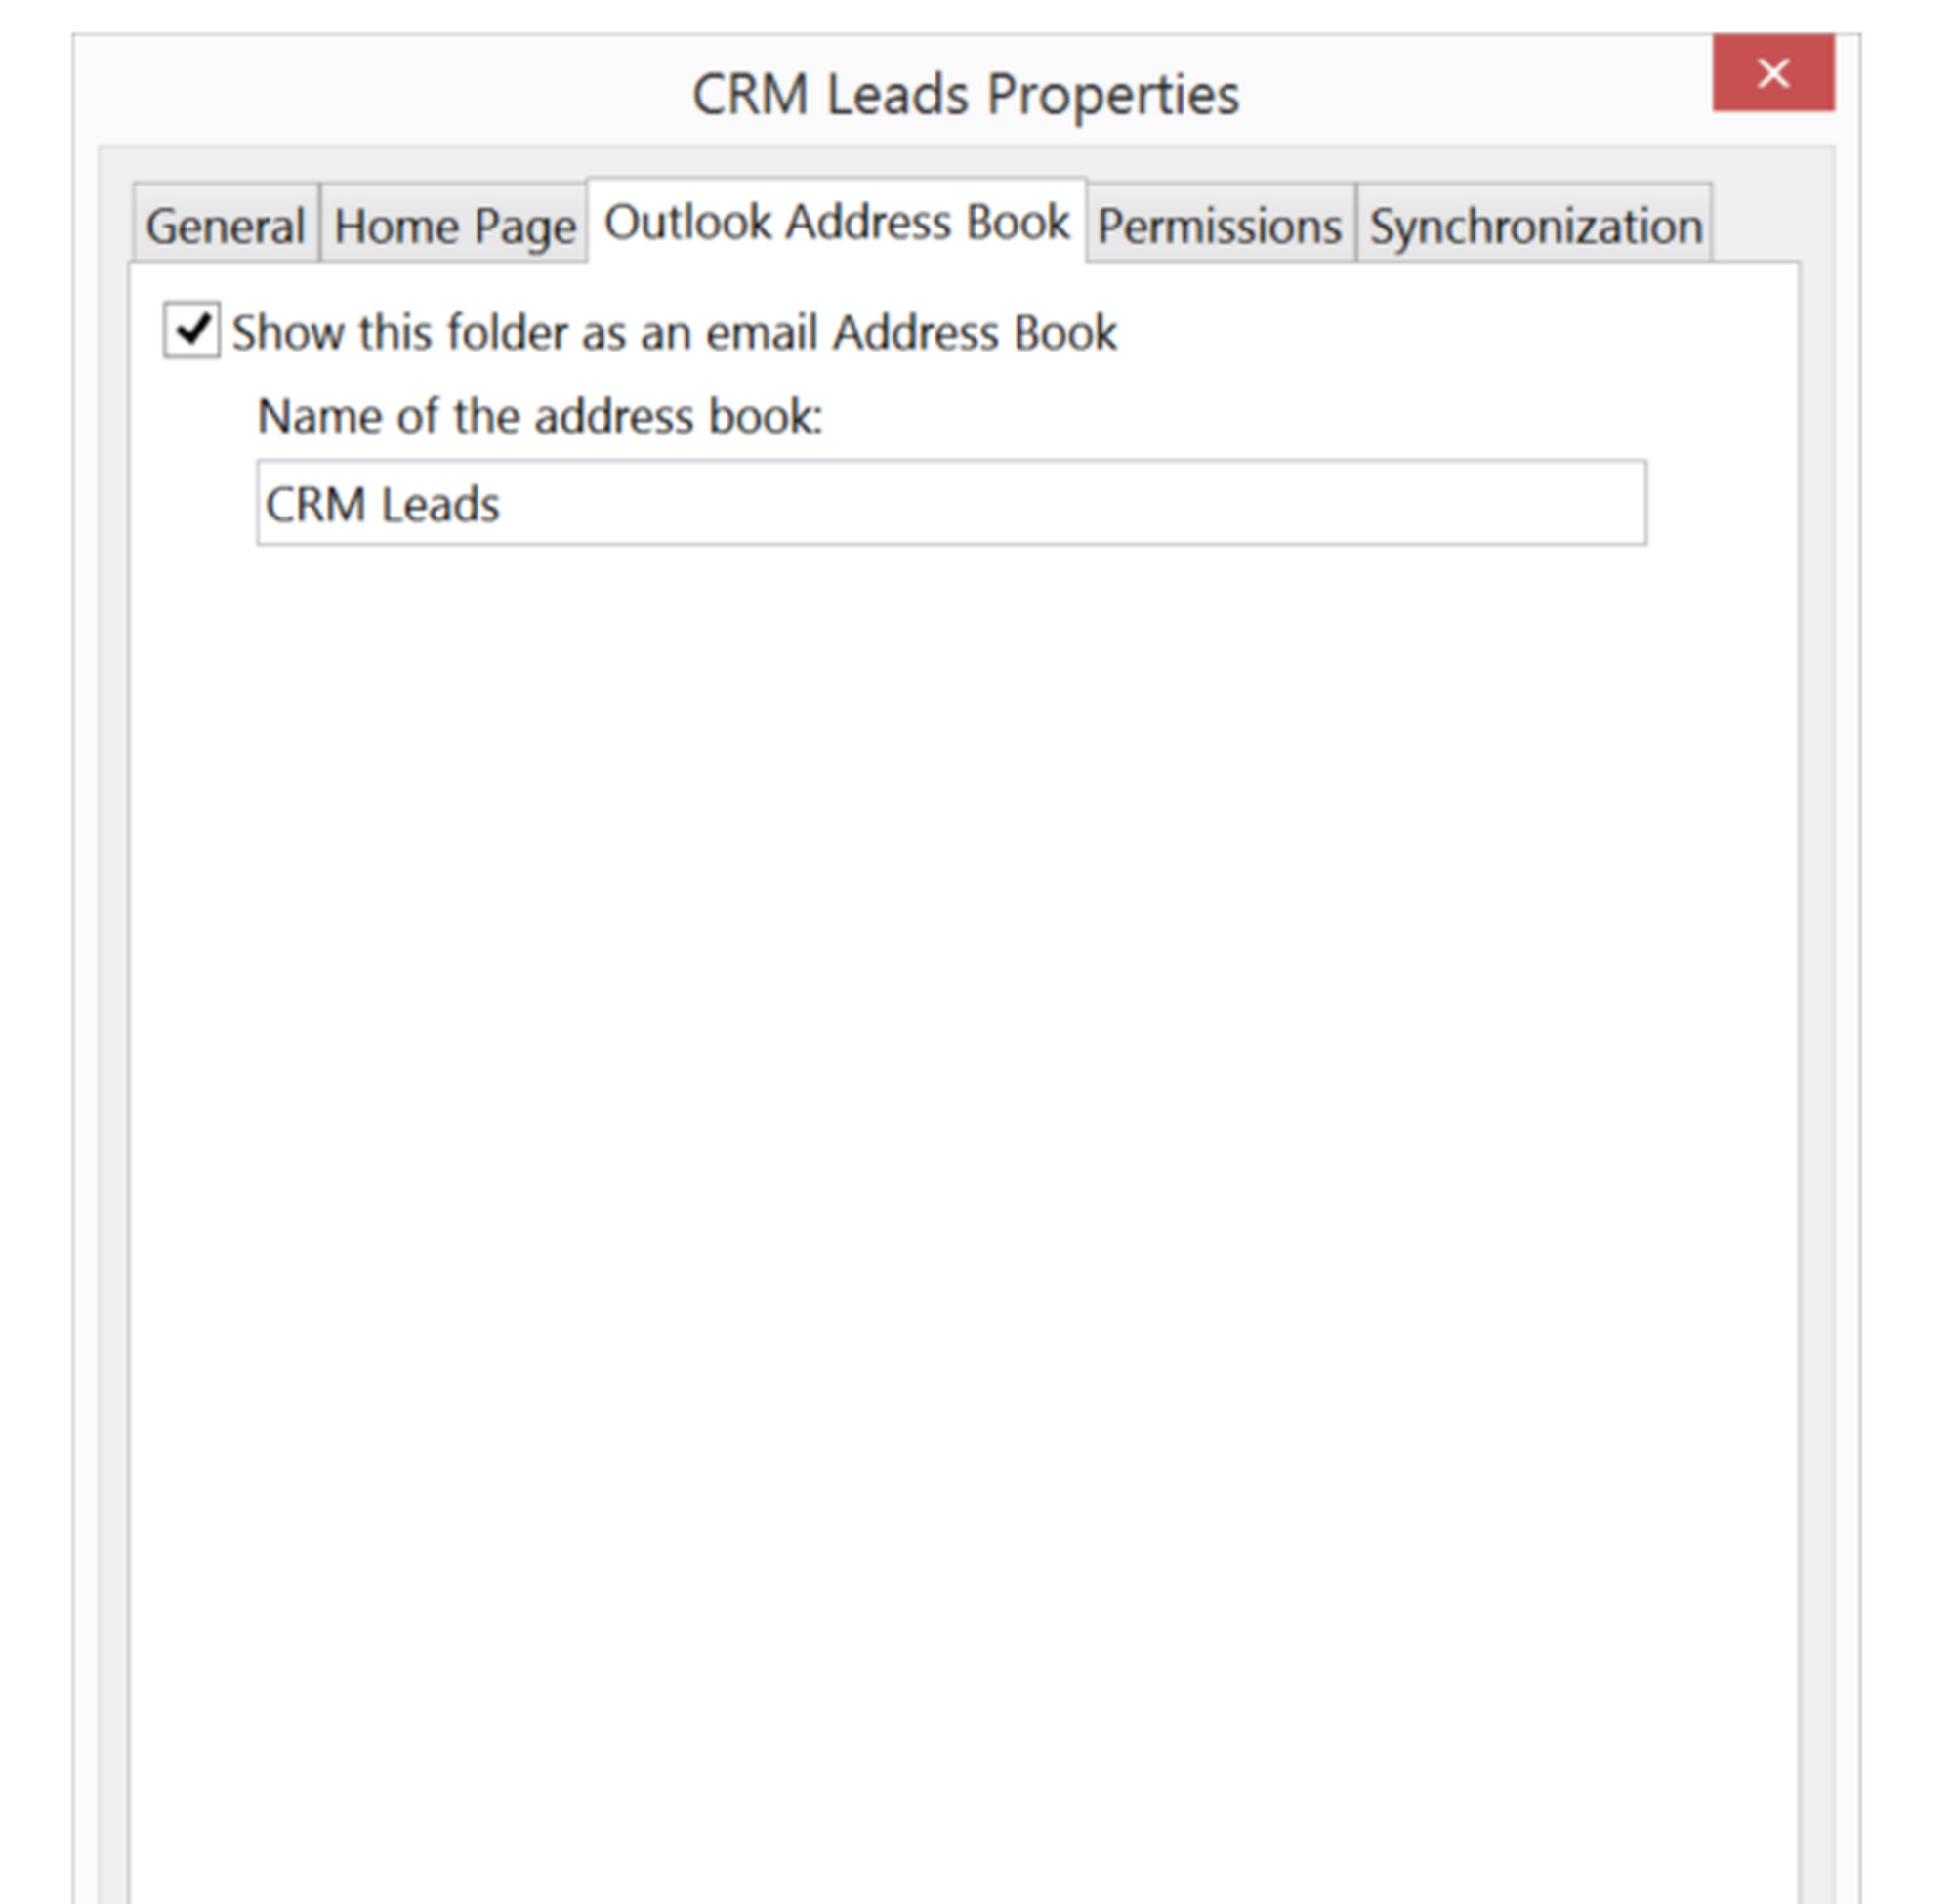
Read external contact groups (iPhone, etc.)
Activate Show this folder as email address book in the properties of the contact group.
⇒ After activation, the contacts contained in it are taken into account by the application.
9.2 Microsoft 365
Synchronising Microsoft 365 contacts
Your contacts in Microsoft 365 can be synchronised with Softphone Pro.
Click on Contacts -> Microsoft 356 in the side menu to access the Microsoft 365 synchronisation menu.
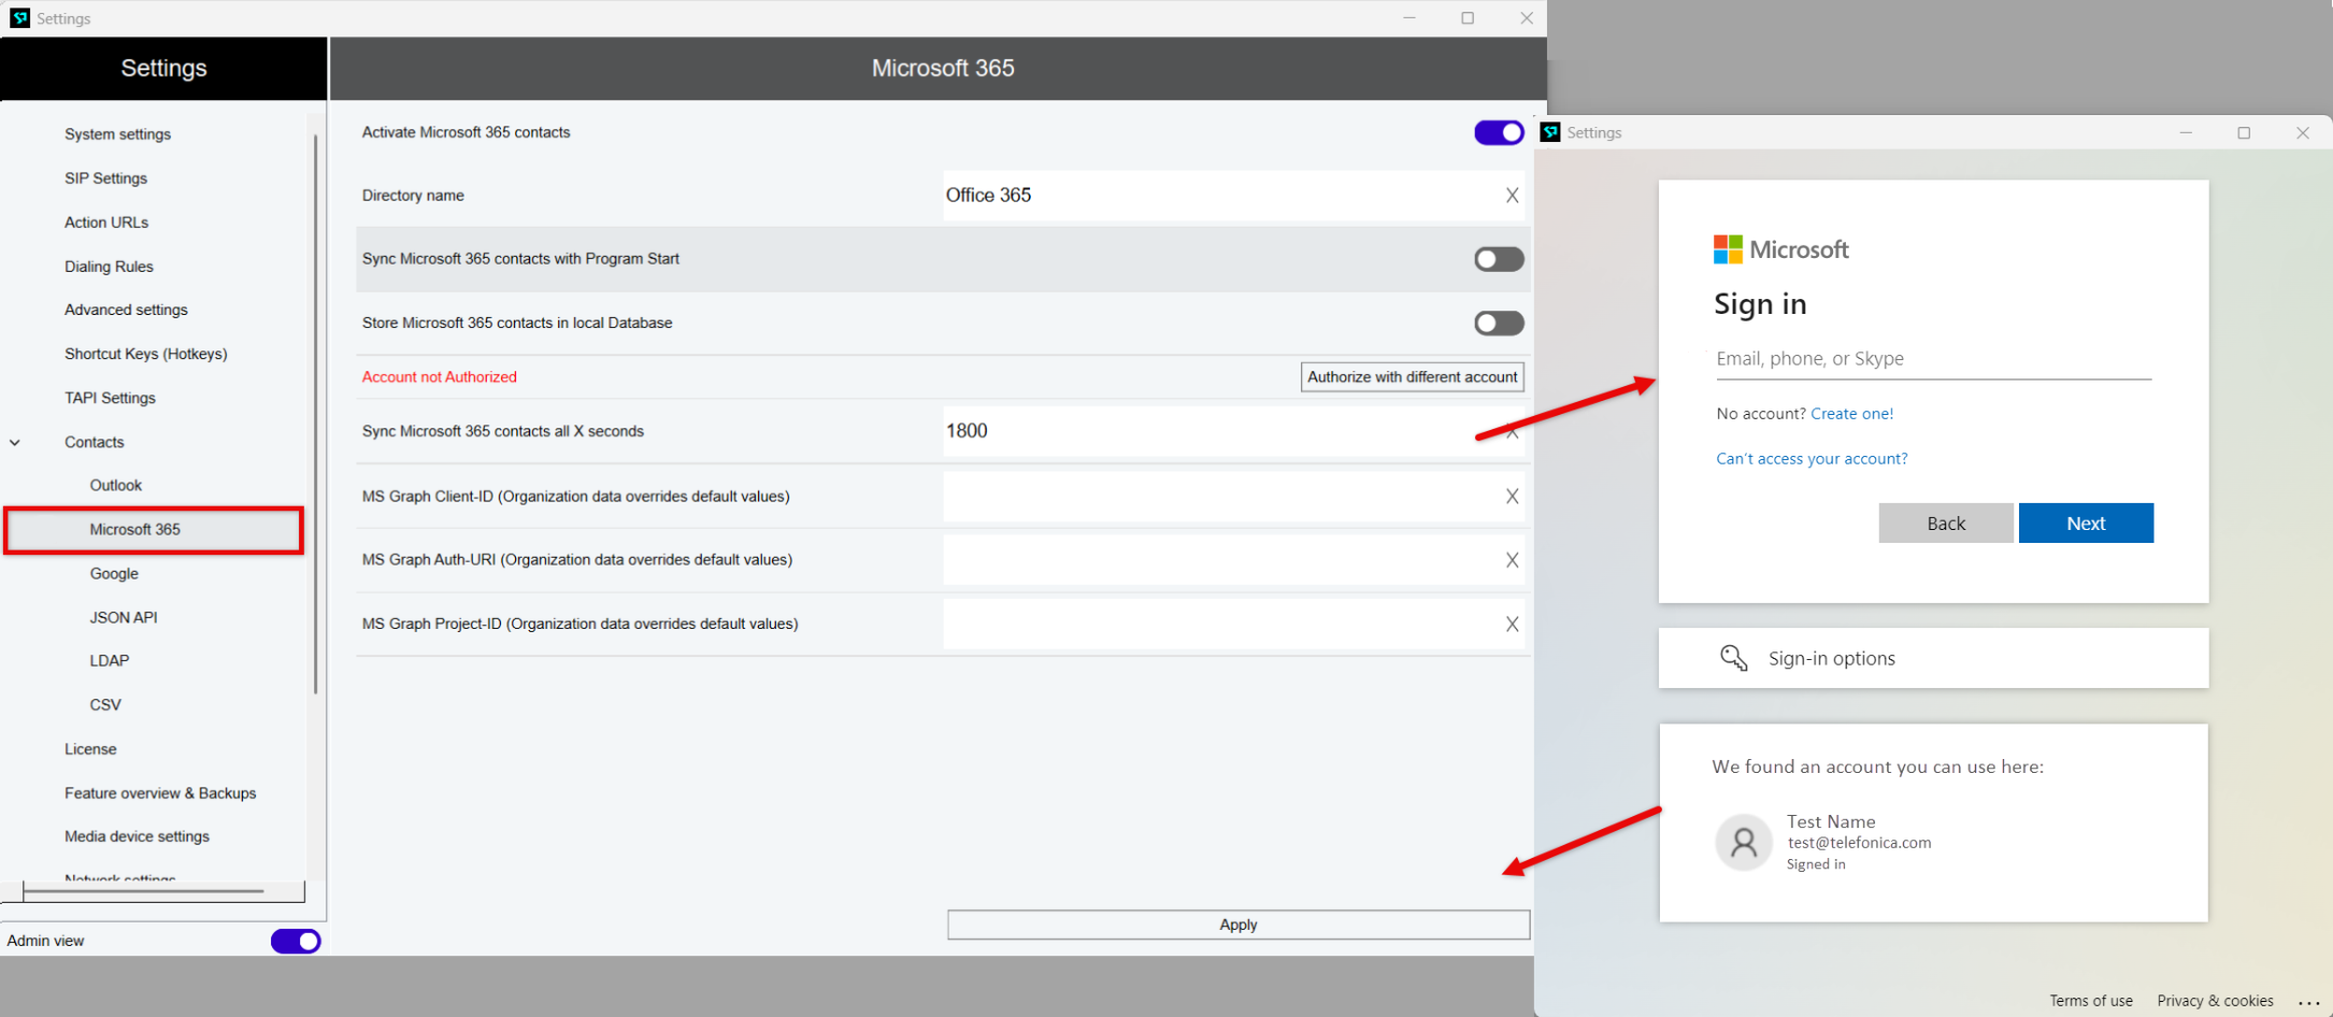
Microsoft 365 settings
Setting name | Description |
|---|---|
Add a new data source | Click on "+" to add a new data source. |
Microsoft 365 Menu | Opens Microsoft Office 365 Menu |
Activate Microsoft 365 contacts | Activates the synchronisation of MS Office 365 contacts with the application Once enabled, the system retrieves and updates contact information from the connected MS Office 365 account. |
Sync Microsoft 365 contacts with Program start | When enabled, MS Office 365 contacts are automatically synchronised when the application starts No further automatic updates occur during runtime. |
Store Microsoft 365 contacts in local Database | Saves synchronised MS Office 365 contacts in the local database of the application, allowing access even without an active MS Office 365 connection |
Account not Authorized | Indicates that no MS Office 365 account has been connected to the application To enable synchronisation, you will need to authorise the account. The button on the right allows switching to another account. |
Sync Microsoft 365 contacts every X seconds | Defines the interval for automatic synchronisation of MS Office 365 contacts Contacts will be updated at the specified time intervals. |
Sign in | Allows logging into an MS Office 365 account to activate contact synchronisation and gain access to connected services |
Sign in with previously used Account | Displays a list of MS Office 365 accounts that were previously signed in to the application This allows users to quickly switch between accounts without having to re-enter credentials. |
Apply | Saves the selected settings and applies the changes without requiring a restart of the application |
9.3 Google
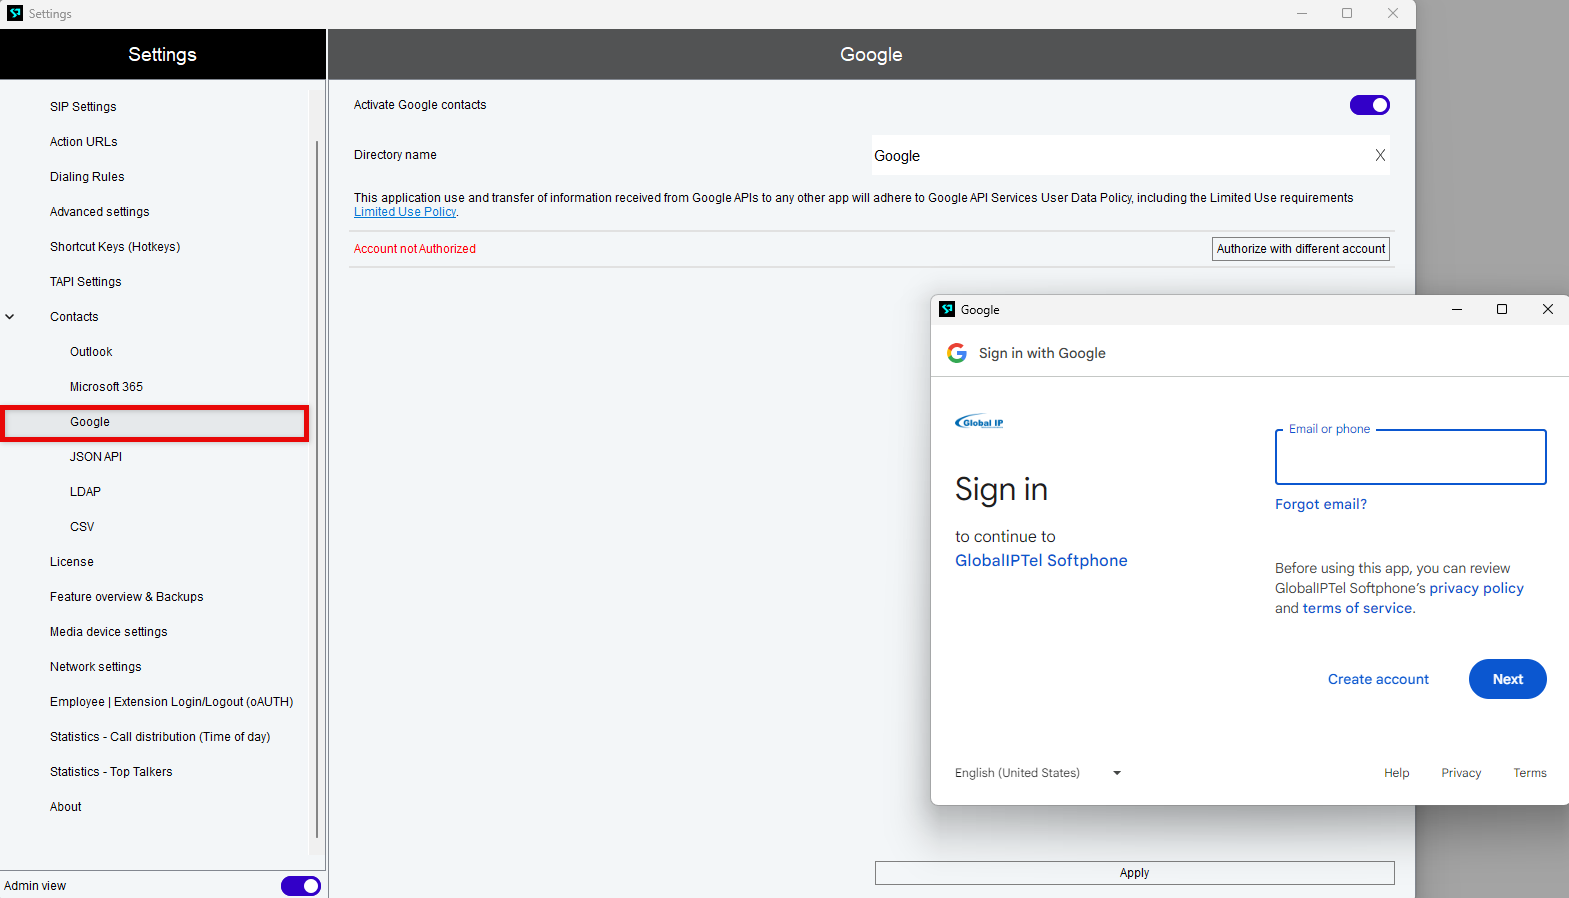
Synchronising Google contacts
Select Contacts -> Google in the side menu.
Next to Add a new data source, click the "+" icon.
Next to Activate Google contacts, switch the toggle on.
⇒ This enables the request to the Google Contacts source.
Authorisation status
If an authorisation has already been applied, you can force a new login using the Authorise with different account button on the right.
Follow the Google instructions for Google authentication.
Click Apply to save the settings.
9.4 JSON API
Synchronising a JSON API
To set up a new synchronisation
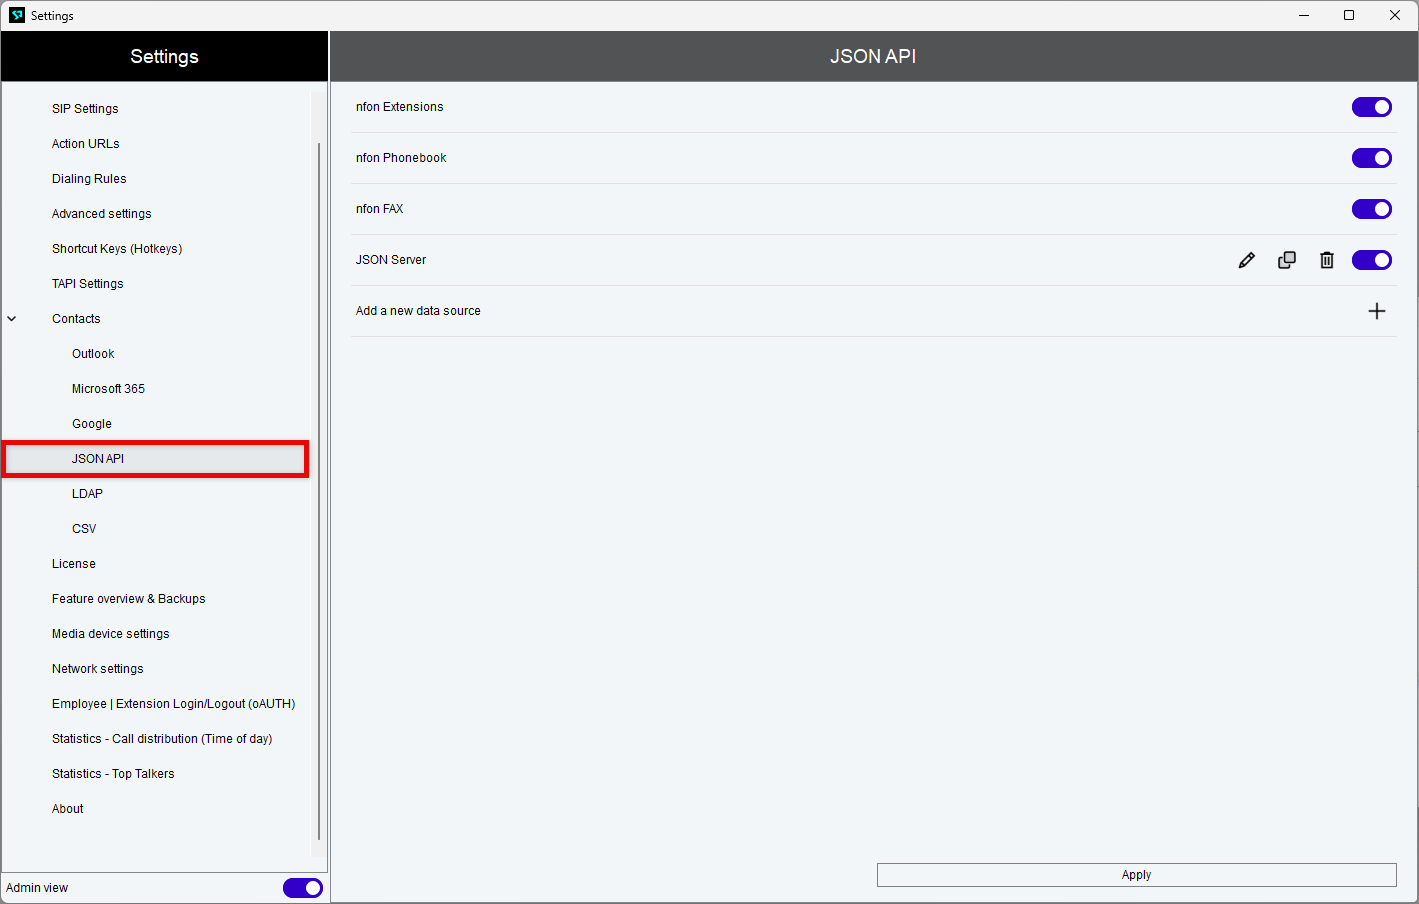
Select JSON API in the side menu.
Next to Add a new data source, click the "+" icon.
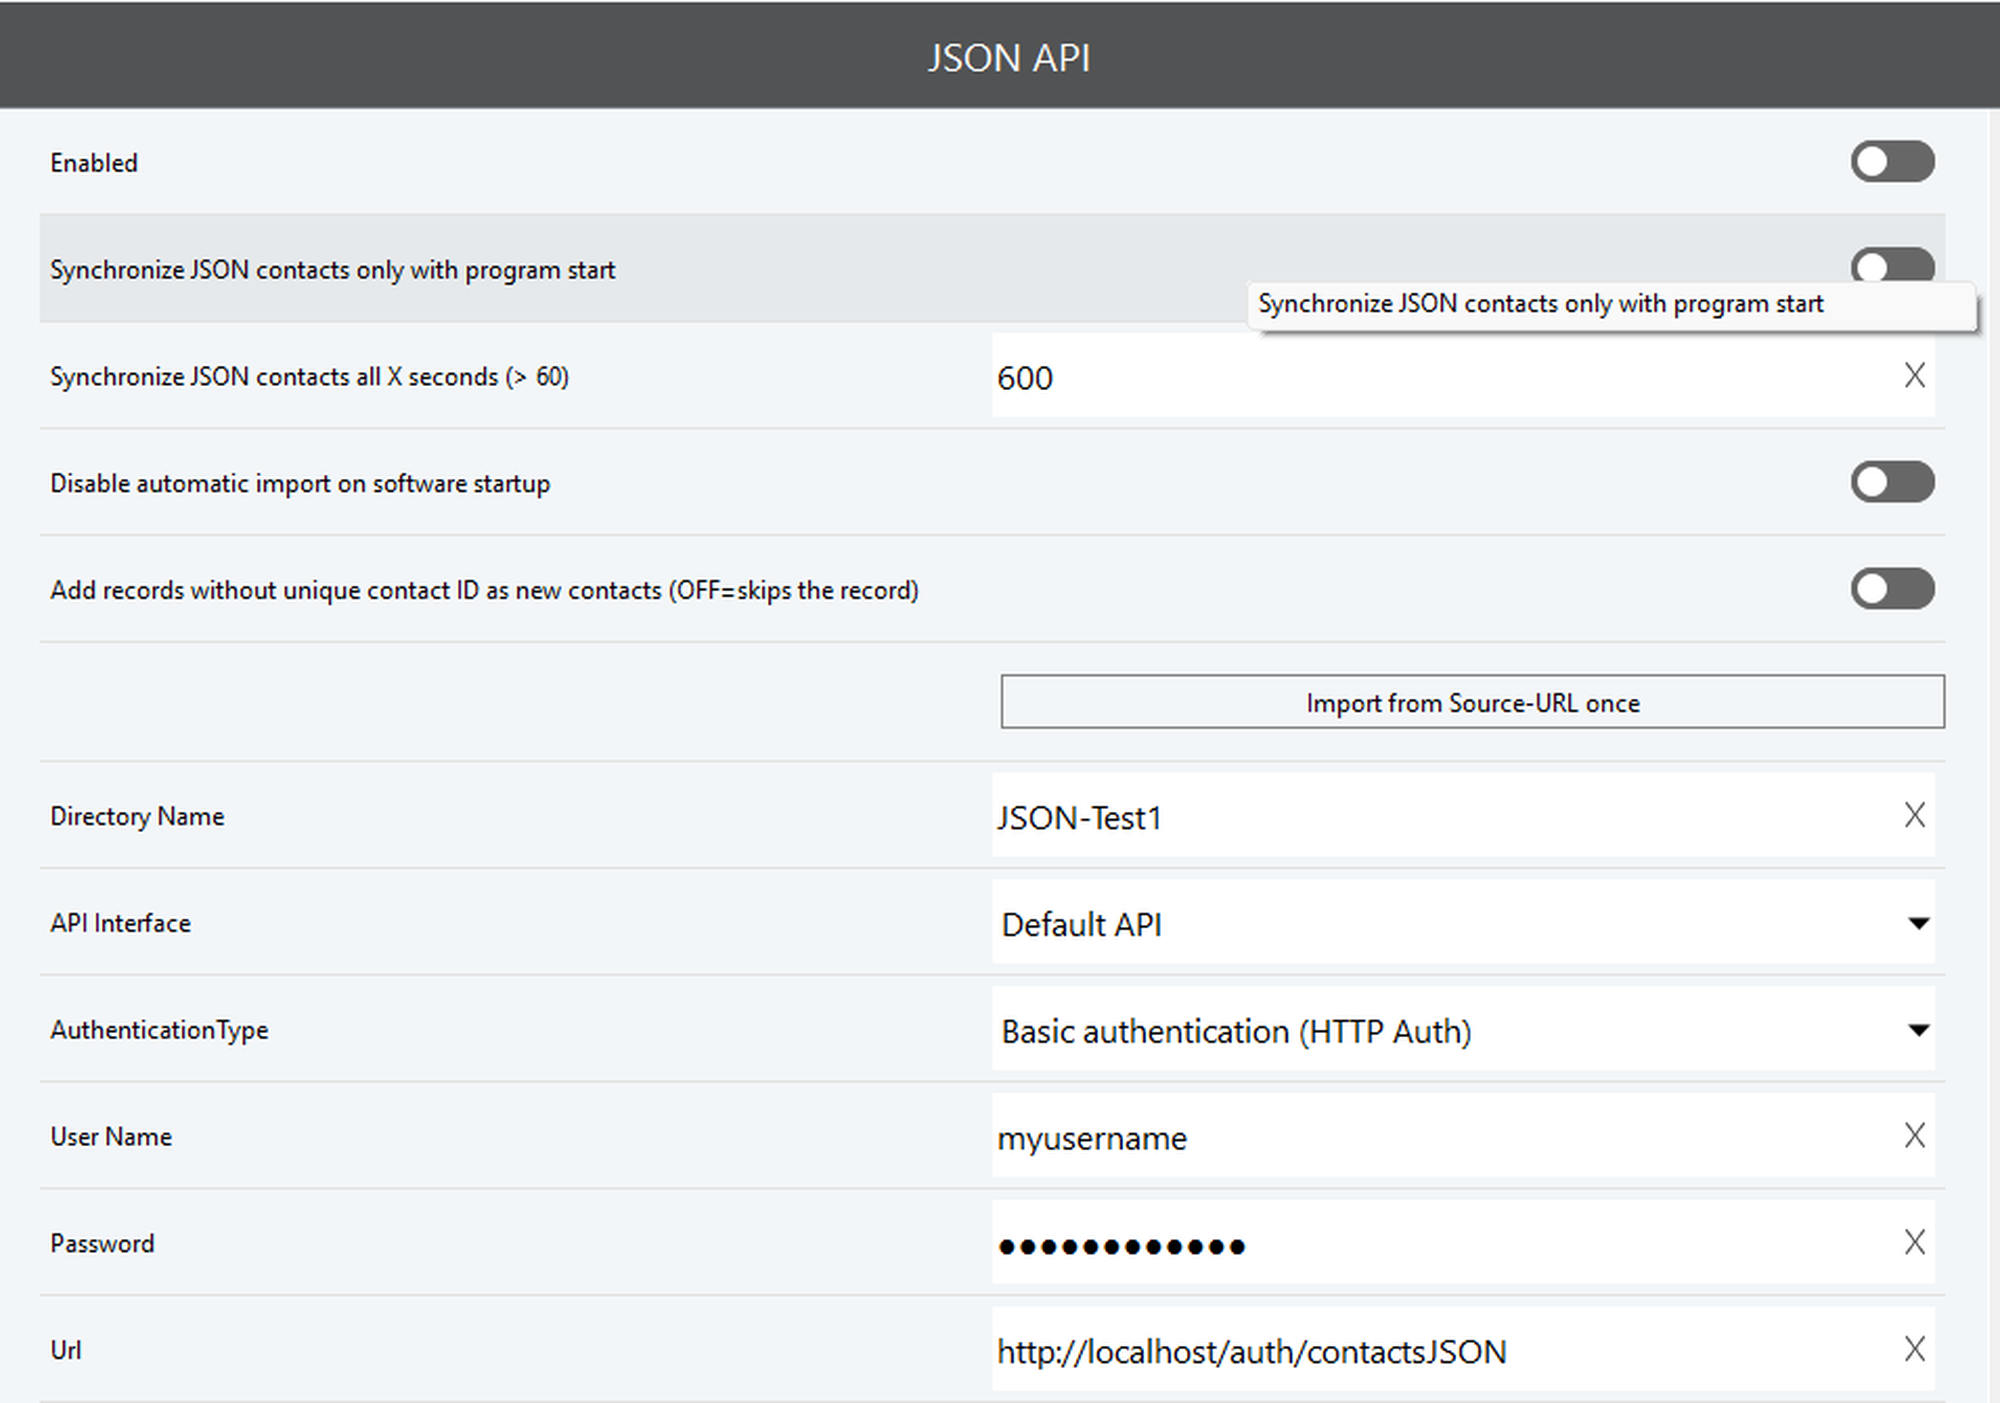
⇒ In the next screen, the connection is now set to Enabled. Adjust the settings as needed.
To edit, duplicate or delete an existing synchronisation
Select JSON API in the side menu.
Click the pencil icon to edit a JSON Server's settings.
Click the copy icon to duplicate a JSON Server.
Click the delete icon to delete a JSON Server.
JSON API settings
Setting name | Description |
|---|---|
Add a new data source | Click on "+" to add a new data source. |
Enabled | Enables the request to any JSON source |
Disable automatic import on software startup | By default, the import is run on startup Disable this feature if you prefer to initiate the import manually. |
Add records without a unique contact ID as a new contact (OFF=skip the record) | Can be activated to import from a source without unique contact ID once Be aware that importing multiple times from a source without unique contact ID will result in the same contacts being created multiple times. |
Import once from the source URL | Click to import contacts. |
Directory name | Free name of the JSON source to be accessed |
API Interface | Selection of an available API interface |
Authentication type | Defines how and where authentication takes place |
User name | User name for negotiation procedures, such as Negotiate |
Password | User password |
URL | URL of JSON data source |
Column 1: Attributes of local data
Column 2: JSON Attribute
Write a custom JSON attribute into the editable fields.
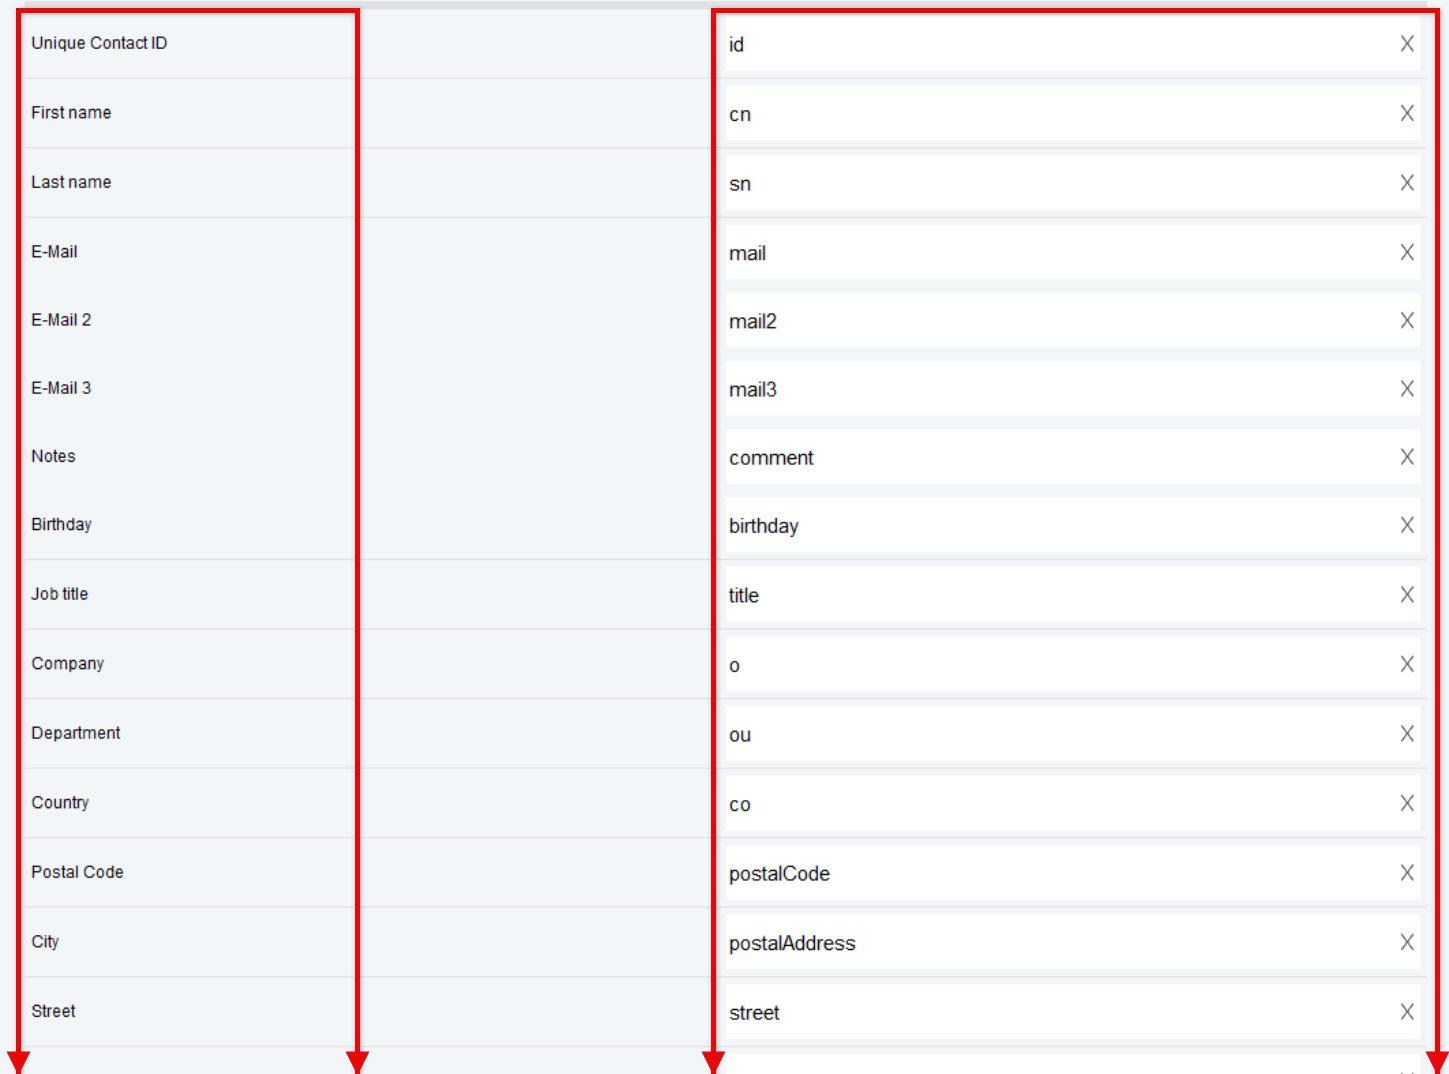
JSON import
JSON data source links
Contacts can be imported from JSON data sources with a URL link or file link. URL data sources are URLs that can be accessed without authentication, with HTTP-AUTH or oAUTH.
Static files
Static files that are created once for the import or updated cyclically can also be used.
Once/cyclical imports
Regardless of the data source, you can import/synchronise contact data 'once' or cyclically.
Unique contact ID assignment
A unique contact ID assignment is preferable to avoid duplicates during cyclical import processes.
Importing from local data sources
To import from local data sources, please use a special form of path specification and add "file:///" before the drive specification, e.g. "file:///d:/json-csv/data.json".
JSON structure
The JSON structure is not subject to any special specifications. JSON objects can be addressed directly and customised for import. This applies to simple objects and JSON arrays.
Value assignment
The data to be imported is assigned using the simple principle of value assignment by object path:
[Value to be imported] -> [Local value]
Example of a simple JSON structure for a single "contact object":
[
{
"id": "10201",
"cn": "Tim1-WEB",
"sn": "Harper1",
"mail": "tim1@testmail.com",
"title": "Product Manager1",
"o": "Test Company Inc.1",
"postalCode": "11111",
"street": "street1",
"jpegPhoto": "",
"extension": "300",
"data":
{
"postOfficeBox": "PO127653-T3",
"st": "NY"
},
"phoneUseBLF":"1",
"phoneUsePresence":"0",
"AssignedSIPAccountID":"placetel"
}
]
Import example "First name"

Import example 'post office box'

When importing from an array, every array index is checked and imported, provided that usable data is available.
"numbers": {
"PRIVATE": [
{
"id": "",
"number_e164": "4964454930560000",
"number_disp": "4930567890"
},
{
"id": "",
"number_e164": "4964454930671111",
"number_disp": "4930678900"
}
]
In some cases, you need to modify the data to be imported. Two functions can be used for this purpose, which influence a value during the data import. These functions can be combined several times in the object path specification. Functions and object specifications are logically linked with "|" (pipe).
writeIfNotEmpty("<Value>")-> only writes the value if the result is > NULLwrite("<Value>")-> always writes the value, regardless of the result
Example:
writeIfNotEmpty("+")|numbers/PRIVATE/number_e164
Result:
+4964454930560000
+4964454930671111
Example:
writeIfNotEmpty("+")|numbers/PRIVATE/number_e164|write("123")
Result:
+4964454930560000123
+4964454930671111123
Special handling when importing group assignments:
You can make a group assignment of a contact by importing data into the Assignment to contact group field.
The following applies:
External group designations always take precedence over the program groups.
The internal program group Favorite is the only group that can be used and assigned haptically alongside the externally supplied groups.
Group names are NOT treated as case sensitive during the import. This avoids multiple groups with different spellings of a group type (Friends, friends, FrienDs).
Imported groups are permanently stored in the application. You will need to delete groups that are no longer required in the group management. Deletion via JSON is currently not provided.
Import example groups from an array:
"groups": [
{
"id": "14741",
"name": "Friends",
"desc": "Friends"
},
{
"id": "14744",
"name": "Partner",
"desc": ""
}
]
If no contact groups with the names 'Friends' and 'Partner' exist, these are created. The contact currently being imported is also assigned to the 'Friends' and 'Partners' groups.

Import of image files:
Image data is always expected in JPEG image format. You need to convert JPEG files to BASE64 format for any import.

9.5 LDAP
Synchronising LDAP
To set up a new synchronisation
Select LDAP from the side menu.
Next to Add a new data source, click the "+" icon.
⇒ In the next screen, the connection is now set to Enabled. Adjust the settings as needed (see table below)
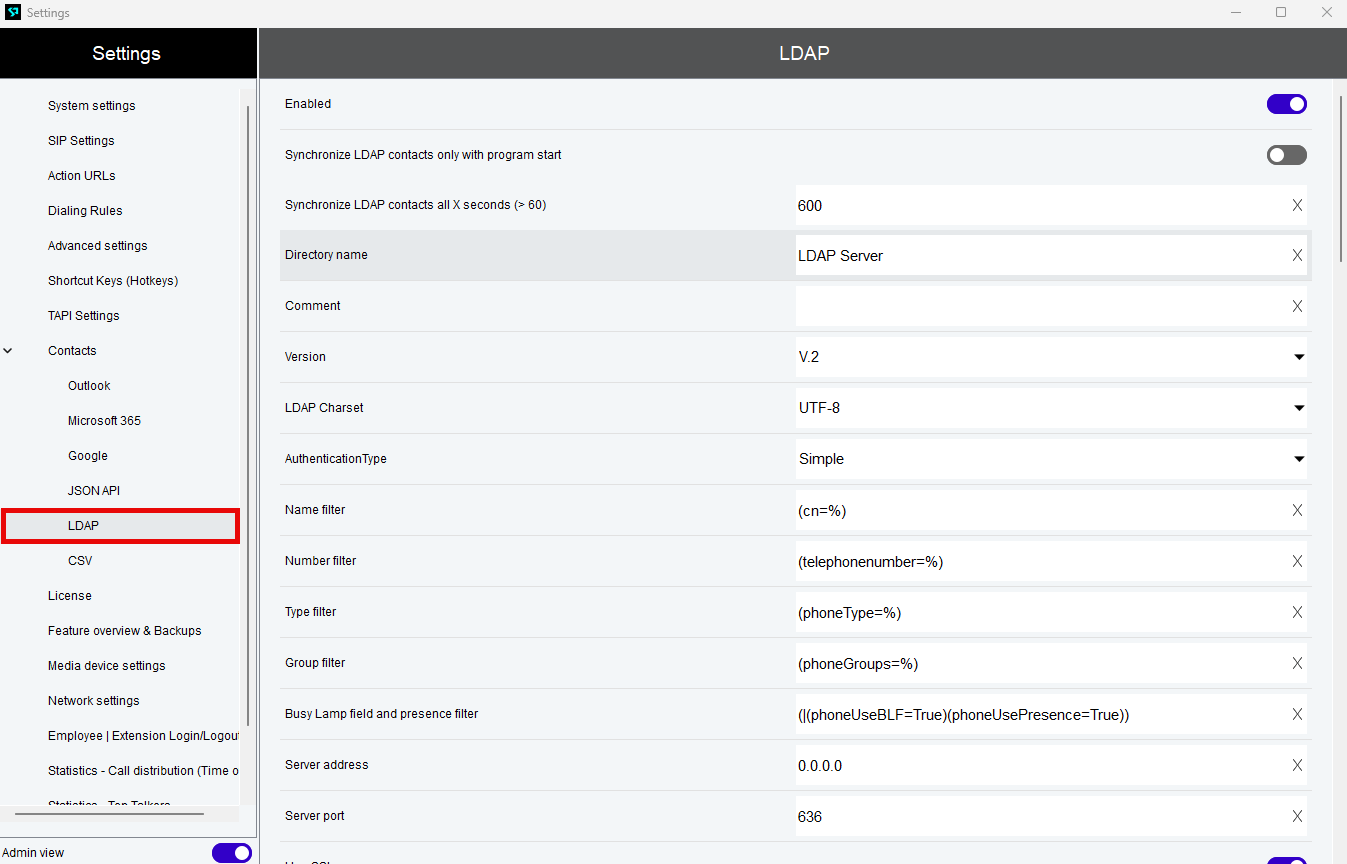
To edit, duplicate or delete an existing synchronisation
Select LDAP from the side menu.
Click the pencil icon to edit an LDAP Server's settings.
Click the copy icon to duplicate an LDAP Server.
Click the delete icon to delete an LDAP Server.
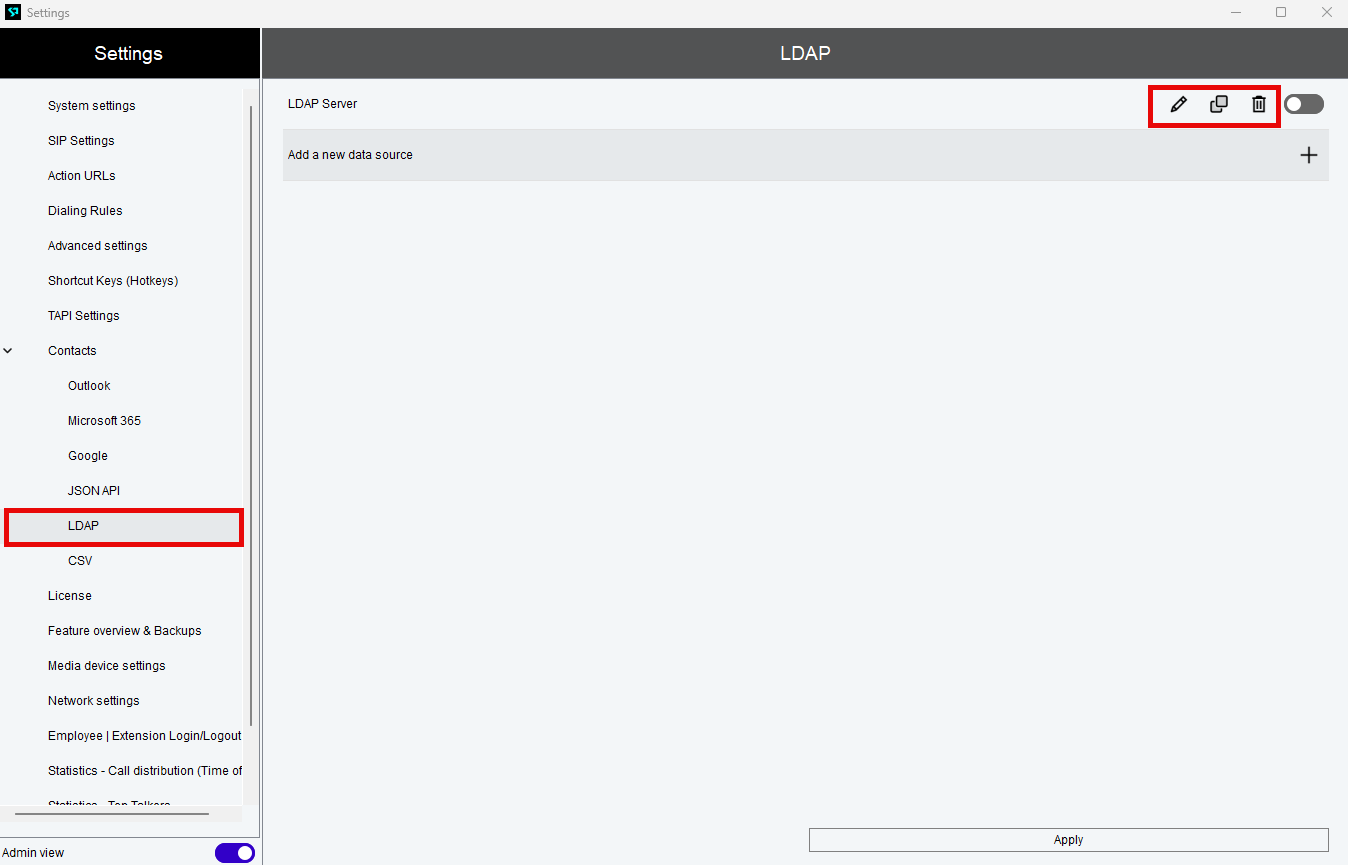
LDAP settings
Setting name | Description |
|---|---|
Add a new data source | Click on "+" to add a new data source. |
Enabled | Enables queries to any LDAP server |
Directory name | Directory of the LDAP server to be accessed |
Comment | Adds a local comment for this LDAP setting |
Version ( 2 | 3 ) | Version of the used LDAP server LDAP 3 defines a number of improvements that allow a more efficient implementation of the Internet directory user agent access model, also UTF-8 etc. LDAP 3 is compatible with LDAP 2. An LDAP 2 client can connect to an LDAP 3 server. However, an LDAP 3 server can choose not to talk to an LDAP 2 client. |
Authentication Type | Types: Simple, Digest, Negotiate, Kerberos |
Server address | IP address or domain name |
Server port | Standard ports for LDAP are 389 (unencrypted) and 636 for SSL. |
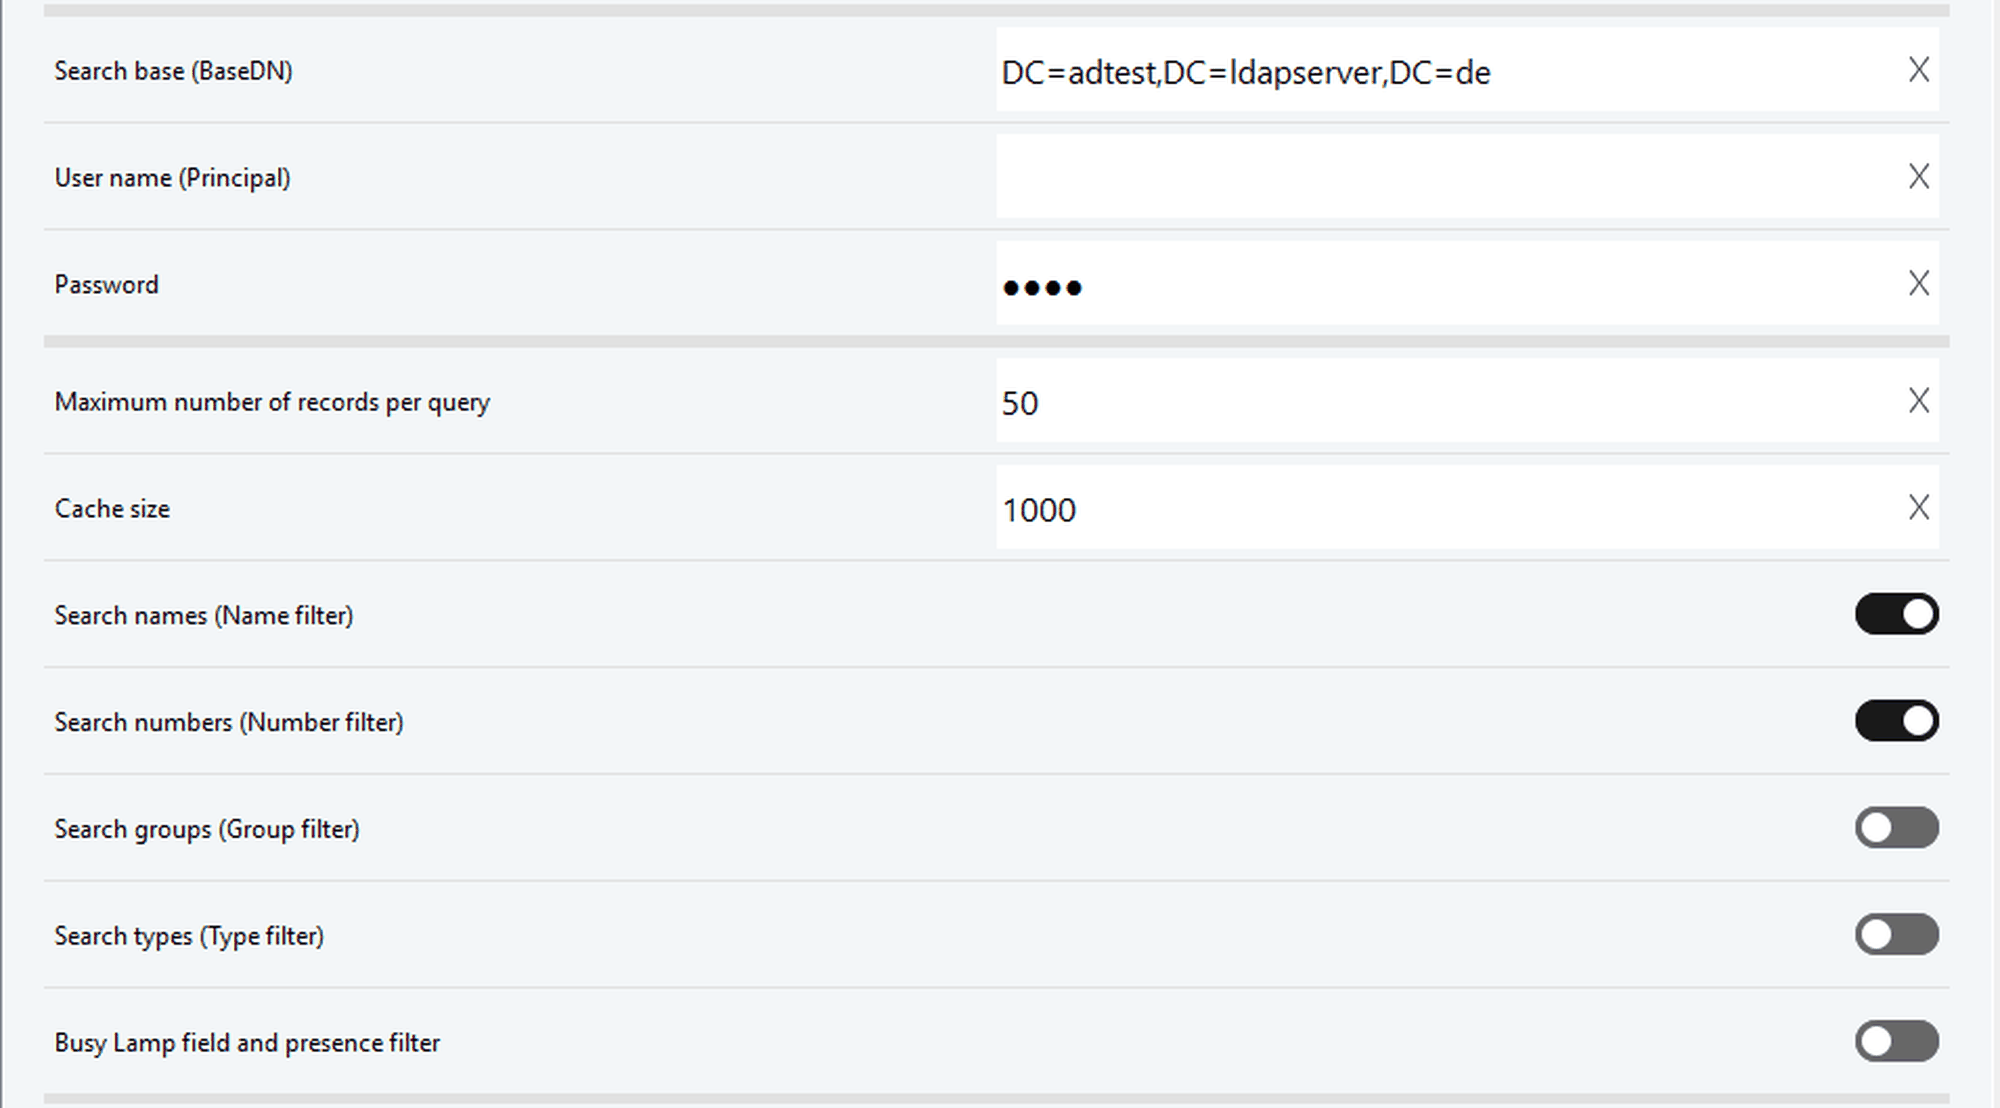
Setting name | Description |
|---|---|
Search base (BaseDN) / User name | Distinguished Name (DN: defines where the search shall start in the lightweight directory (descending) / Username for LDAP access. Examples:
UID attribute (Active Directory: "CN" is equal to "UID"): https://docs.microsoft.com/en-us/windows/win32/adschema/a-uid |
User name (Principal) | User name for the negotiation process if expected |
Password | Password of the LDAP user |
Maximum number of data records for each request | Enter the maximum number of data records to be returned to the software. The number should be used well (default: 50). |
Cache size | Number of maximum cached data If the number X is reached, older data records are automatically overwritten (default: 1000) |
Column 1: Attributes of local data
Column 2: LDAP attributes
Write a custom JSON attribute into the editable fields.
LDAP filters
You can see a number of LDAP filters in the input fields concerning filters (also see screenshot above). For more information, go to LDAP filters here.
9.6 CSV
CSV import
Your contacts can be synchronised with Softphone Pro via a CSV file.
Click on Contacts -> CSV in the side menu to access the CSV synchronisation menu
Find a full description of the settings and options in the table below.
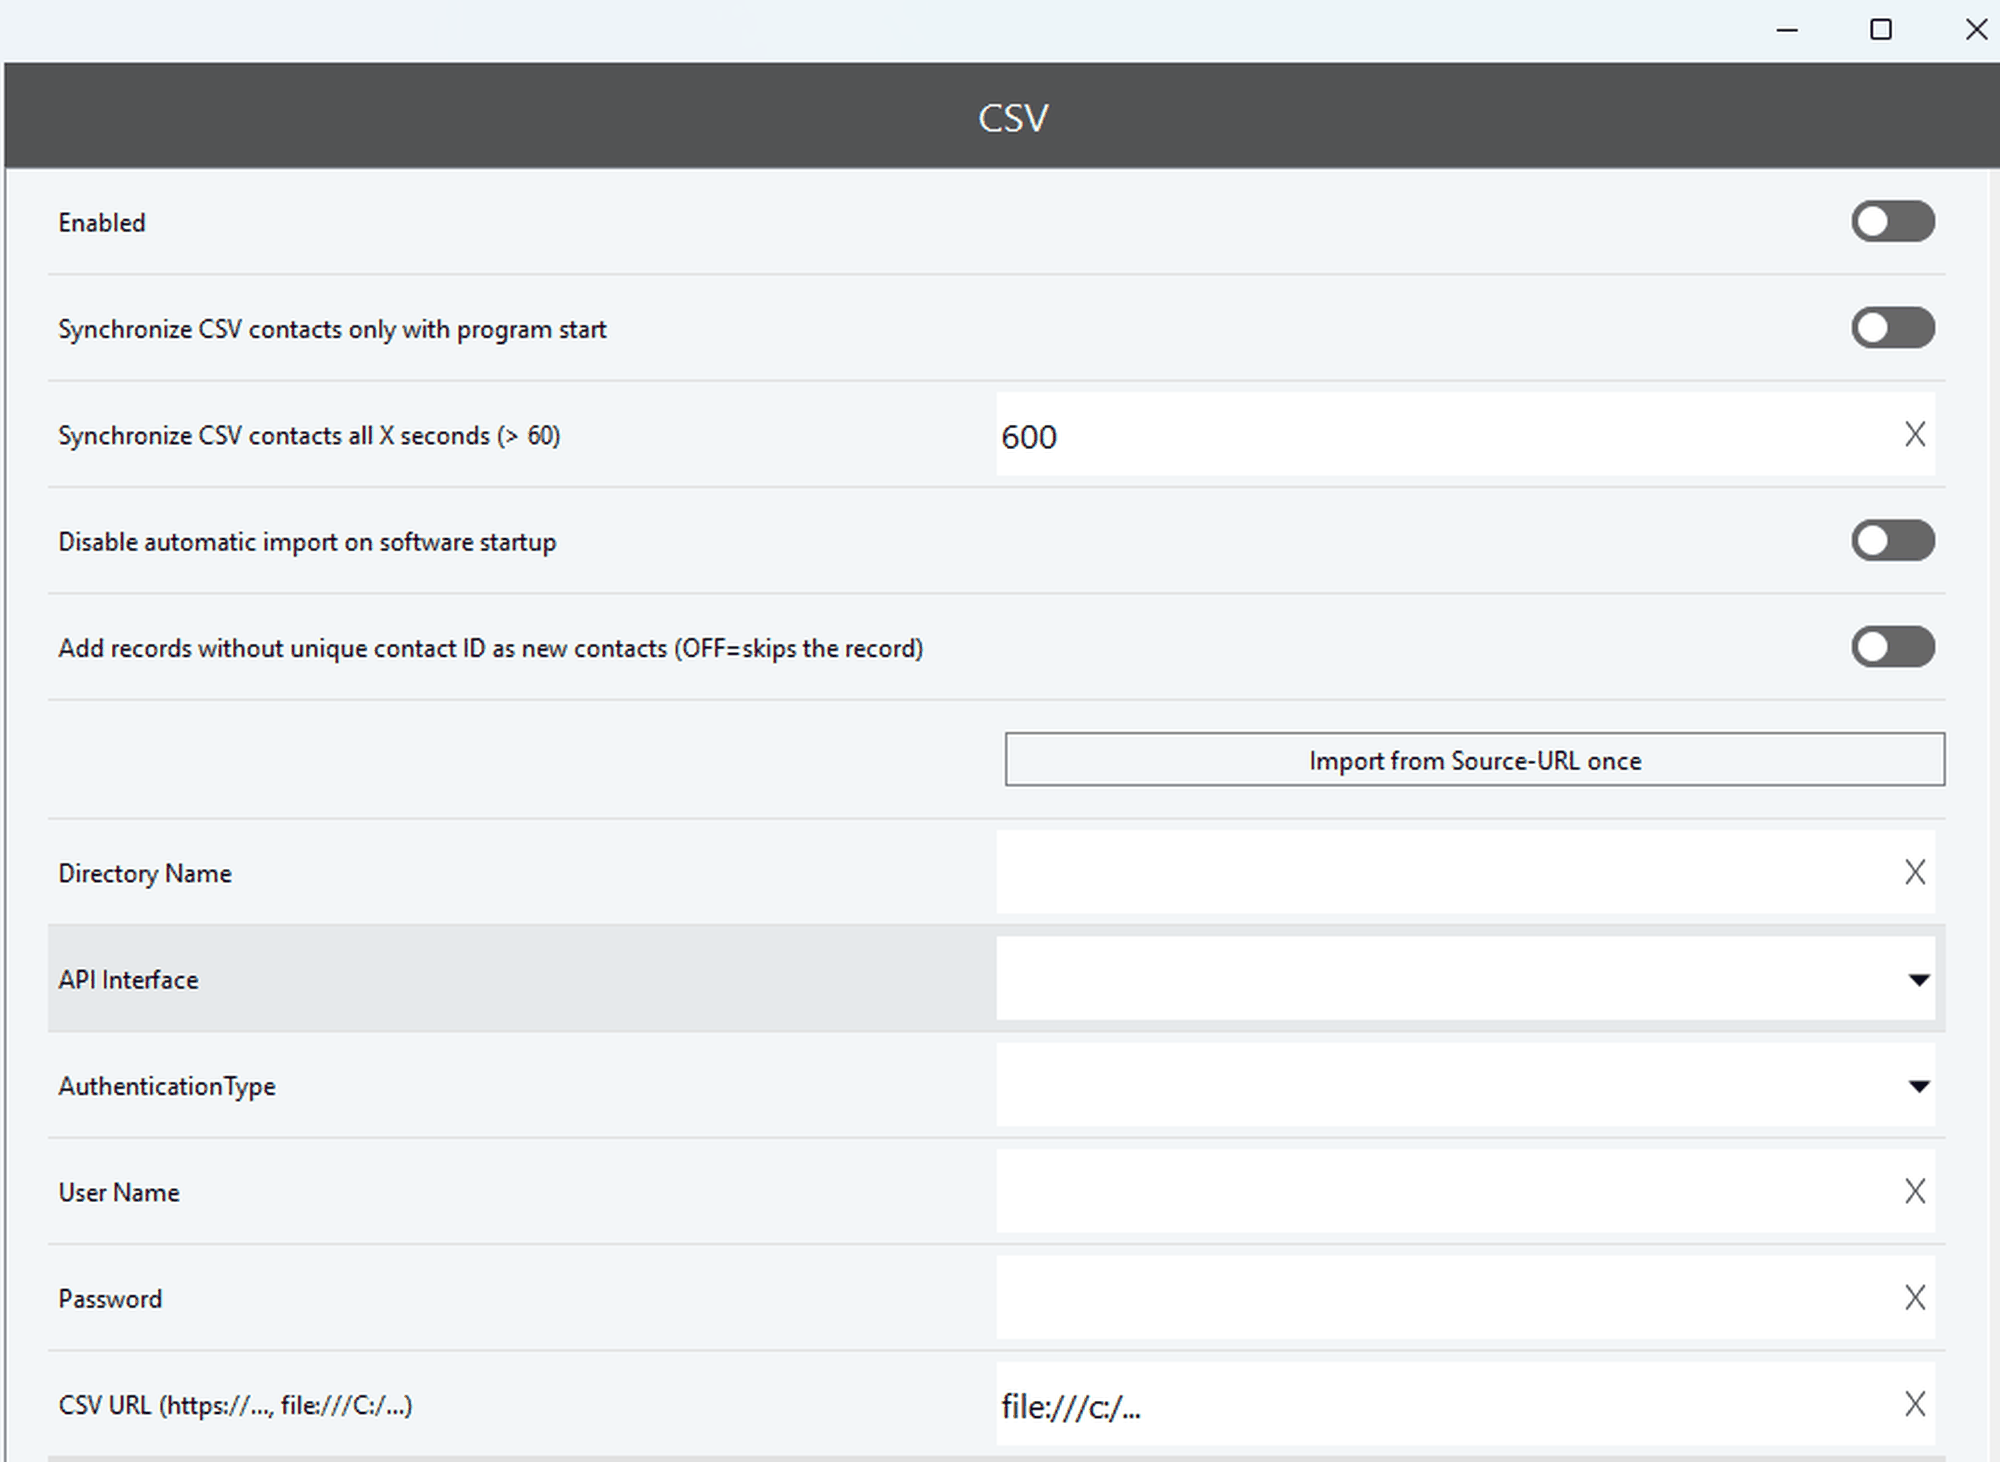
CSV settings
Setting name | Description |
|---|---|
Add a new data source | Click on "+" to add a new data source. |
Enabled | Enables the request to any CSV source |
Disable automatic import on software startup | The import is run on startup by default. Disable this feature if you prefer to initiate the import manually. |
Add records without a unique contact ID as a new contact (OFF=skip the record) | When activated, imports from a source without unique contact ID once Bear in mind that importing multiple times from a source without unique contact ID will result in the same contacts being created multiple times. |
Import once from the source URL | Click to import contacts right now. |
Directory name | Free name of the CSV source to be accessed |
API Interface | Selects an available API interface |
Authentication type | Defines how and where authentication takes place |
User name | Defines user name for negotiation procedures, such as Negotiate |
Password | Defines user password. |
URL | Defines URL of CSV data source. |
Import specifications
CSV data source links
You can import contacts from CSV data sources with a URL link or file link. URL data sources are URLs that can be accessed without authentication, with HTTP-AUTH or oAUTH.
Static files
Static files that are created once for the import or updated cyclically can also be used.
Once/cyclical imports
Regardless of the data source, contact data can be imported/synchronised "once" or cyclically.
Unique contact ID assignment
A unique contact ID assignment is preferable to avoid duplicates during cyclical import processes.
Importing from local data sources
Use a special form of path specification and add "file:///" before the drive specification, e.g. "file:///d:/json-csv/data.csv".

Required delimiter
The CSV structure is not subject to any special specifications. The expected delimiter (separator) between individual values is the "comma character" (,).
Column structure
The first line corresponds to a header with a meaningful column structure. The column structure can contain any order of the values to be transmitted.
Column names
The column names are not subject to any specifications. Data records always correspond to an input line.
Value assignment
The data to be imported is assigned using the simple principle of value assignment by specifying the column name from the header:
[Value to be imported] -> [Local value]
Example for coding a simple CSV structure for a single "contact object":
id,cn,sn,title,phone1,groups
010201,Tim1-web,Harper1,Product Manager1,1,"friends,support,dev"
Import example 'First name'
The CSV import does not support arrays. Only 1:1 assignments can be made. For more complex import projects, the JSON import is preferable.
Import of image files:
Image data is always expected in JPEG image format. Convert JPEG files to BASE64 format for any import.
Column 1: Attributes of local data
Column 2: CSV attributes
Write a custom CSV attribute into the editable fields.
10. Feature overview & backups
Feature overview & backups
Click Feature overview & backups in the side menu to view:
Your customer number and license key
Your license status
Current Version of Softphone Pro
Update availability
Find a full description of the settings and options in the table below.
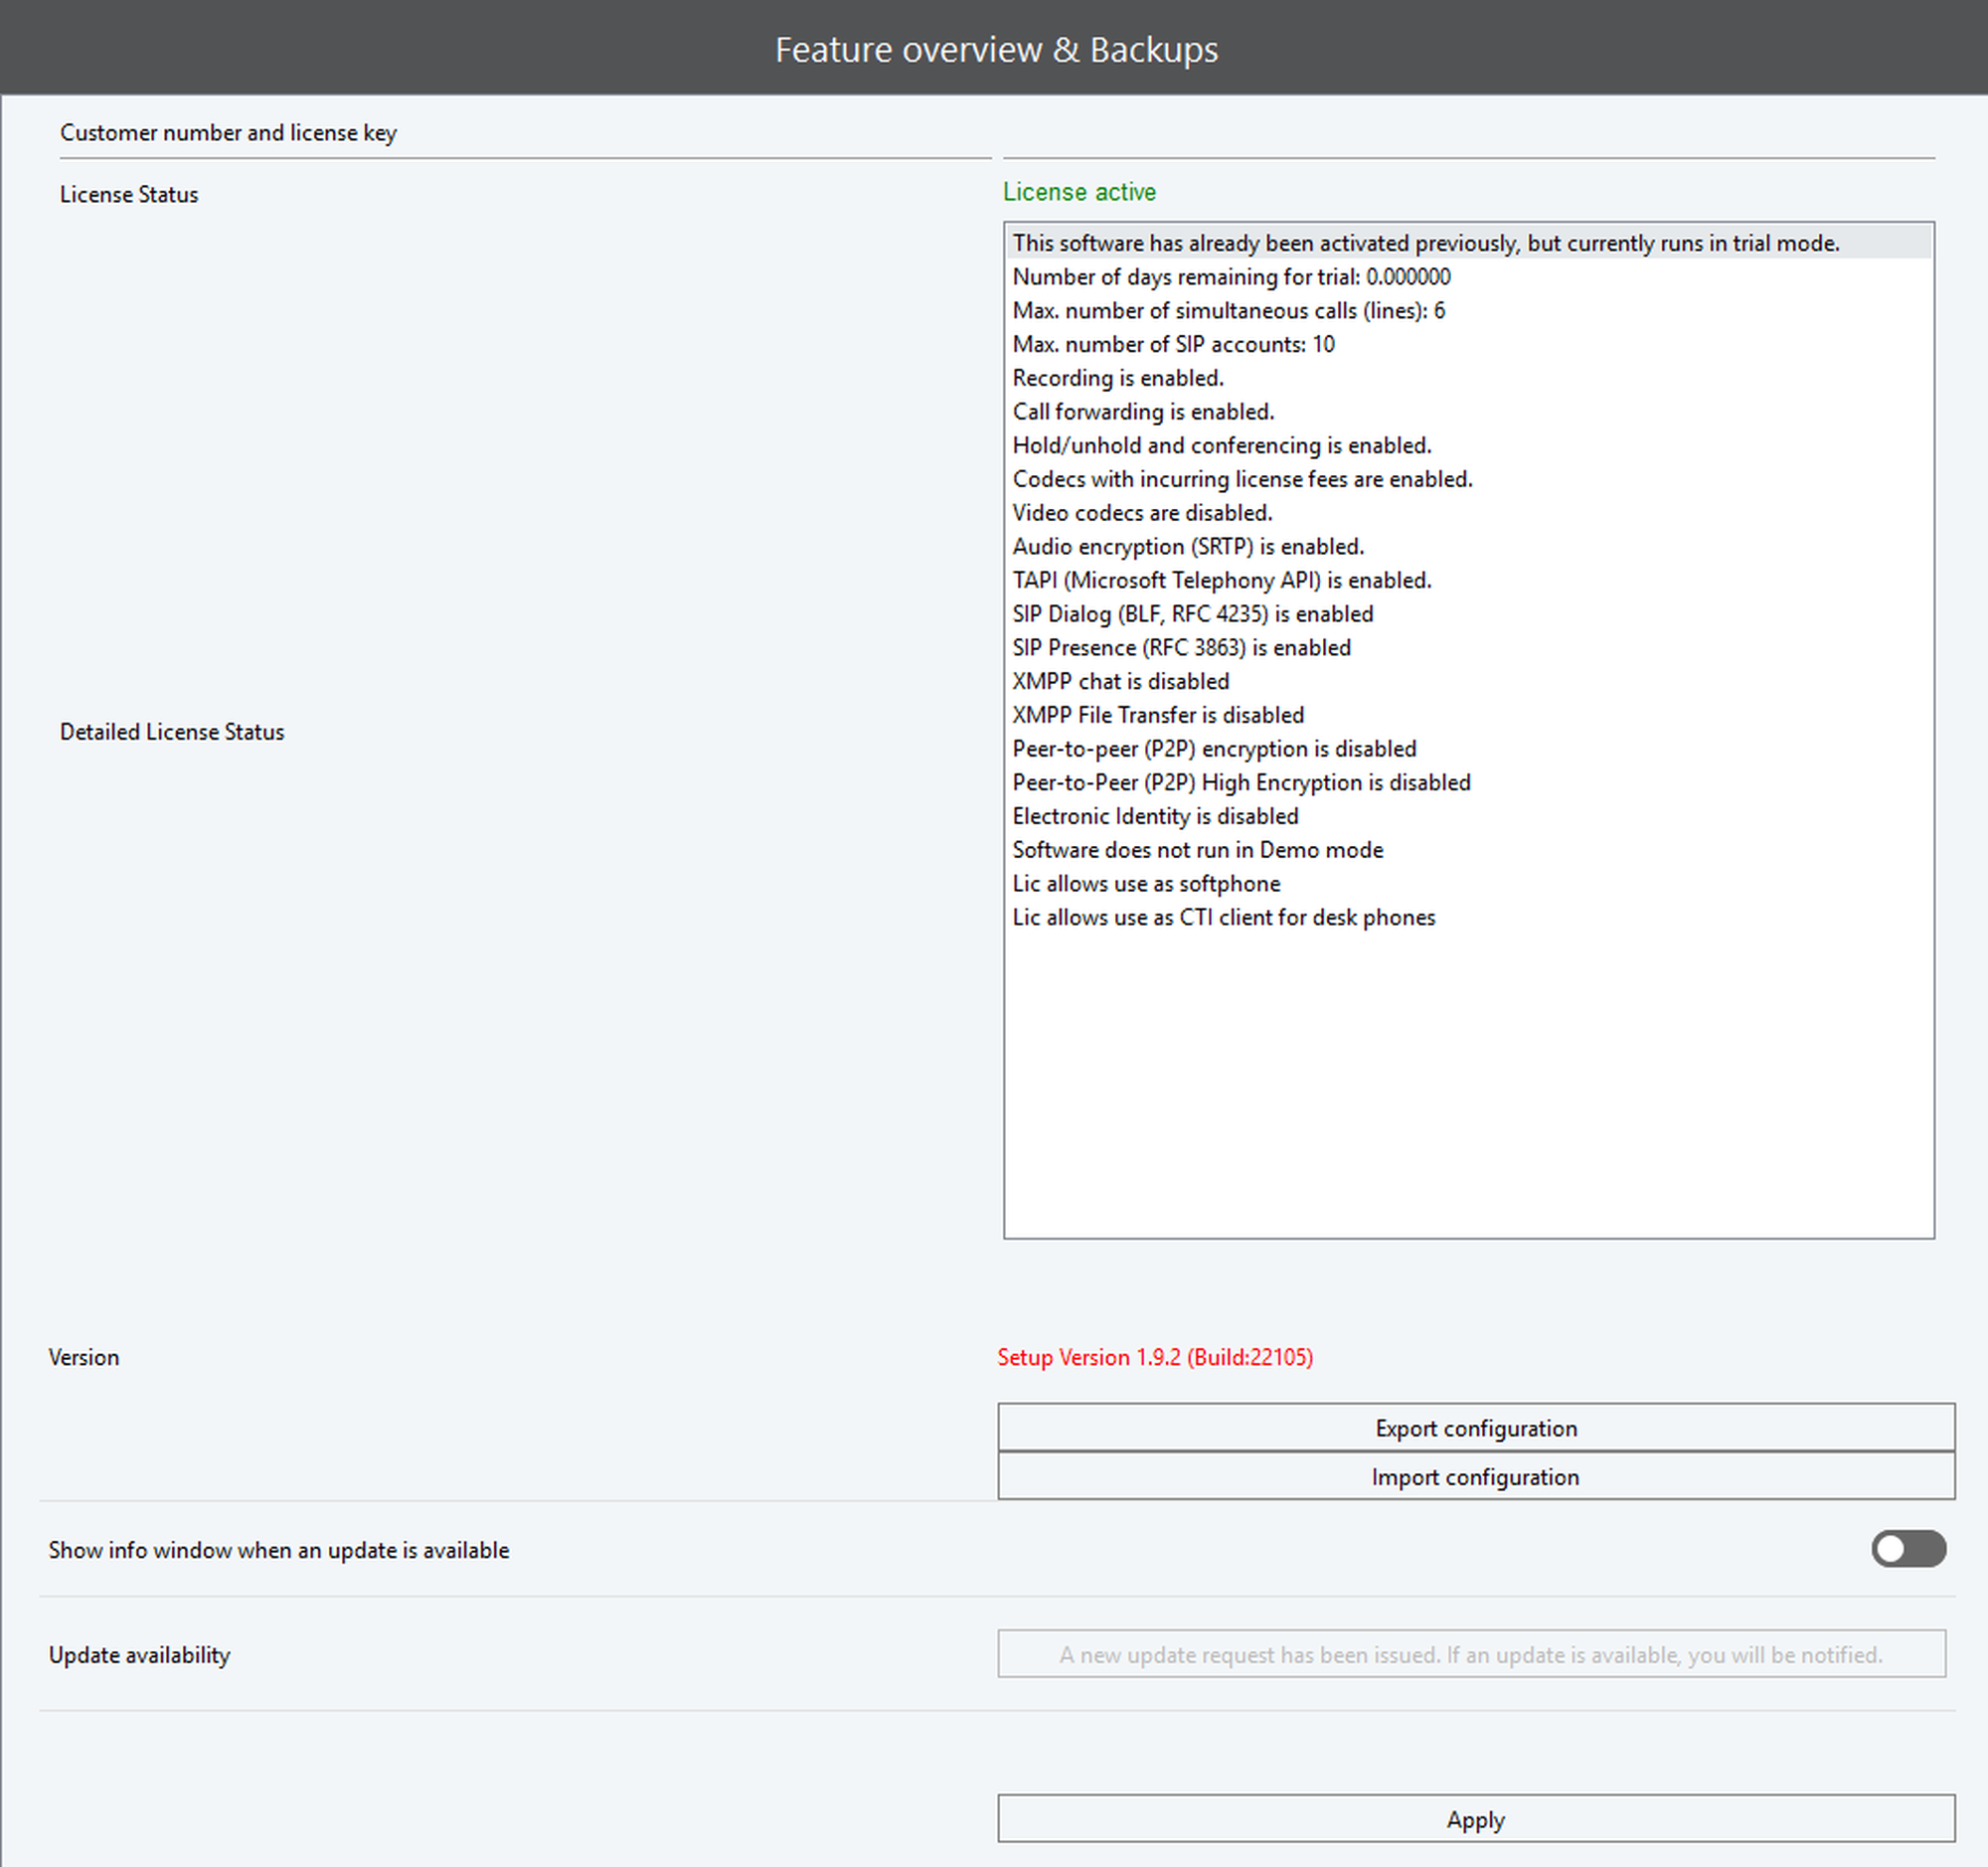
Feature overview & backups settings explained
Setting name | Description |
|---|---|
License status | A function overview that shows the features enabled with this software version. |
Version | Shows the current version of the software. |
Export/import configuration | You can export your configuration or import another one. |
Show info window when an update is available | As soon as an update is available, an info window appears when you use the software. |
Update availability | Shows available updates. |
11. Media device settings
Media device settings
Click Media device settings in the side menu to view a range of media device configuration options.
Find a full description of the settings and options in the tables below.
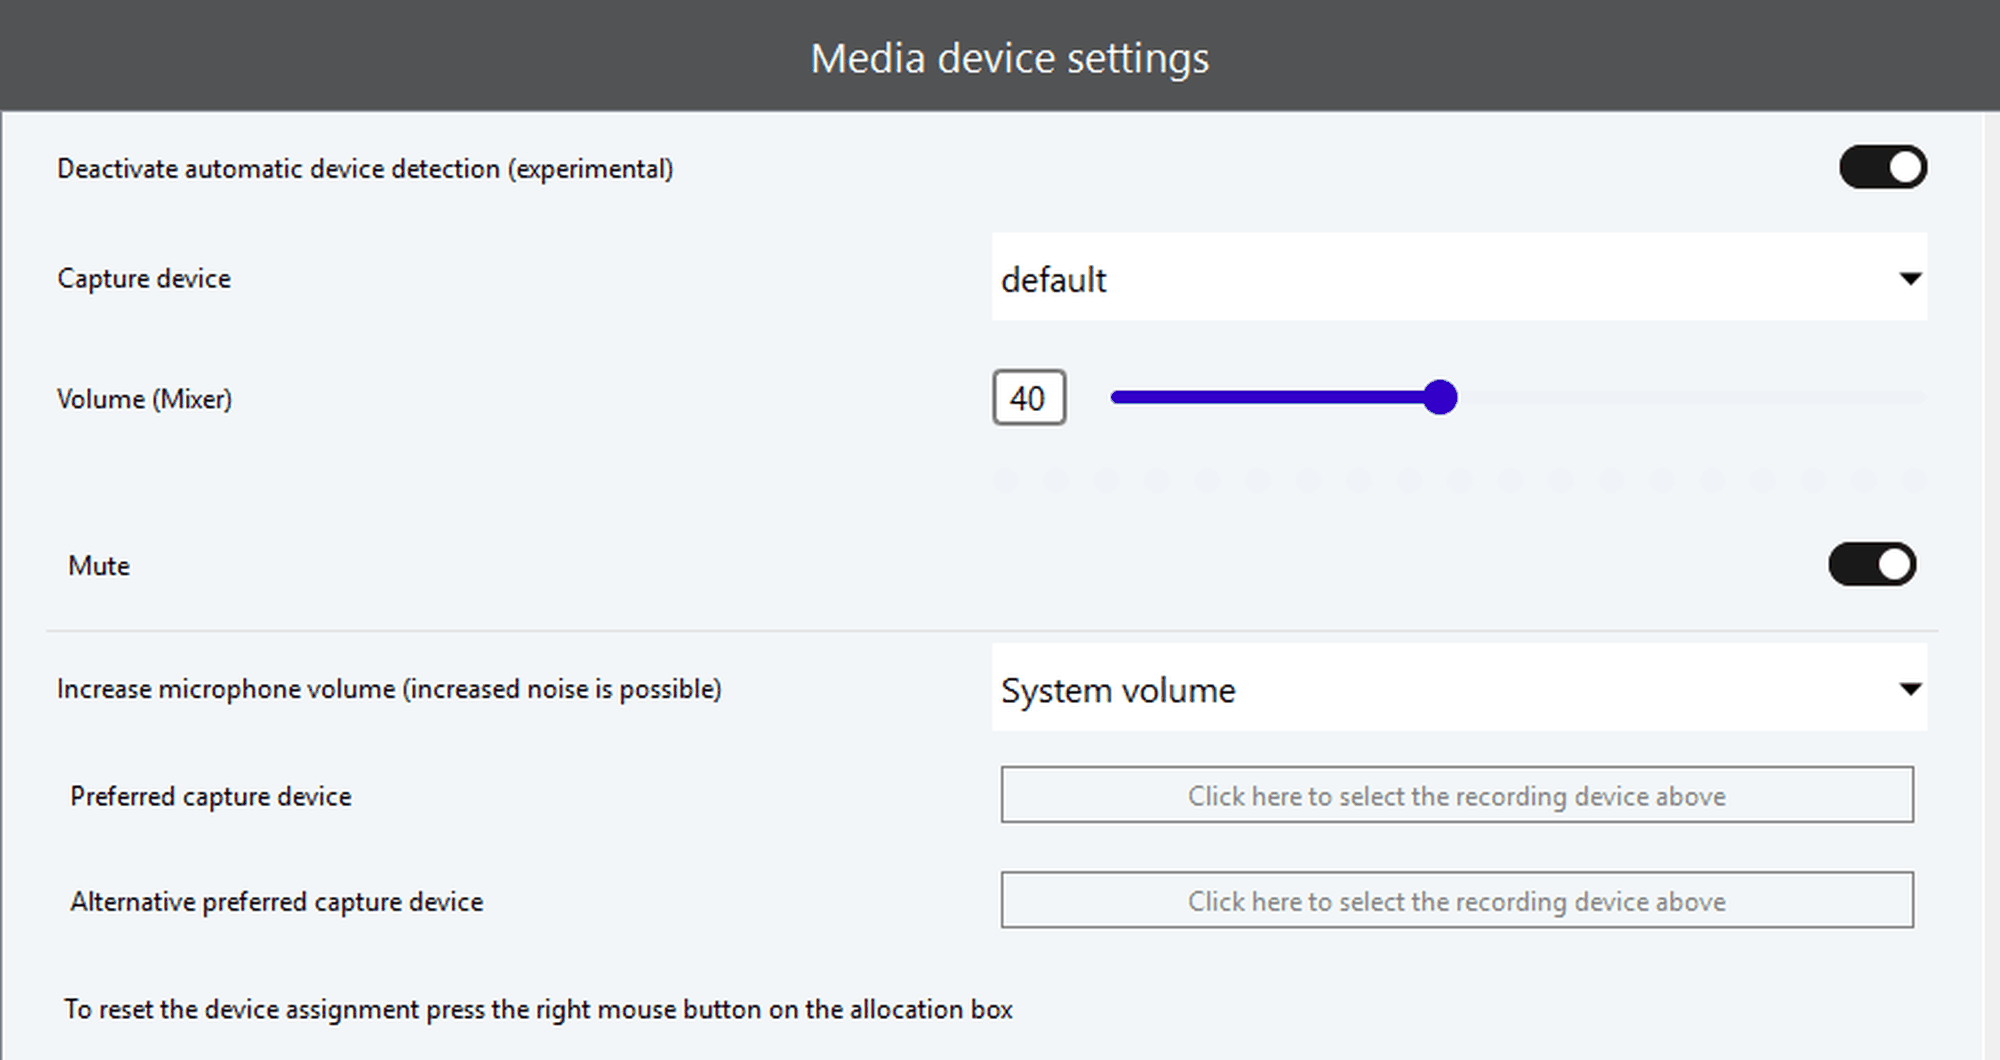
Media device settings explained
Setting name | Description |
|---|---|
Audio input device | Microphone for audio input. |
Volume (Mixer) | Volume of the microphone. |
Mute | Mute the microphone. |
Preferred audio input device | Select your preferred audio input device. |
Alternative preferred audio input device | Select an alternative audio input device if the preferred one is not available. (For example, microphone of the notebook) |
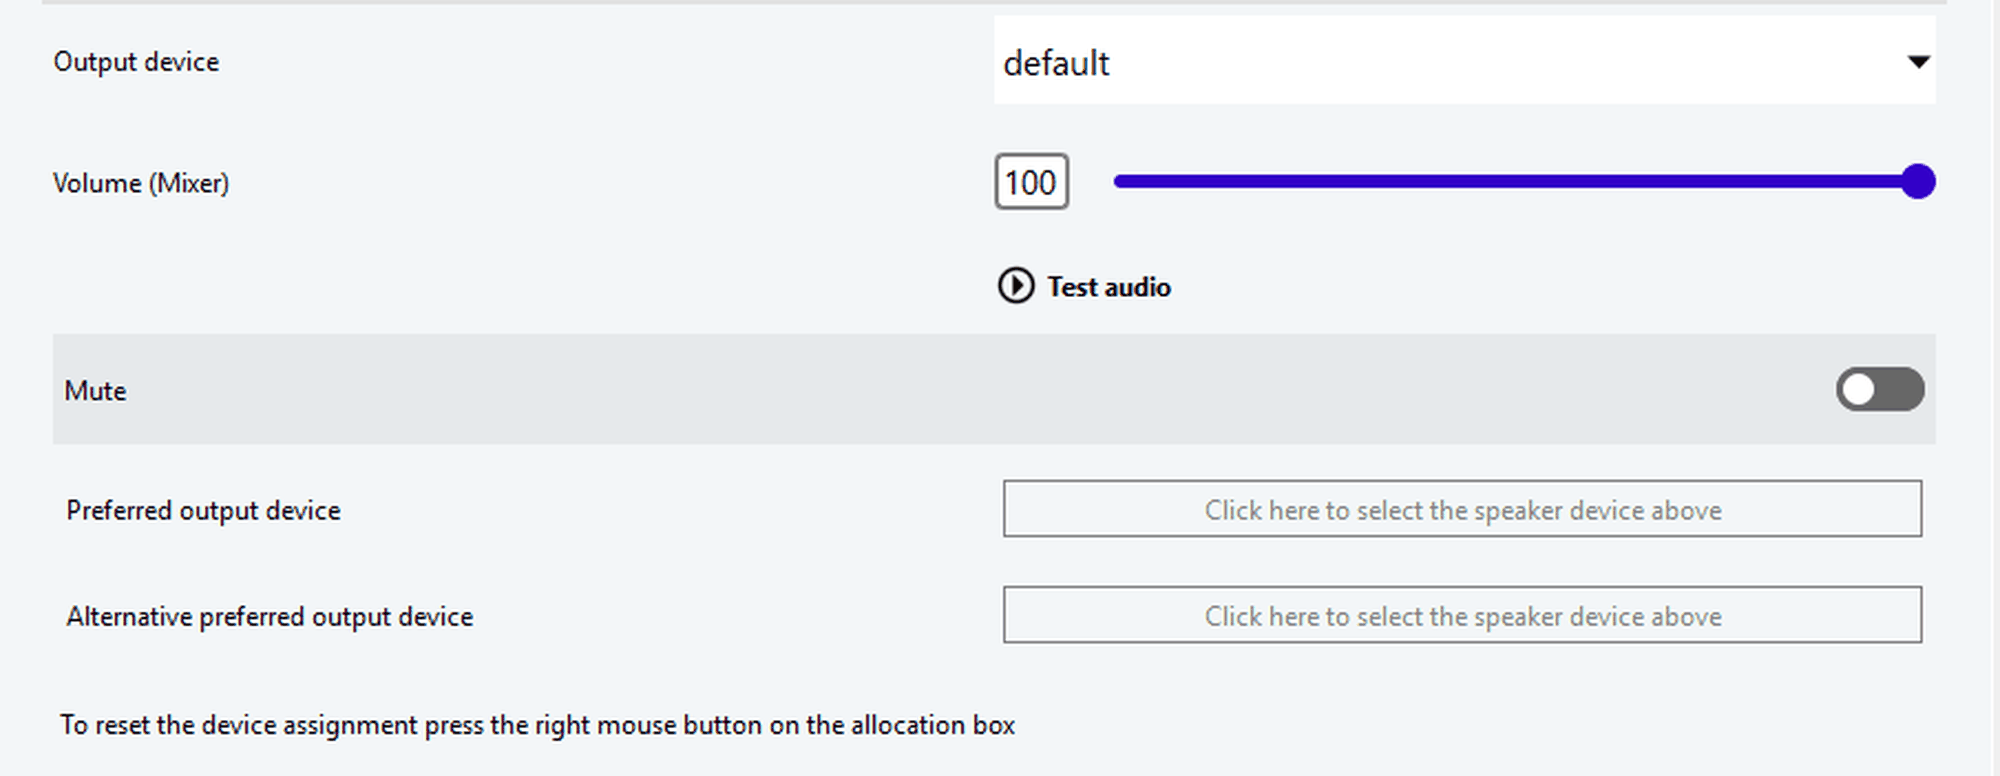
Setting name | Description |
|---|---|
Output device | Loudspeaker for audio output. |
Volume (Mixer) | Volume of the audio output. |
Mute | Mute the loudspeaker. |
Preferred audio output device | Select your preferred audio output device. |
Alternative preferred audio output device | Select an alternative audio output device if the preferred one is not available. (For example, microphone of the notebook) |
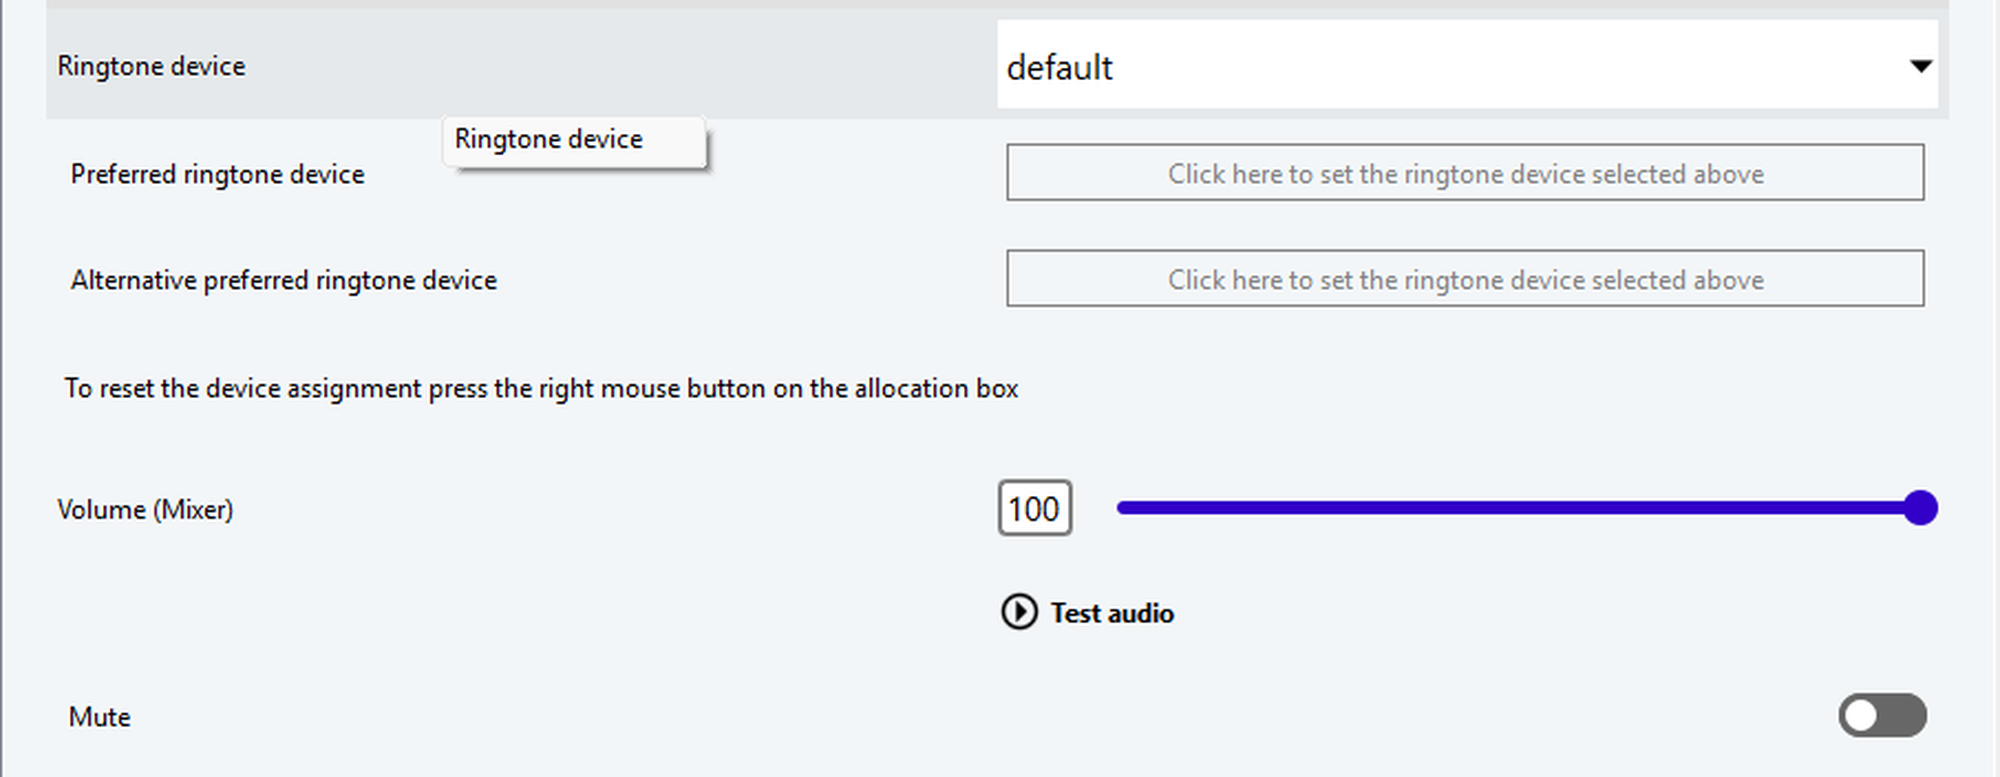
Setting name | Description |
|---|---|
Ringtone device | Output device for ringtone: loudspeaker for ringtone output for an incoming call. |
Preferred output device for ringtone | Preferred loudspeaker for ringtone output for an incoming call. |
Alternative preferred ringtone device | Alternative audio output for ringtone output if the preferred one is not available. |
Volume (Mixer) | Volume of the audio output of the ringtone. |
Mute | Mute ringtone. |
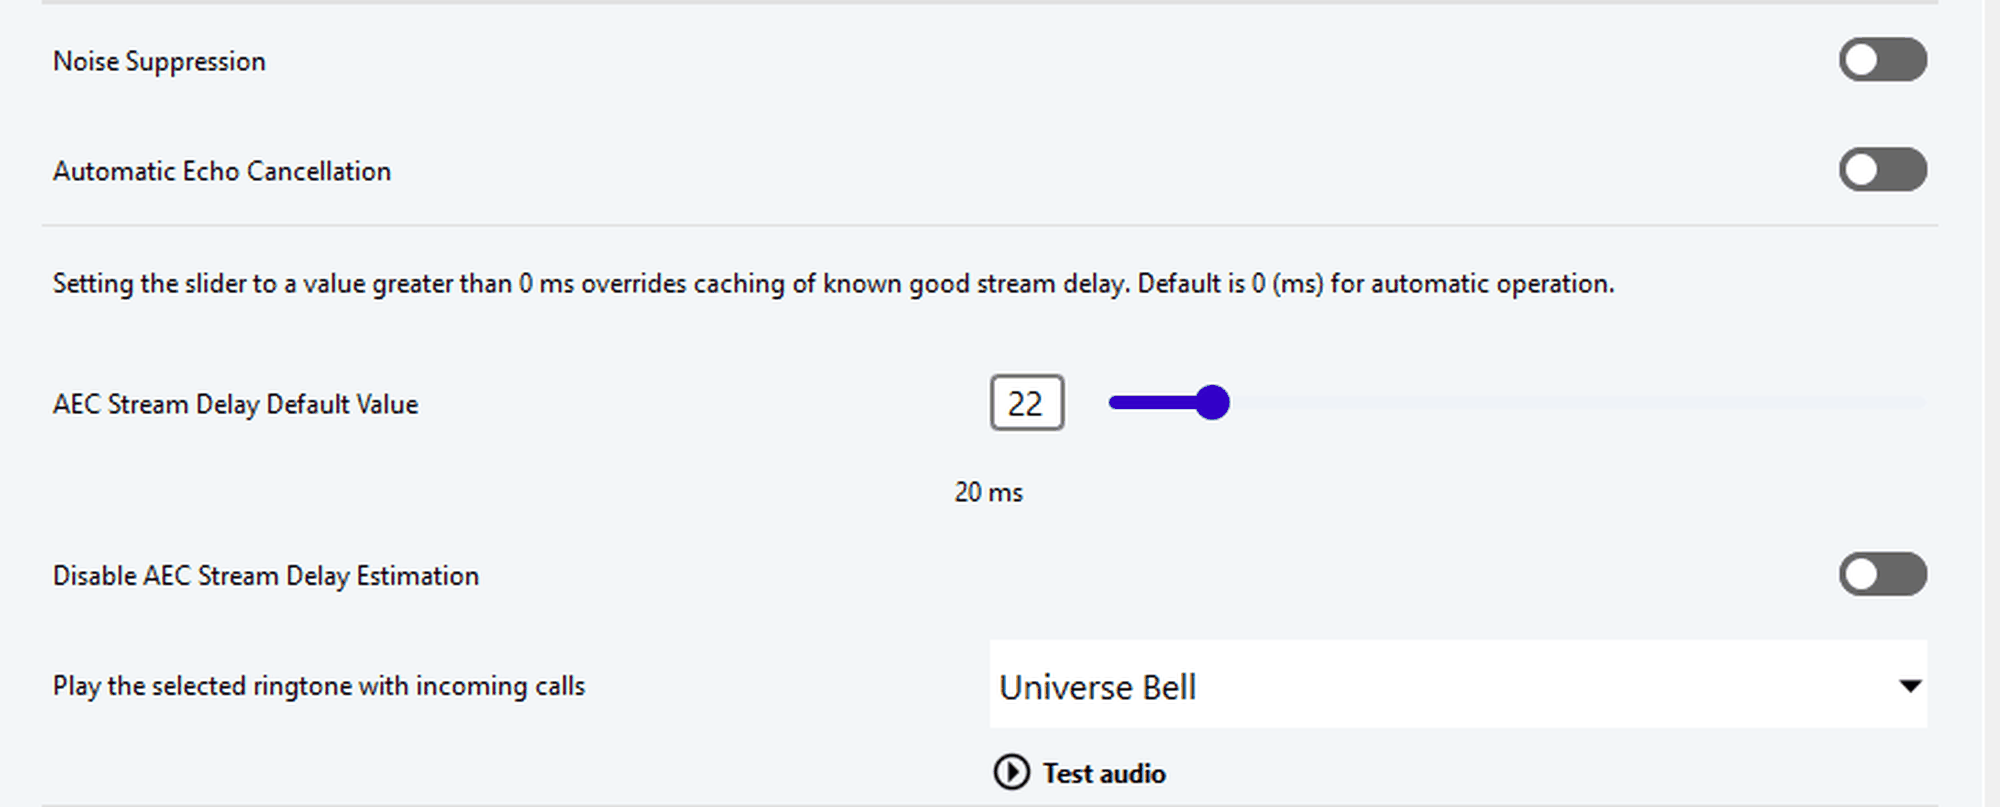
Setting name | Description |
|---|---|
Noise reduction | Process with the aim of reducing unwanted noise in the audio signal. |
Automatic echo cancellation | Method aimed at suppressing or eliminating echo or reverberation effects during simultaneous transmission and reception of signals. |
Default for AEC Stream Delay | Method for compensating hardware delays in milliseconds. |
Disable AEC Stream Delay Estimation | Disables automatic AEC stream delay. Will use the delay provided with 'Default for AEC Stream Delay' instead. |
Play the following ringtone for incoming calls | Default ringtone (general). The ringtone is always played as long as no other ringtone is specified in the SIP proxy. |
12. Network settings
Network settings
Click Network settings in the side menu to view configuration options, QoS levels and firewall settings.
Find a full description of the settings and options in the tables below.
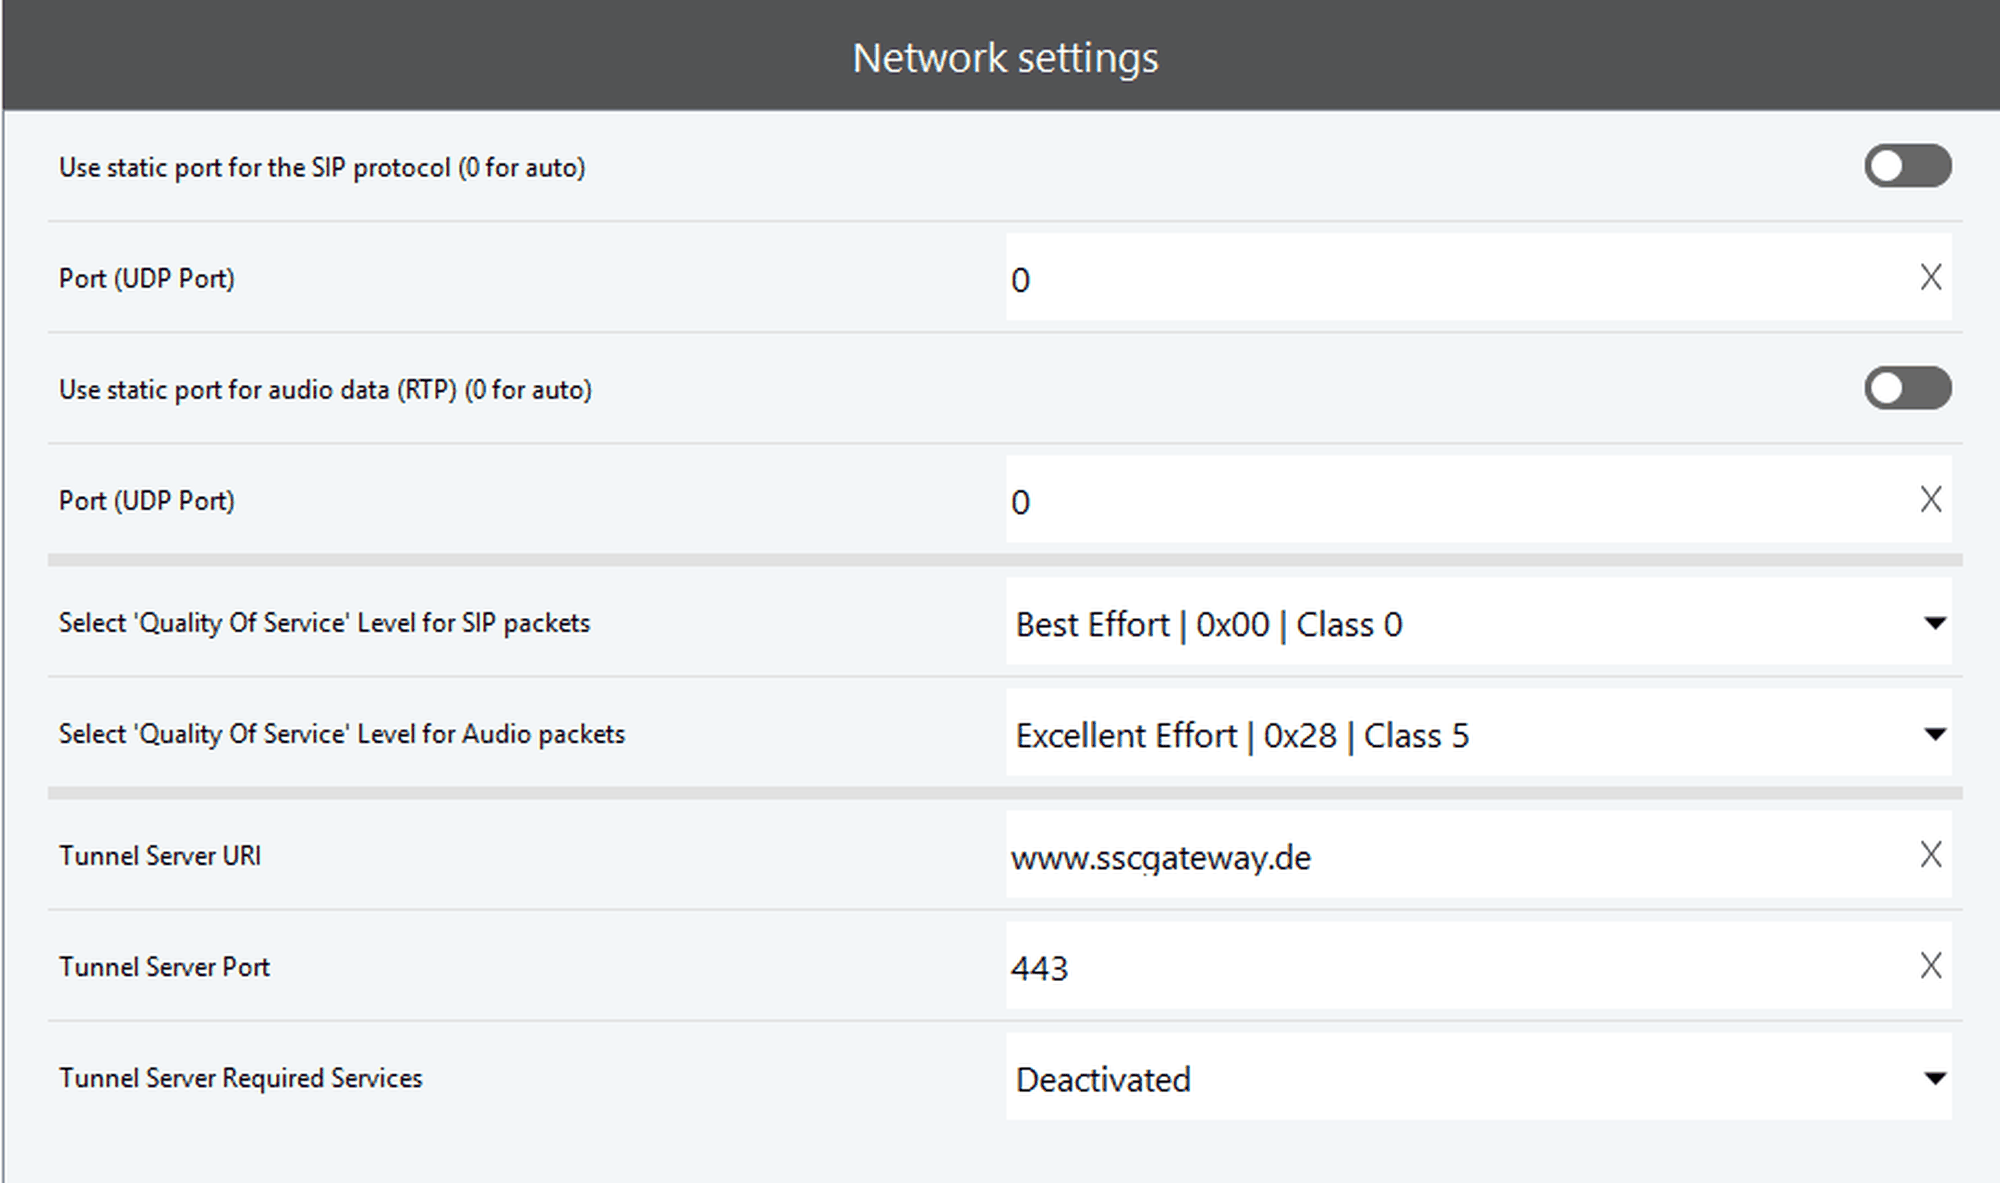
Notifications for your firewall settings
Refer to the table below for the relevant firewall settings.
Firewall settings
Setting | Description |
|---|---|
Use static port for the SIP protocol (0=auto){} | Enable to customise SIP port. |
Port (UDP Port) | Customised SIP port. |
Use static port for audio data (RTP) (0=auto) | Enable customised (RTP) port. |
Port (UDP Port) | Customised RTP port. |
Network settings & QoS levels
The following QoS levels are available:
Setting | Description |
|---|---|
Use static port for the SIP protocol (0=auto) | Please note firewall settings. |
Port (UDP Port) | Please note firewall settings. |
Use static port for audio data (RTP) (0=auto) | Please note firewall settings. |
Port (UDP Port) | Please note firewall settings. |
Select 'Quality of Service' Level for SIP packets | Quality of Service is needed for prioritisation of data packets. Each packet is signed with a value, so a switch or router forwards data packets depending on the attached information. Important: QoS must also be supported by your hardware (network adapter, router, switch). See available QoS levels in the table below. The QoS level, eg 0x38, is appended to any data packet. This data packet is used to determine with which priority a switch or router shall transport the data packet through the network. QoS has to be configured and used over the Windows device components (network card). QoS was standardised by Microsoft since Windows version VISTA. See also: Http://msdn.microsoft.com/en-us/library/windows/desktop/aa374102(v=vs.85).aspx Enter the aforementioned QoS values (DSCP) in your QoS configuration of the managed switch or router. |
Select 'Quality of Service' Level for Audio packets | See the aforementioned statement regarding item 5. |
Tunnel Server URI (Integration to Q4 2021) | Support for difficult environments, e.g. firewall, router limitations |
Tunnel Server Port | Assignment of a Port (Default: 443) |
Tunnel Server Required Services | Specification of the desired service to be used via tunnel. |
BestEffort | 0x00 | - | Class1 |
Background | 0x08 | 2 | Class5 |
ExcellentEffort | 0x28 | 5 | Class5 |
AudioVideo | 0x28 | 5 | Class5 |
Voice | 0x38 | 7 | Class7 |
Control | 0x38 | 7 | Class7 |
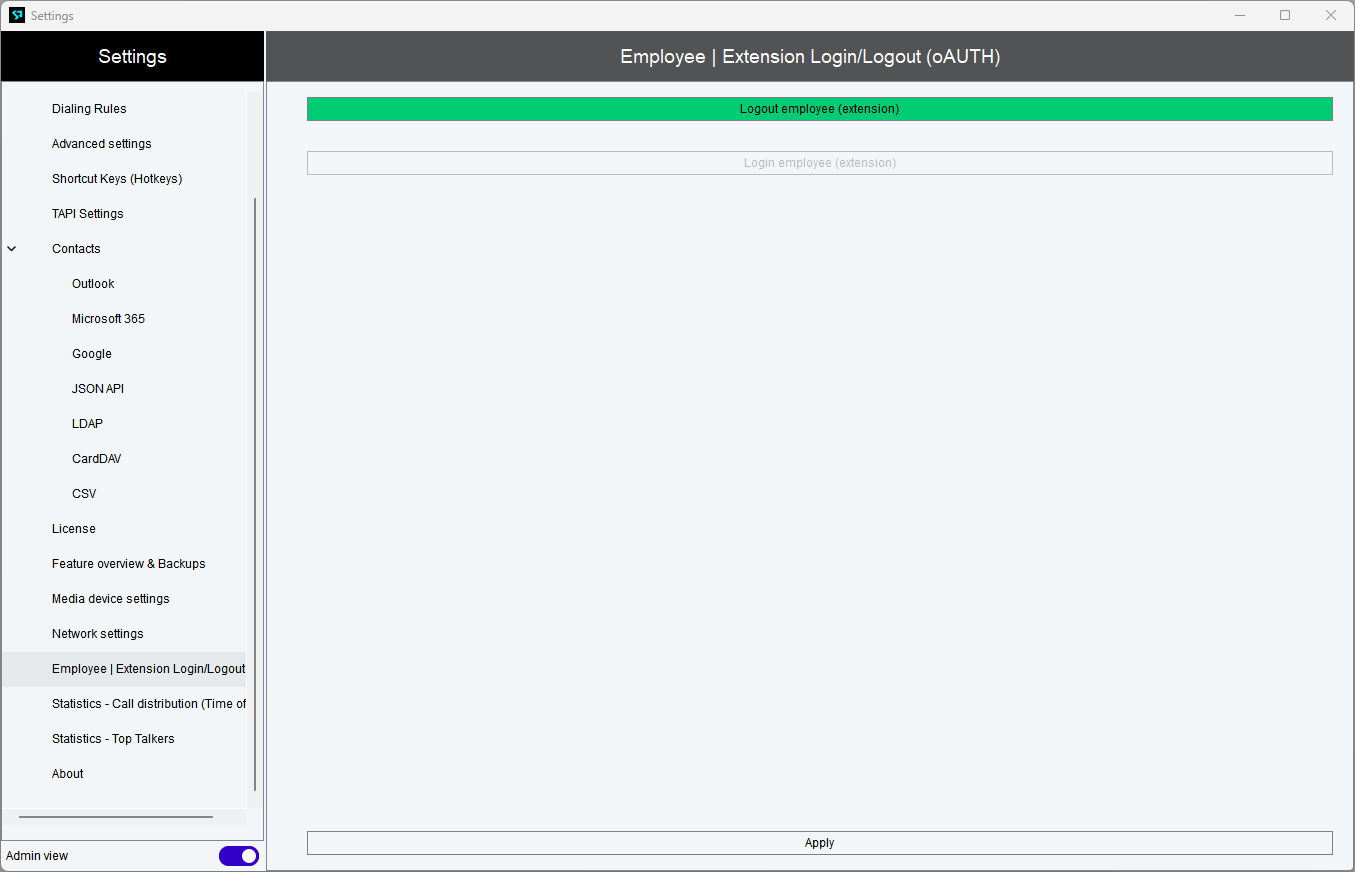
13. Employee | Extension login/Logout (oAUTH)
Logging a user in/out
To log a user in or out of the app:
Open the Settings .
Enable the Admin view toggle.
⇒ Employee | Extension Login/Logout (oAUTH) appears in the side menu.
Select Logout employee (extension) or Login employee (extension)
Click Apply.
⇒ If logging in, the login window opens.
For further login information and troubleshooting, see Logging in to the app .