B. Using the app
1. Overview
Logging in to the app
The Softphone Pro app must be downloaded onto your PC. (See Installation .)
To use the app:
Start the app from your desktop.
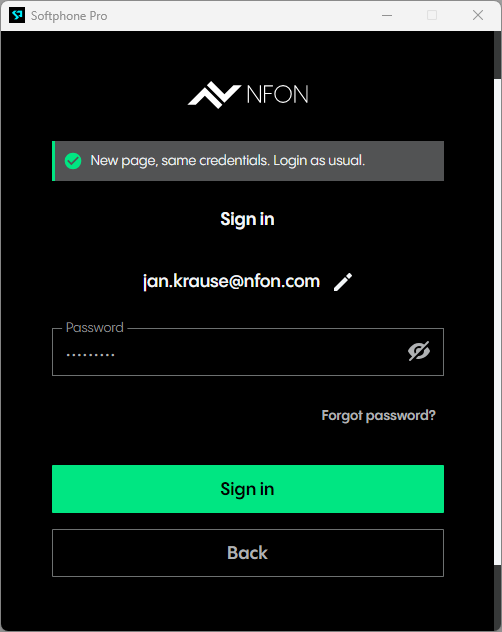
⇒ A Login window opens.
Enter your Cloudya email address and password.
Click on Sign in.
⇒ The user icon in the top left shows a green border. This means you are signed in.
Login troubleshooting

If the user icon has a grey border and no user initials (as shown above), you are not logged in. To log users in or out, see Employee | Extension Login/Logout (oAUTH) .
Demo version pop-up
If a notification that you are using a demo version opens, you can use the full version of the software for 30 days. After this, please contact your sales representative to acquire a subscription. A licence will then be sent to your Cloudya Administrator.
If you already have a valid licence, it may be unassigned. Ask your Cloudya Administrator to assign the licence to you. See User Management Application manual > Managing licences by the admin .
Menu / Toolbar
A toolbar is started for operation. It can be docked to any monitor edge and can be operated with any number of monitors.
To hide/show the toolbar
Swipe the mouse twice on the lower edge of the screen.
User/status
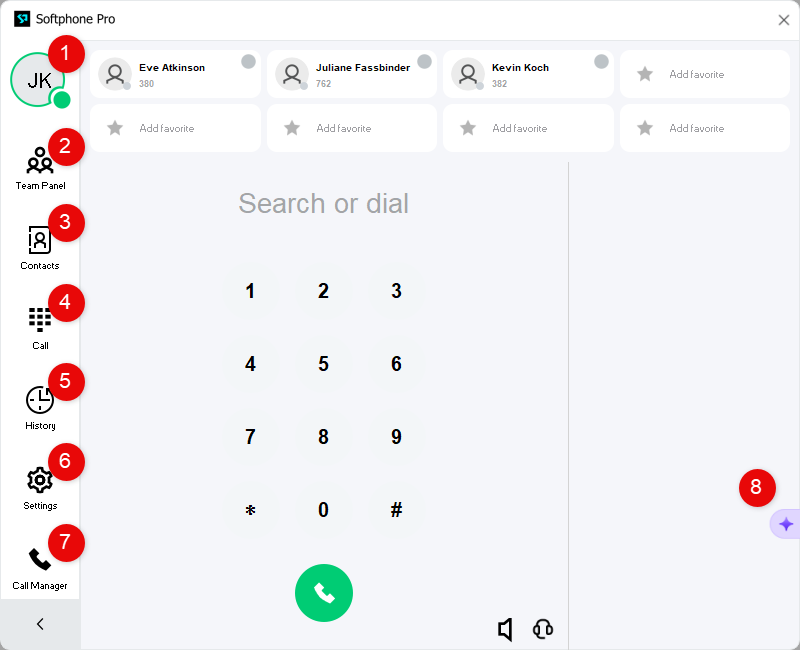
The user icon in the upper left-hand corner serves as a status indicator and shows you the connection between your telephone system and your softphone.
If the border (status) is not green, there is an error.
Your telephone status is shown with a BLF:
Green: The user is not in a call.
Red: The user is in a call.
DND: DND is activated.
Grey: The user is not logged in.
Please note that you need to click on the user icon to open a menu with additional user options (see below).
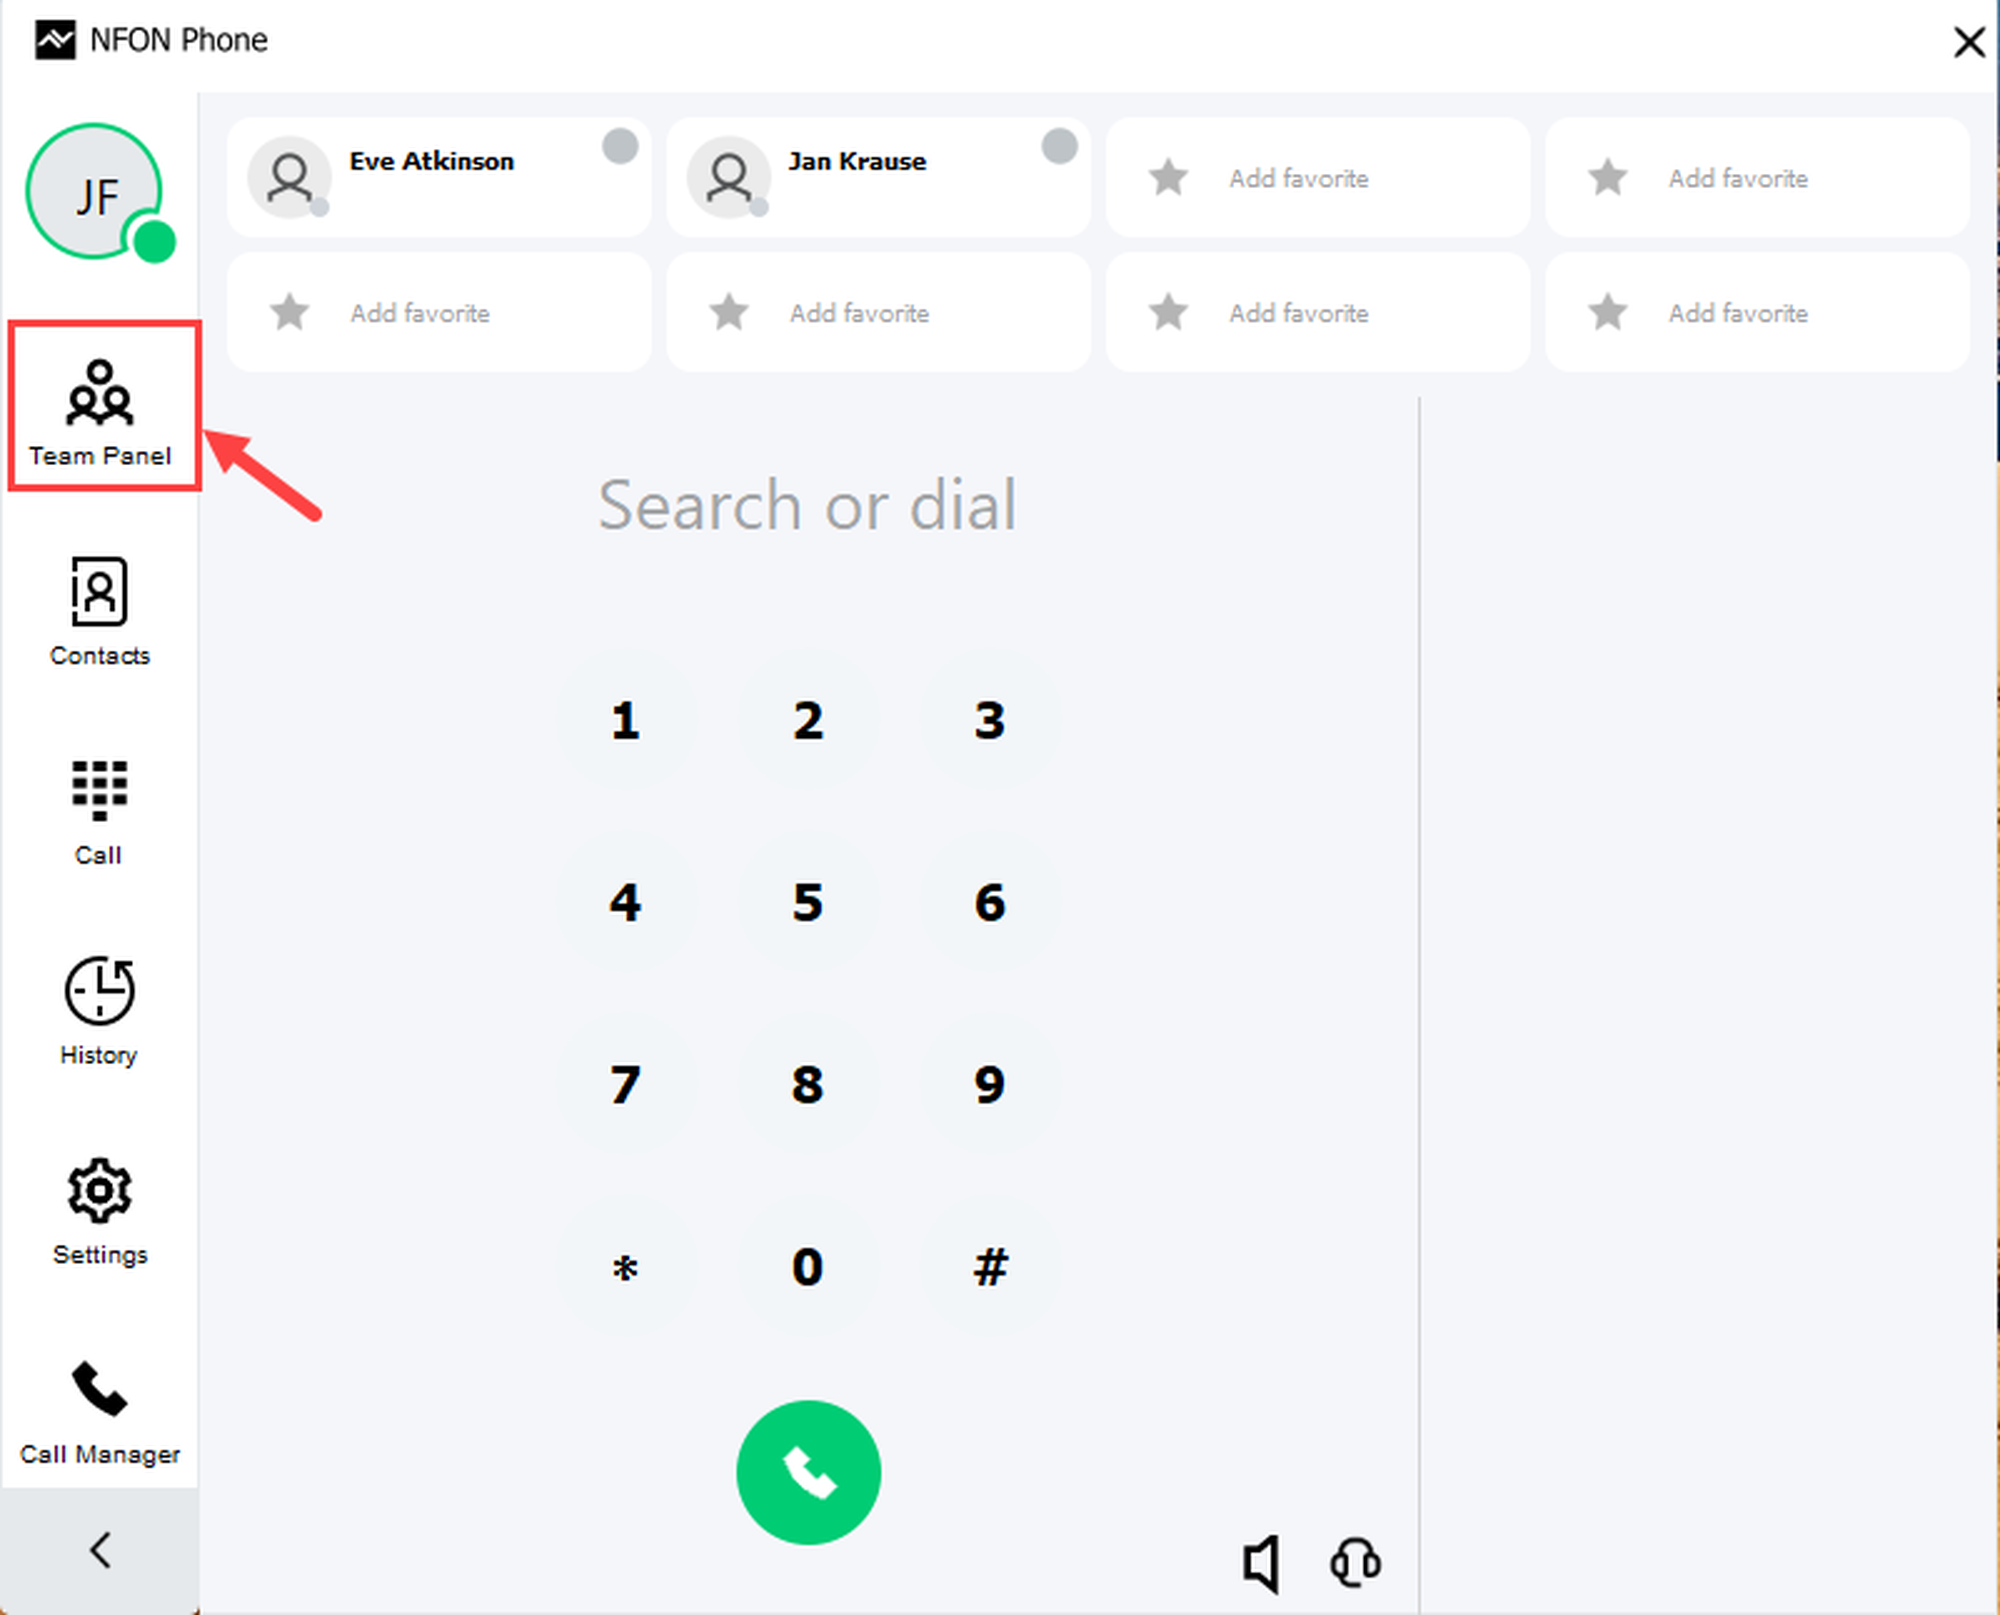
Team Panel (contact group display)
An information bar appears at the top of the screen that displays both contacts and contact groups.
Contacts
Opens a separate window to manage your contacts.
Call
Shows a dialpad to make calls.
History
Opens a clear call history.
Settings
Opens settings.
Call Manager
The call manager is an input bar for dialling phone numbers that appears in the bottom right-hand corner of your screen and can be moved anywhere on the screen via drag & drop.
Nia (NFON Intelligent Assistant)
Nia is an AI chatbot feature designed to support your use of Softphone Pro. See Nia (NFON Intelligent Assistant) .
Tip
The functional features shown depend on the connected device (hardware phone) or on the software telephone.
Therefore, the features listed here may differ from the expected functionality.
User menu
To open the user menu
Click the user icon in the upper left-hand corner.
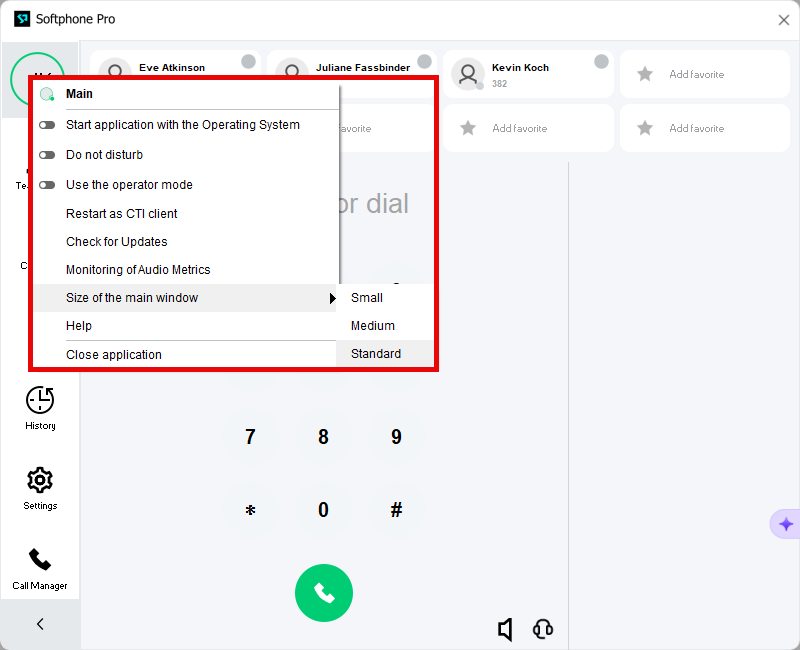
⇒ A menu with additional options opens.
In this menu, you can:
Set profile for outgoing telephony (SIP user)
Start the application with the operating system (Softphone Pro is started automatically with Windows)
Change your status to DND (prevents incoming calls from being audibly signaled. Depending on the settings, calls are either rejected or redirected to voicemail)
Use the operator mode (find more information under Operator Panel mode)
Restart in CTI mode (find more information under CTI mode / Softphone mode)
Check for updates (search for newer versions of the softphone)
Start monitoring of audio metrics (review native audio settings)
Set the main window size using three presets (Small, Medium, Standard).
Note: Changing the window size restarts the Softphone Pro client.
Open Help (opens the web browser to the Softphone Pro documentation)
Close application (exit the softphone)
2. Making a call
Dialling
To make calls
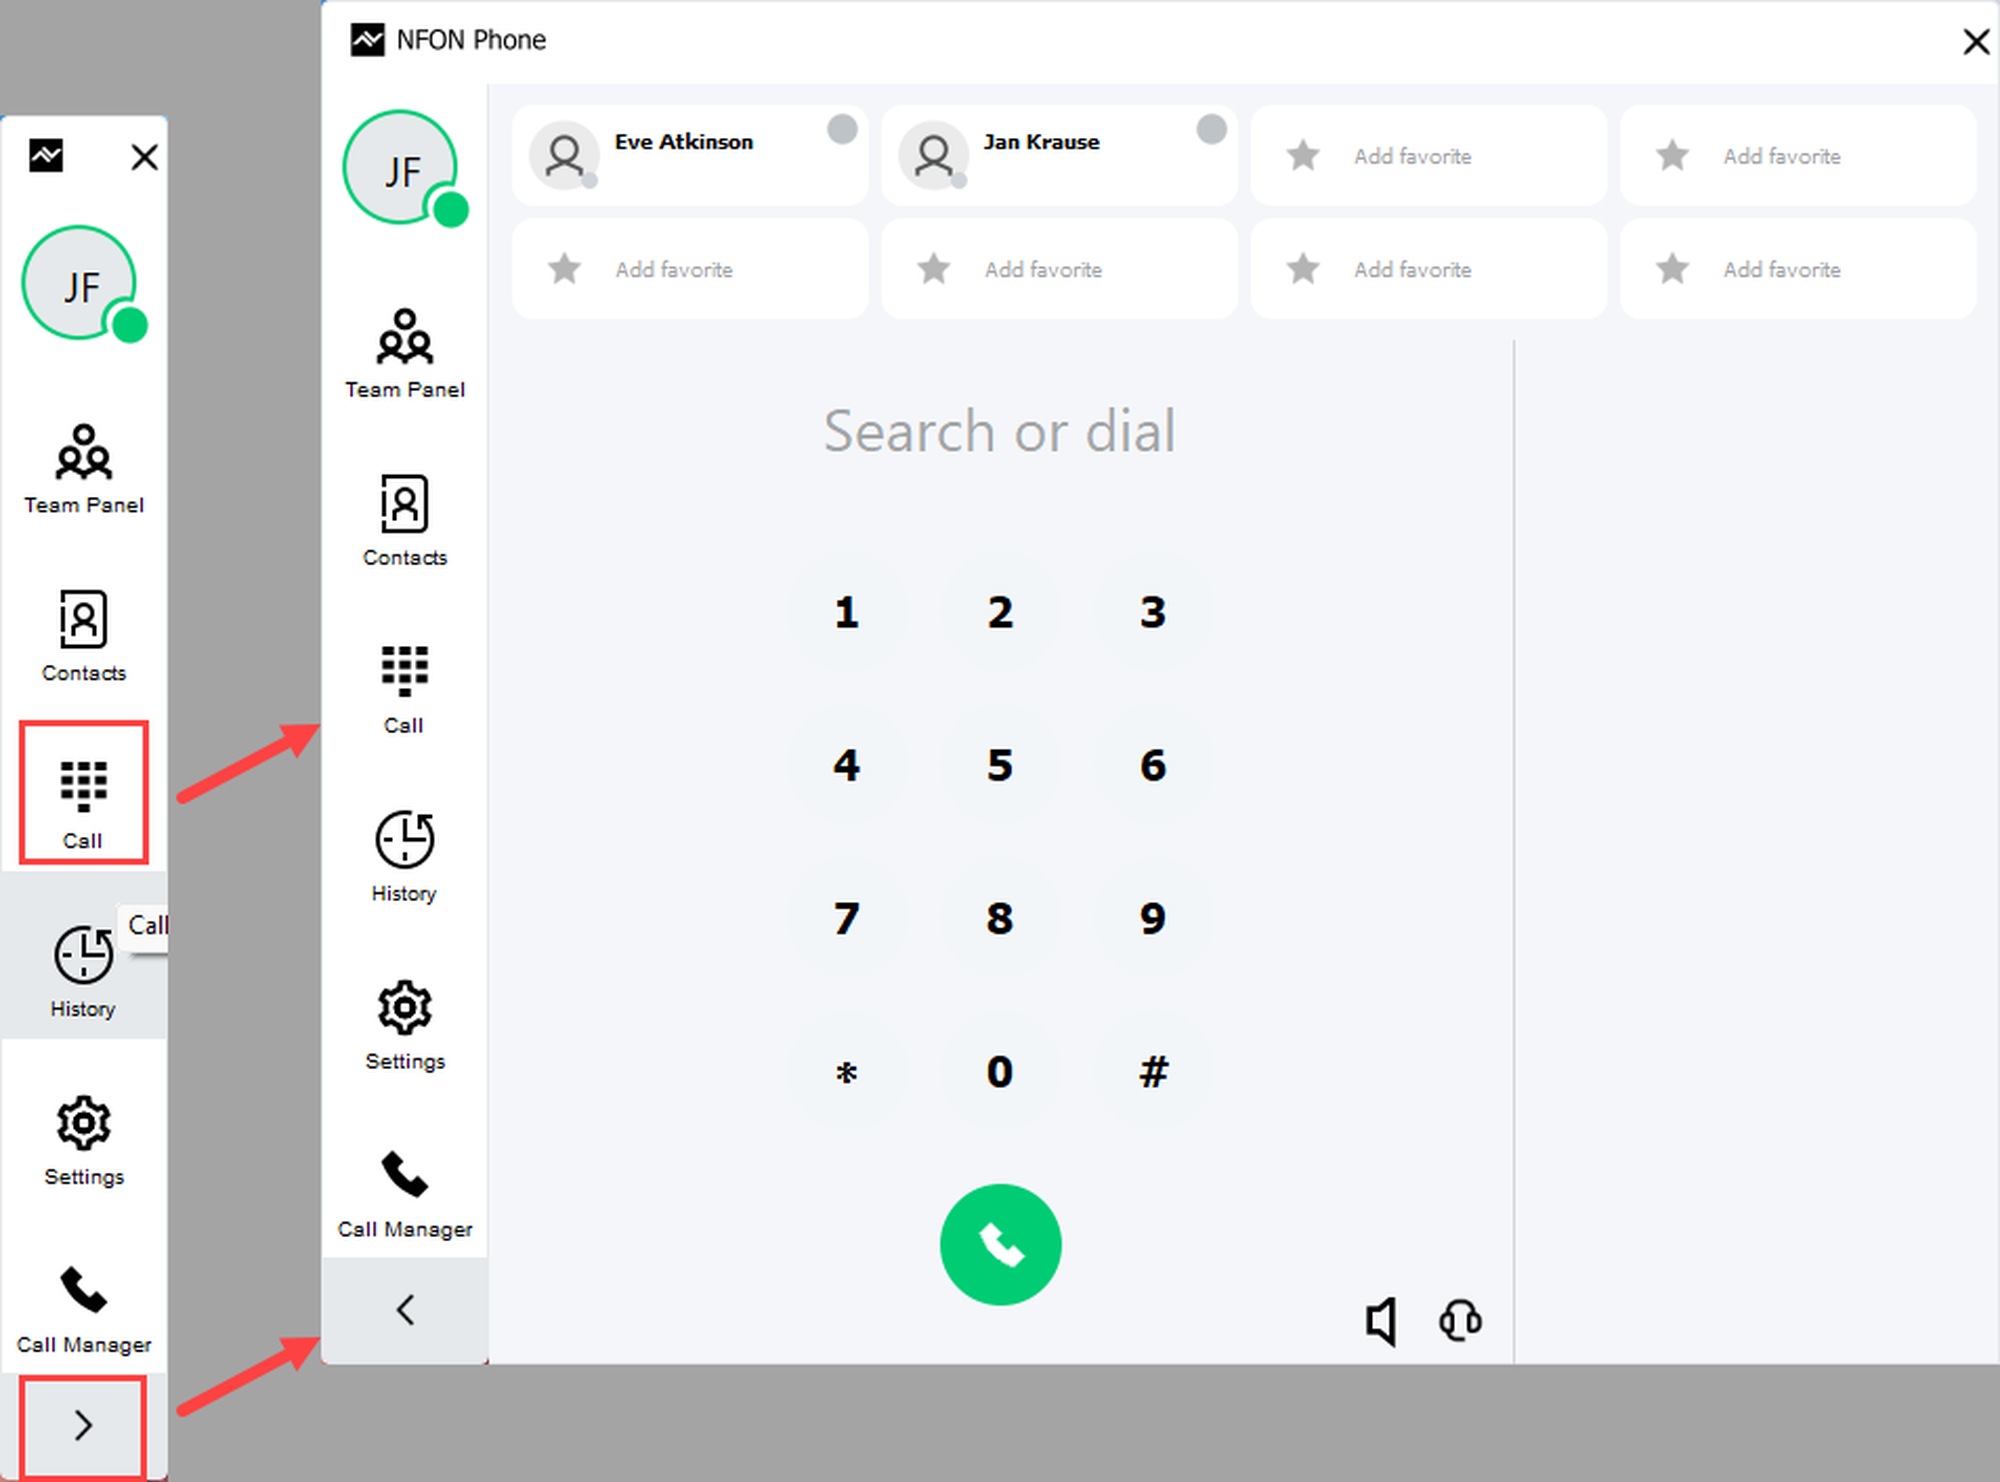
Open the keypad via Call or use the grey button with the arrow.
To dial a number
Enter the number via the keypad or type the number via the keyboard in the Search or dial area.
Dial the number by clicking on the handset symbol or using the enter key.
Alternatively, use the call manager to dial a number (see below).
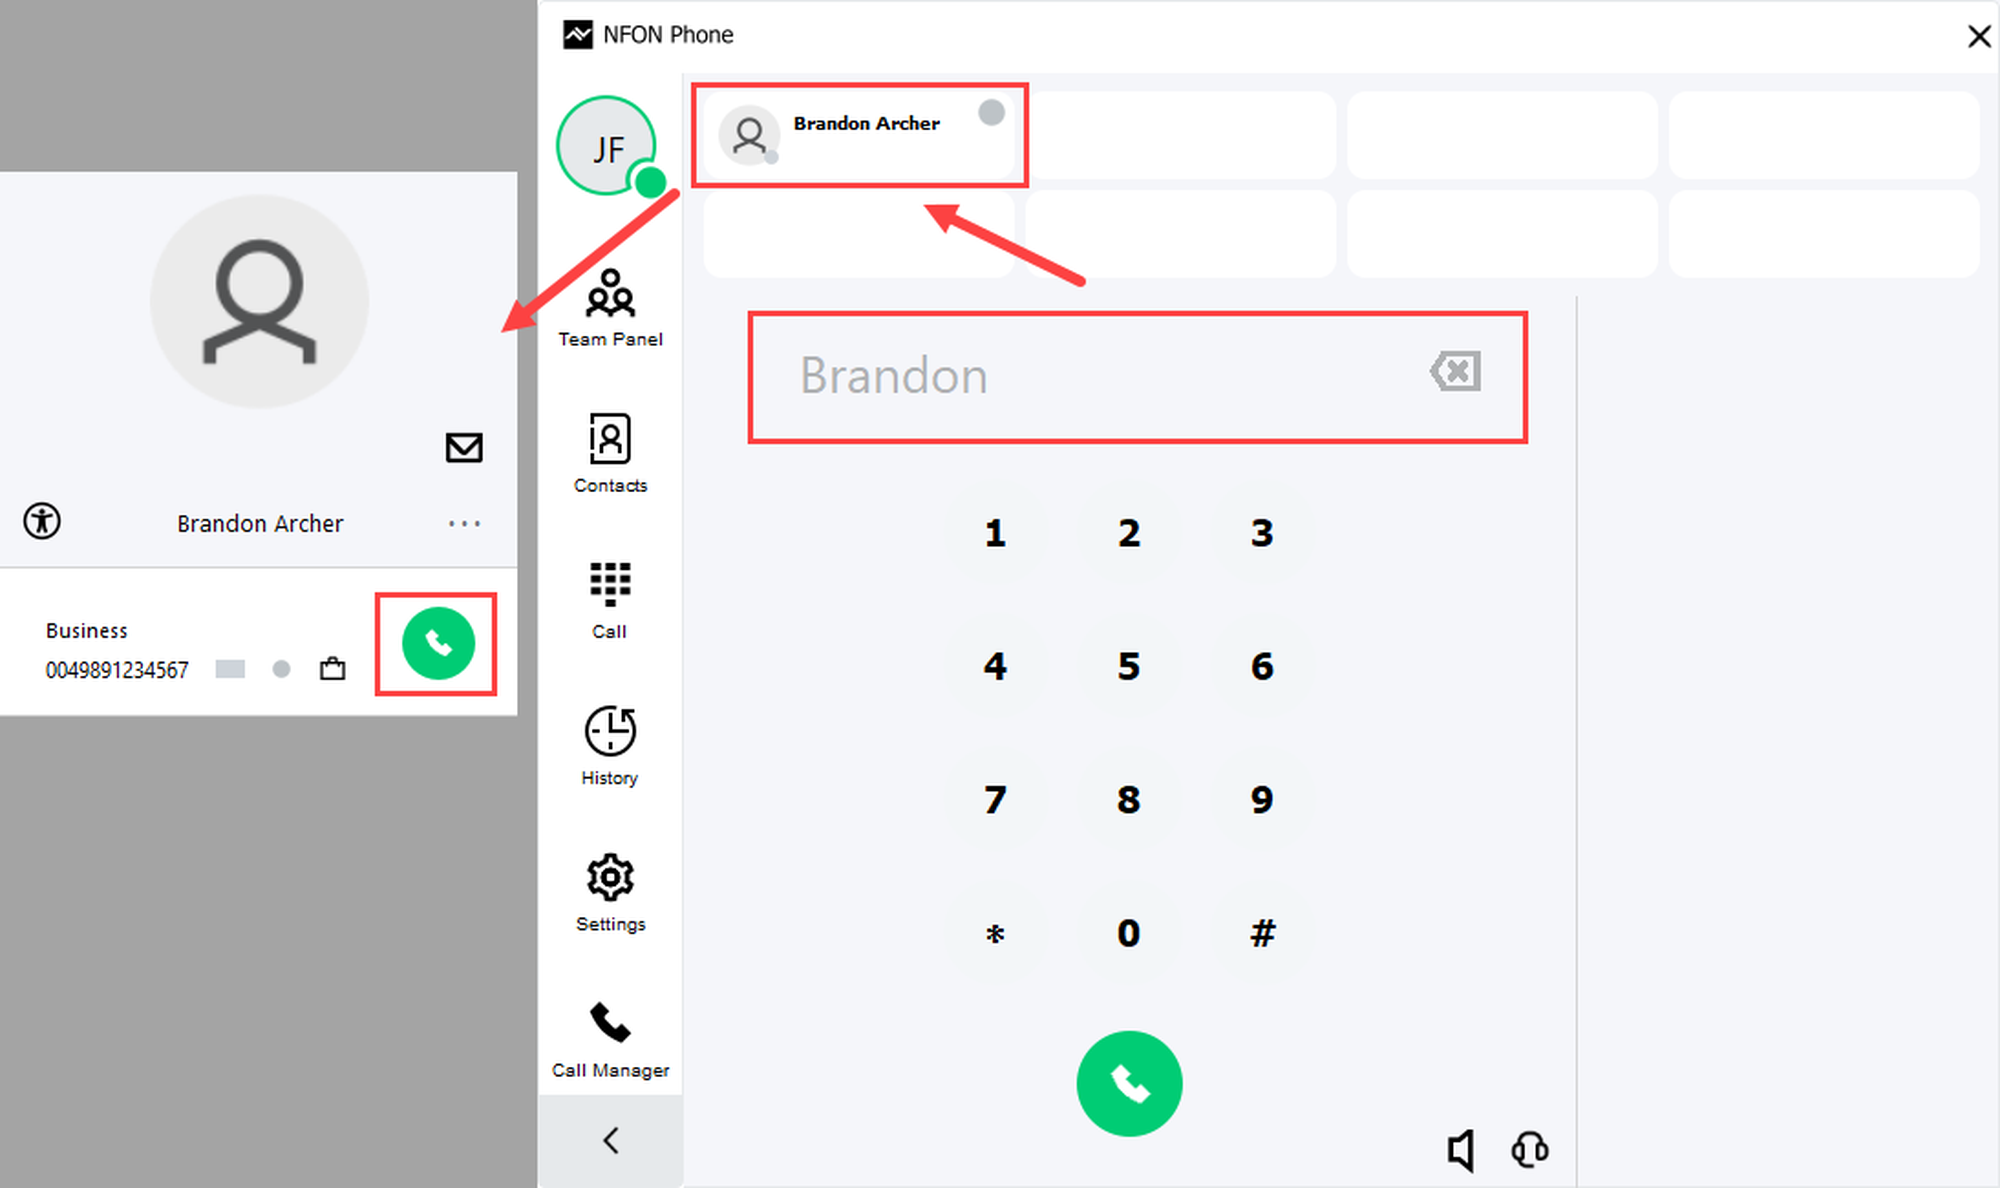
Searching contacts
To search for contacts
Enter a name in the Search or dial field.
⇒ The matching results are displayed in the favorites area.
Click on the desired contact to open the contact information.
Call the primary phone number using the blue handset symbol.
Call other phone numbers using the gray handset symbol.
In addition, you can write an email to the contact or manage the contact. The contact origin is displayed via the symbol to the left of the name.
Call manager
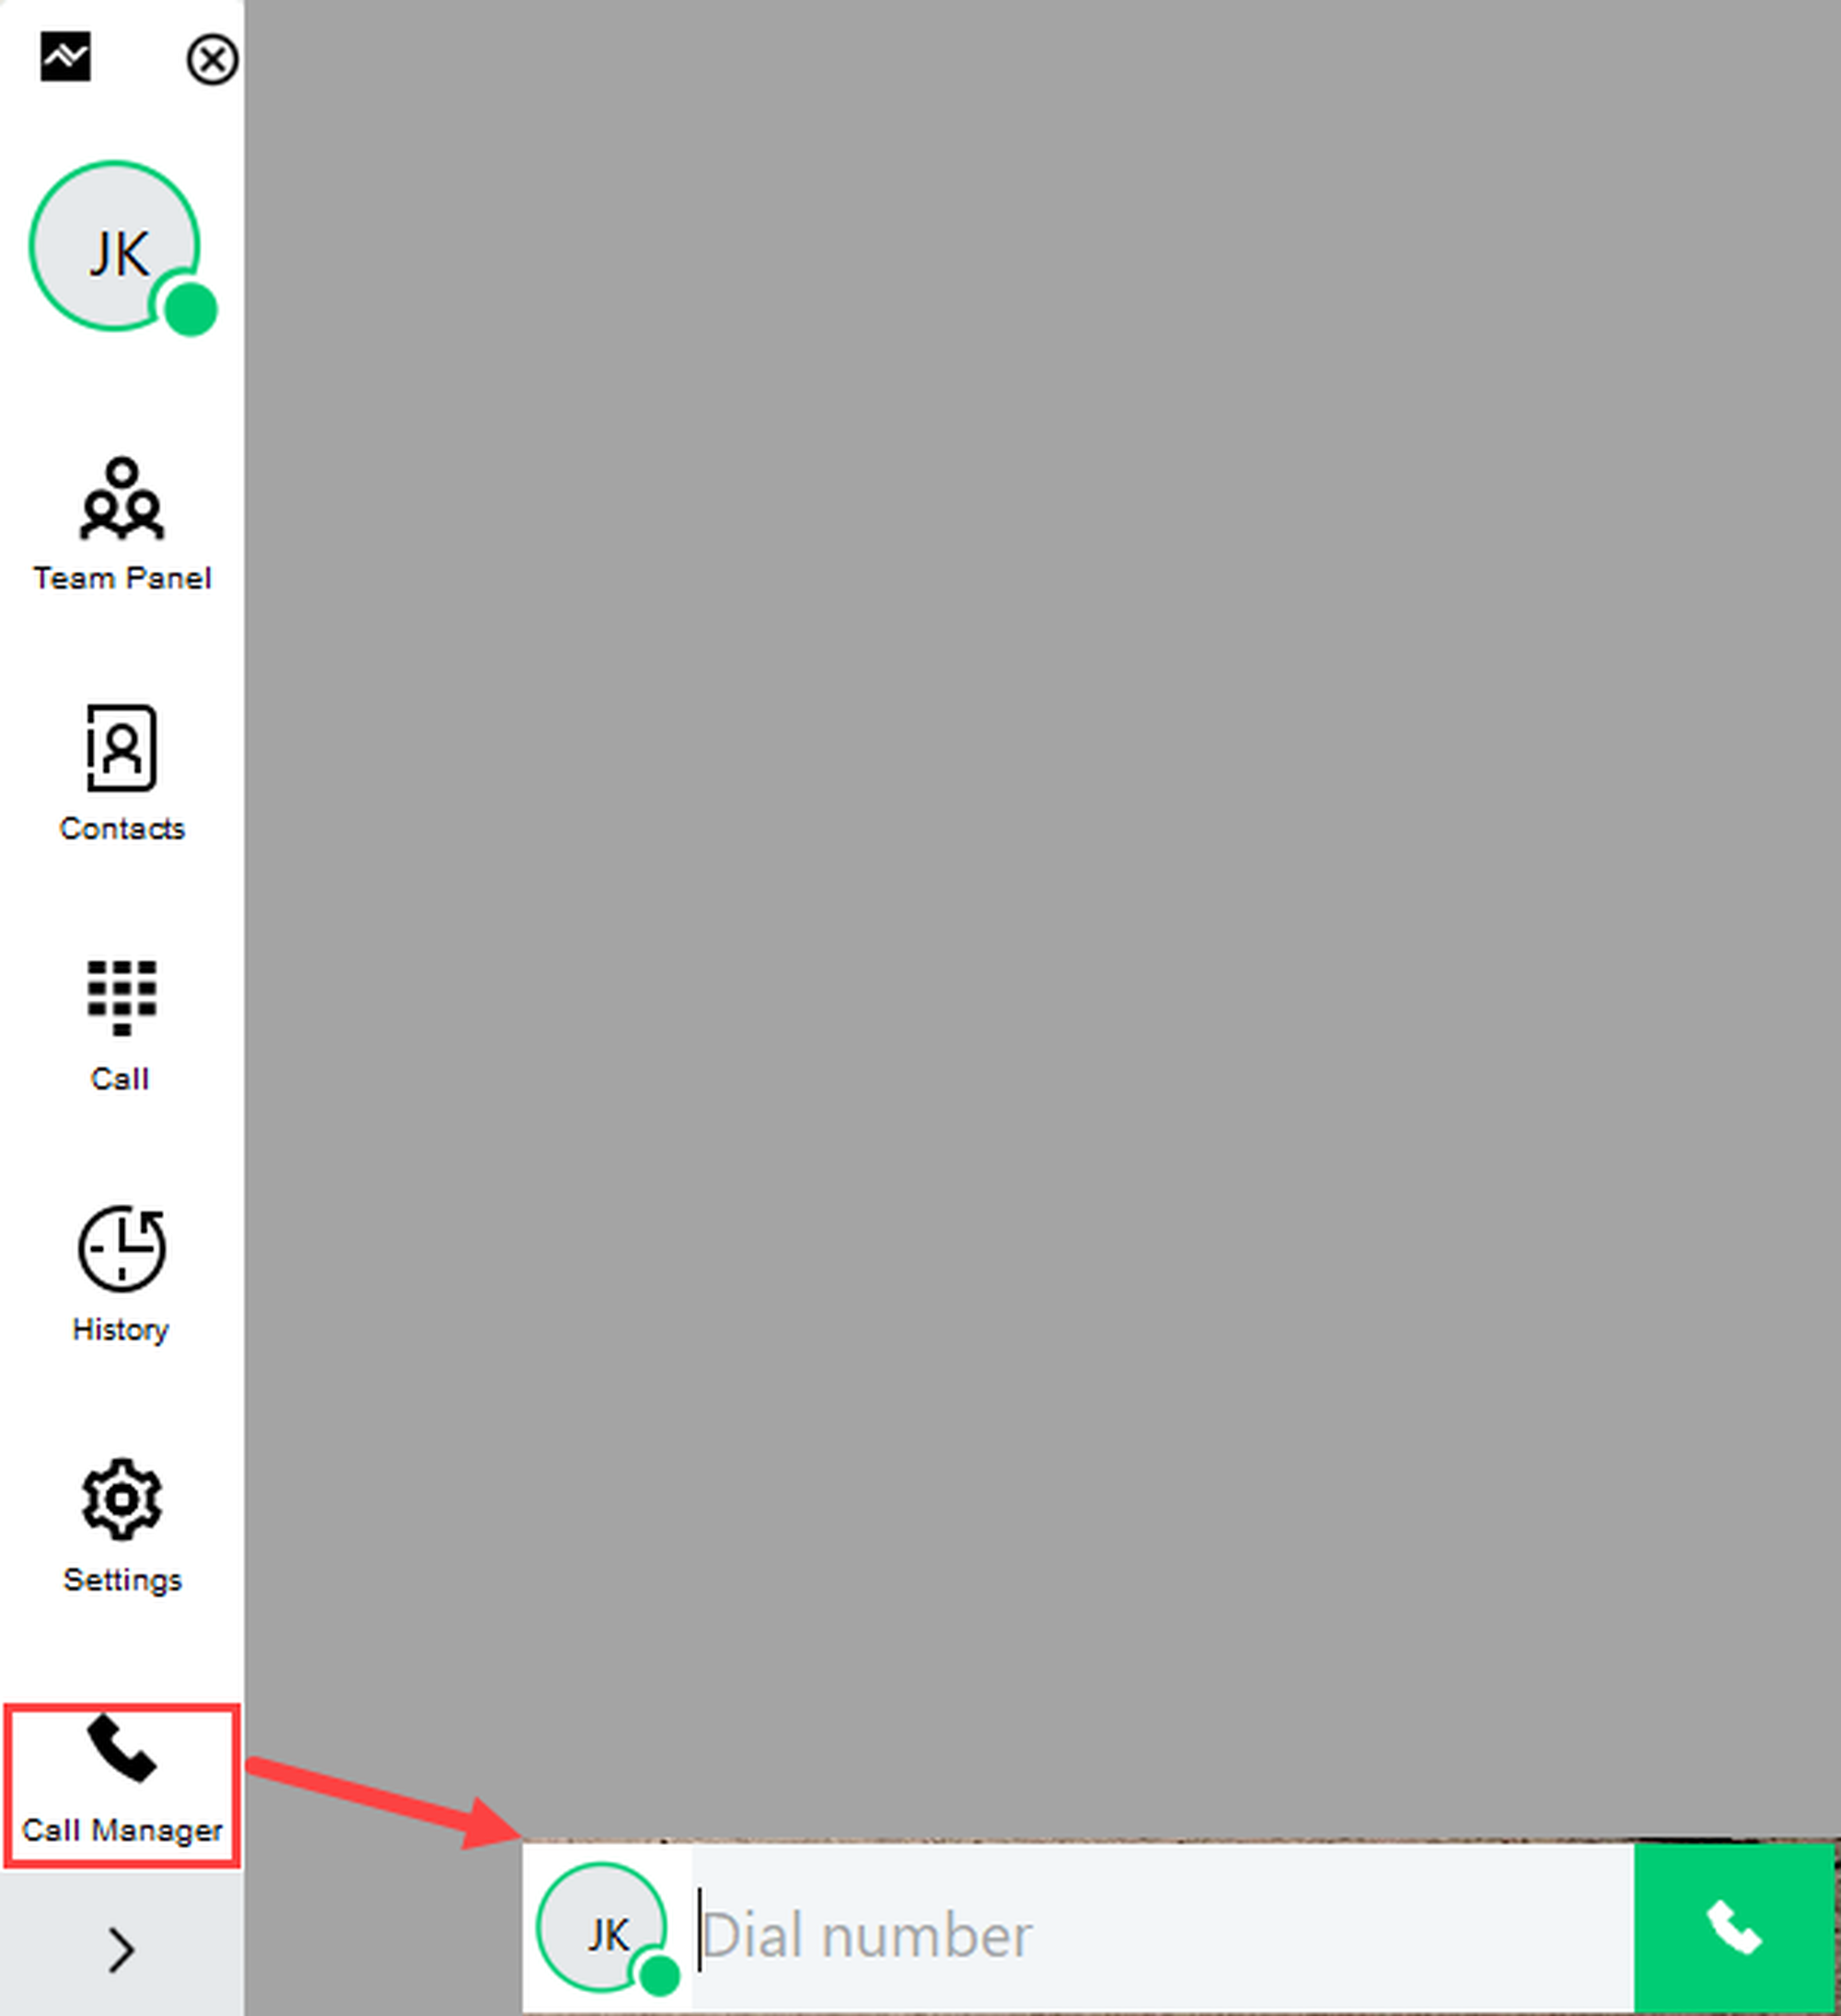
Click Call Manager.
⇒ The call manager appears at the bottom right edge of the screen. You can move it anywhere on the screen via drag & drop. The call manager forms the lower basis for call pop-ups for incoming or outgoing calls.
Call tabs
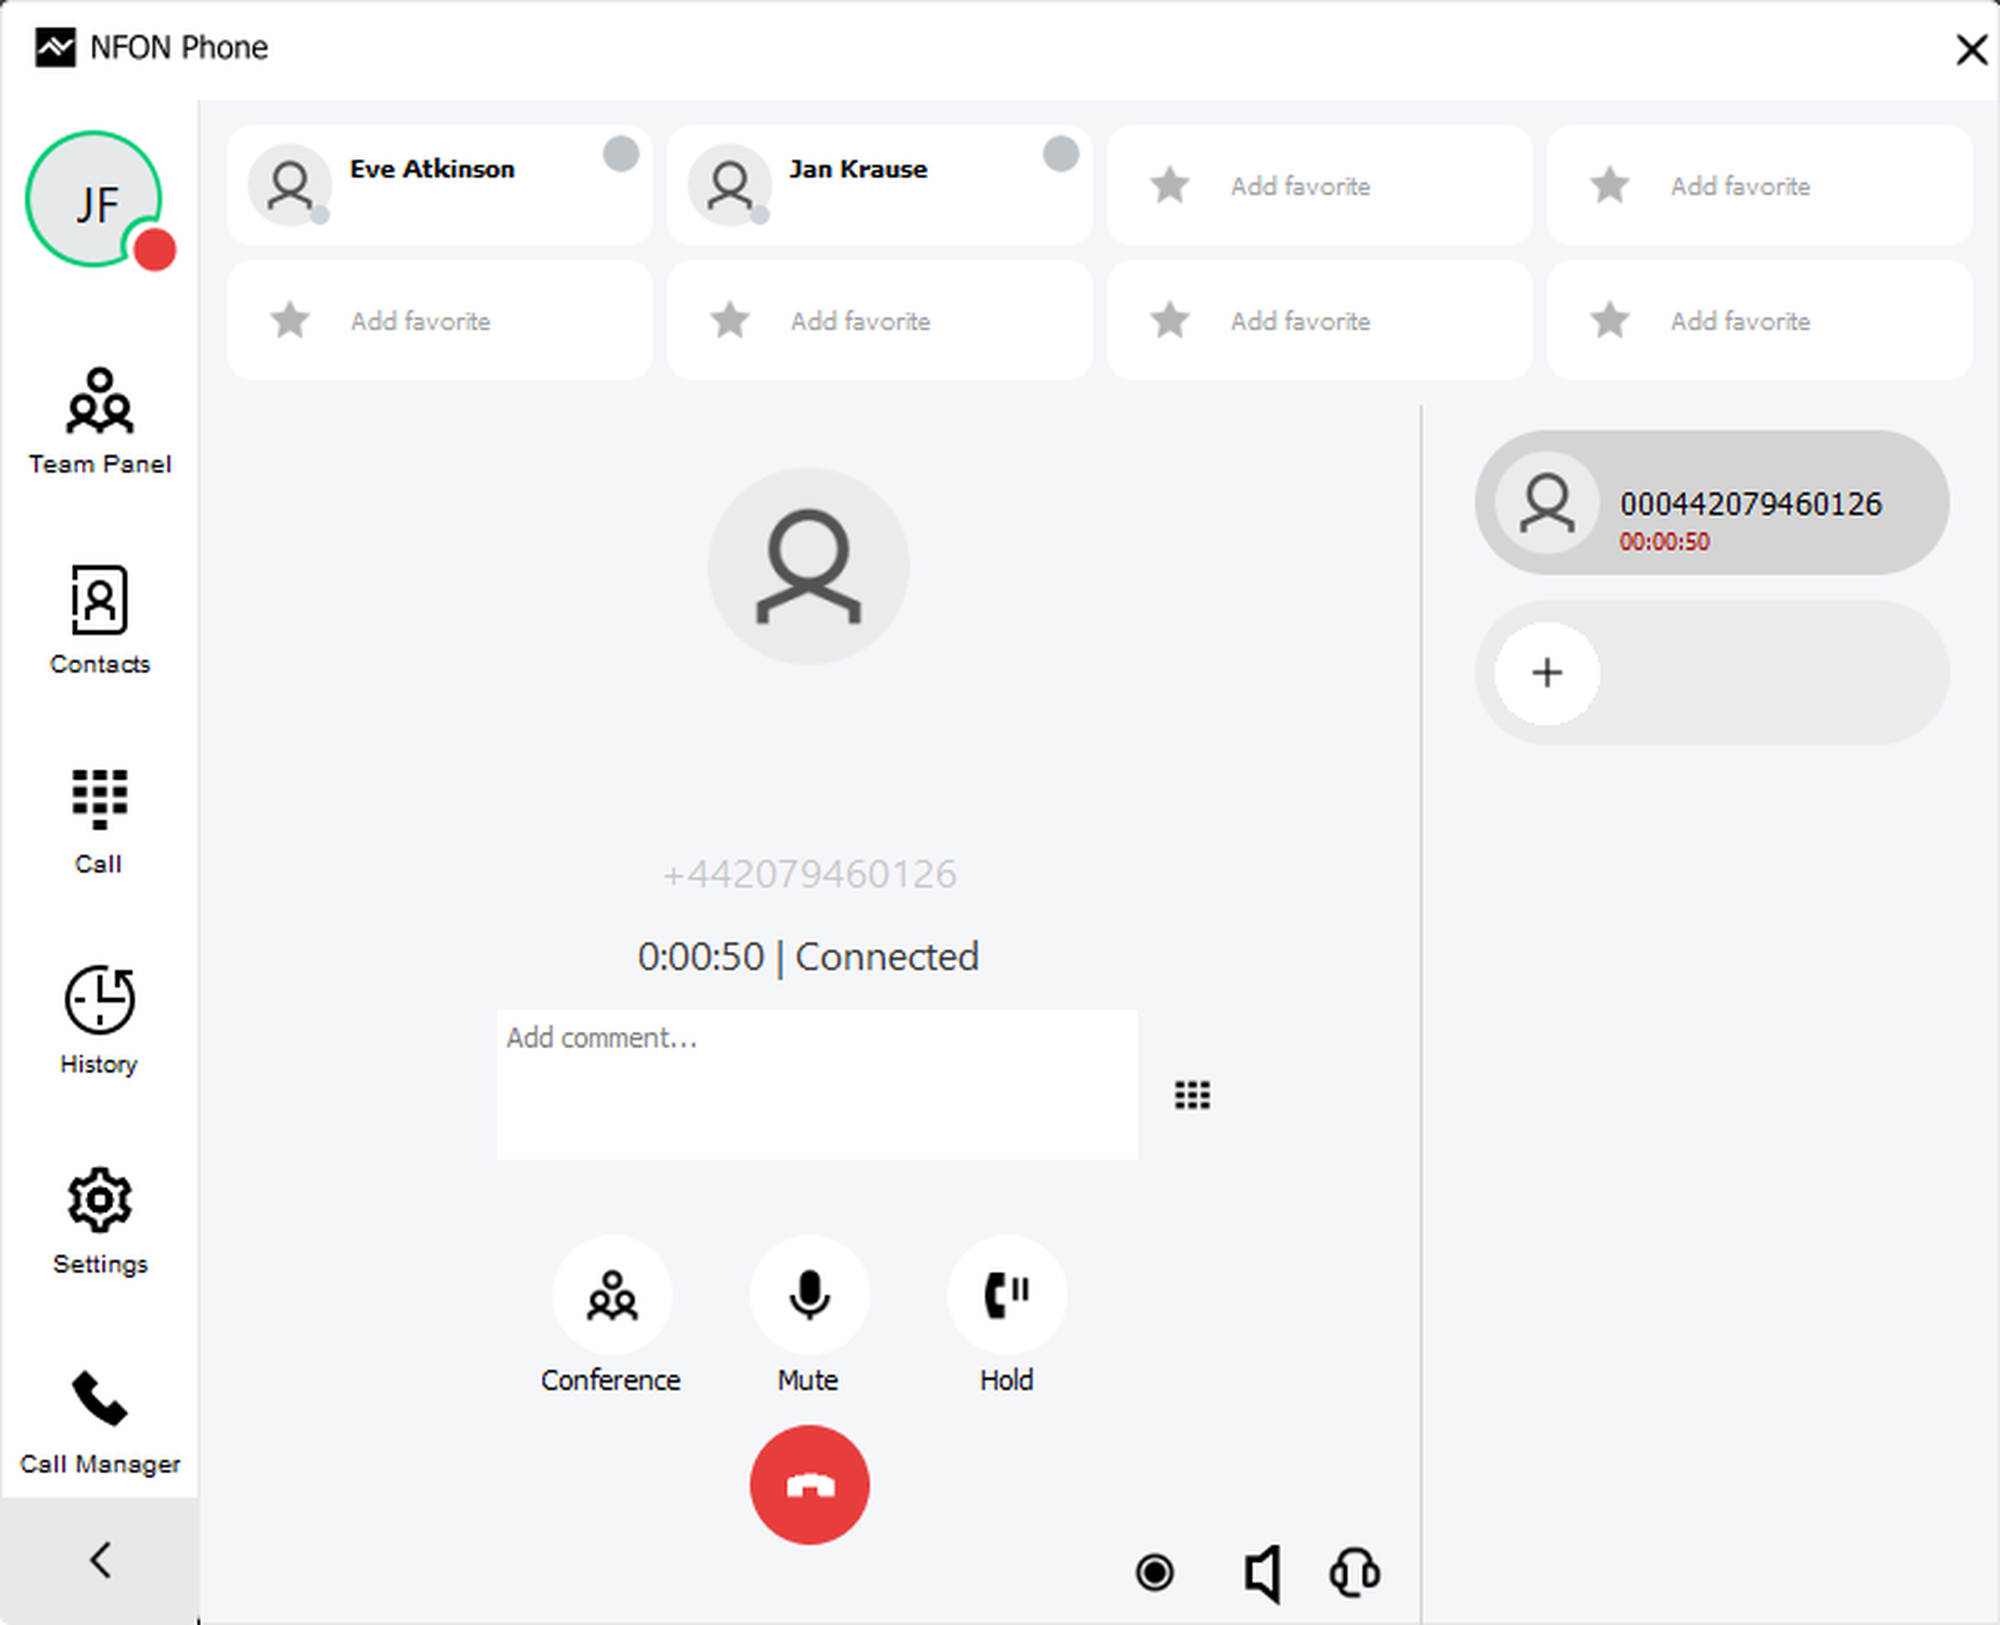
If you are in an active call, you can open another call tab on the right below the first call tab.
To open a call tab
Click on the plus symbol.
⇒ The existing call is automatically put on hold.
Please note that you can use up to 8 call tabs in parallel.
The call tab you want to control is displayed in light blue, while the other open call tabs are gray.
During a call, you can also use the comment and DTMF functions.
To make a comment
Enter your remarks in the field displayed.
⇒ As soon as the call is ended, the comment is automatically saved in the call history.
To make DTMF entries
Switch to DTMF in the comment field.
⇒ The comment field is then the area for your DTMF entry.
Call transfer
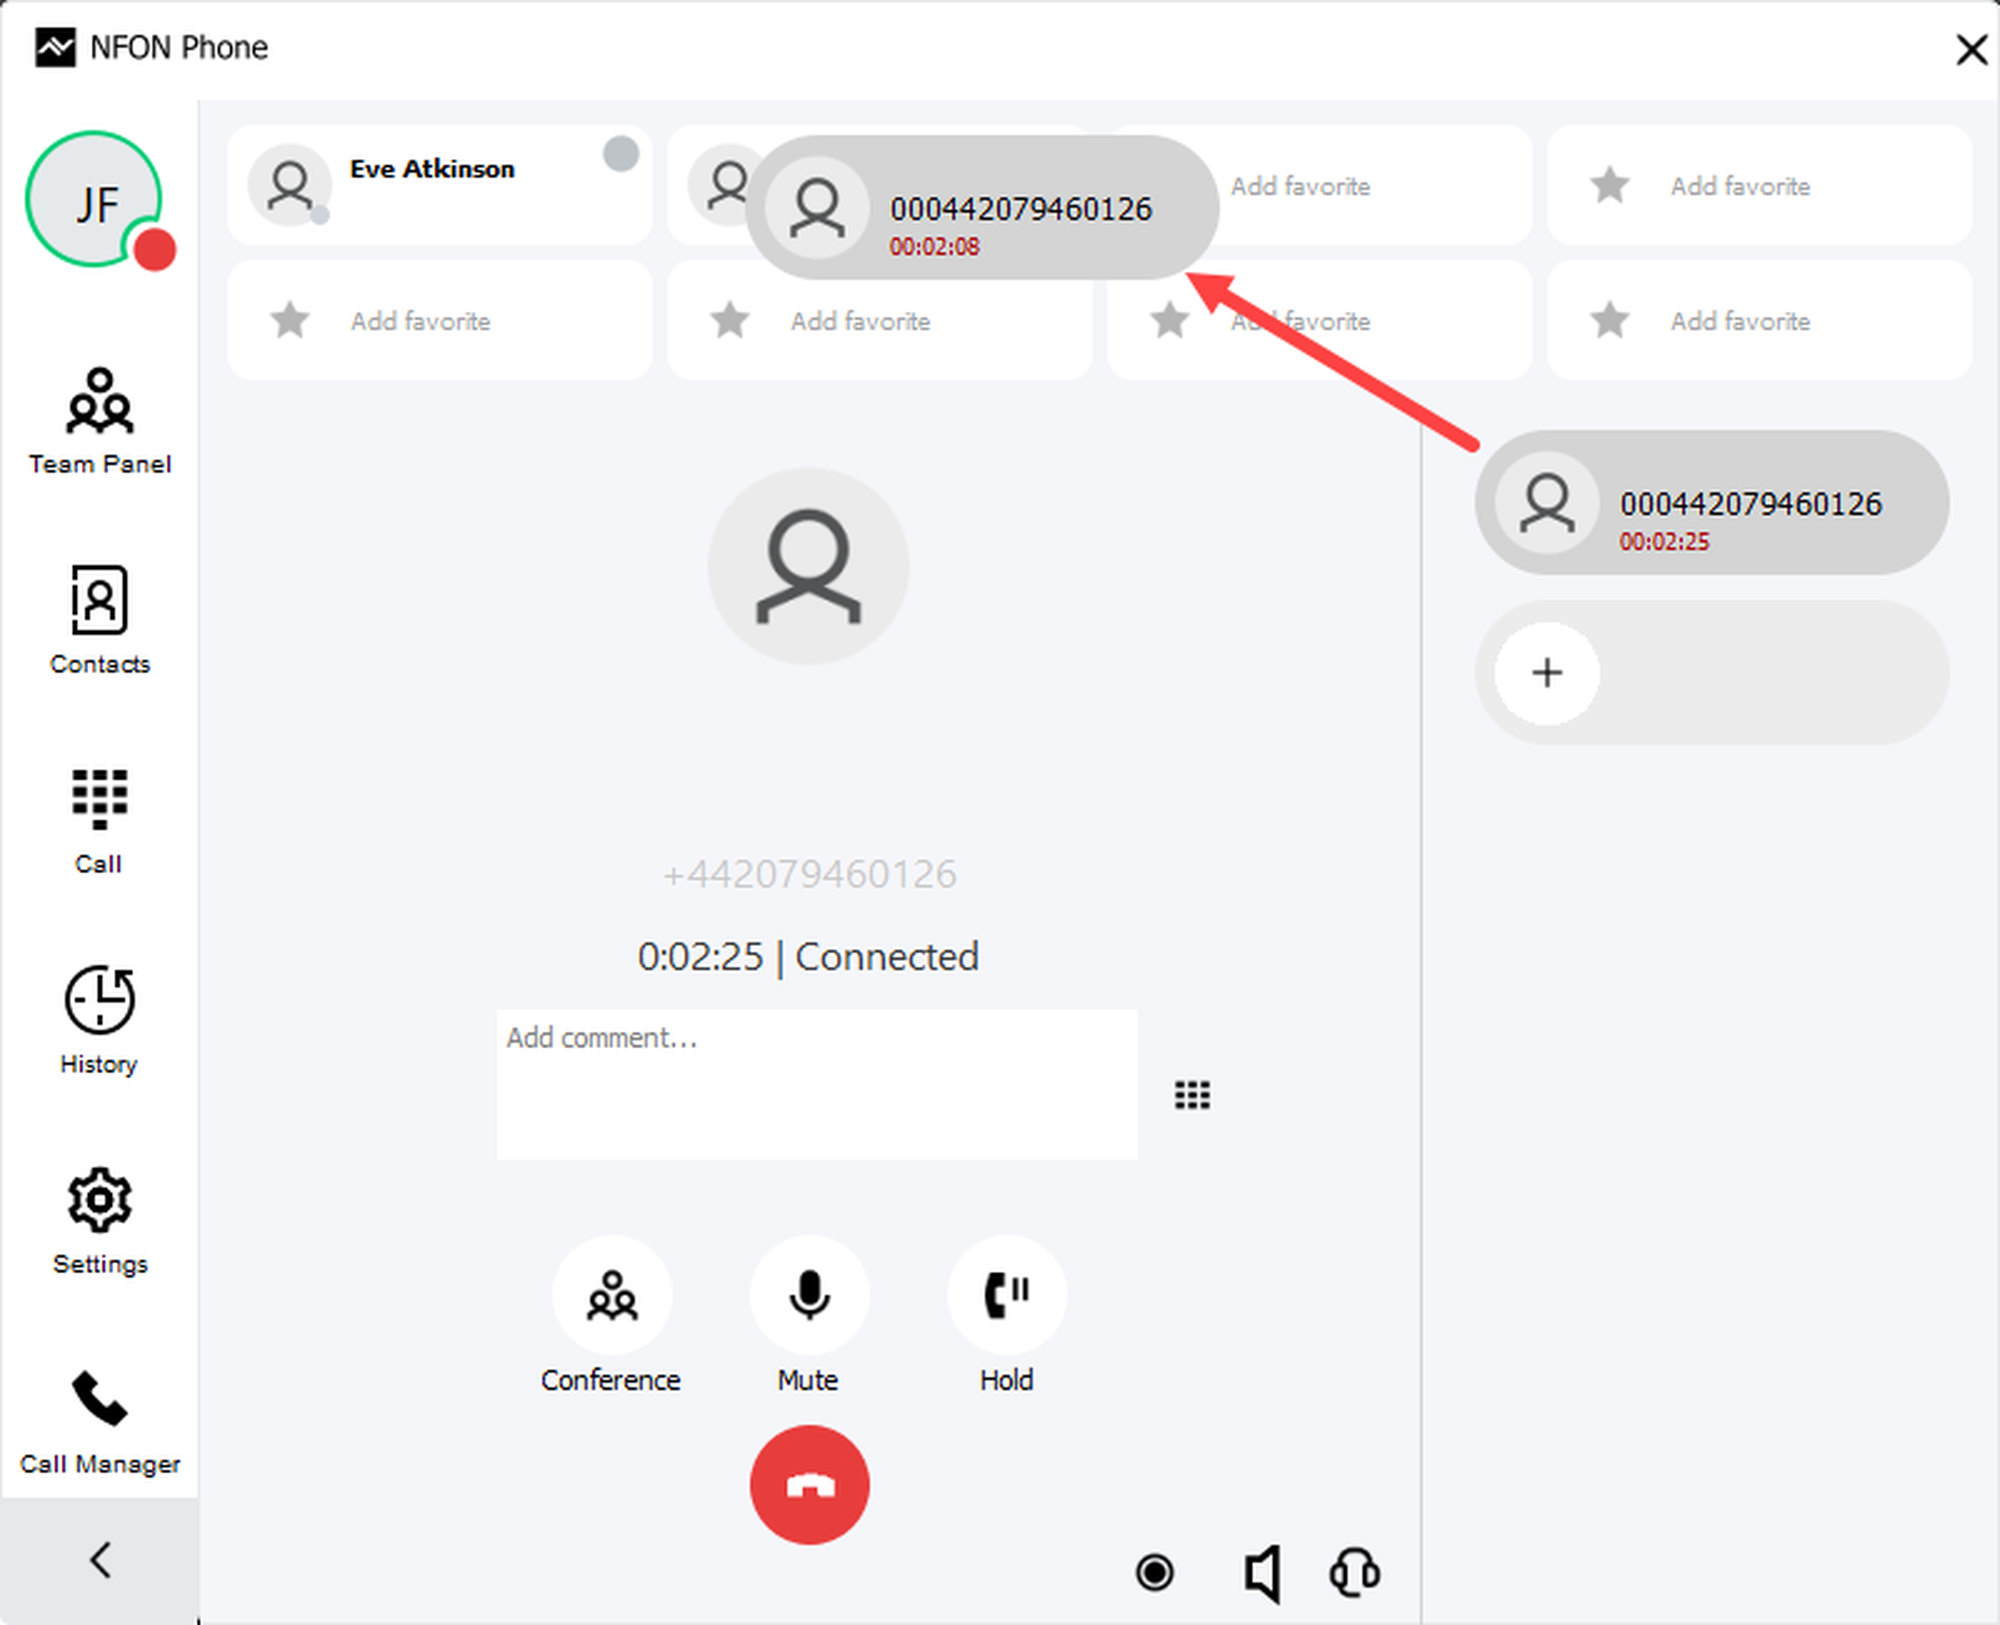
You can transfer calls via drag & drop.
To transfer a call
Drag the call tab to the desired transfer destination. Please note that the destination can be a contact (favorite in the keyboard, contact in the team panel, contact in the contact window), a call tab or any phone number in the keyboard or in the call manager.
To make a blind transfer
You can open an additional call tab during an incoming call, enter a number on the keypad or in the Call Manager and drag the call tab of the incoming call to a number via drag & drop.
The same applies for transferring active calls.
Call pickup
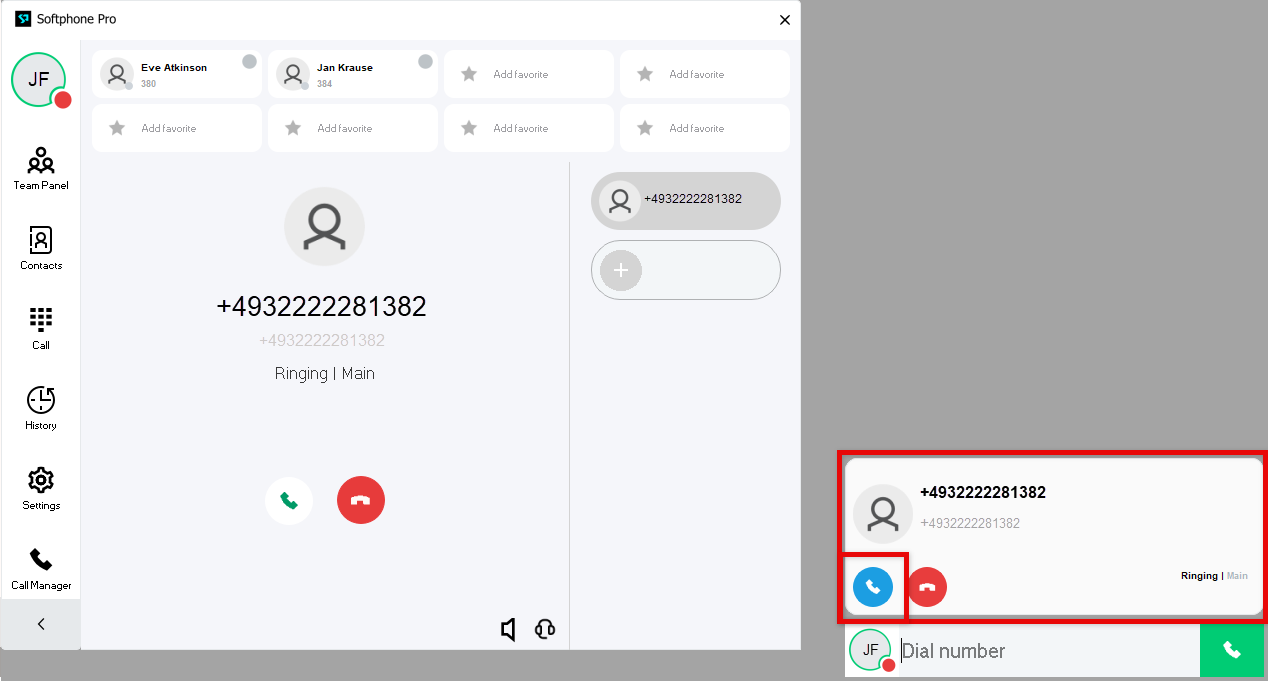
When you receive a call, a pop-up appears in the bottom-right corner of the screen.
To pick up the call
Click the blue receiver icon.
Holding and toggling calls
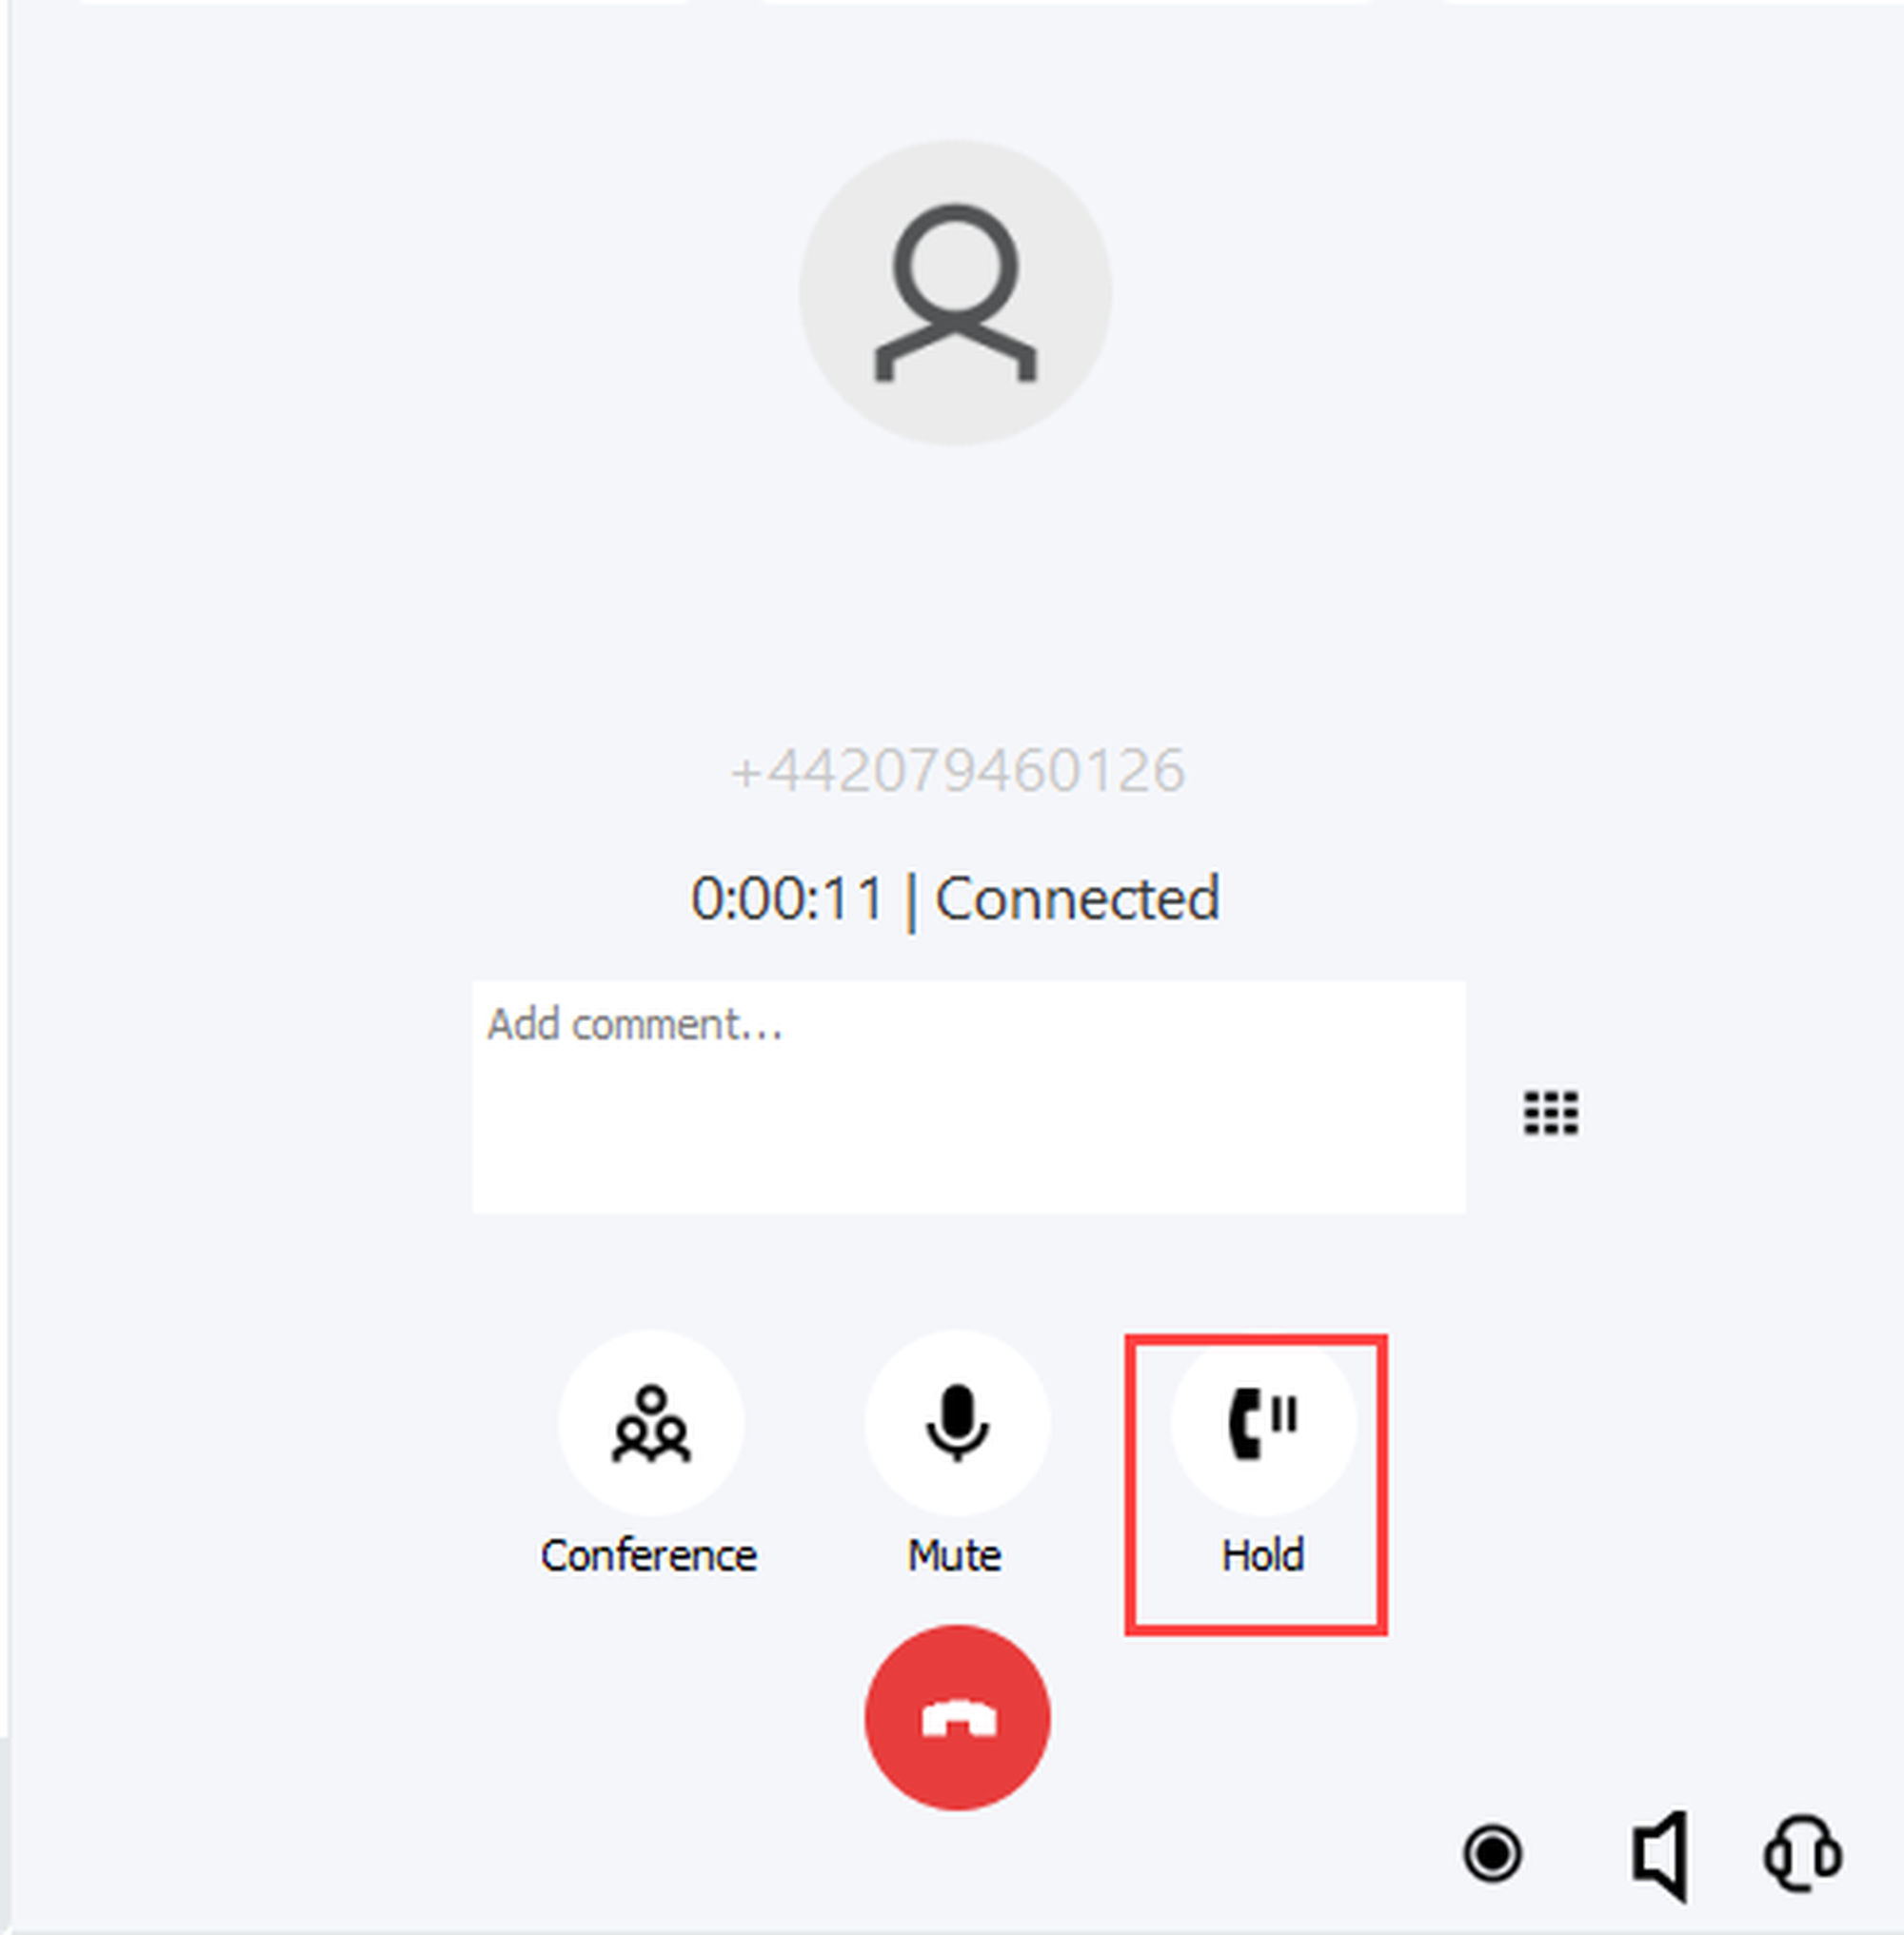
Click the Hold button to put active calls on hold.
If you have several call tabs open, you can toggle between the lines by selecting the desired call tab.
Starting a conference
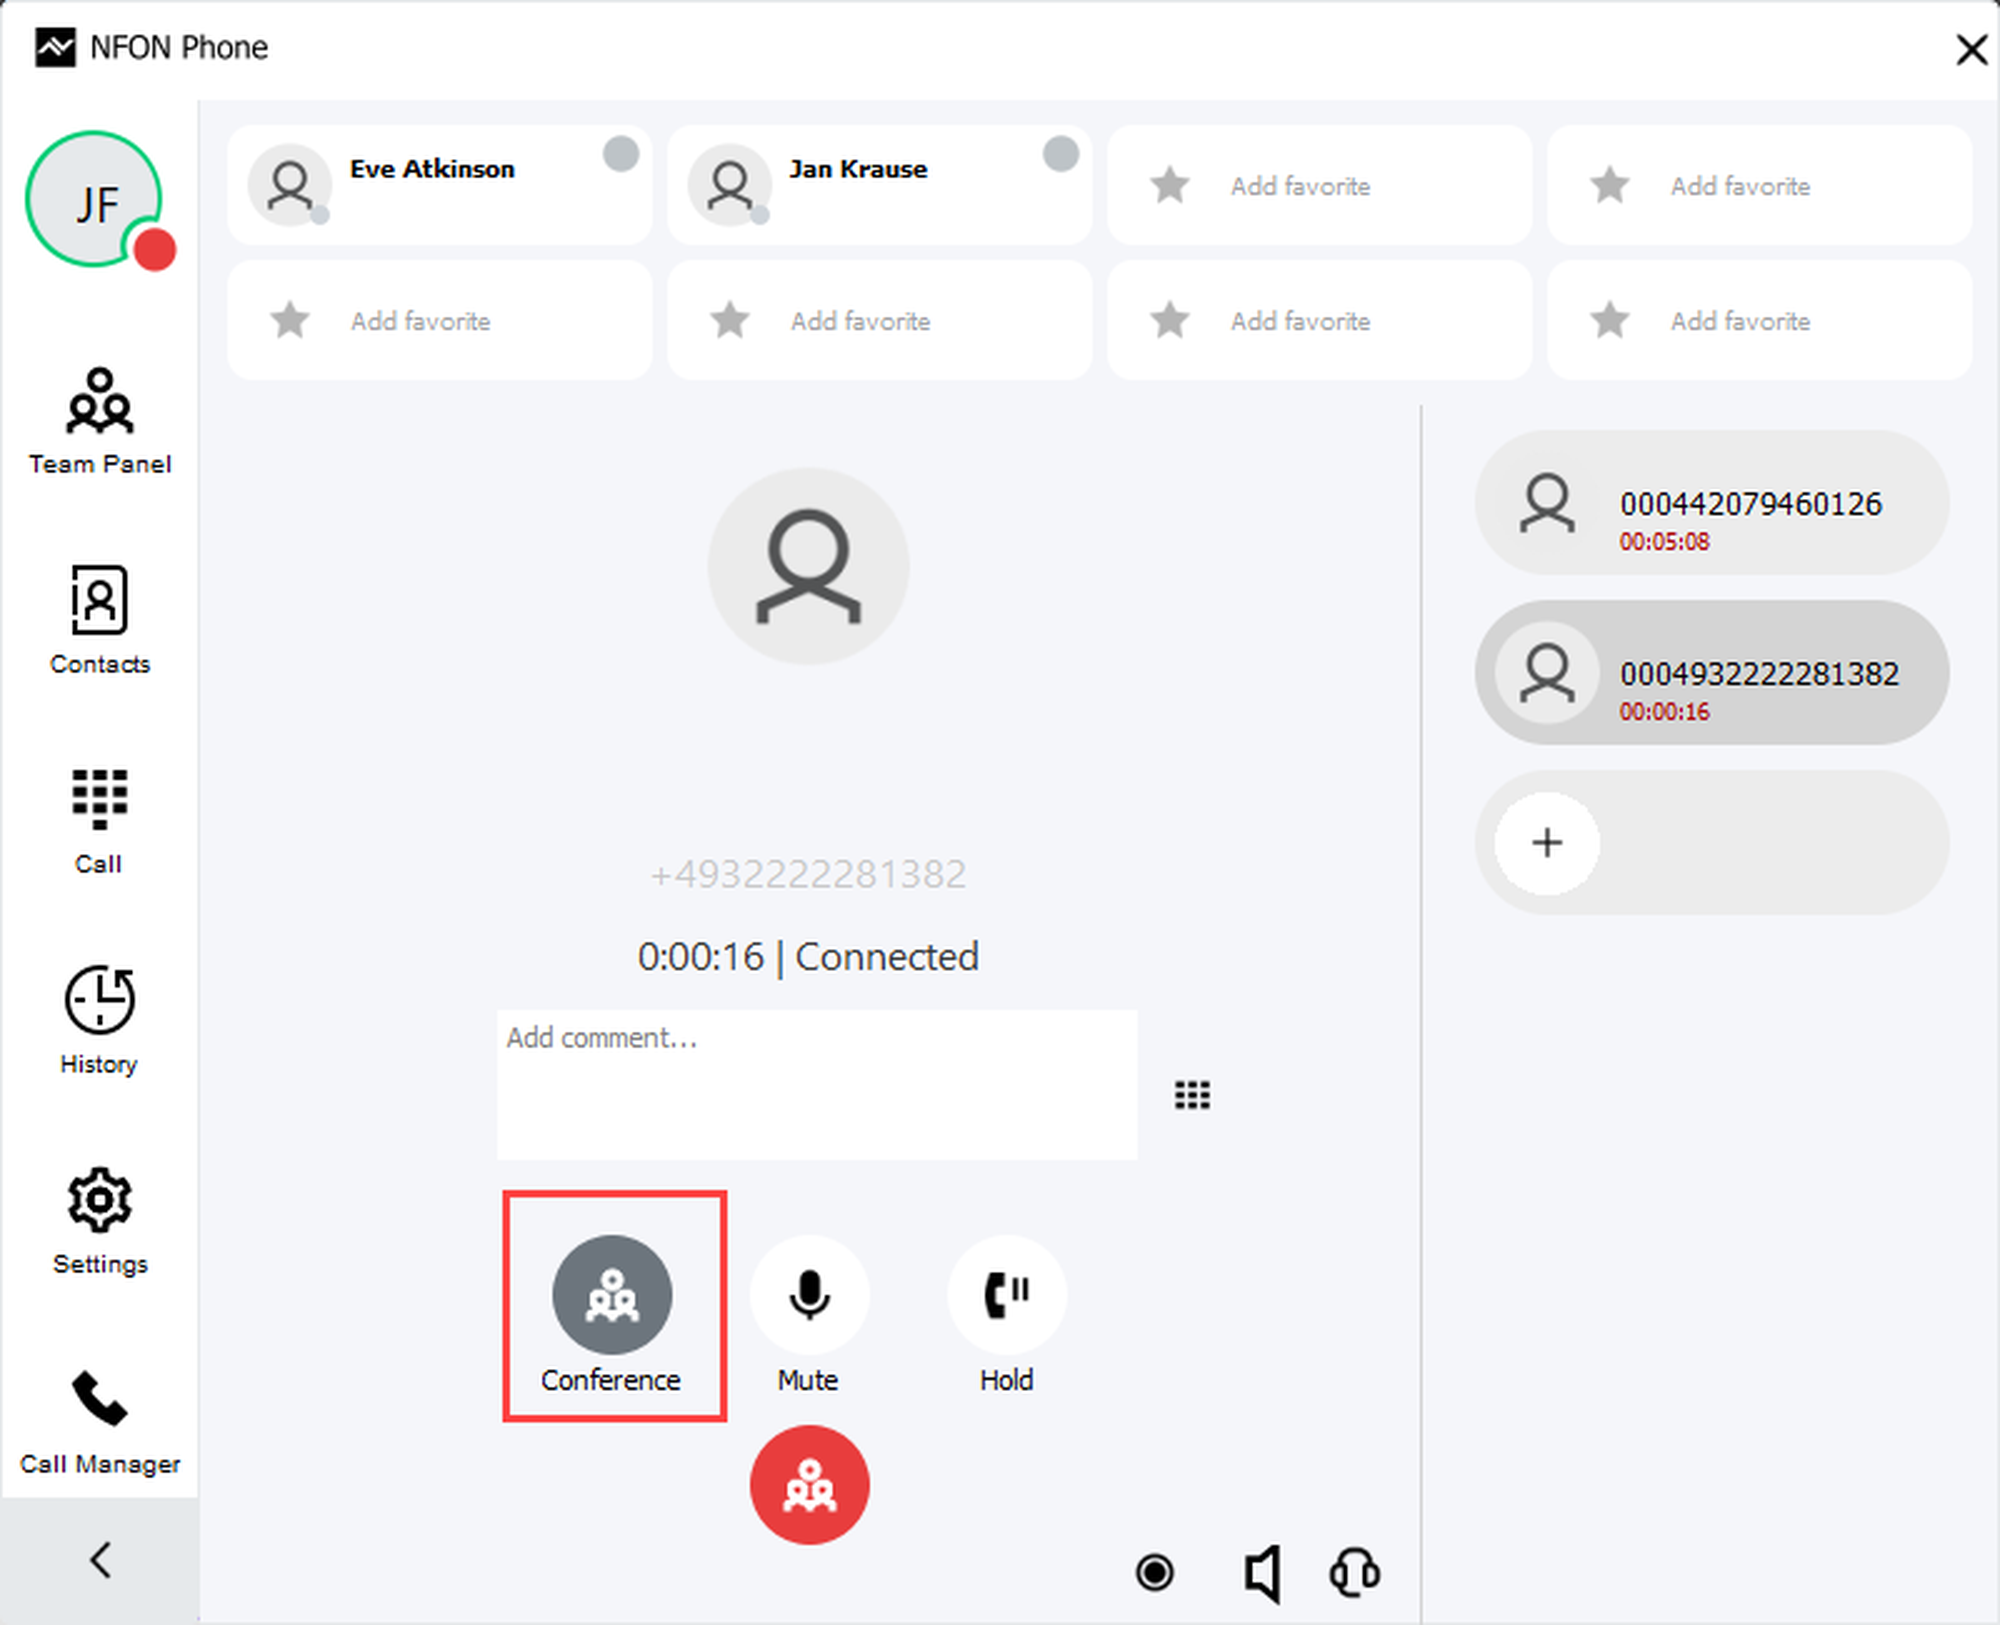
You can combine all active call tabs into a conference.
To start a conference:
Click the Conference button.
To end the conference:
Click the Conference button to end the conference.
Adding comments
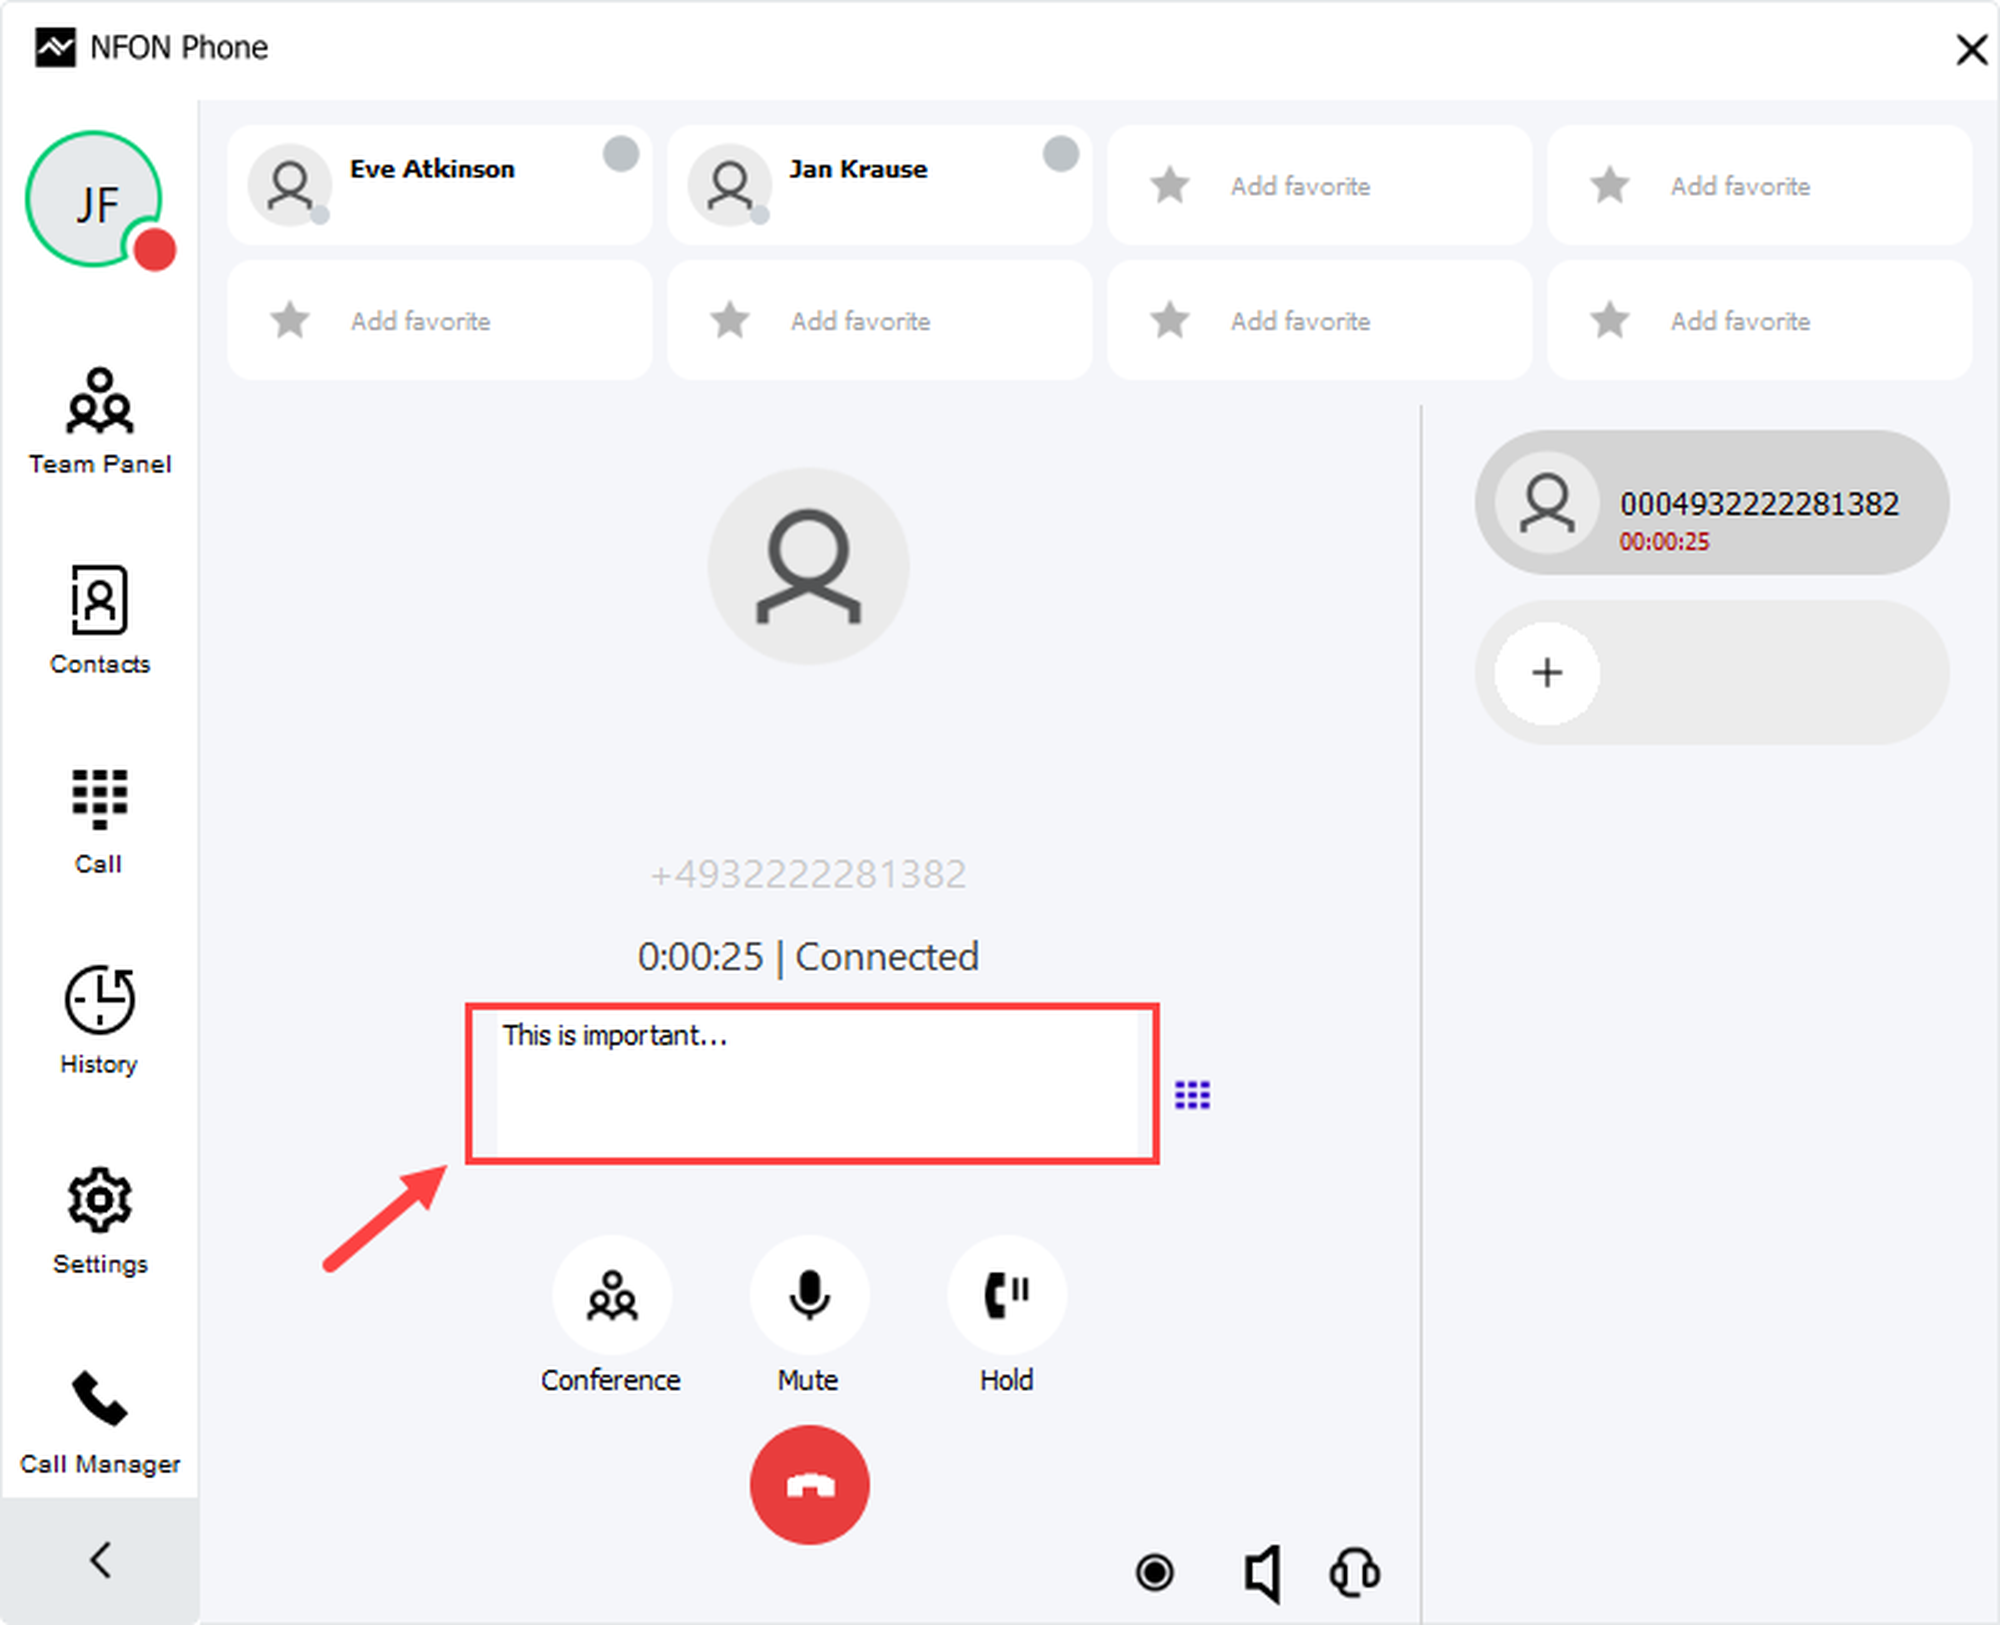
During a call, you can add comments which are automatically saved in the call history on your local device. This gives you the possibility to view important information directly and without much effort during the next call.
Add new comments or delete existing ones with a right-click.
Audio settings
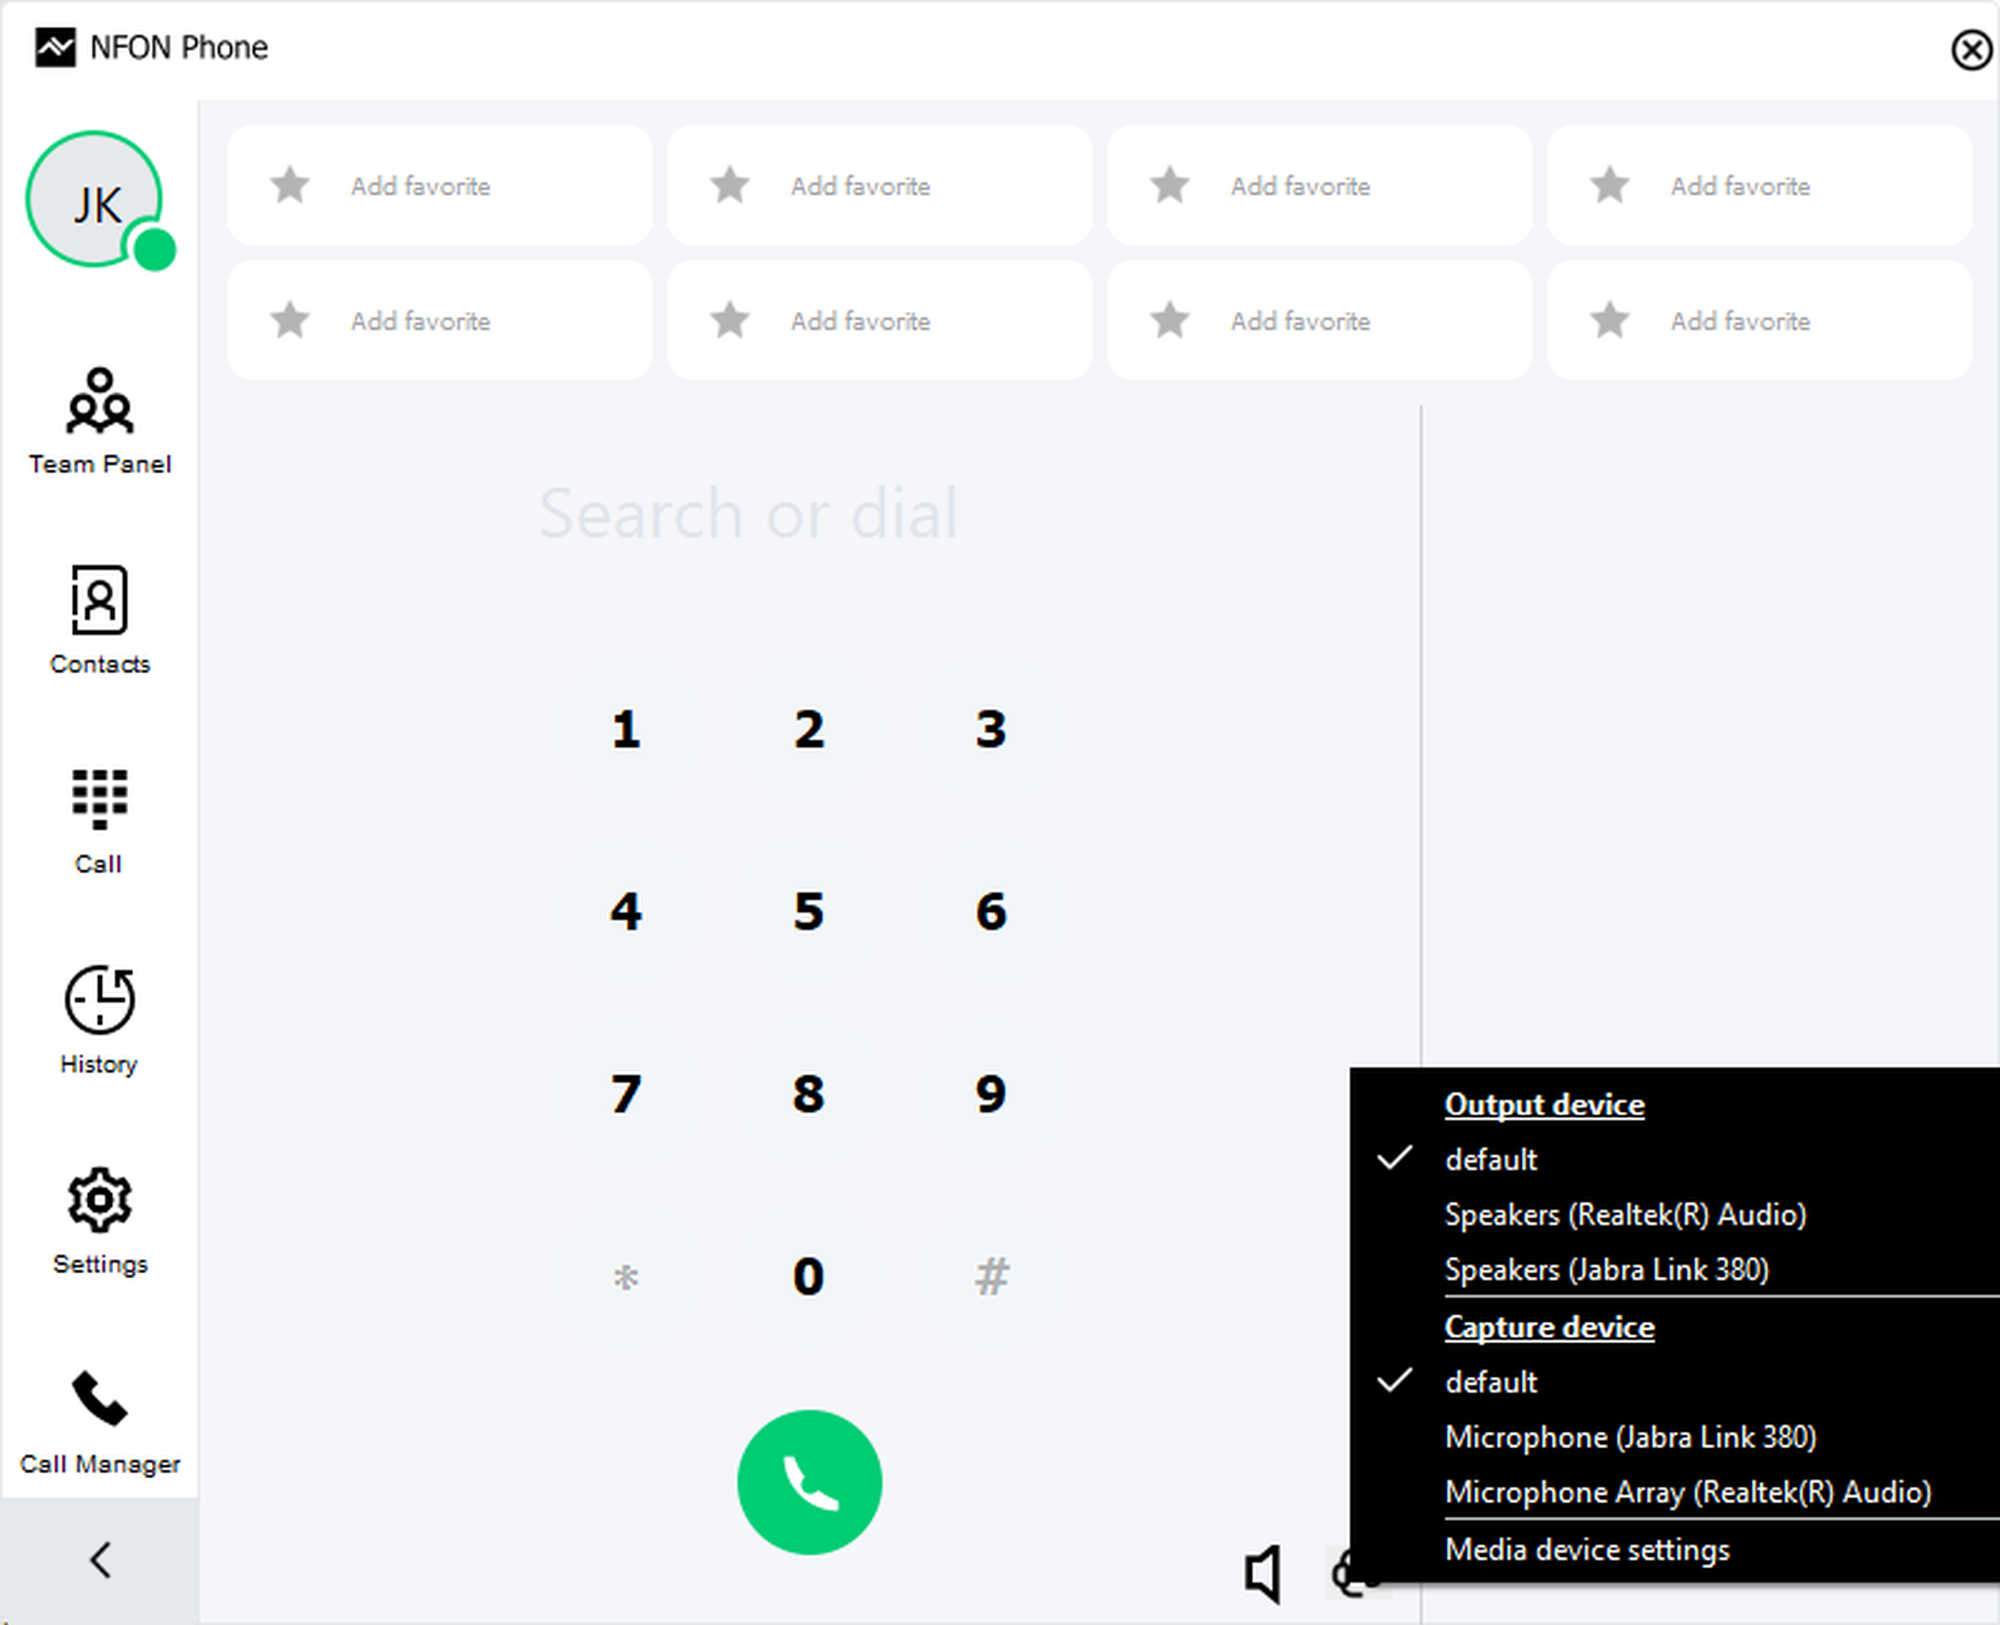
Select the terminal device for audio & microphone via the headphone icon.
For further options available, go to Settings > Media device settings.
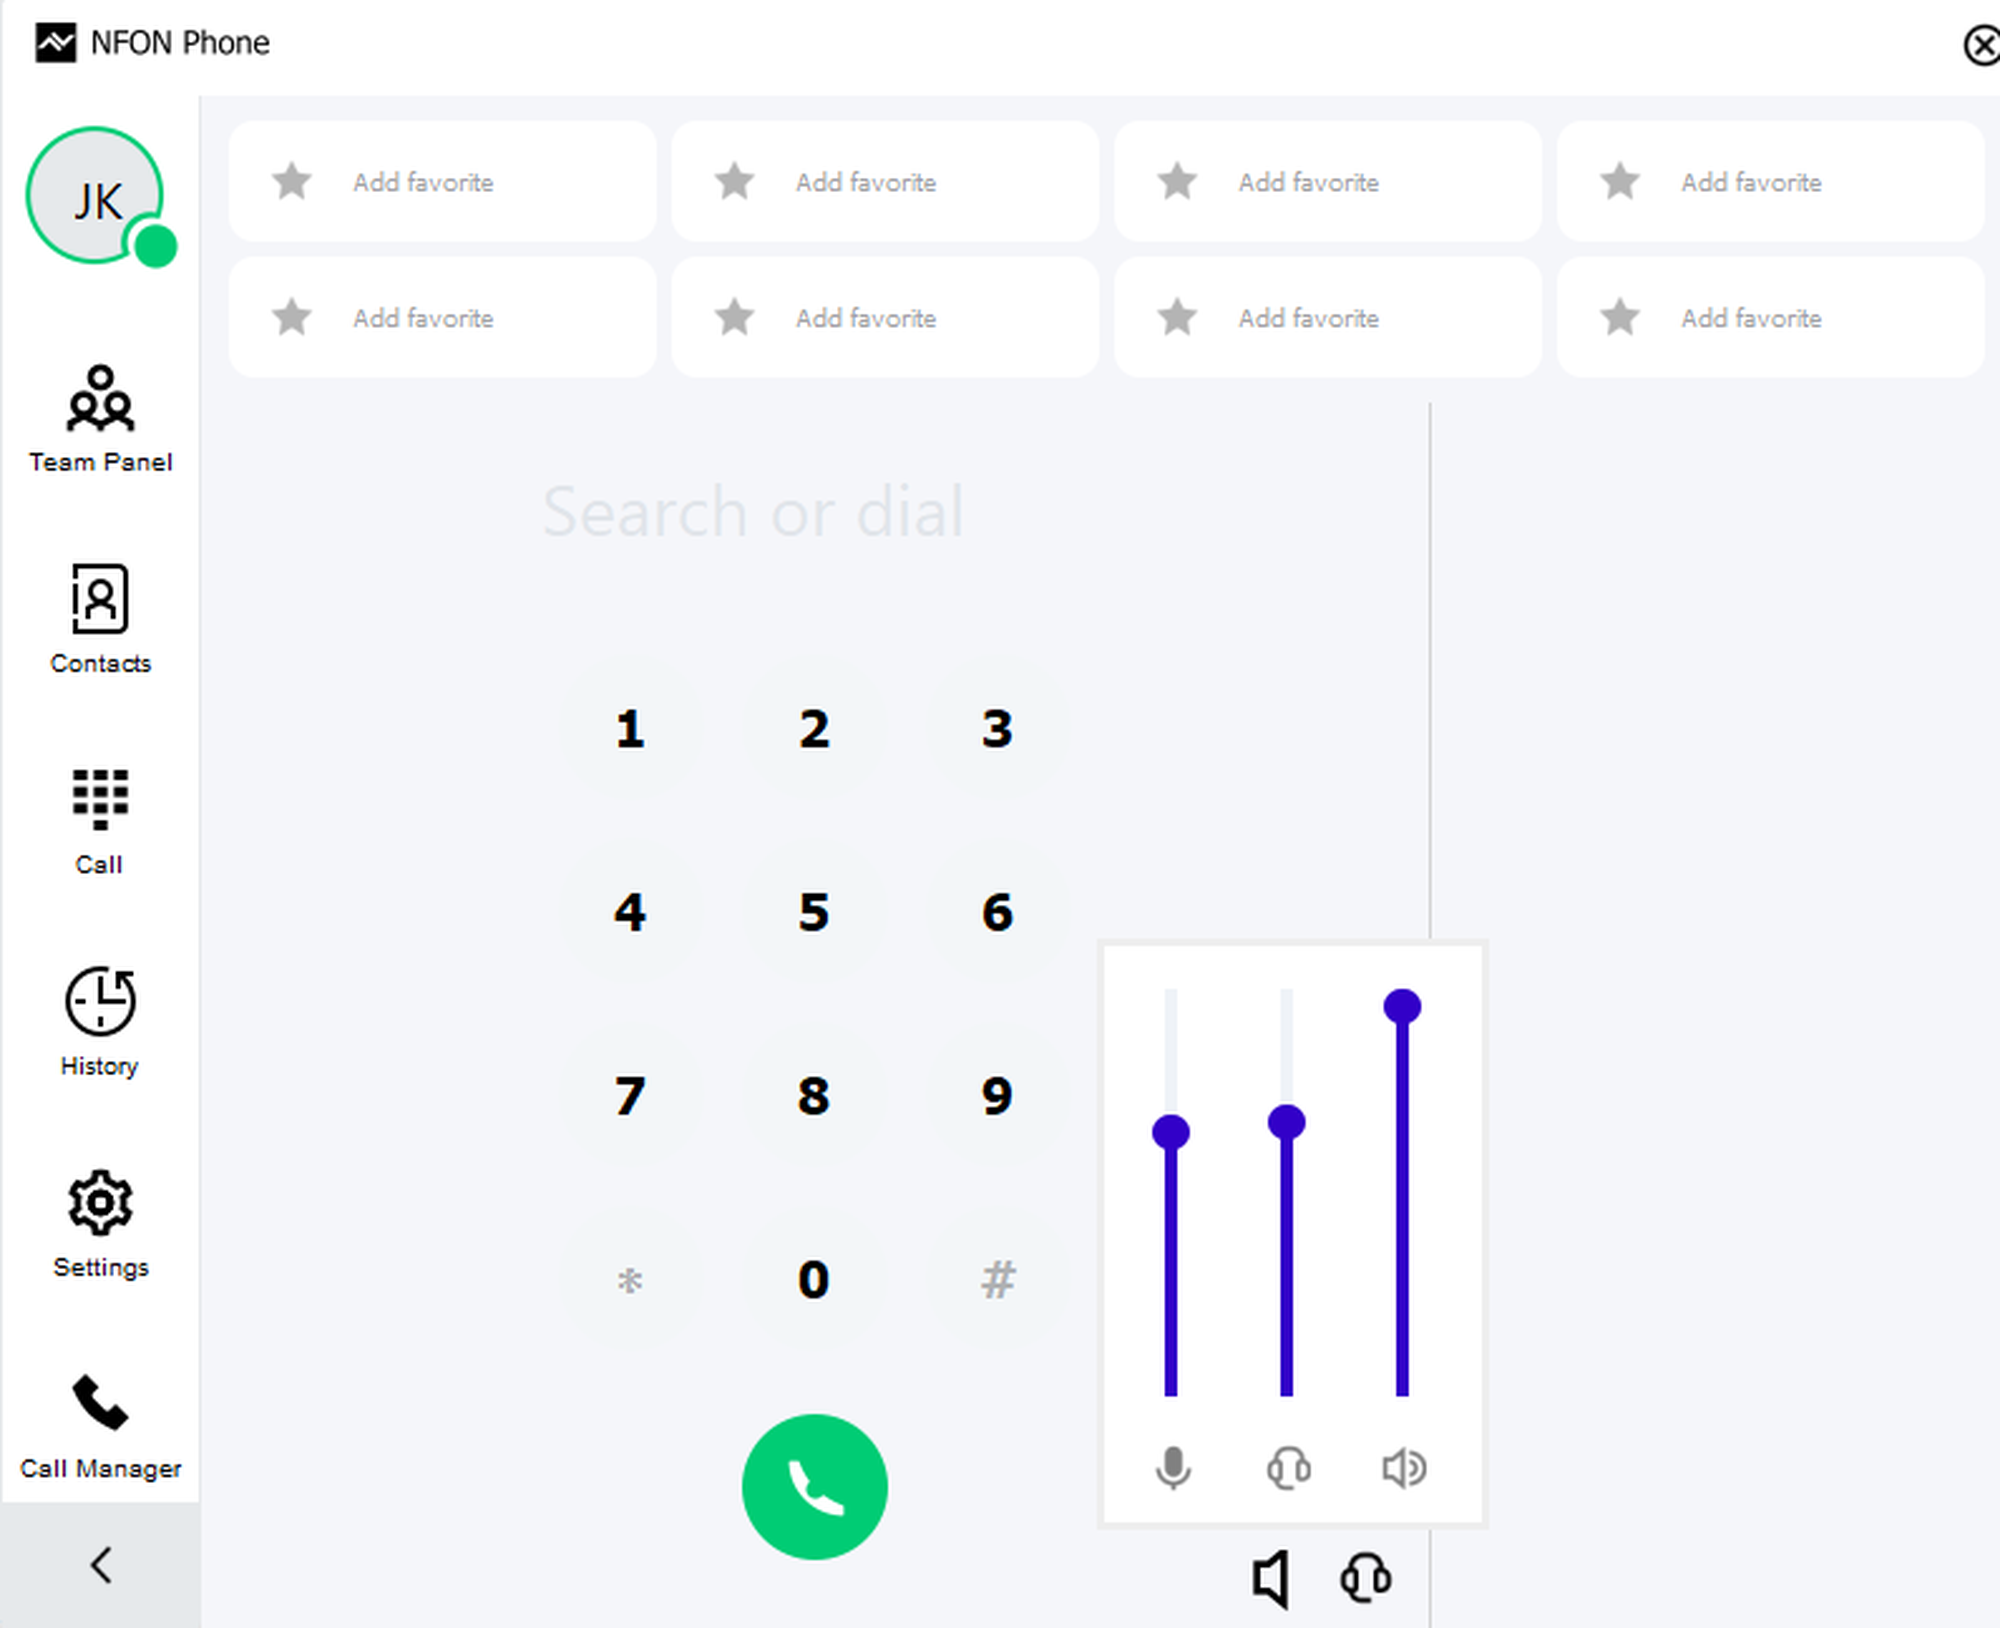
Change the volume of audio in- and output via the speaker icon.
3. Call transcription
The Call Transcription feature uses intelligent AI to provide you with a full transcription, summary, and key points, such as outcomes, action items or tasks, from your call.
Call transcription is available to users who have an AI Essentials subscription license assigned to them. Licences can be managed, assigned or revoked by an administrator. (See Managing licenses by the admin .)
3.1 Call transcription overview
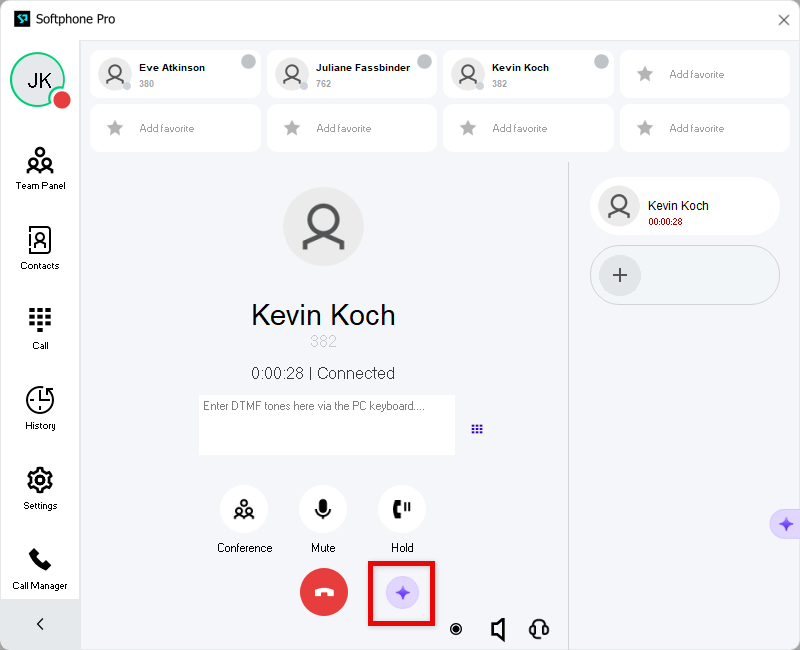
In the standard view, the call transcription button is visible only after the callee has accepted the call.
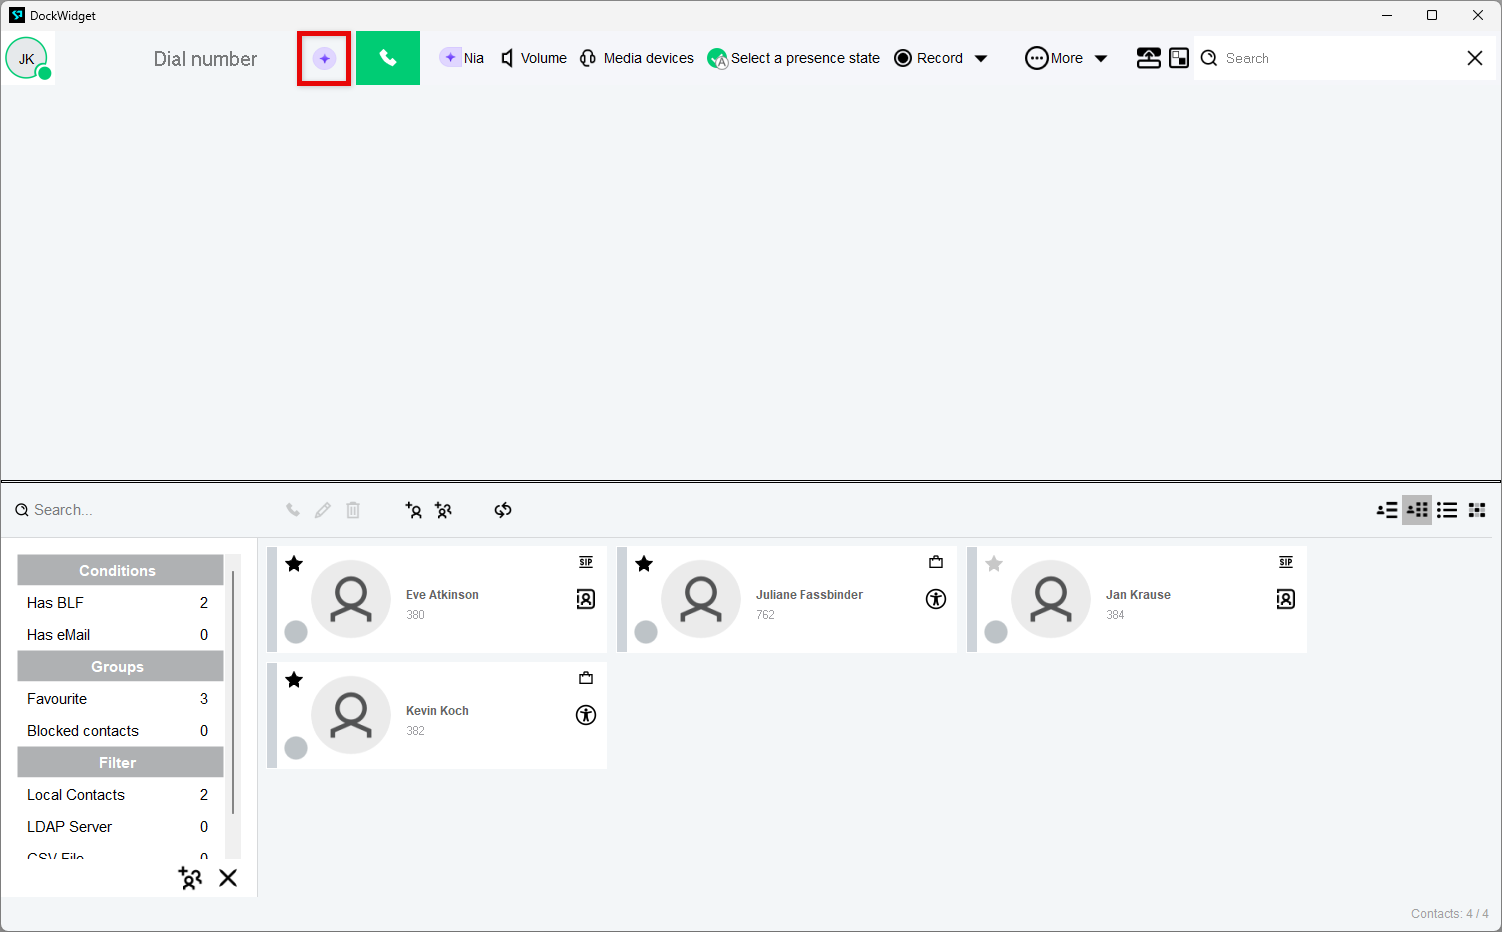
In Operator Panel mode, the call transcription button is shown in the Dial number field. See Using Operator Panel mode .
Important
Please note that anyone who has a subscription license to AI Essentials can start a call transcription. However, the transcription starts only after all the parties have given their consent.
3.2 Using call transcription
Starting a call transcription
You must be in an active call to access the call transcription feature.
To start call transcription:
Start a call.
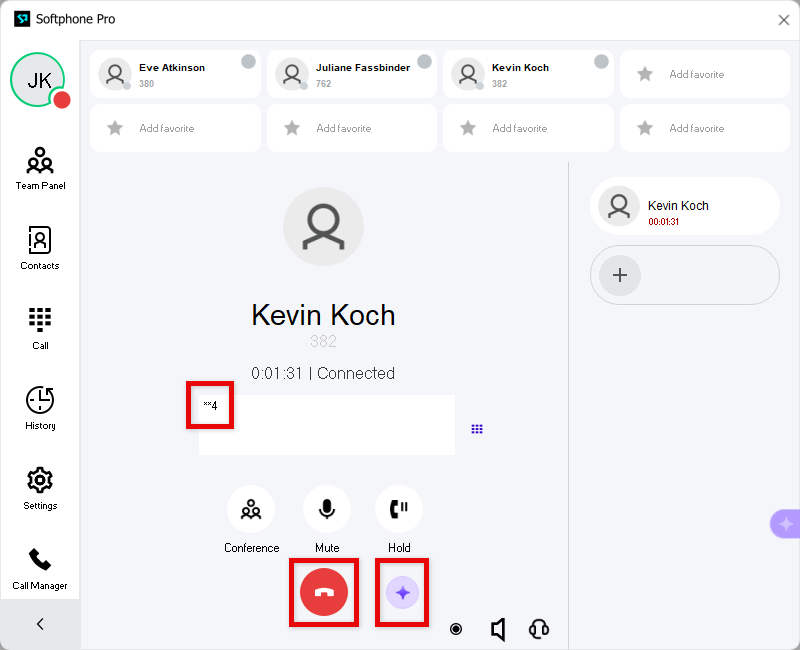
⇒ When the callee has answered the call, the Call transcription icon
 appears next to the call button.
Click the Call transcription icon at any time during the call.
Alternatively, enter *4 in the DTMF field.
⇒ The callee will hear an audio notification.
⇒ They will be prompted to consent by inputting a digit on their device's dial pad.
Note: The call transcription will start only after the other party has given their consent. If the requested digit is not entered on the dial pad, both parties hear a notification that the call transcription has been rejected. Call transcription can be prompted again at any time during the call.
⇒ The call transcription starts.
Note: The transcription language will be detected automatically.
To end a call transcription, you can either:
Enter **4 in the DTMF field
or
End the call
After the transcription is stopped or the call ends, the transcription is processed. It can then be accessed from the History tab.
See Viewing a call transcription .
Transcription processing time
It may take a few minutes for the transcription to be processed before it appears in the History tab.
Call transcription email notifications
An email notification can be sent to the caller when a call transcript becomes available after transcription stops or the call ends.
To enable or disable email notifications for call transcription, see Cloudya Web App manual > Settings > User > Call settings .
Starting call transcription in a conference call
Call transcription can also be used to transcribe conference calls.
To start a call transcription in a conference call:
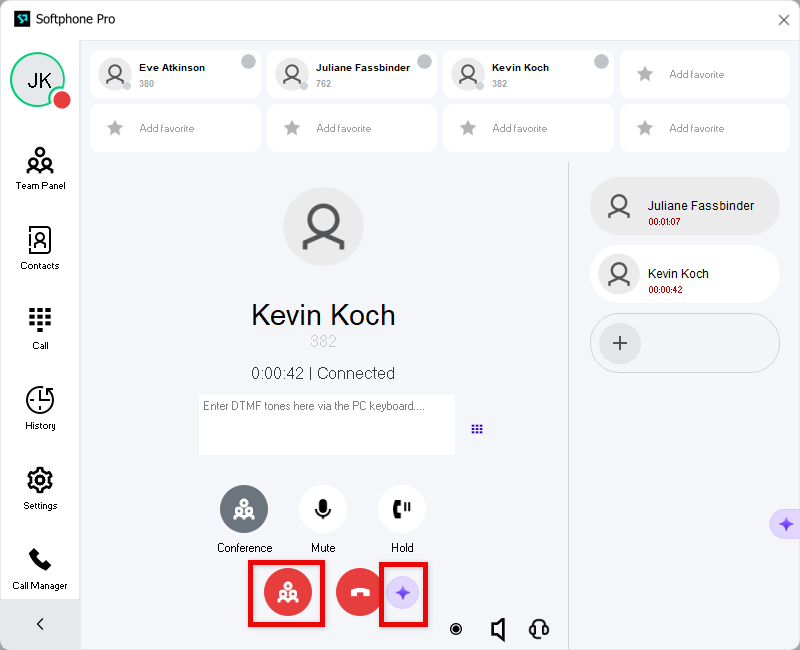
Start a conference call. (See Starting a conference call ).
Start call transcription following the same process as described above under Starting a call transcription.
Note: the call transcription will start only after all call participants have consented by dialling the digit on their device's dialpad when prompted by the audio notification.
Starting a call transcription from a desk phone
To be able to start a call transcription from a desk phone, your Softphone Pro application must have the same extension as used on your desk phone.
To start a call transcription from a desk phone:
Dial *4 .
Dial **4 to stop the transcription.
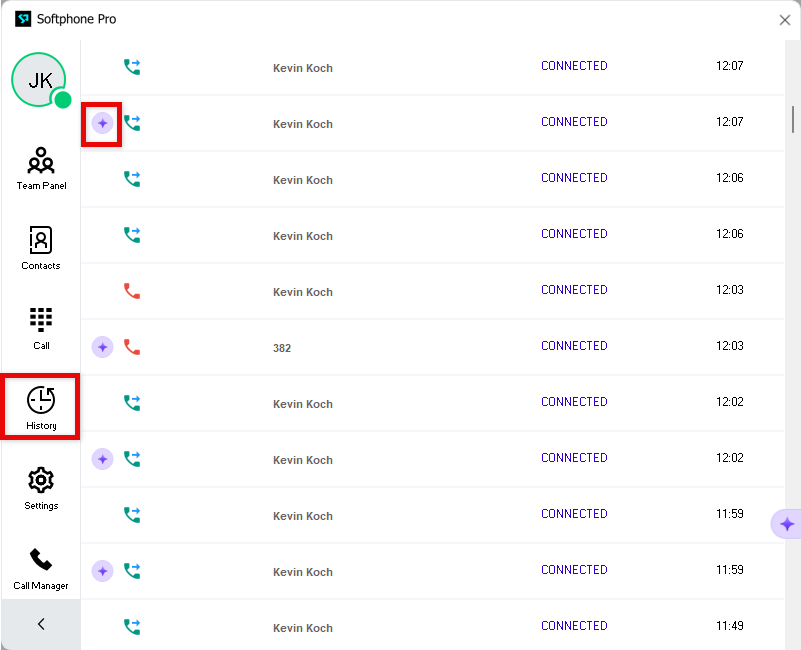
To read the call transcription, log in to Softphone Pro and open the History tab.
⇒ All transcribed calls will show the call transcription icon next to the call record.
3.3 Viewing a call transcription
The call transcription feature includes a full transcription, summary, and key points, such as outcomes, action items or tasks, from your call.
To view the call transcription, summary and key points:
Go to the History tab.
Click the Call transcription icon
next to the call record you wish to view.Note: Only calls that have been transcribed will show the Call transcription icon next to them.
⇒ The summary, transcription and key points open in a new window.
3. Click the tabs to navigate between Summary and Transcription:
Summary tab shows:
Summary: a bulleted list of topics from the conversation.
Key Points, Outcomes, Decisions, Action items, Tasks: headings vary based on the content of the conversation.
Transcription tab shows:
The full call transcription.
Call transcription retention
Call transcriptions are stored in your call history for 40 days.
4. Managing contacts
Managing contacts
Click Contacts to open the contact window.
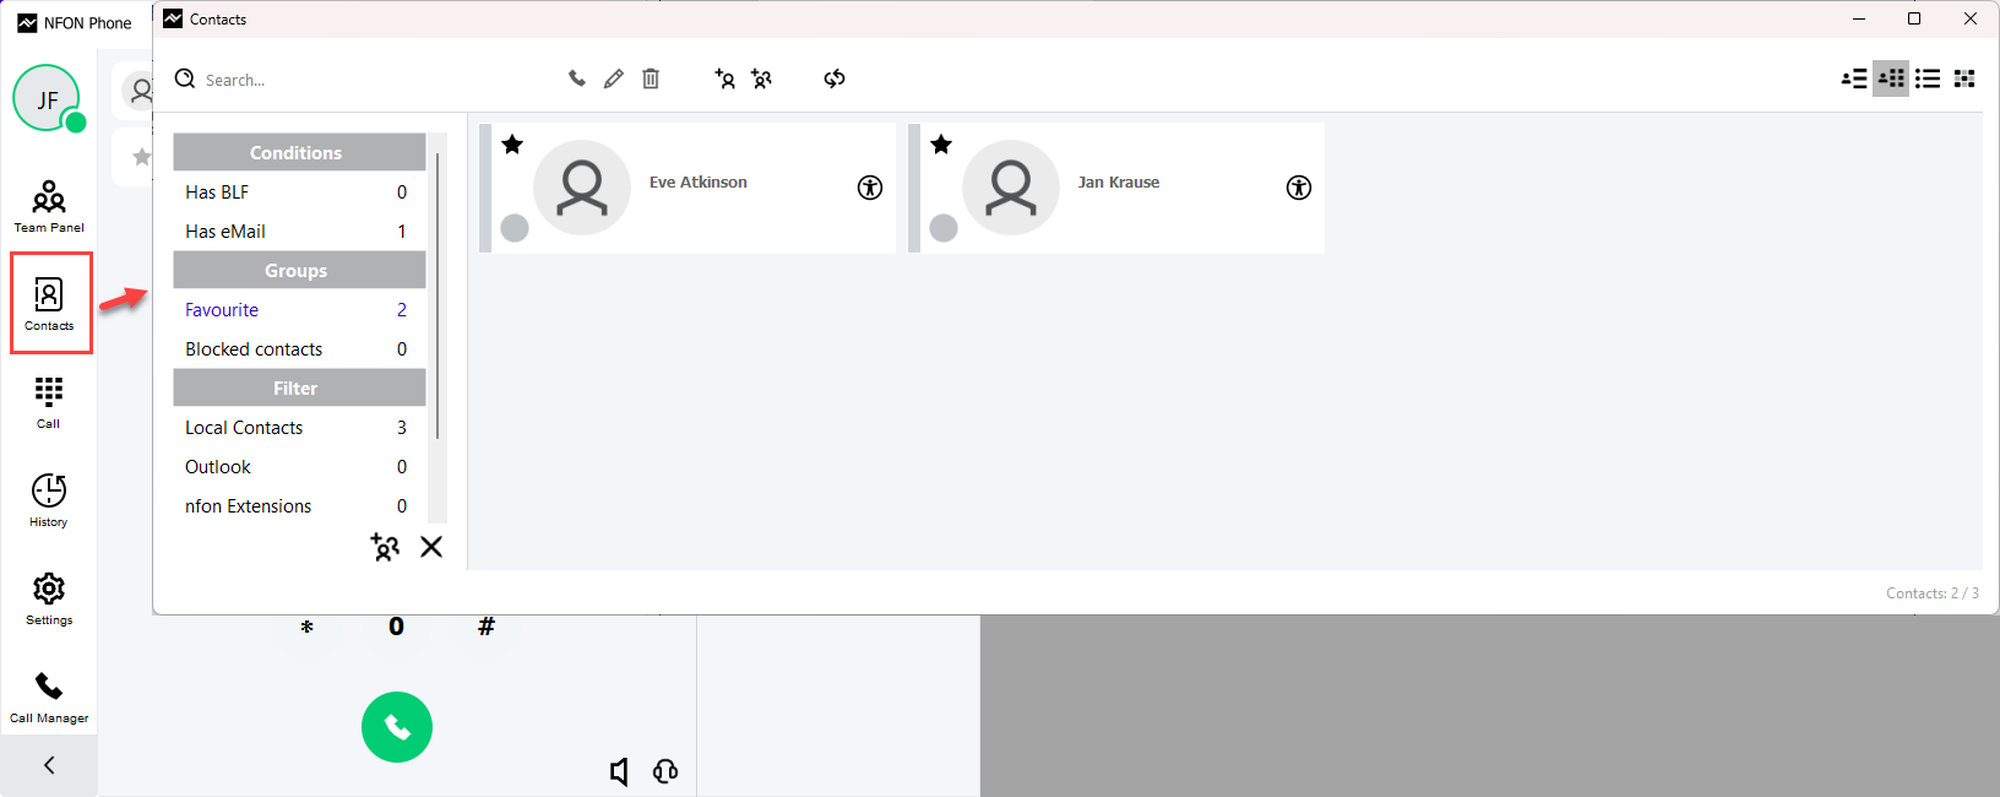
Creating a contact
To create a contact
Click on the add-contact icon at the top of the action bar.
Assign information such as name, address, phone number and email.
Click on Apply to add the contact to your contact list.

Editing contacts
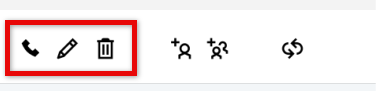
Left-click to mark a contact.
⇒ You can now call, edit or delet the contact directly.
Use the buttons at the top of the contact window to call, edit or delete the cont.
Contact information
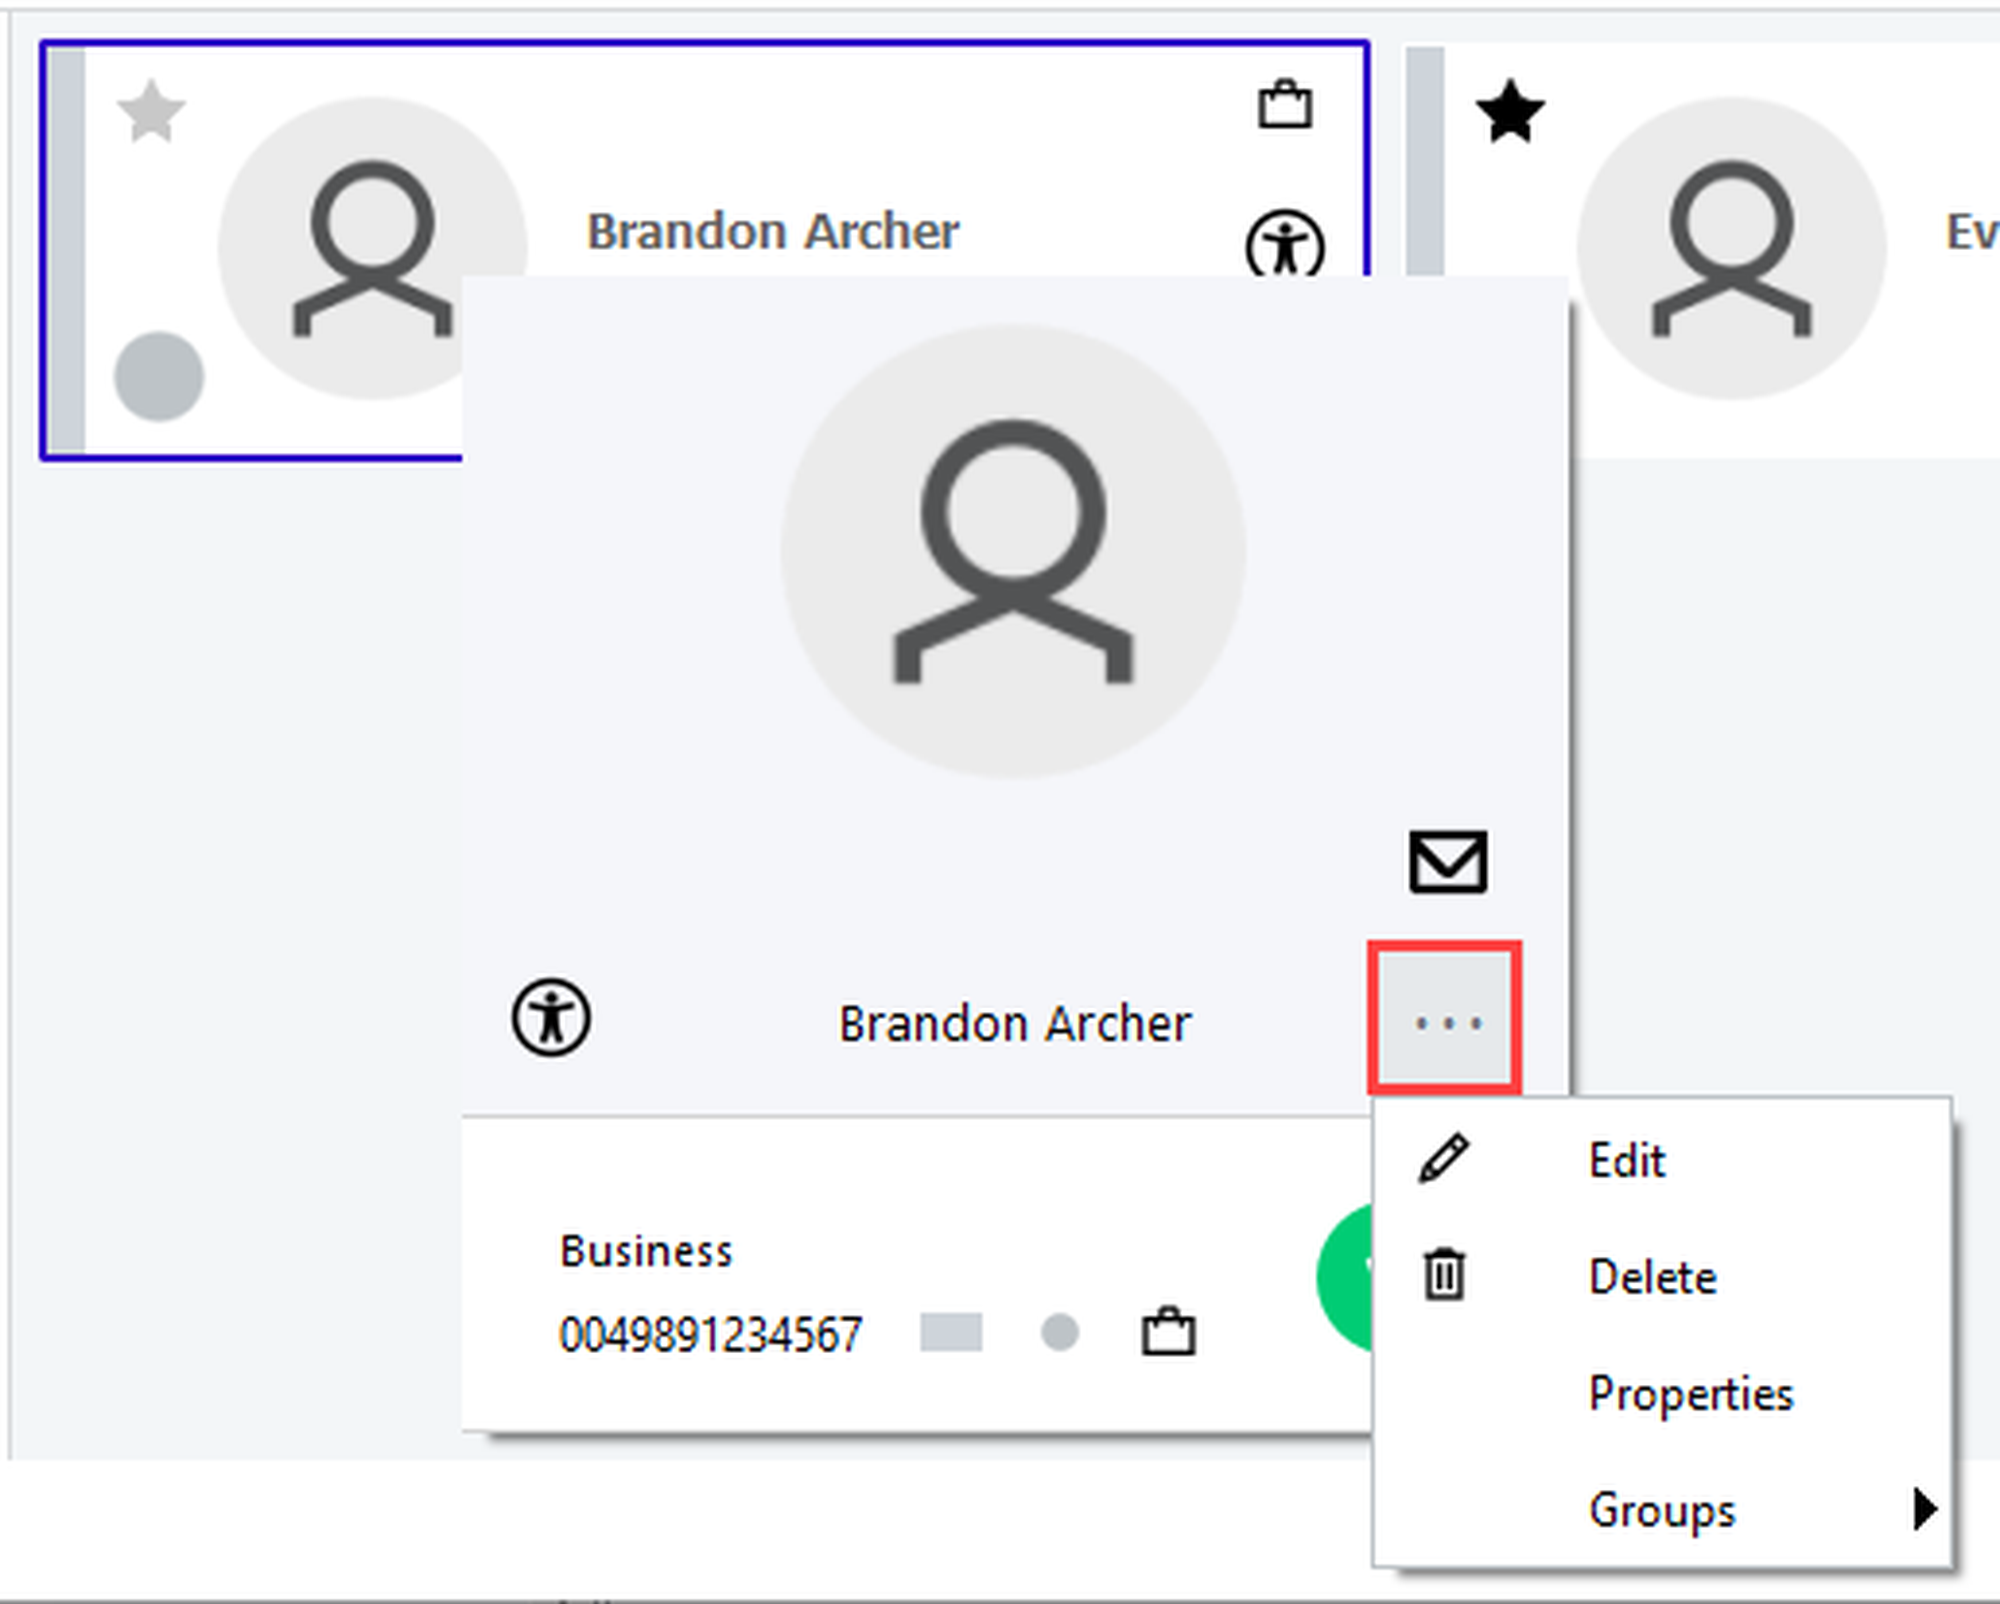
Right-click on any contact to open the contact information.
⇒ You can edit, delete or add the contact to a group using the 3-dot button.
Editing a contact: Setting the primary phone number
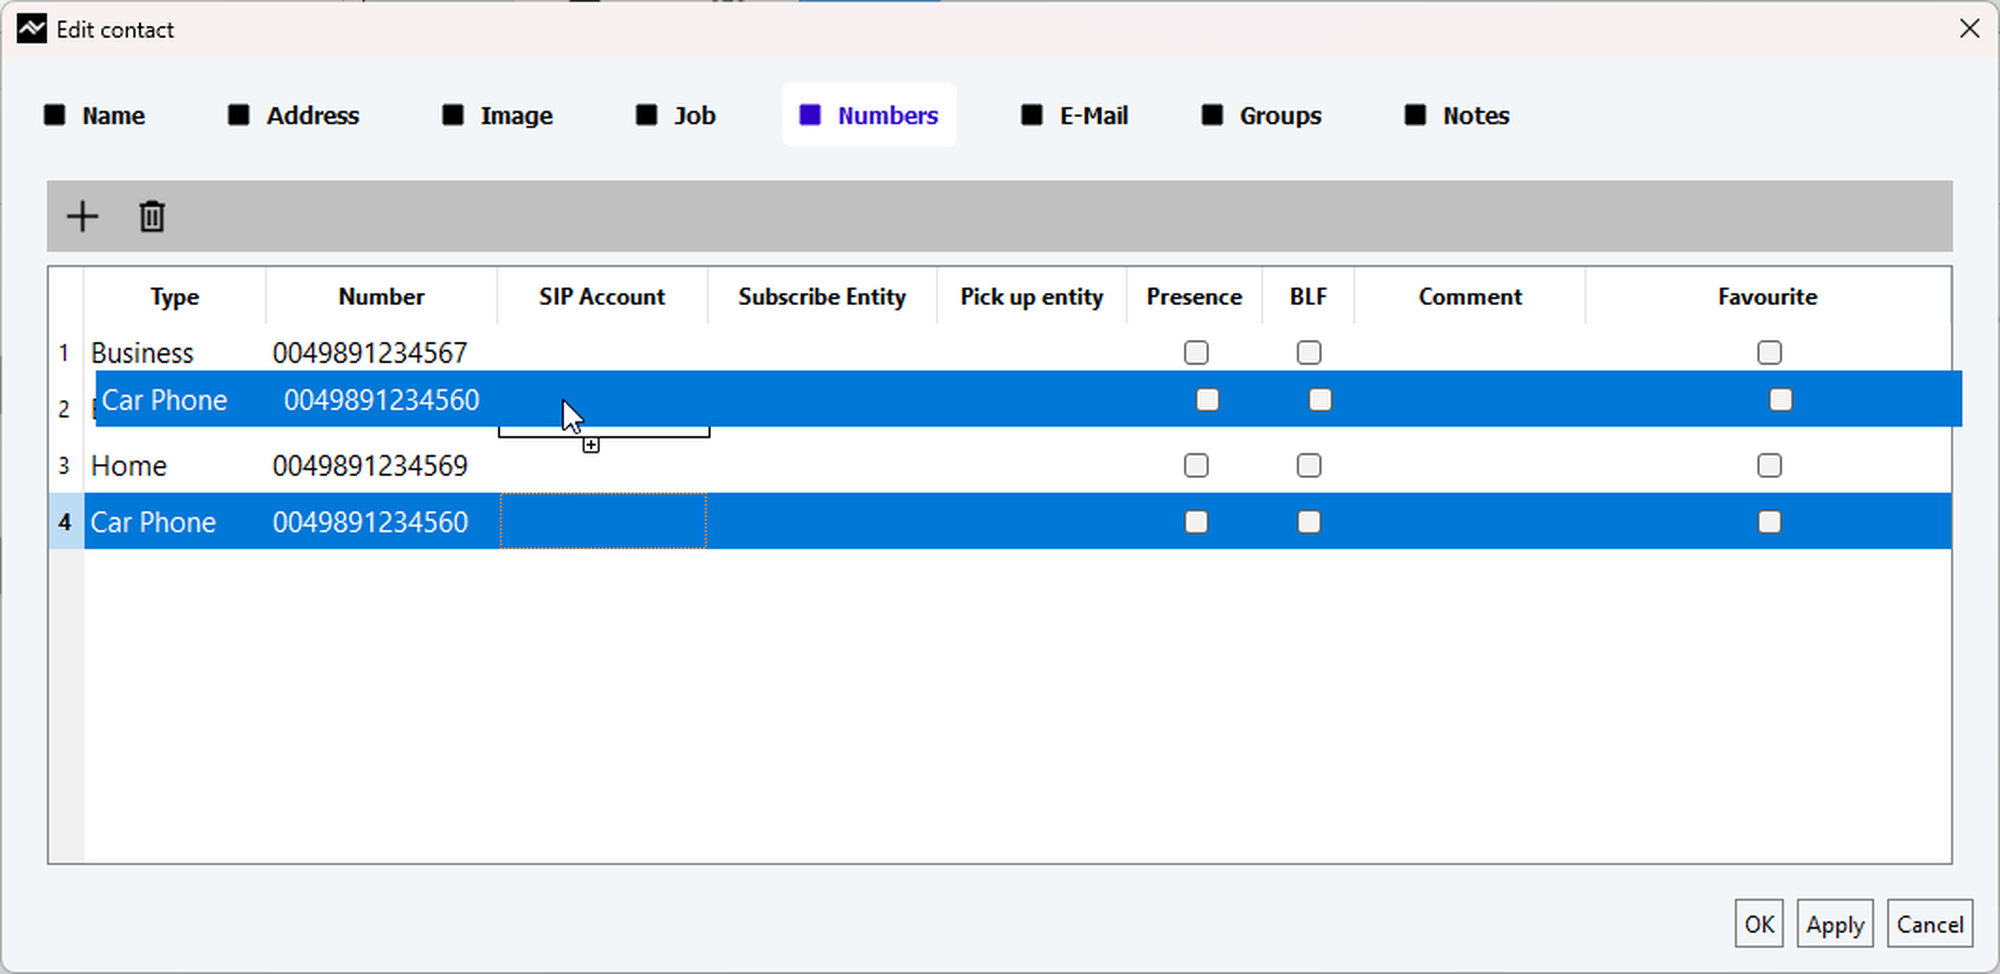
Under the Numbers tab in the Edit Contact section, you can define the primary phone number of each contact.
Drag and drop the desired primary phone number to the top position.
Click Apply to confirm.
To create a new contact via history
Right-clicking on the contact you want to add.
Under Number you will find the functions Copy or Add contact.
Creating a contact group
To create a group of contacts
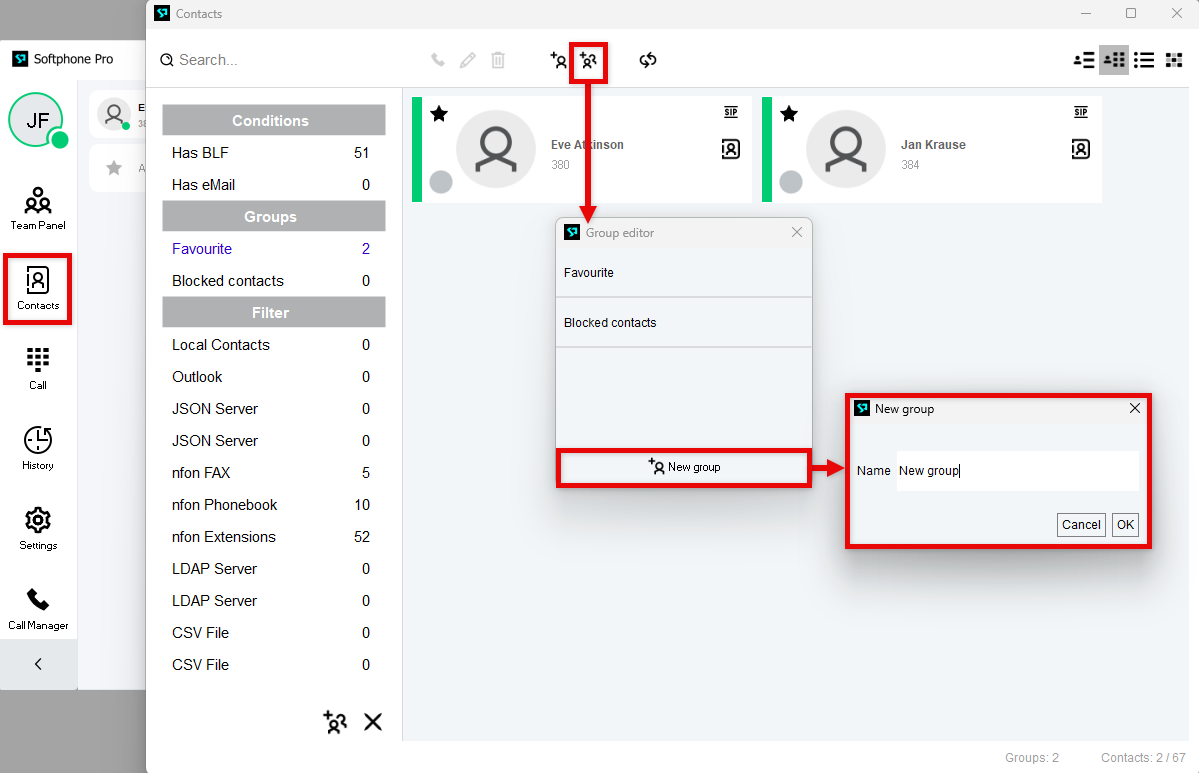
Click Contacts.
In the contact window, click on the Create group icon.
⇒ At the bottom, you will see the function + New Group.
⇒ A dialogue window opens.
Enter a group name.
Click OK.
⇒ You have created a new group.
Please note that you can change the name of the group at any time or delete the group.
Click on the Create group icon to return to the contact overview.
Adding a contact to a contact group
To add a contact to a group
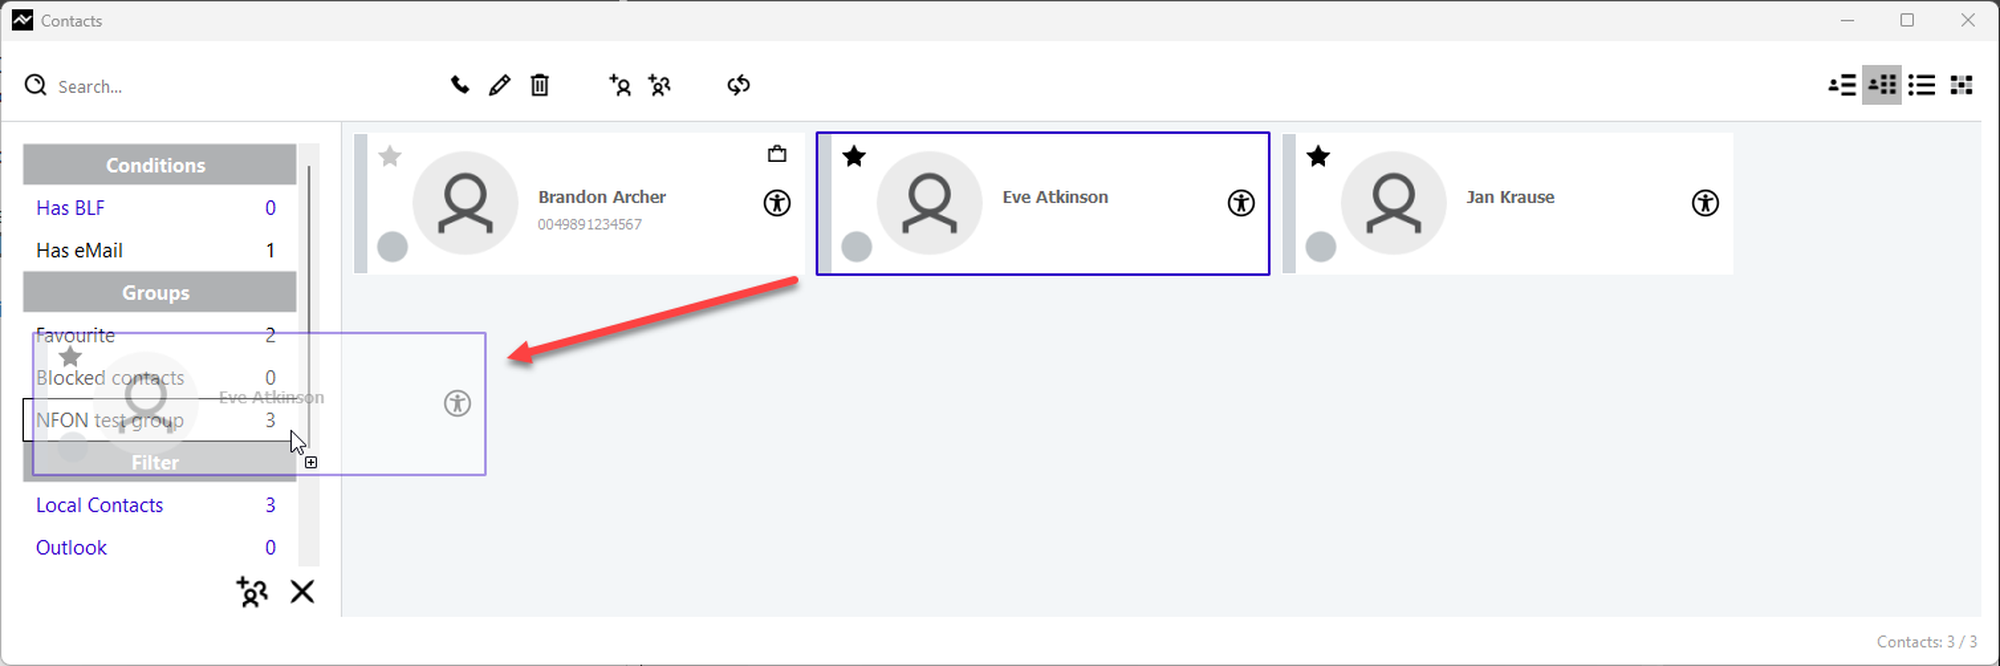
Drag and drop a contact onto the groups listed in the contact window on the left.
Alternatively, right-click on the contact to open the contact information and use the 3-dot menu to assign the contact to a group.
Favourites
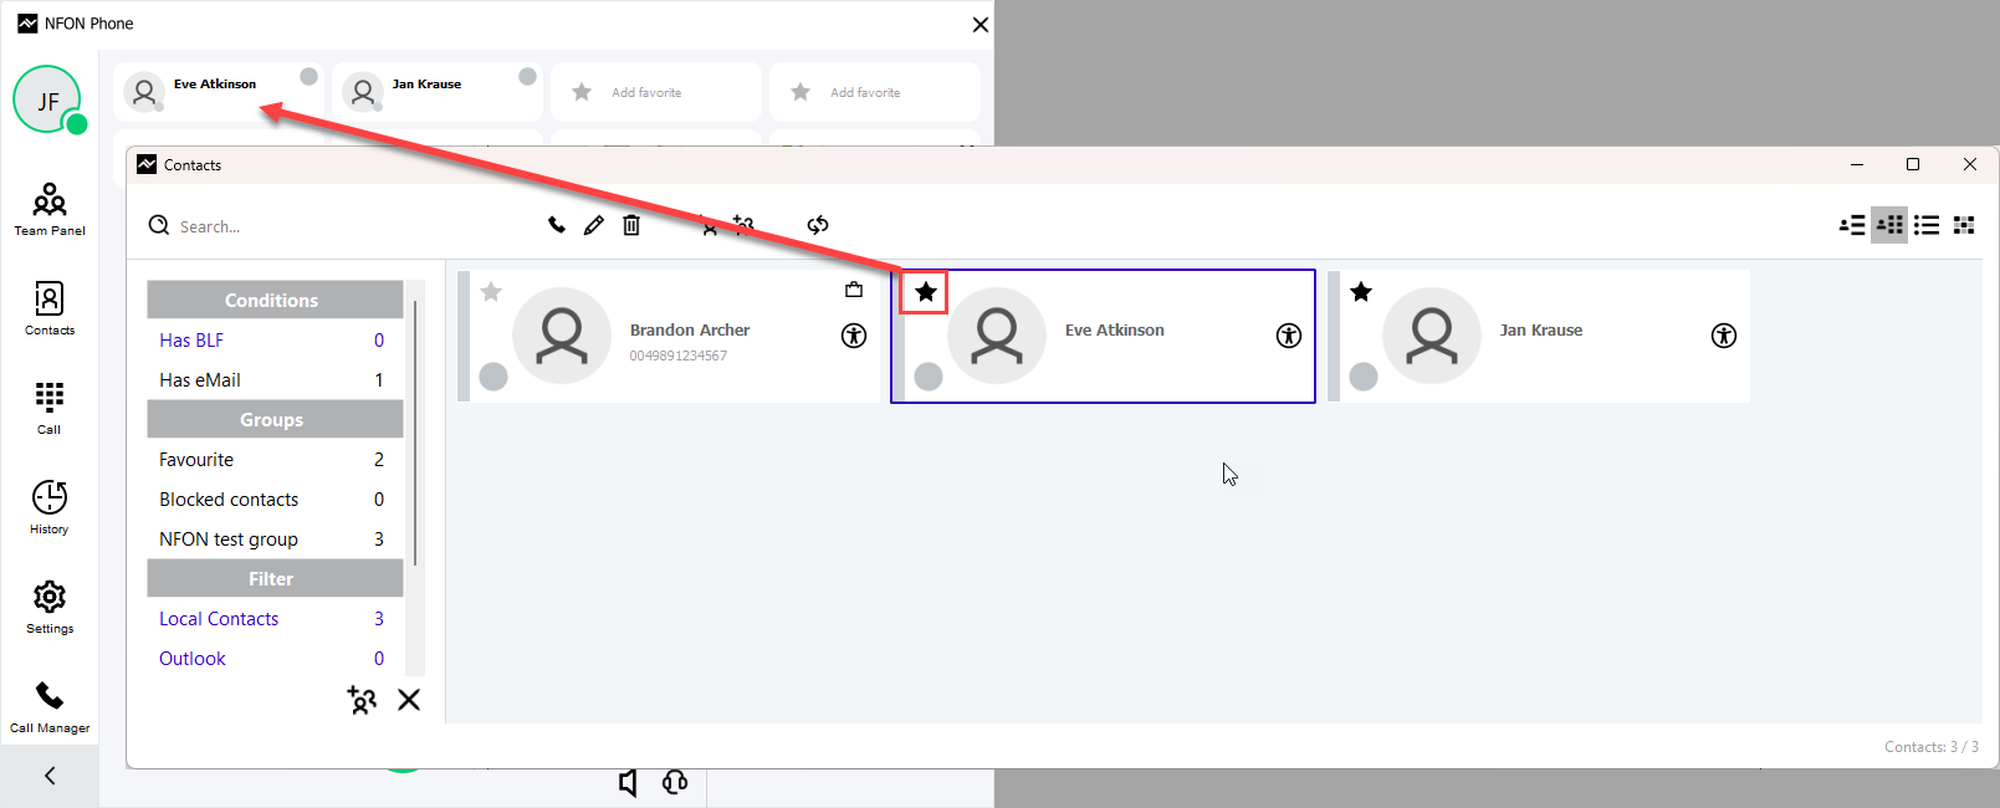
Click Add favorite or on the Contacts menu item in the toolbar.
Click the star symbol of a contact.
⇒ The contact has been added to the favorites section of the keyboard.
Please note that you can add as many contacts as you like to the favorites. If there are more than 8 favorites, 7 favorites are displayed, while the other favorites are available under +x-Favorites.
5. Call History
Call history
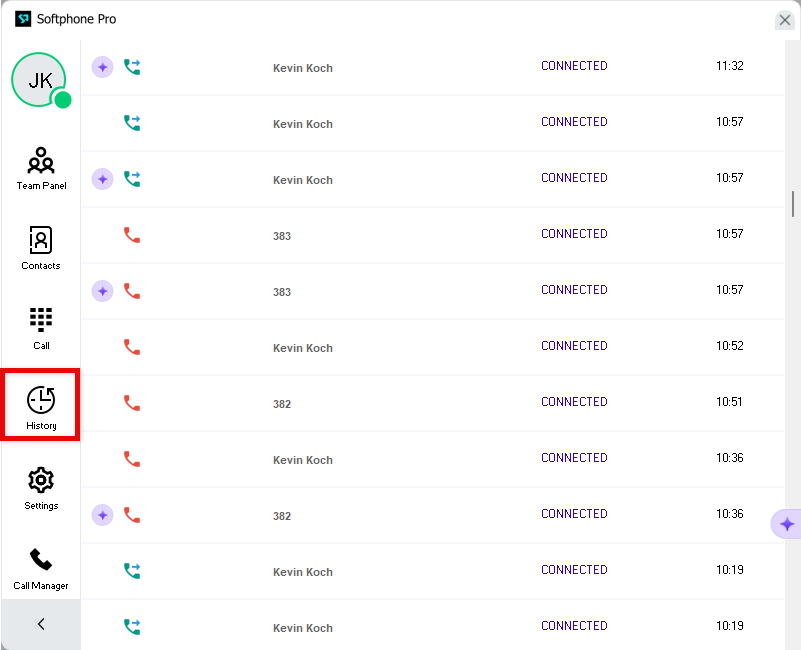
Under the History tab, you can:
See an overview of your call history
Access your Call transcriptions:
Click the Call transcription icon
.For further information, see Call transcription .
Detailed call history
To open a detailed call history
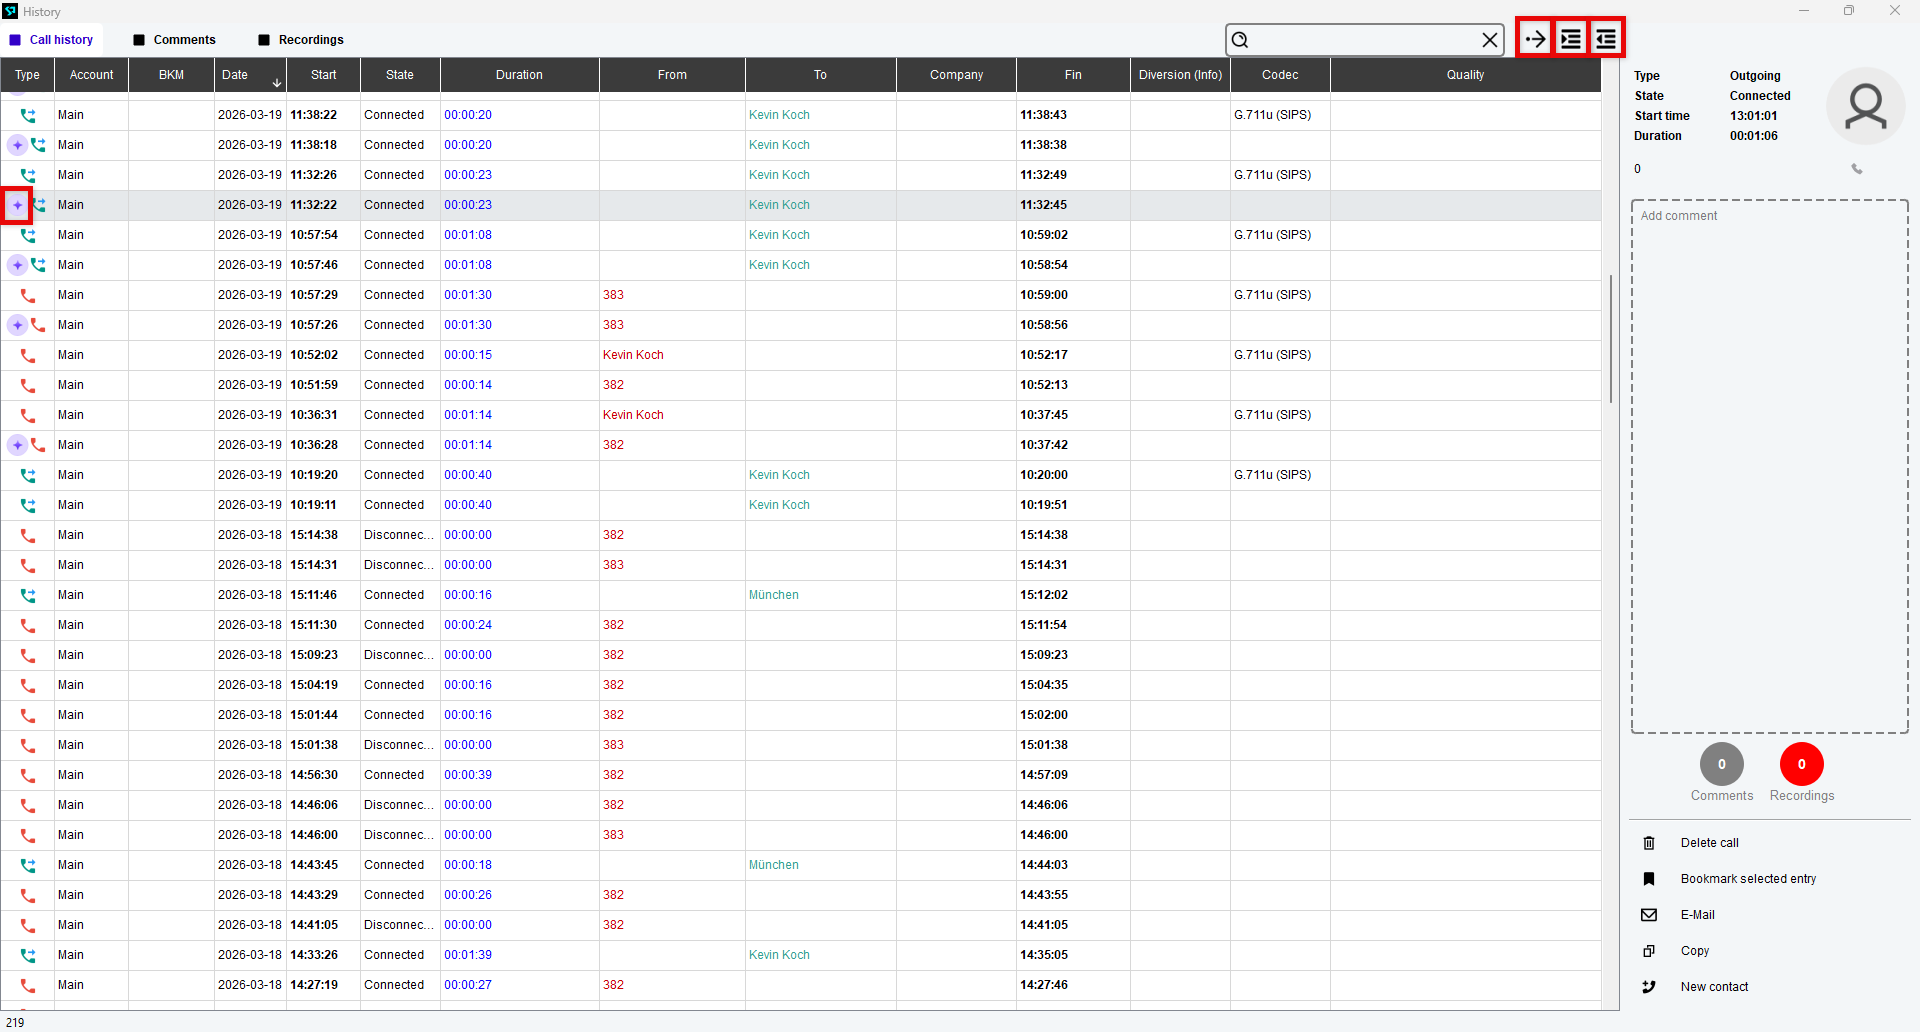
Click the document icon in the top right  .
.
⇒ A separate history window opens where you can access any Call transcriptions , and view detailed call records such as the date, start and end of the call, duration, call partner, call forwarding information and notes.
With the icons in the top right, you can:
Export the detailed call history as a CSV file
Set the following filtered views:
Incoming calls
Outgoing calls
6. Team Panel
Opening Team Panel
Click the Team Panel icon.
⇒ The Team Panel opens as a separate window and is fixed to the top of your screen.
Team Panel overview
As a default, the Team Panel displays your favourite contacts and their call status. Additionaly, you can enable your blocked contacts to be displayed.
Click Favourites to disable or enable (blue: currently enabled)
Click Blocked contacts to disable or enable (blue: currently enabled)

7. CTI mode / Softphone mode
CTI mode / Softphone mode
As a default, your Softphone Pro will start in the Softphone mode. You can restart the app as a CTI client (also referred to as CTI mode).
What is the difference?
Softphone mode
The softphone mode is the basic use case of the Softphone Pro: Using the app as your telephony device with a wide range of options for making calls, monitoring the call status of your team members and managing contacts.
CTI mode
In the CTI mode, you can use the Softphone Pro as CTI Client for another telephony device, usually a desktop phone. While you use your desktop phone to make calls and monitor the call status of your colleagues, you have the Softphone Pro to manage features and setup of your desktop phone.
Depending on the mode you started the app with, some features are or aren't available. In the table below, you can see an overview of the most important differences:
Feature | Softphone mode | CTI mode |
|---|---|---|
Status indicator | Yes | No |
Make calls | Yes | No |
Operatorpanel | Yes | No |
CTI settings | No | Yes |
Media device settings | All options available | Only ringtone device options available |
System settings | All options available | Some options unavailable |
TAPI settings | Two options, effect softphone | Three options, effect desk phone |
For more information on how to configure CTI settings, go to CTI settings for desktop phones.
8. Operator Panel Mode
What is Operator Panel Mode?
The Operator Panel Mode view is an interface optimised for call handling.
A Voice Operator Panel (VOP) is a software or hardware solution designed for professional call management in companies, call centers or reception areas. It enables operators or receptionists to efficiently control, route and monitor incoming and outgoing calls.
Softphone Pro does not explicitly differentiate between use cases in terms of functionality, as most features are available across all applications.
This is because, instead of offering multiple products, an all-encompassing software solution is provided that covers both everyday telephony and specific operator requirements equally. Uniform graphical elements and functions apply to both operating modes. Thanks to consistent meanings and clearly recognisable symbols, the Operator Panel Mode can be used immediately without any training time.
The key factor is the handling: Larger overviews for better call control, usability across multiple screens (call panel, contacts) and optimal integration of various contact sources with cross-database phone number reverse lookup.
Advantages of a Voice Operator Panel Mode
1. Centralised call management
Manage multiple calls simultaneously
Easy call forwarding (blind transfer, attended transfer)
Call monitoring and control
2. Increased efficiency and speed
Drag-and-drop call routing
Quick search for contacts and extensions
Speed dial buttons and hotkeys for frequent actions
3. Improved overview and transparency
Display of call status for all extensions (busy, available, in conversation)
Integration with CRM or Helpdesk systems
Detailed call logs and statistics
4. Integration
Support for various CTI interfaces, e.g., TAPI, Outlook integration, LDAP etc.
5. Scalability
Suitable for small businesses to large-scale installations in medium-sized enterprises or corporate environments
6. Enhanced user friendliness
Intuitive user interface with graphical representation
Customisable dashboards
Typical use cases
Typical use cases include:
Businesses with high call volumes
Reception desks in hotels, hospitals or large companies
Call centers and support hotlines
Government agencies and public institutions
8.1 Operator Panel Overview
Operator Panel overview
The Operator Panel consists of two distinct sections:
Line Operator area
Contacts area
These areas can be displayed together as a single window or separated into two windows using the docking button  .
.
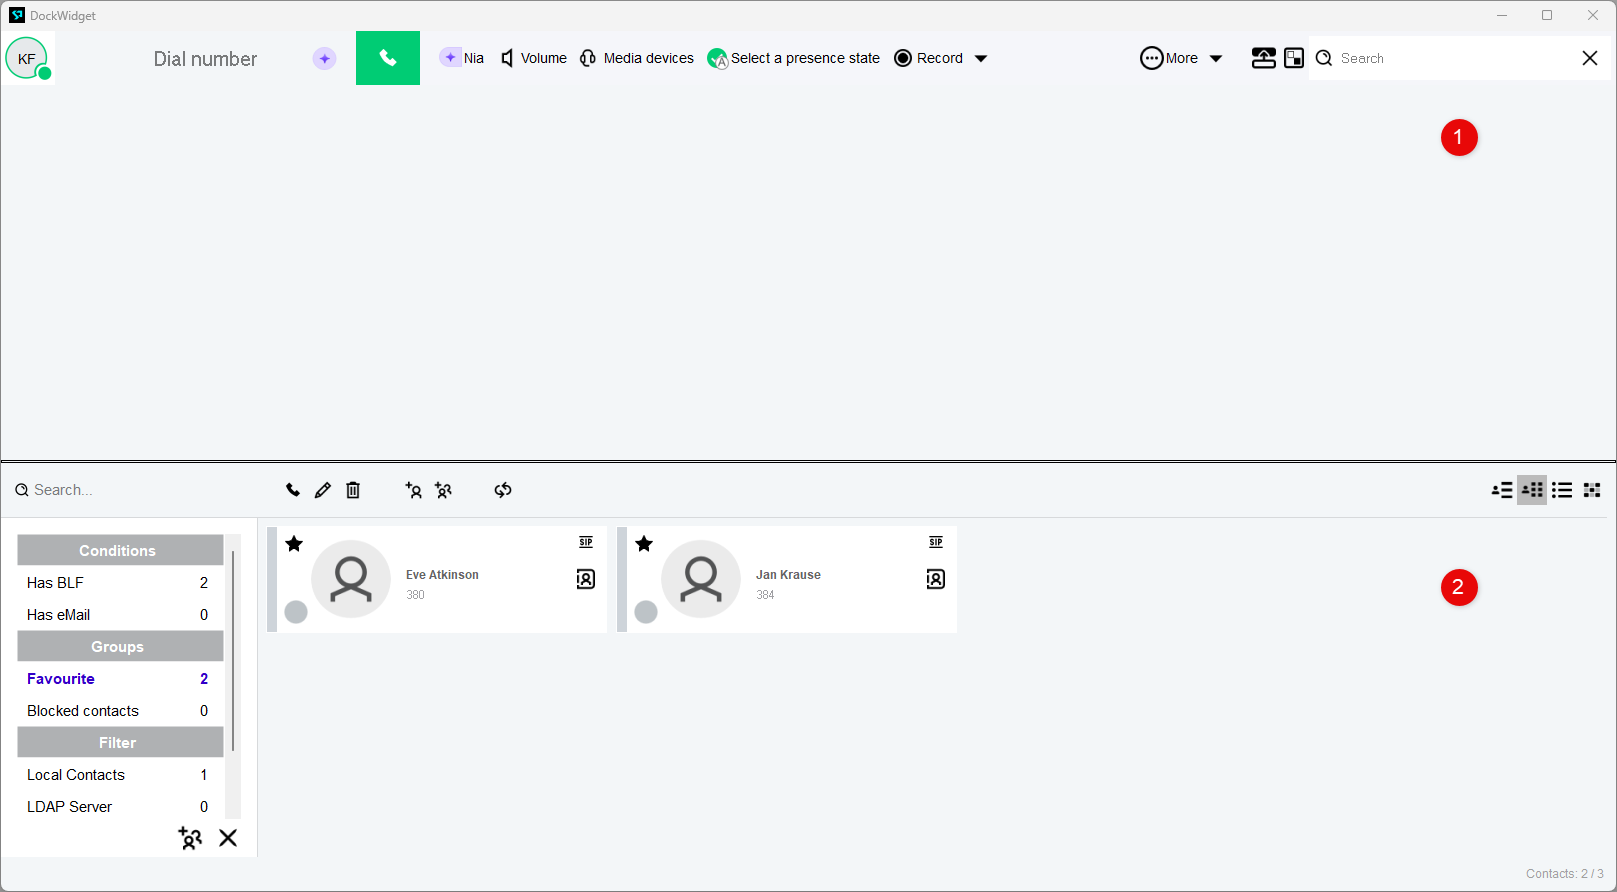
Features
For the Line Operator area, the available features are listed below.
For more information on the Contacts area, see Managing Contacts .
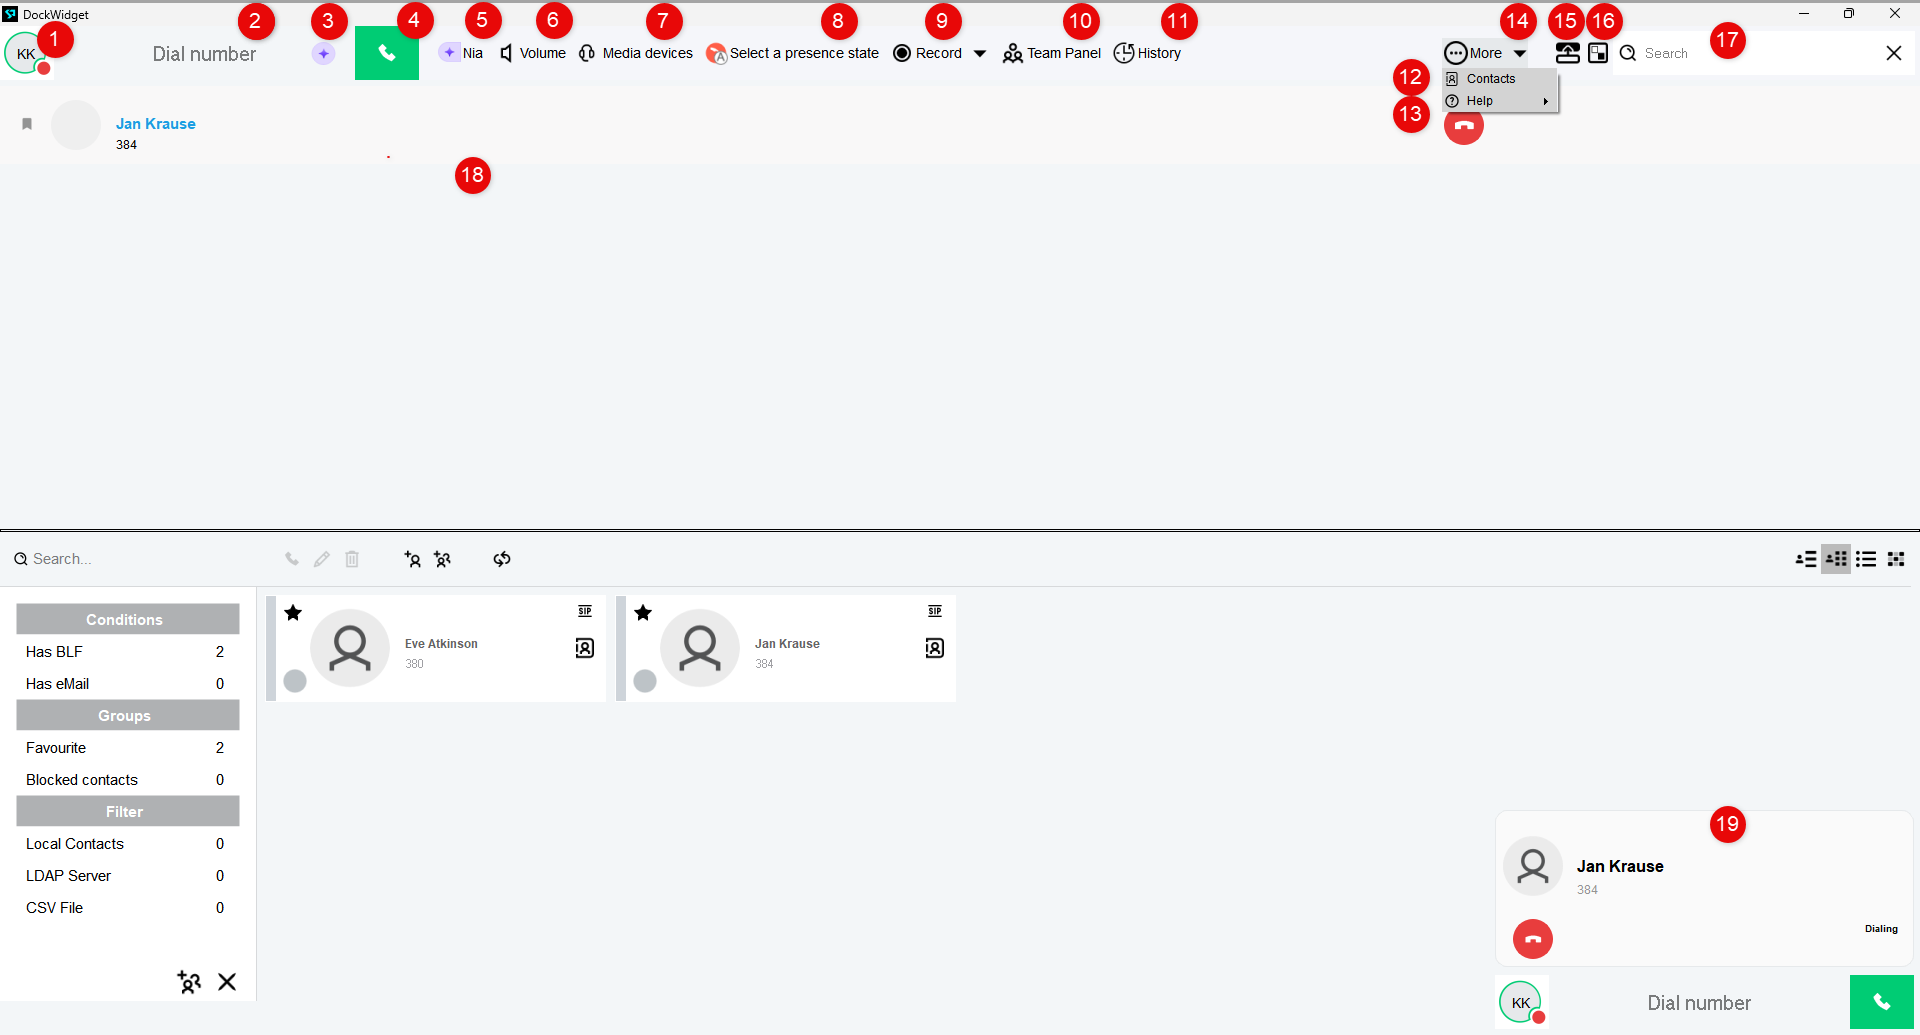
Number | Description |
|---|---|
1 | Status antenna Displays the connection status between your telephone system and your softphone. The icon border colour indicates the status: Green : The user is not in a call. Red : The user is in a call. DND : DND is activated. Grey : The user is not logged in. See Logging in to the app . |
2 | Dial Number field Dial the phone number you wish to call and click the Call button or press Enter on your keyboard. This area also serves as a drop zone for call forwarding or attended transfer. See Transferring a call . |
3 | Call transcription Press the call transcription icon during the call to enable call transcription. The call recipient will be automatically notified and prompted to accept via their keypad. See Call transcription . |
4 | Call button Calls the number entered in the Dial number field. |
5 | Nia  Opens the Nia Intelligent Assistant chatbot. See Nia (NFON Intelligent Assistant) . |
6 | Volume Adjusts the audio volume. |
7 | Media Devices Displays the audio input and output devices connected via the Media Device Settings. Select a different device to switch. |
8 | Select a presence state Sets the activity status (Simple SIP Presence) |
9 | Recording Click on the icon to record a call. Select the dropdown menu Open recording path to access the file path where the recordings are saved. Settings related to recording direction (both or one-way), recording path, and file type can be configured in the Advanced Settings . |
10 | Team Panel Opens an information bar at the top of the screen that displays contacts and contact groups. |
11 | History Displays a detailed view of the call history. For more information, see Detailed Call History . |
12 | Contacts Opens/closes the Contacts area. |
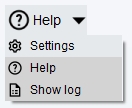
13 | Help Opens a submenu to:
 |
14 | More If there is not enough horizontal space to display all menu items, the remaining items appear under More. 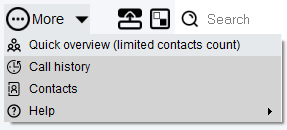 |
15 | Docking mode Click the docking button to merge Line Operator and Contacts areas into a single window, or separate them into two windows. |
16 | Switch screens  In docking mode, click Switch Screens to swap the position of the Line Operator area and the Contacts area. |
17 | Search Search for a contact name or phone number. The search result will be shown in the Contacts area, even if undocked. |
18 | Call bar Displays an active phone call with a timer and available call controls. |
19 | Call manager Displays the same functions as the call bar in a separate pop-up. |
Options during a call
Active calls are displayed in two locations:
As a call bar in the Line operator area
In the Call Manager pop-up in the bottom-right of the screen.
In both areas, incoming calls can be answered, rejected, or transferred.
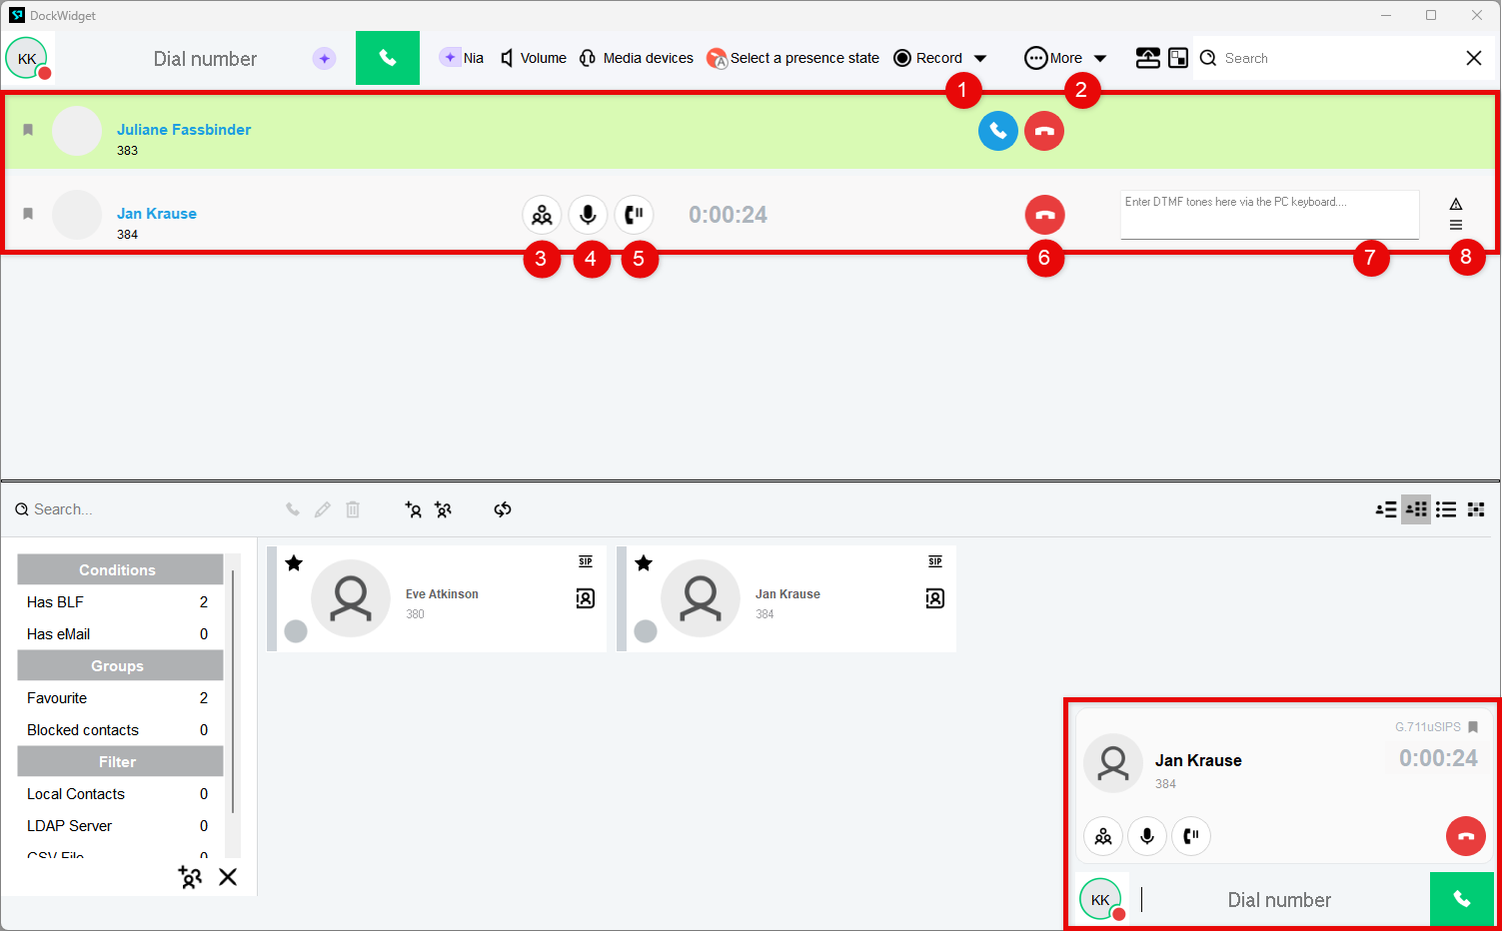
The buttons on the call bar enable you to:
Number | Description |
|---|---|
Incoming call | |
1 | Answer a call |
2 | Decline a call |
In an active call | |
3 | Create a group call |
4 | Mute a call |
5 | Hold a call |
6 | End a call |
7 | Enter DTMF tones via PC keyboard |
8 | Add notes |
8.2 Using Operator Panel Mode
Accessing Operator Panel Mode
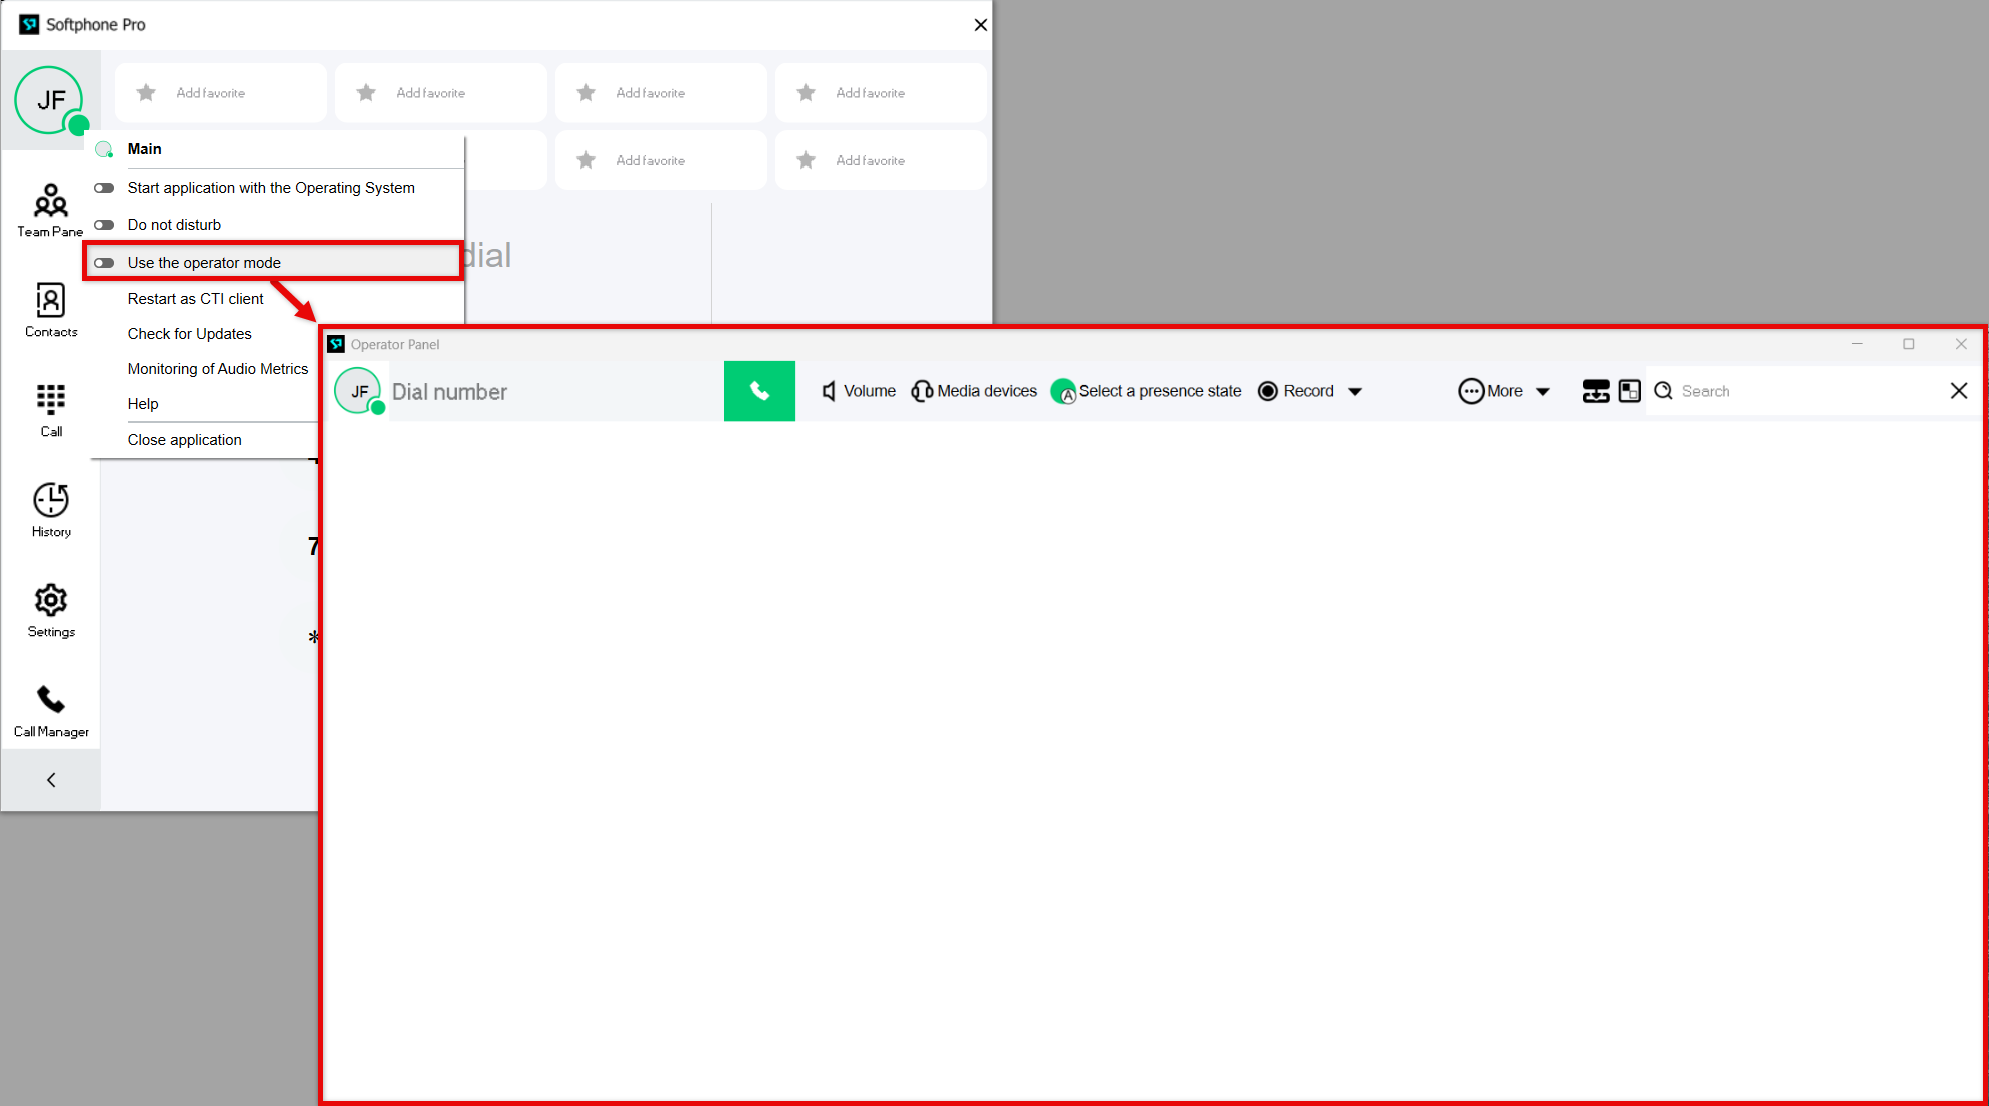
From the standard view, Operator Panel Mode can be accessed as follows:
Click the profile icon.
Select Use the operator mode.
⇒ The Operator Panel window opens.
Making a call
Calls can be made either by dialling or by using drag & drop.
To make a call by dialling:
Enter the telephone number in the Dial number field
Press Enter, or click the Call button
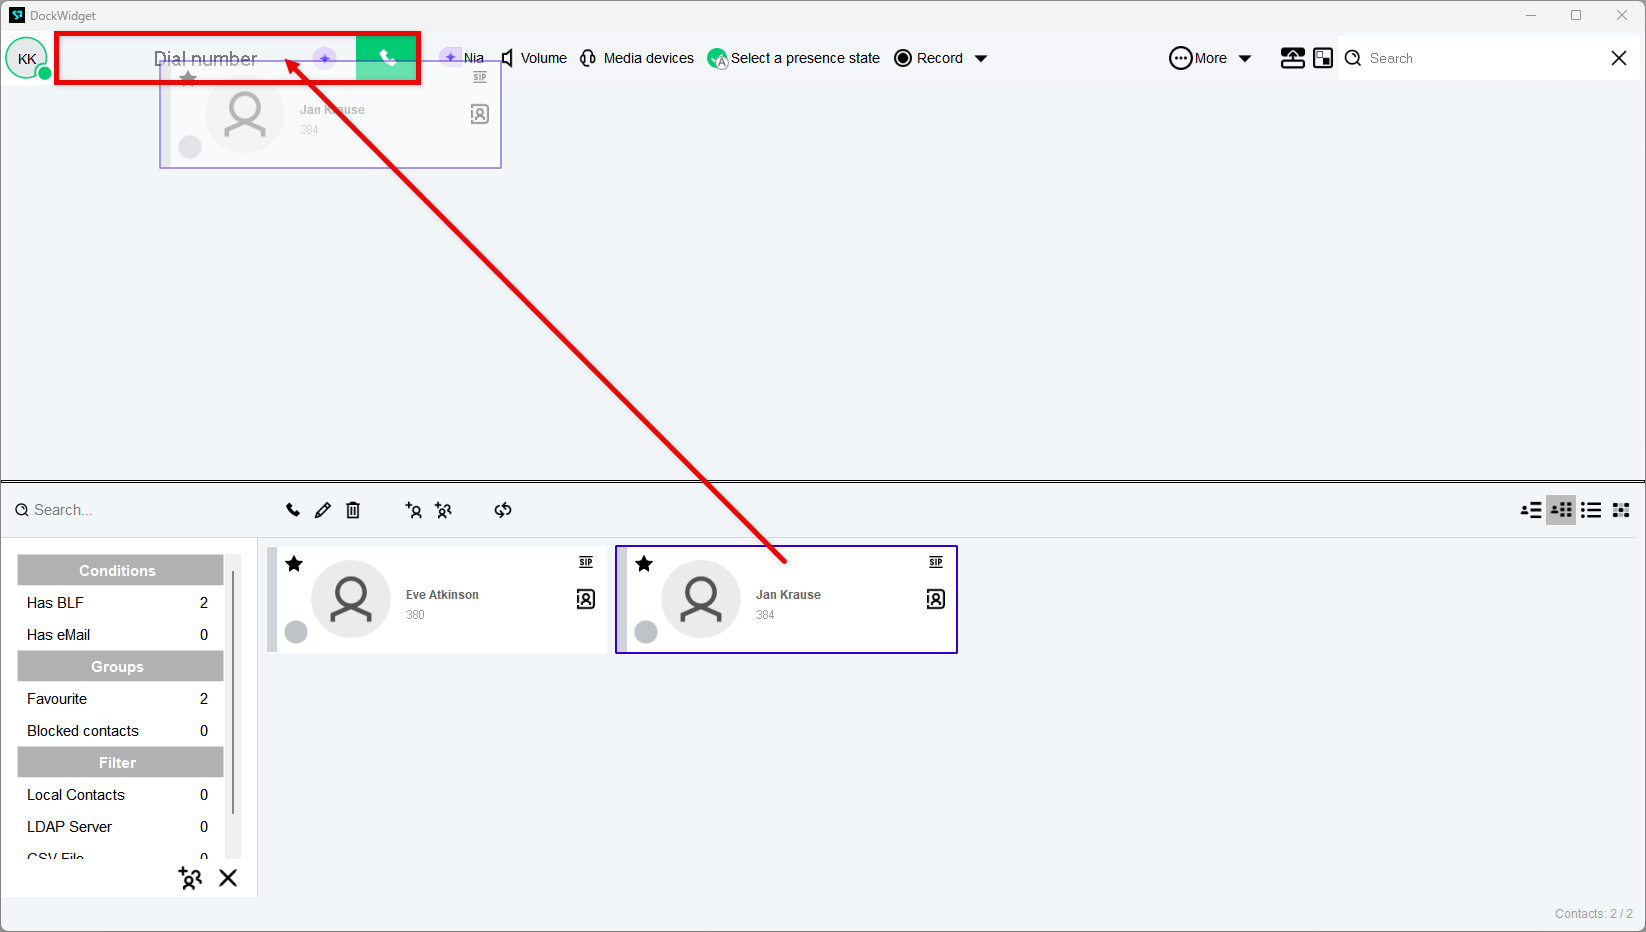
To make a call via drag & drop:
Drag & drop a contact from the Contacts window onto the Dial number field.
⇒ The call will start automatically.
Transferring a call
The drag & drop interface enables calls and contacts to be displayed and managed in the same way as the Call manager in the standard view. (See Call manager .)
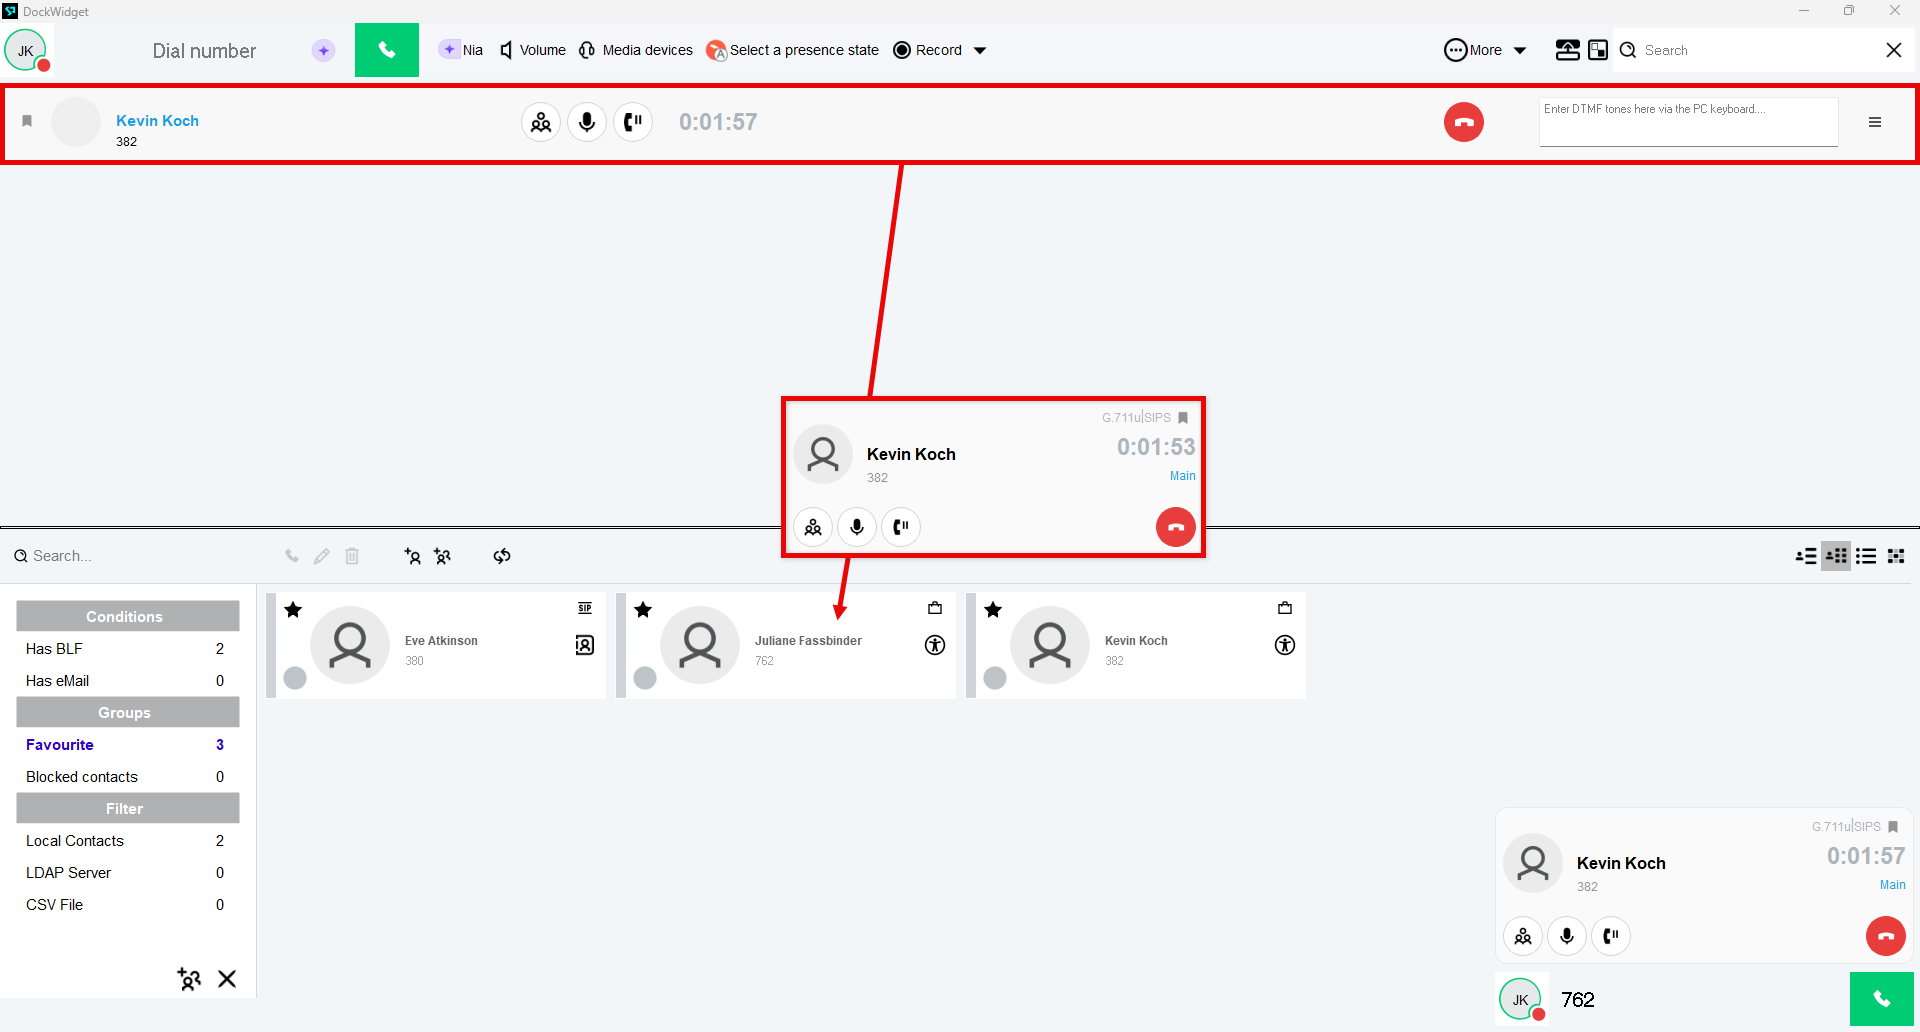
Transferring an answered call without consultation
To transfer an answered call to a contact directly without consultation, either:
Drag the call bar from the Line Operator area onto a contact in the Contacts area
or:
Drag the contact from the Contacts area onto the call bar in the Line Operator area.
Transferring an unanswered call
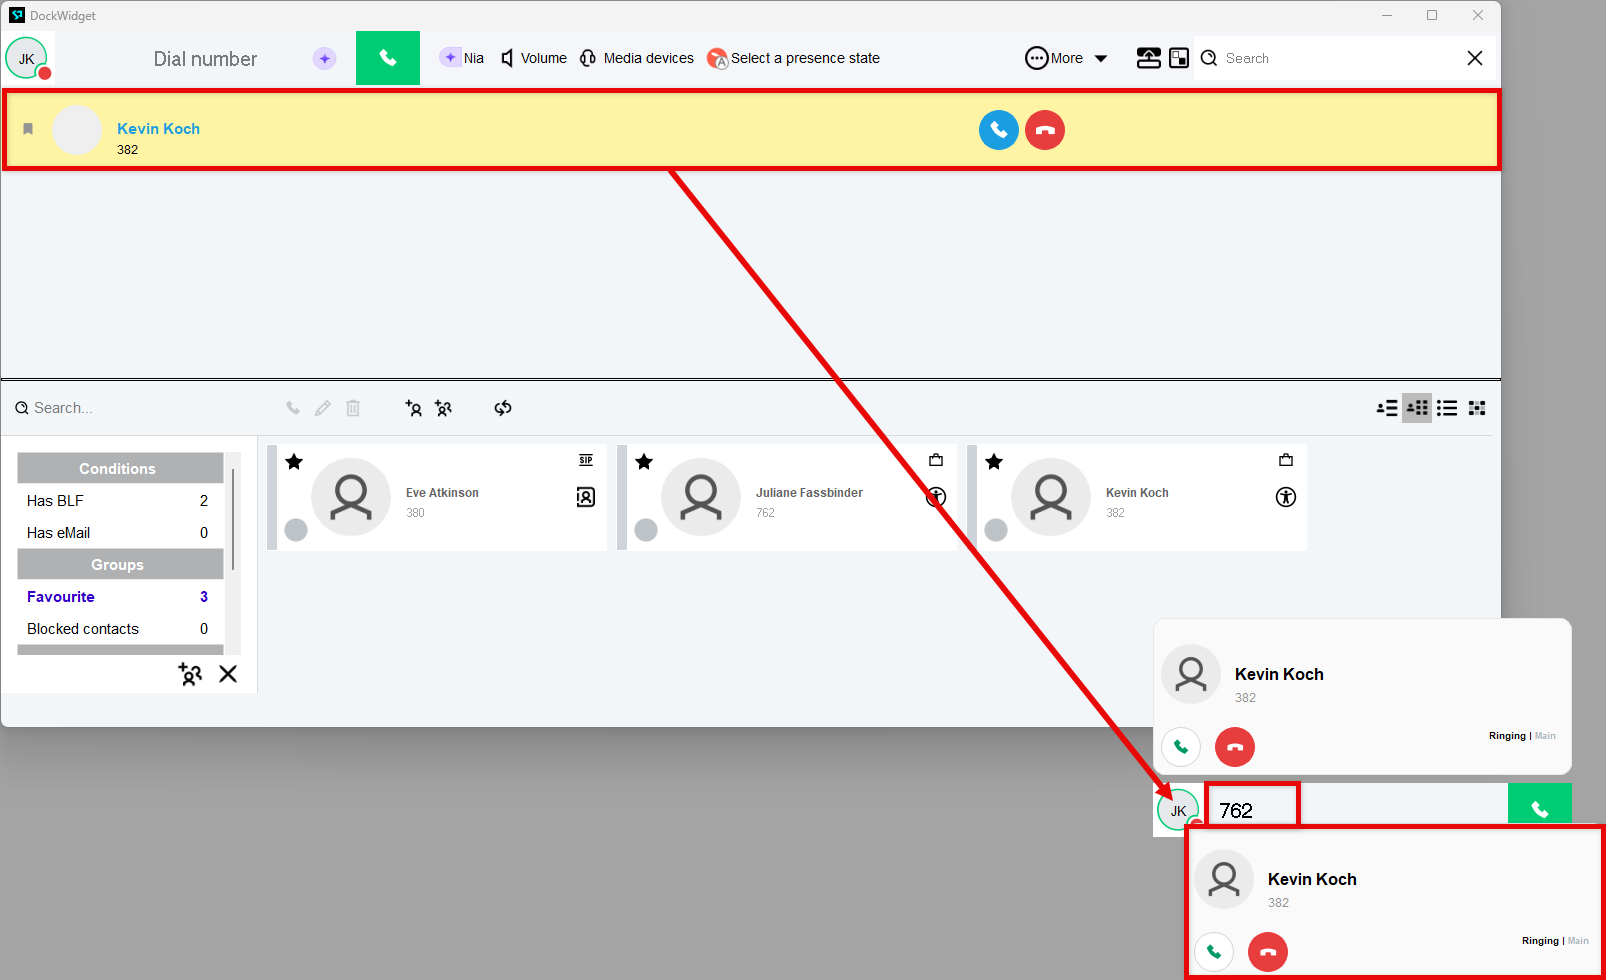
To directly transfer an unanswered call to a contact, either:
Drag the call bar of an incoming call onto a contact in the Contacts area
or:
Drag the call bar onto the Call manager pop-up.
Note: a phone number must be entered here.
Transferring an answered call after consultation
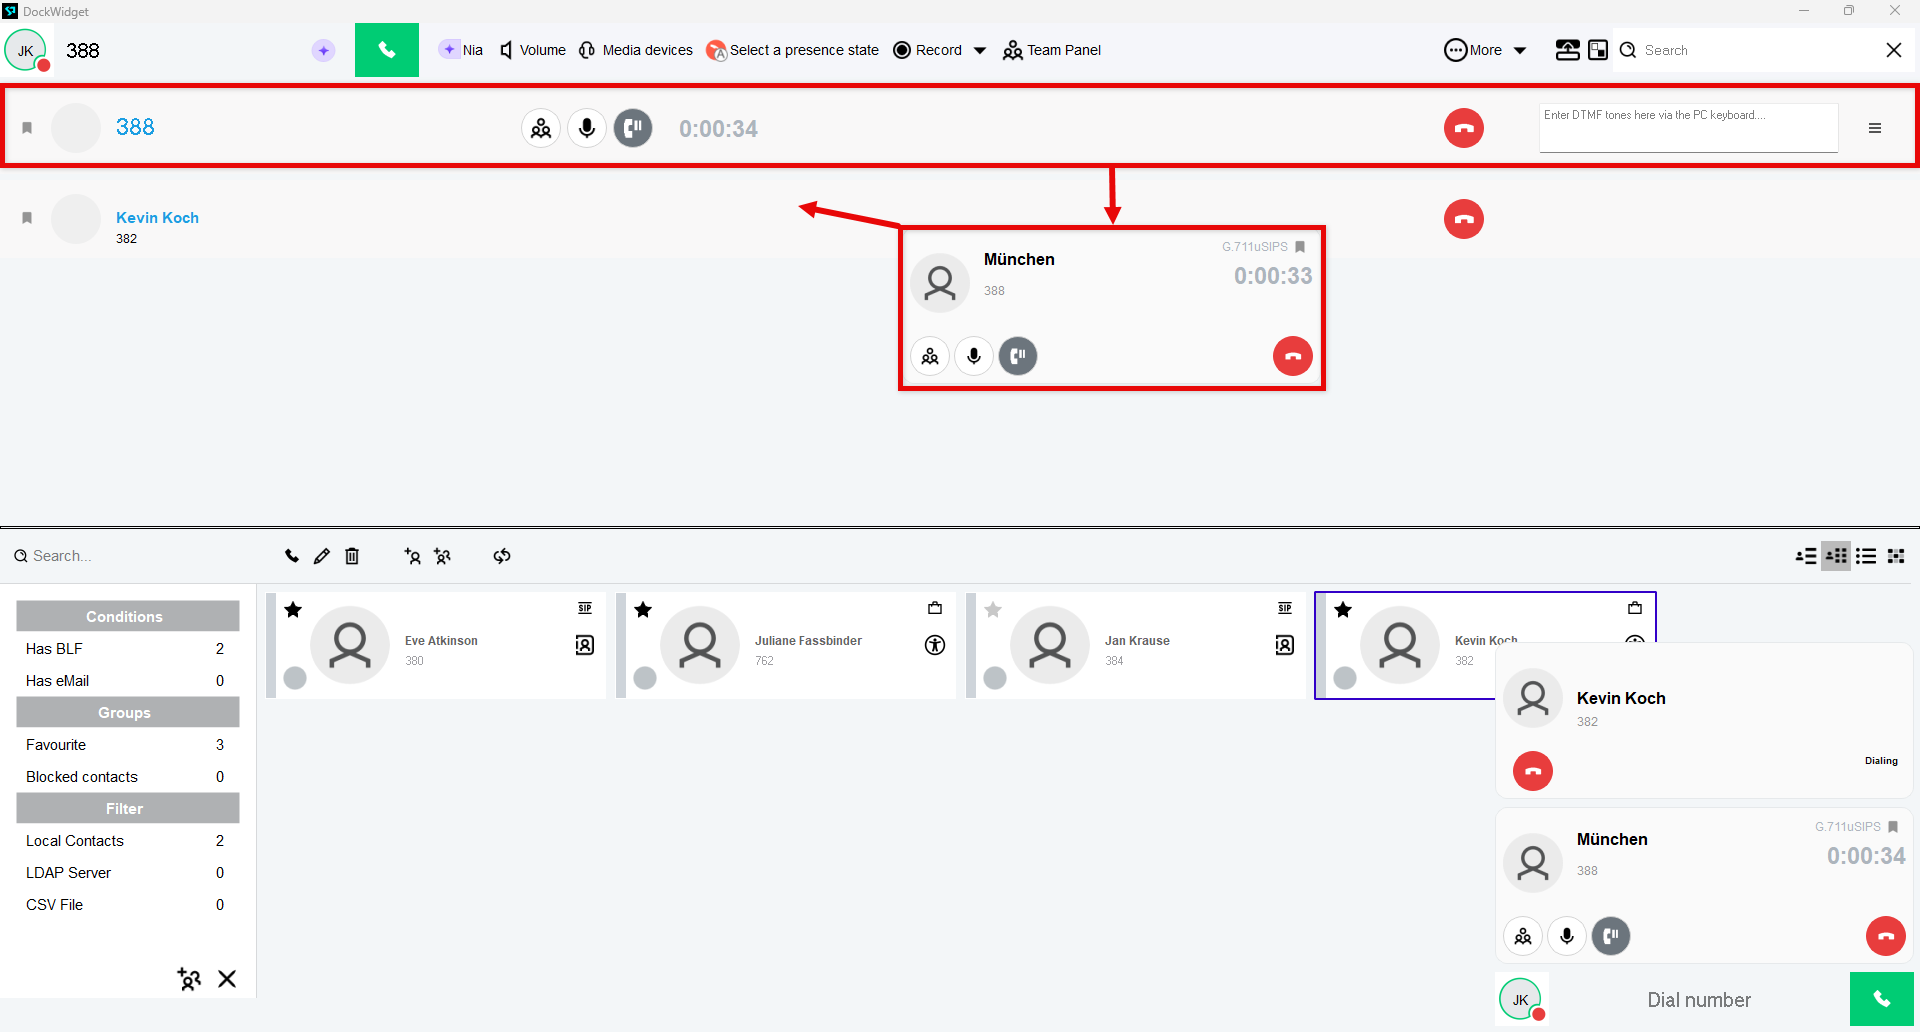
To transfer an answered call after speaking to the call recipient:
While on an active call, call the desired recipient of the transfer.
⇒ The existing call is automatically placed on hold.
Drag the call bar you want to connect onto the recipient's call bar .
Call signalling phases
Call signalling phases are a feature that indicates by colour how long incoming calls have remained unanswered.
As soon as an incoming call is initiated, the call bar is displayed across the Line Operator area. A background timer monitoring the duration of the active call signal begins (not displayed).
To indicate how long the call signal has been active without being accepted, the call bar changes colour (see table below).
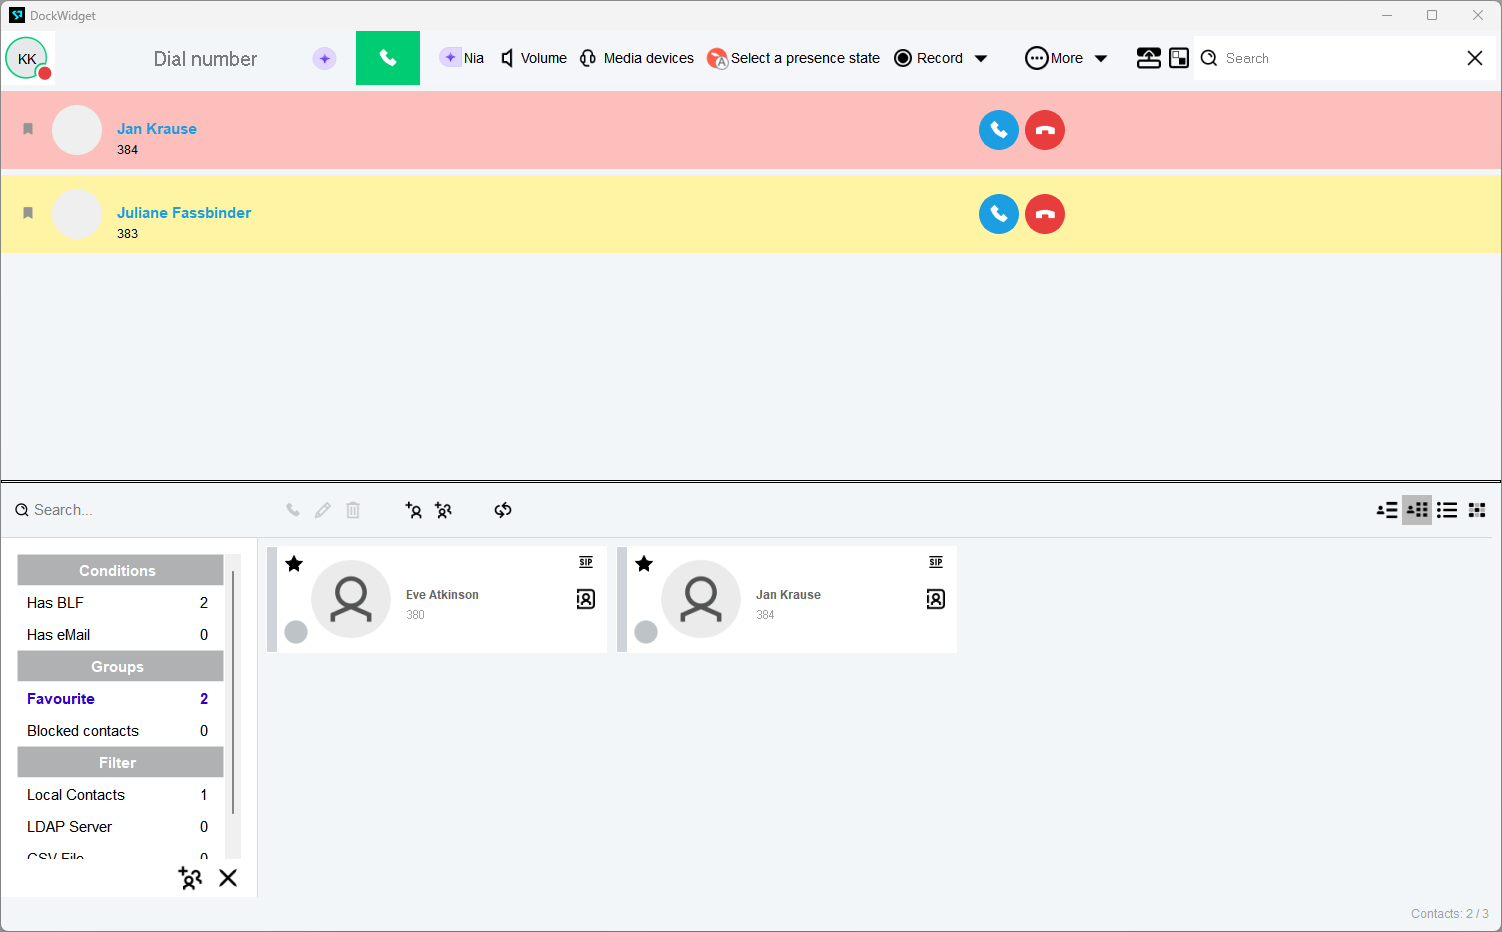
The three call signalling phases are:
Phase (Call Level) | Description |
|---|---|
1 | Standard Colour in Green Call signalling without call acceptance lasts between 0 and 15 seconds. |
2 | Warning in Yellow Call signalling has exceeded 15 seconds without call acceptance. |
3 | Warning in red Call signalling has exceeded 45 seconds without call acceptance. |
8.3 Keyboard shortcuts
The following keyboard shortcuts are available:
Shortcut | Description |
|---|---|
Alt+PgUp | Answer a phone call |
Ctrl+F3 | Open Contacts |
Ctrl+F4 | Open call history |
Ctrl+F5 | Hold/resume active phone call |
Alt+R | Audio recording start/stop |
F9 | Forward the last hold call to the active call |
Shift+F7 | Hang up all active calls |
F12 | Forward the Active Conversation to a Contact |
Ctrl+Pause | Stop incoming call signalling (ringtone) |
9. Nia (NFON Intelligent Assistant)
9.1 Nia Overview
Nia (NFON Intelligent Assistant) is a chatbot feature designed to support your use of Softphone Pro.
Nia is available to users who have an AI Essentials subscription license assigned to them. Licences can be managed, assigned or revoked by an administrator. (See Managing licences by the admin .)
Important
Please note that by using Nia, you accept the privacy policy. A notice at the beginning of each session states:
“By messaging Nia, you agree to the data processing according to our privacy policy. Please avoid sharing personal information.”
9.2 Using Nia
Using Nia
To use the Nia chatbot:
Click on the purple star symbol  in the bottom-right side of the app.
⇒ A chat box will open where you can chat to Nia in natural language.
In the chat box, you can:
Ask questions related to cloud telephony and the Softphone Pro application. Nia will provide answers and links sourced from related documentation.
Refresh or clear the chat by pressing the refresh button.
Close the chat by using the X button after you have finished asking your questions.
Important
Please note that Nia is only able to answer questions related to Cloud PBX based on the available documentation, for example, how to set up call forwarding, add contacts etc.
Nia will not answer general questions.